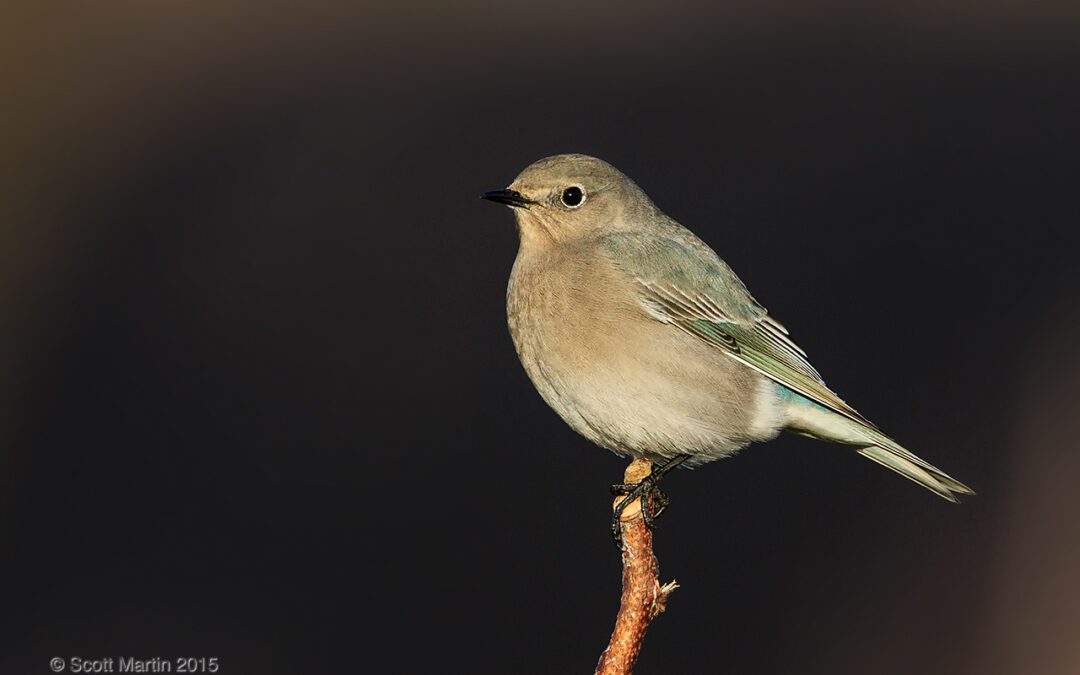
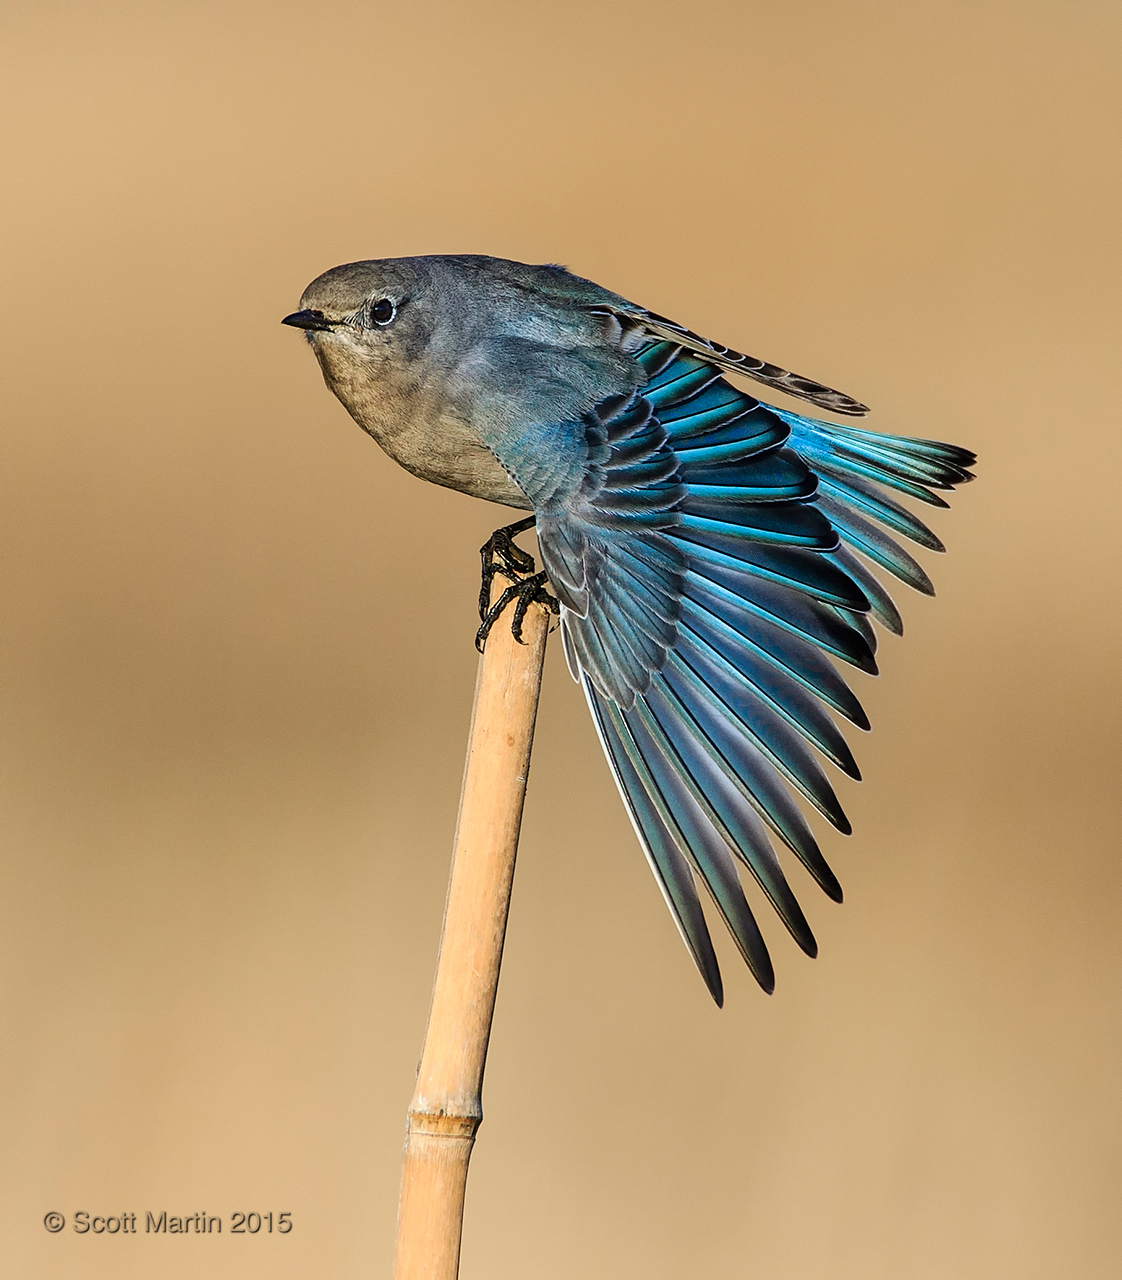
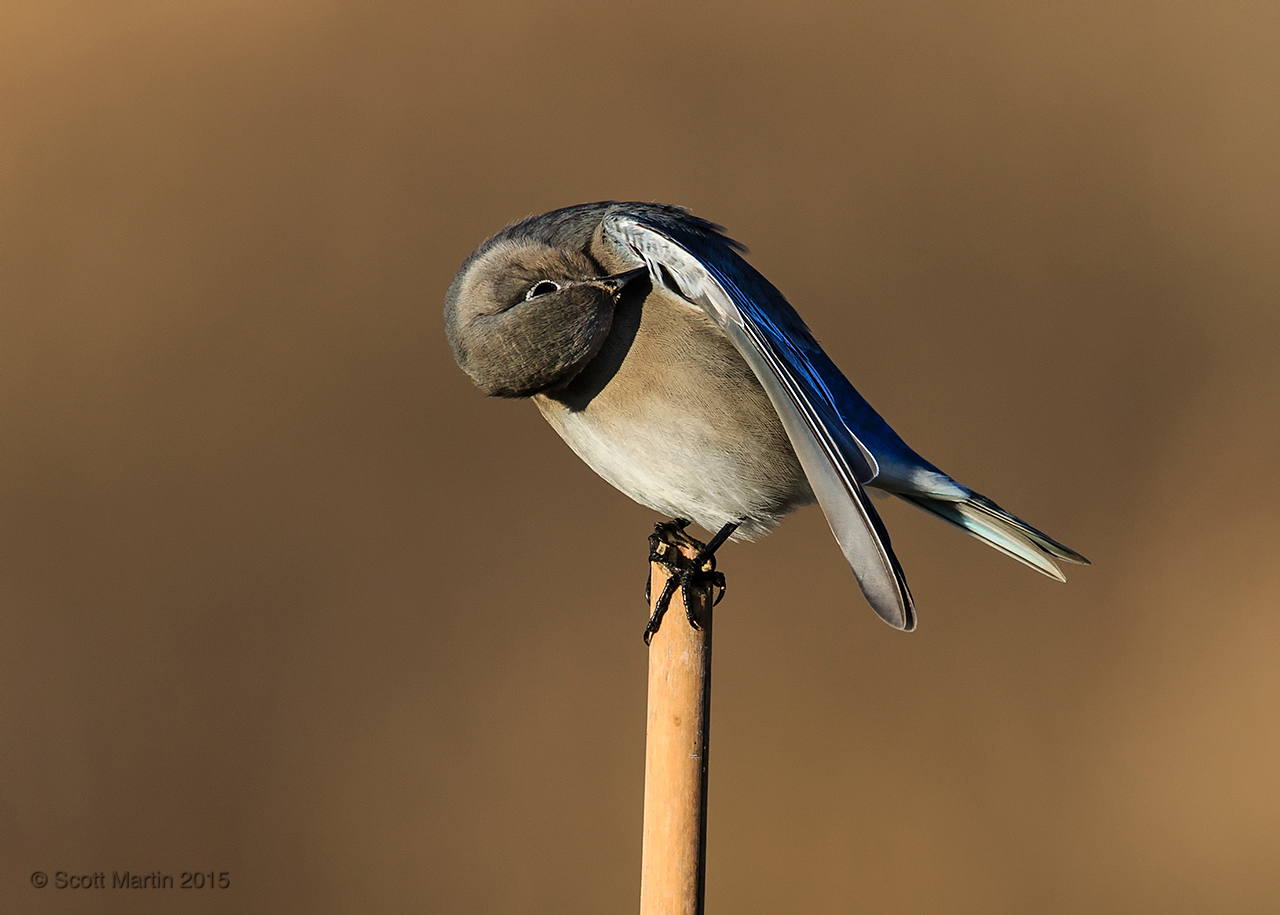
The Mountain Bluebird (MOBL) is a small sized thrush that prefers open space habitats in Western North American desert and mountainous regions. They are year around residents in the western states however migrate as far north as Alaska to breed and as far south as Central America during the winters. The male MOBL is a vibrant blue colour while the female has more subdued colours with strong blue wing colouration. The Mountain Bluebird is the state bird of Idaho and Nevada.
A few weeks ago a lone female Mountain Bluebird arrived in an open field on the western reaches of Lynde Shores Conservation Area in Whitby and quickly became a local celebrity amongst birders and bird photographers. For many it was their first time seeing one of these beautiful birds.
I was twice able to visit this bird and I’m thankful for one of those opportunities being with nice light for photography. The following are some of the images I was able to obtain of her. These photographs were taken last Friday morning, December 11th.
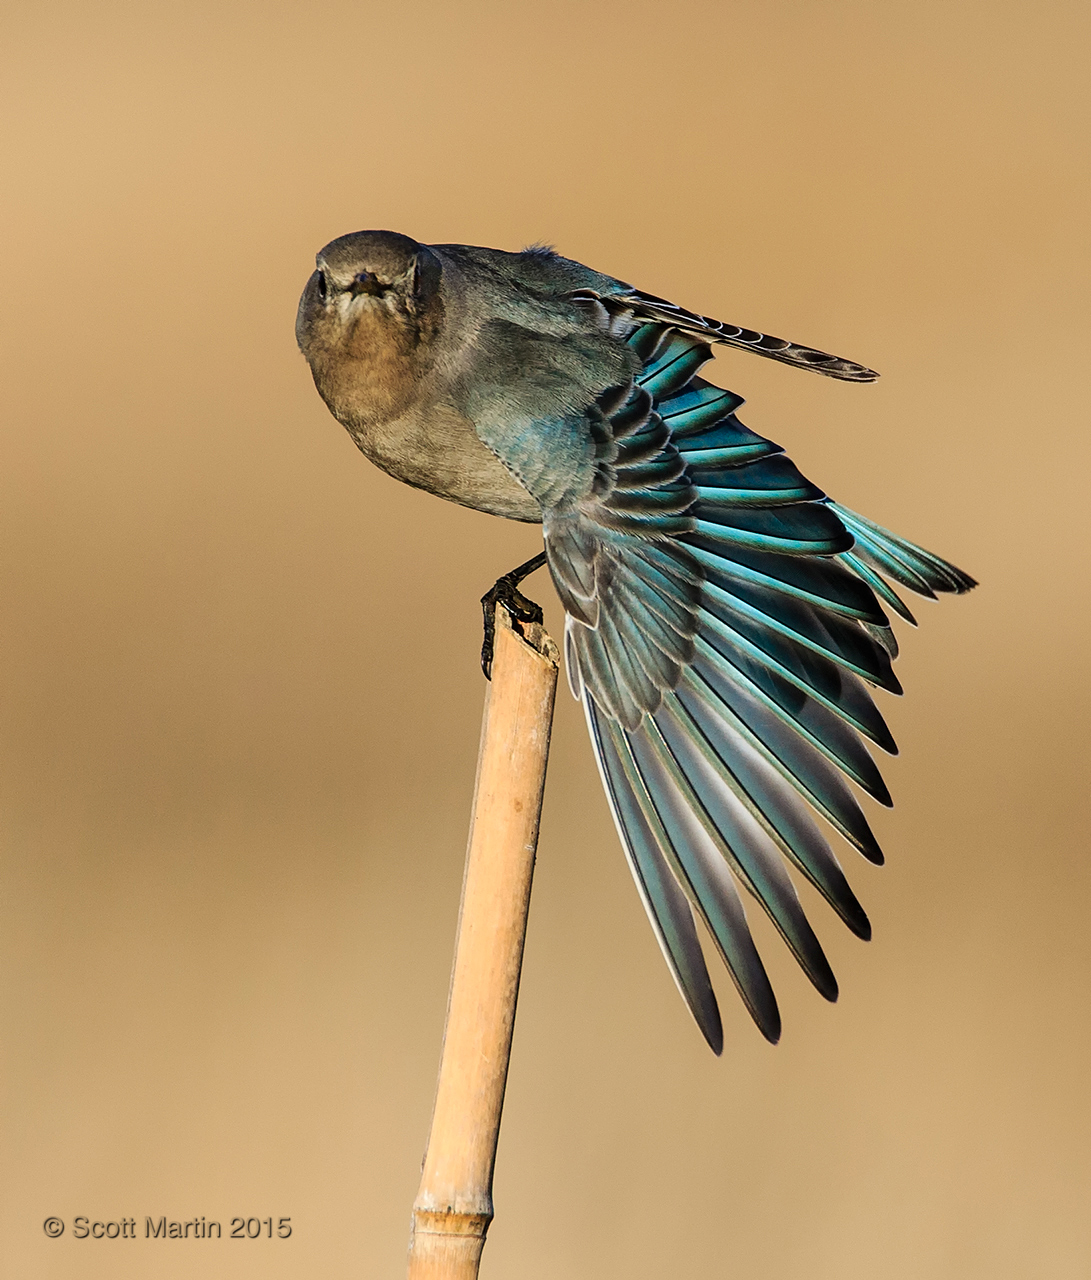
The object of an image is generally obvious and we always think about it before releasing the shutter however care must always be taken to consider the back ground of every image you take. Often the difference between a snapshot and a great photograph is the back ground. The first two images in this series have the black walls of a barn creating the back ground which creates a high contrast with bird. The great distance between the bird and the barn allowed the use an aperture of f/8 to keep all of the bird in focus and still blur the back ground enough that the barn was completely indistinguishable.
.
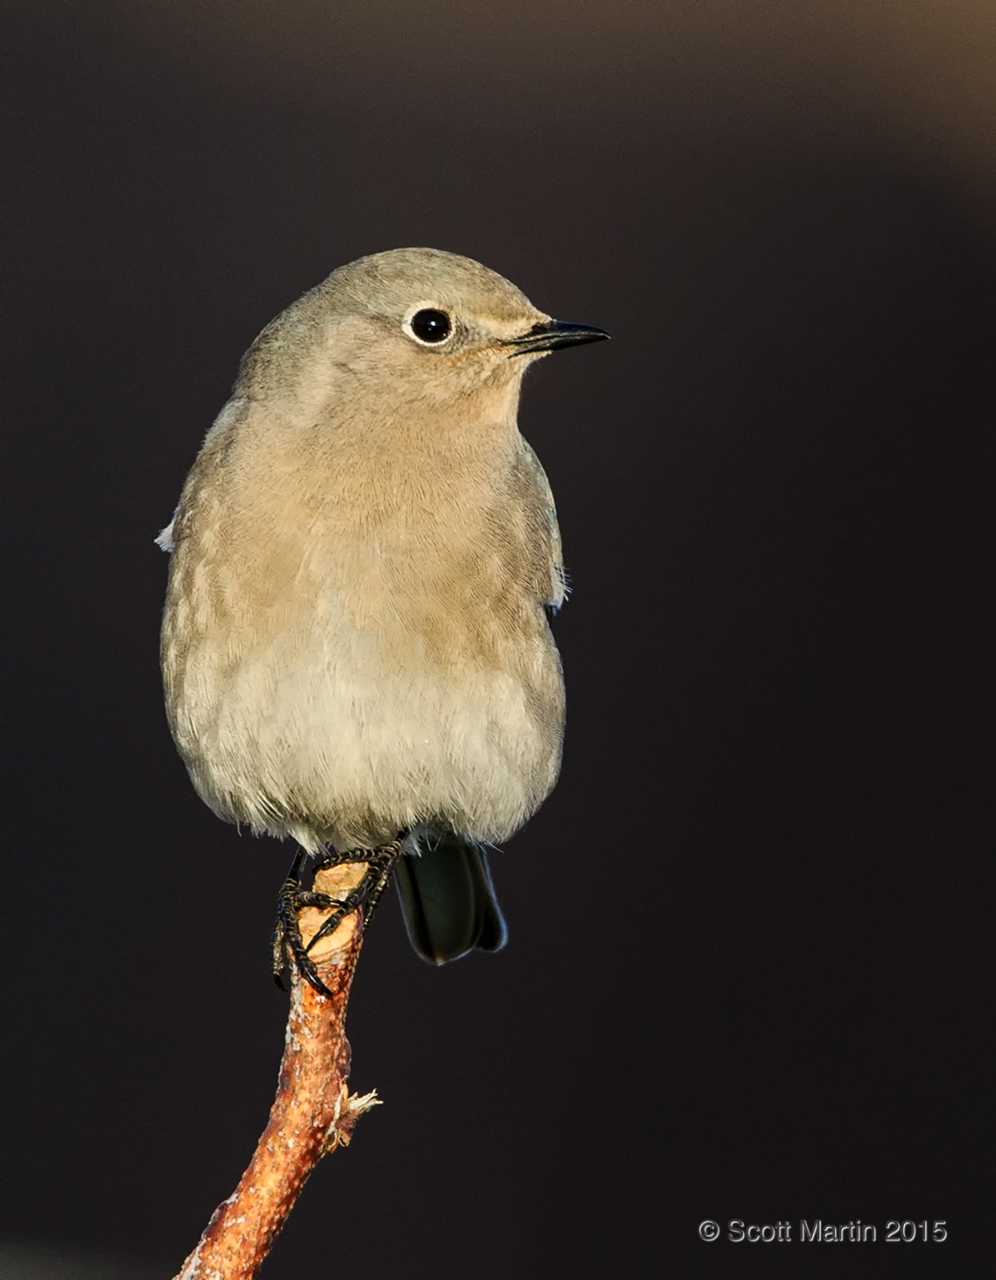
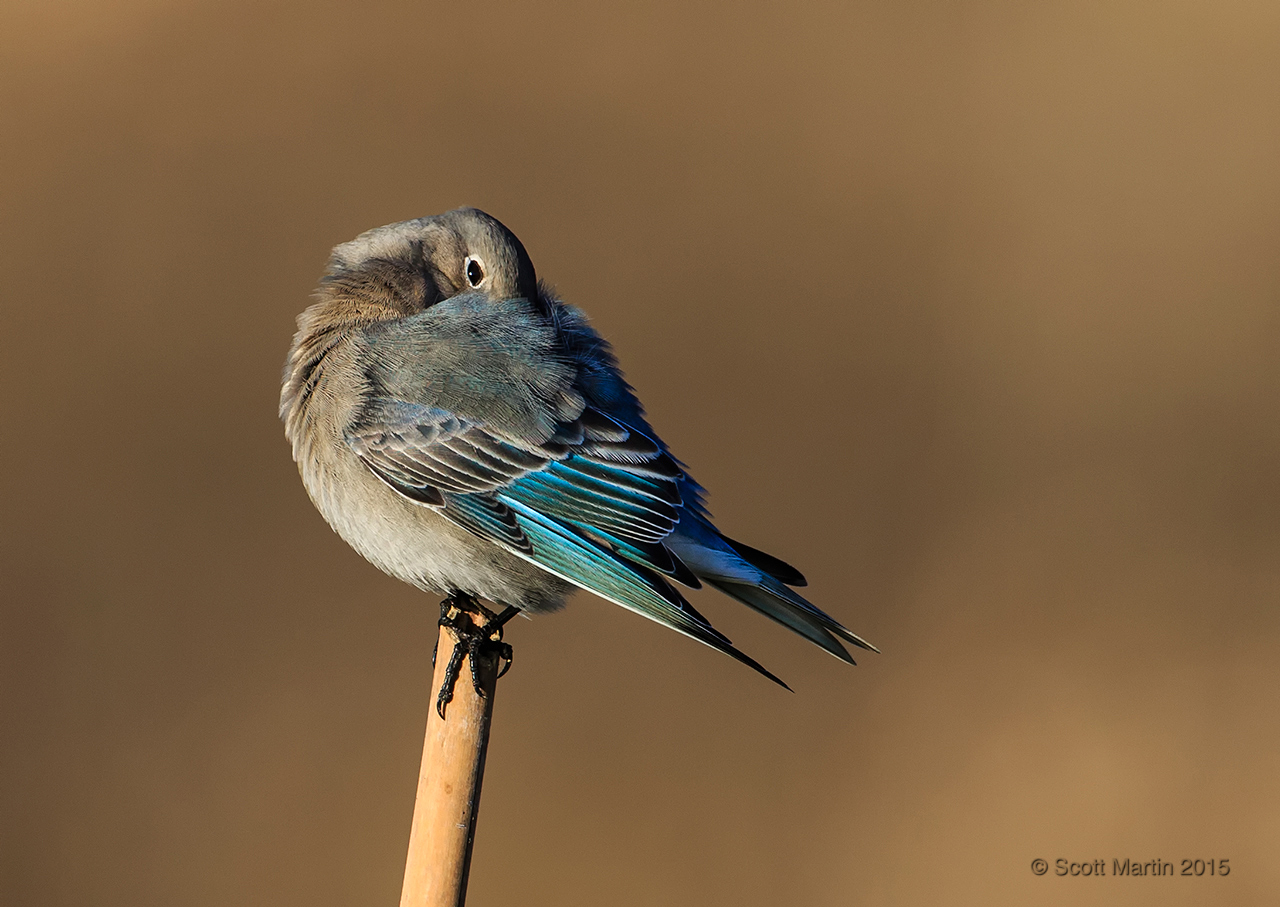
For the next two images I moved not more than ten feet in order to replace the barn as the back ground with a coniferous tree line in order to replace the black back ground with a green one. Although this is very subjective, I prefer the green which is a bit more natural looking and provides a better contrast with the beak of the bird. Compare images one and four and then two and three. Each pair is pretty much the same compositionally except for the back ground colour. Do you have a preference?
.
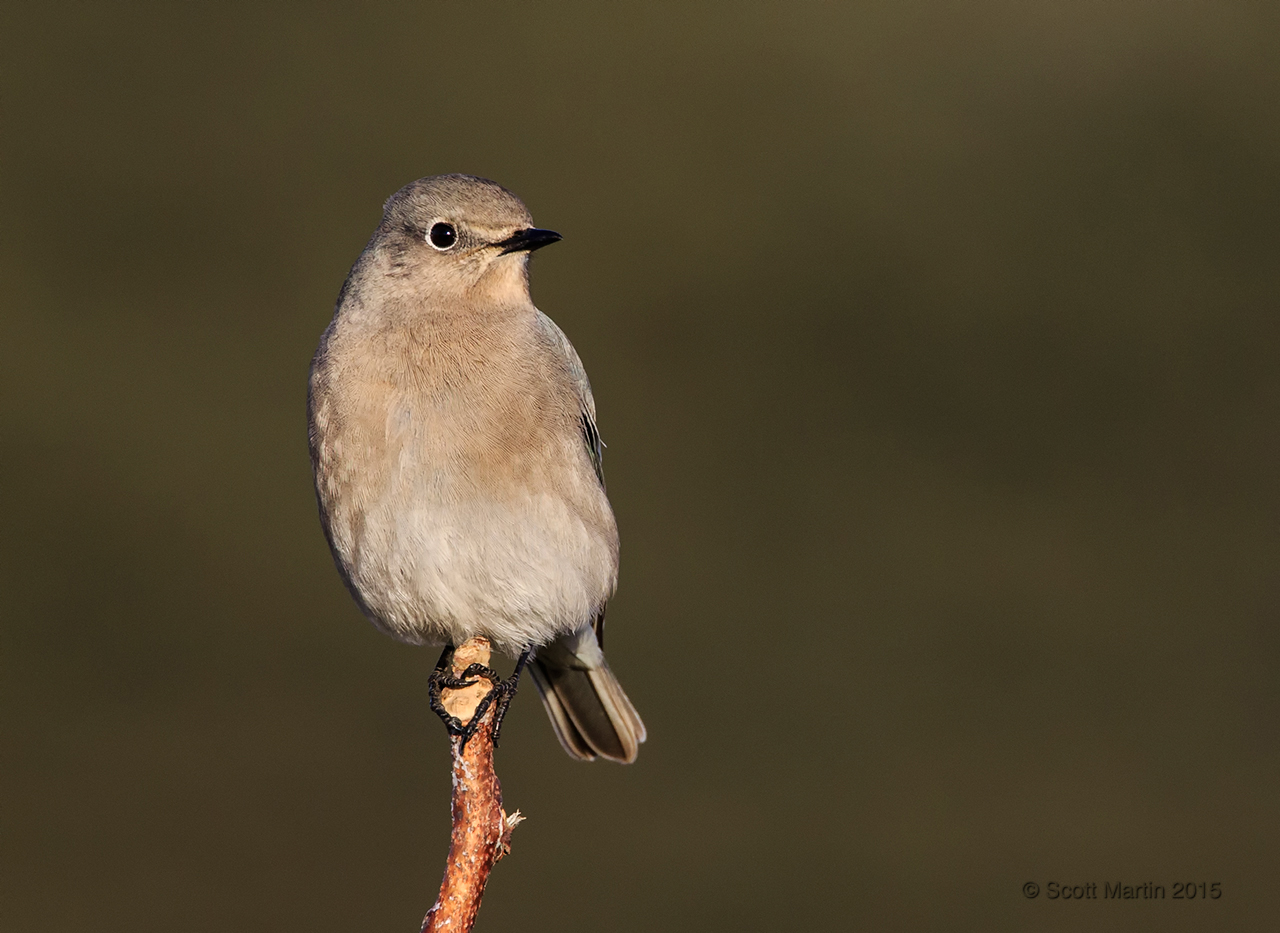
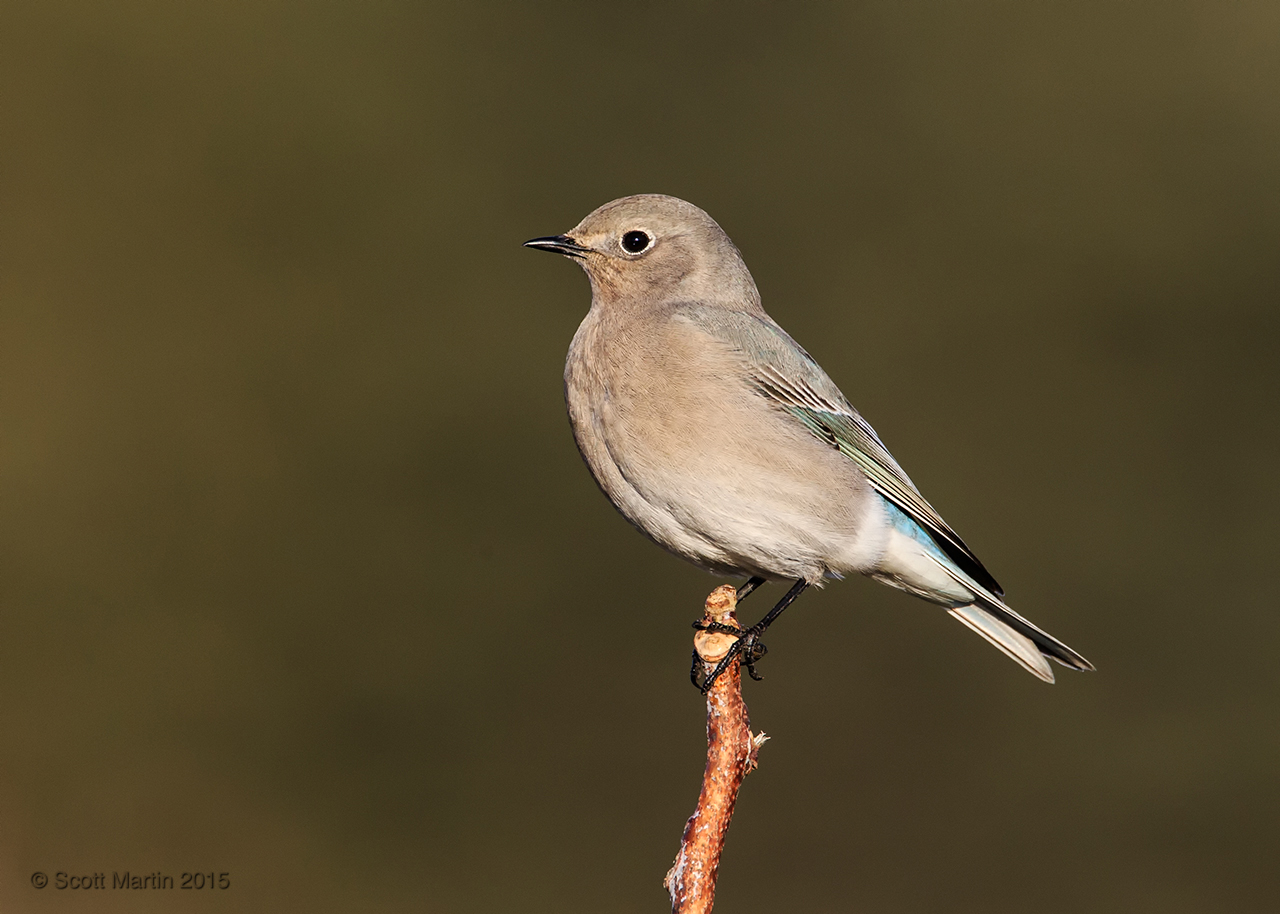
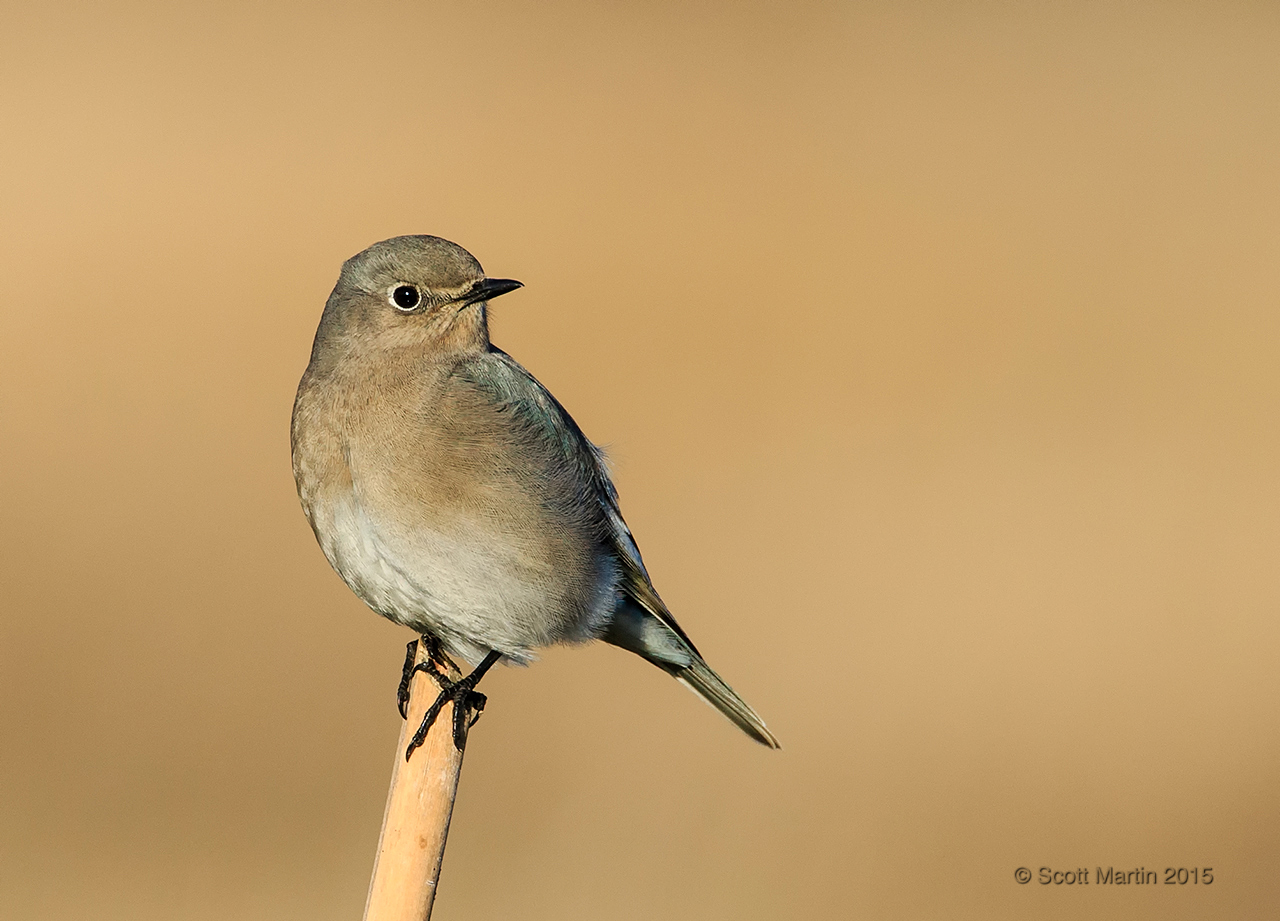
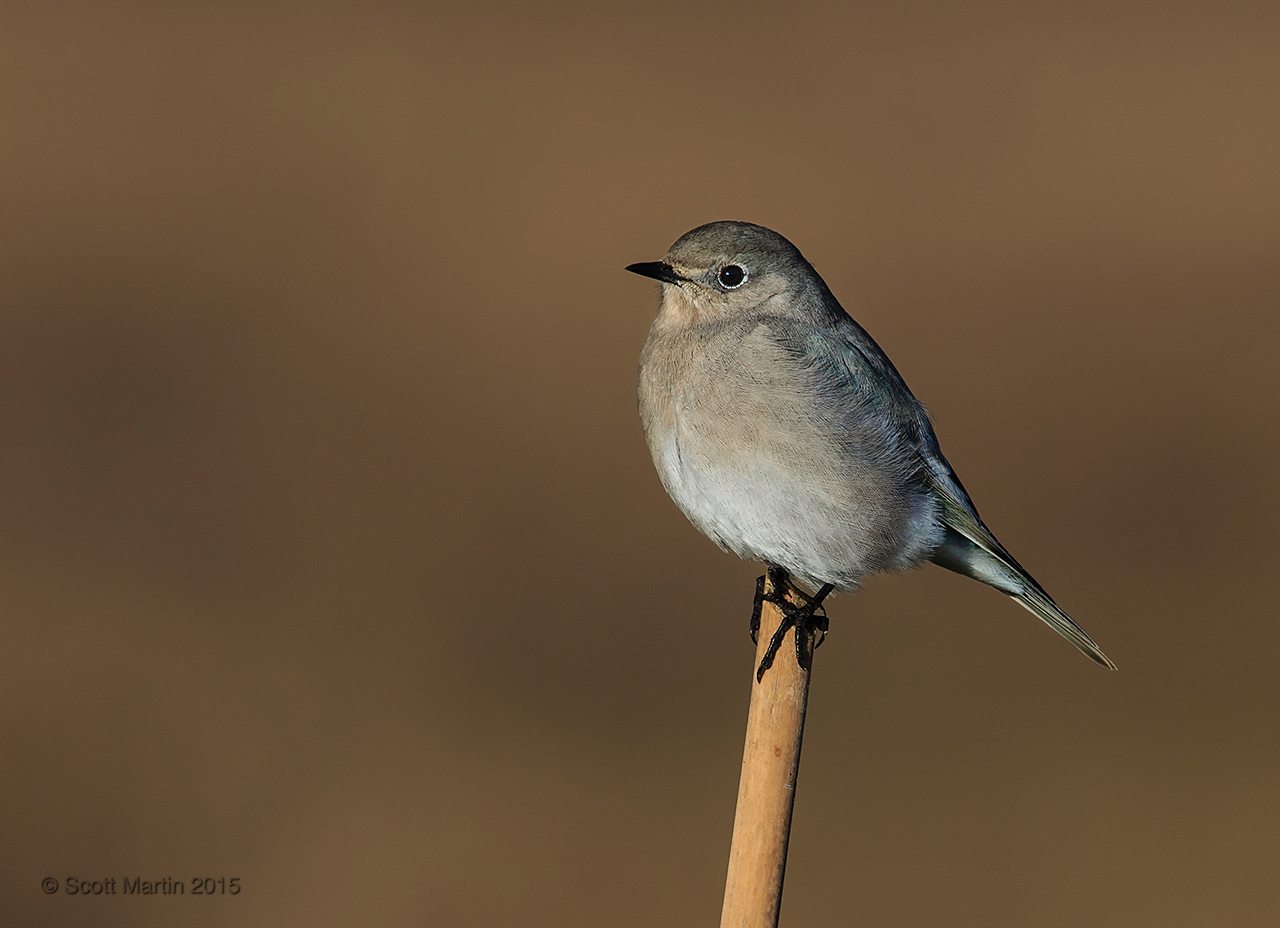
The remaining images are from a different perch which was located such that overgrown grasses provided the back grounds. The first three images are against a ‘white’ grass/hay back drop creating the brightest of the BG’s and great contrast with the bird….and it also complimented the rather ugly bamboo perch!
.
.
The final three images are against darker grasses that create a back ground shade which is perhaps my favourite of all we’ve looked at today with a nice warm tone that compliments the colours of the bird nicely.
.
When a rare bird makes an appearance hundreds of birders and photographers will make a point of seeing the celebrity. Typically that means a plethora of photographs will show up on various photo sharing websites and soon they begin to look quite similar. It’s wise to observe the bird and its various behavioural displays and look for that unusual shot. Sometimes even the very common act of preening will provide that unique image.
The Mountain Bluebird was last seen early Saturday morning when just after sunrise it was observed flying west, presumably to return to its home territory. Often these lone birds that get off track while migrating don’t survive the rigours and dangers of travelling long migration distances alone without the help and safety that comes with travelling in numbers. She certainly looked healthy when I took these pictures the day before she left so I trust that by now she has been re-united with her family.
All of these images were taken using a Canon 1Dx and 500/4 lens with 1.4 x TC for an effective focal length of 700mm.
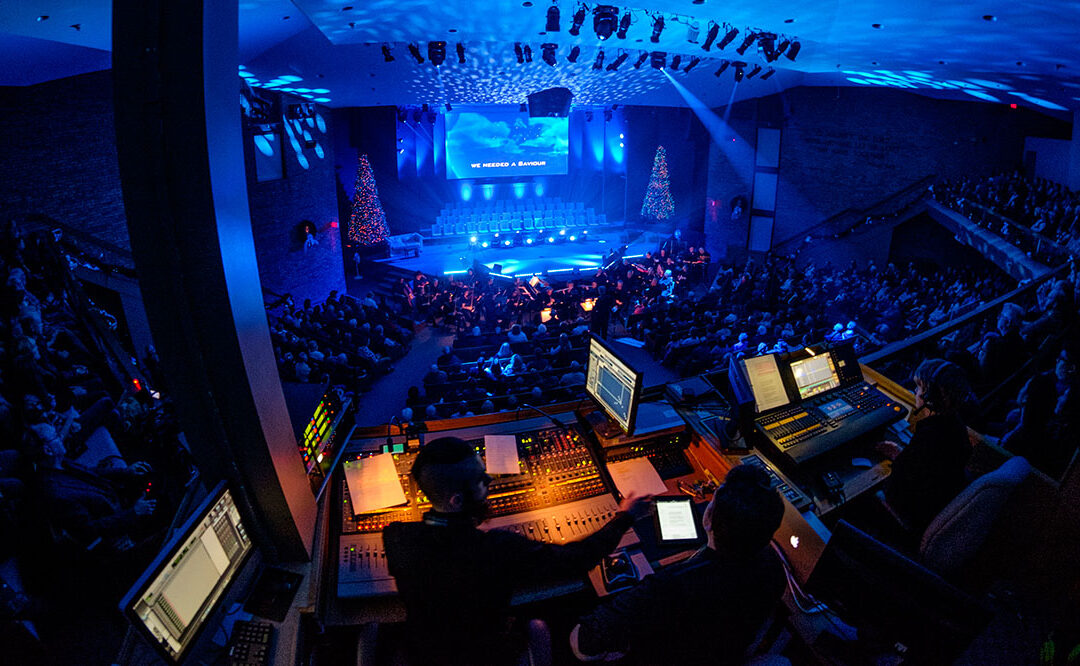
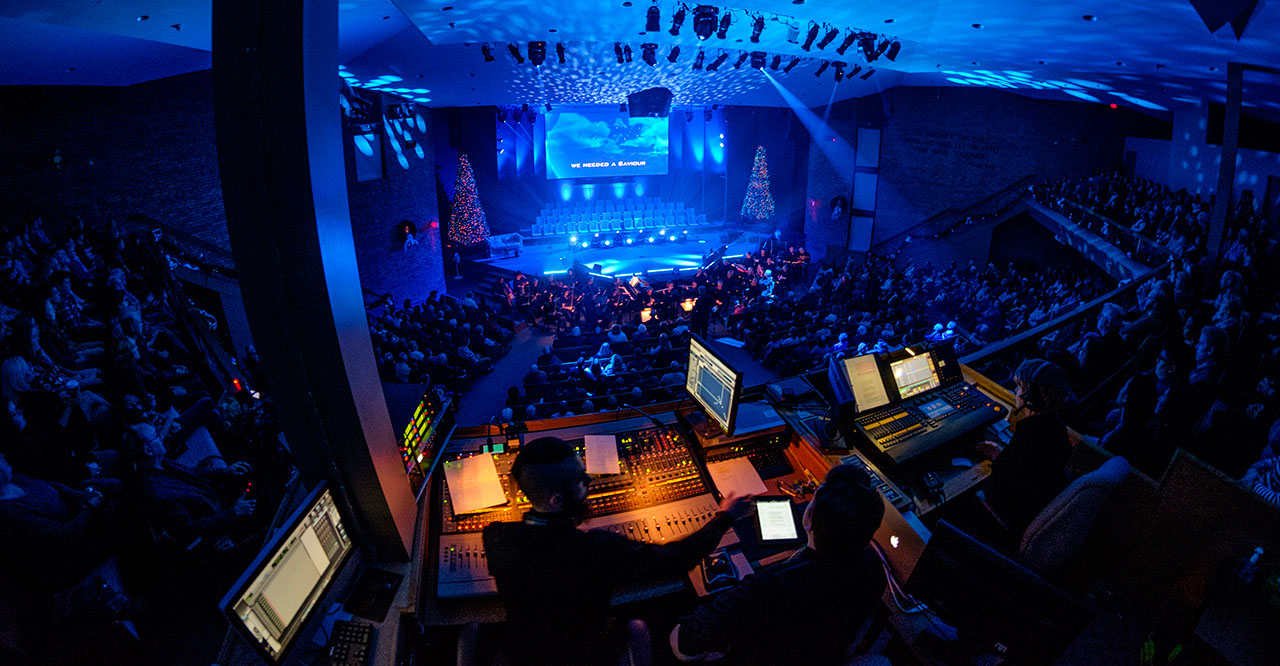
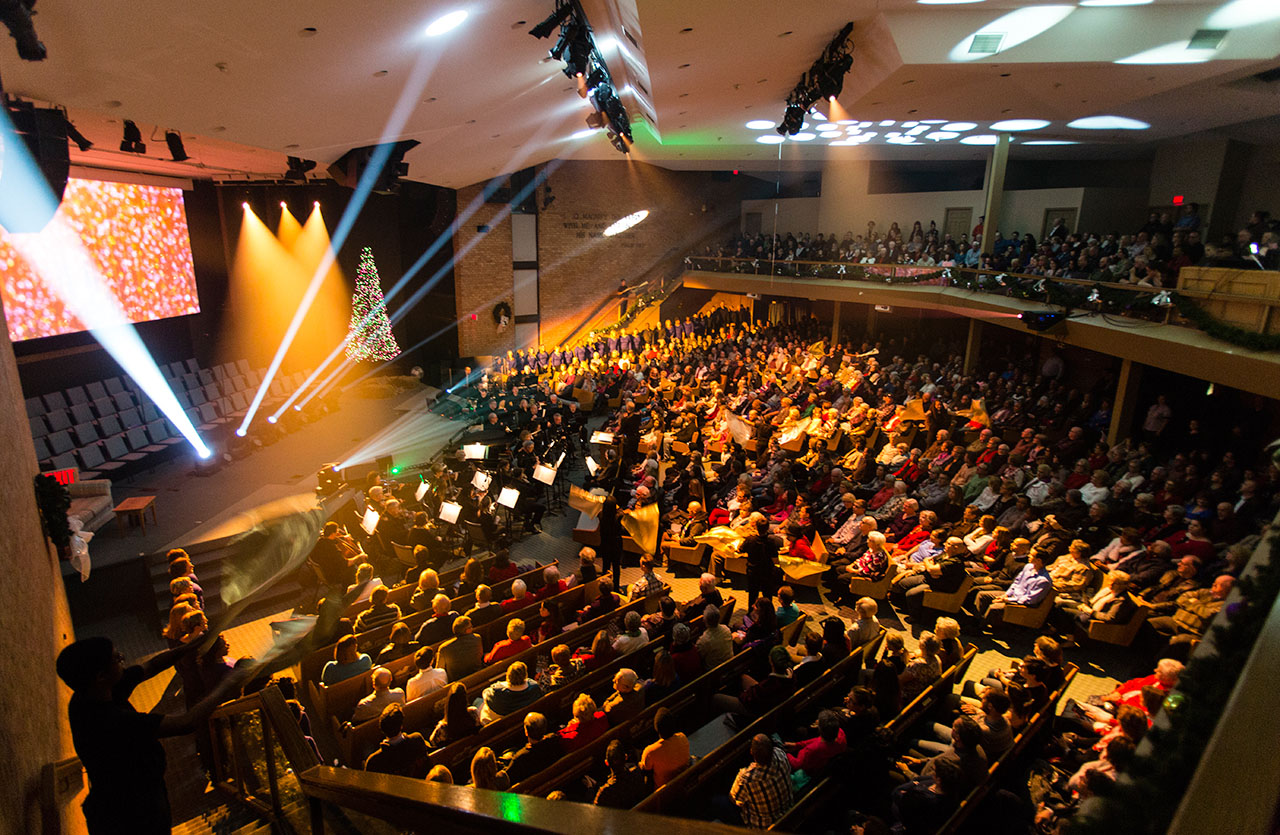
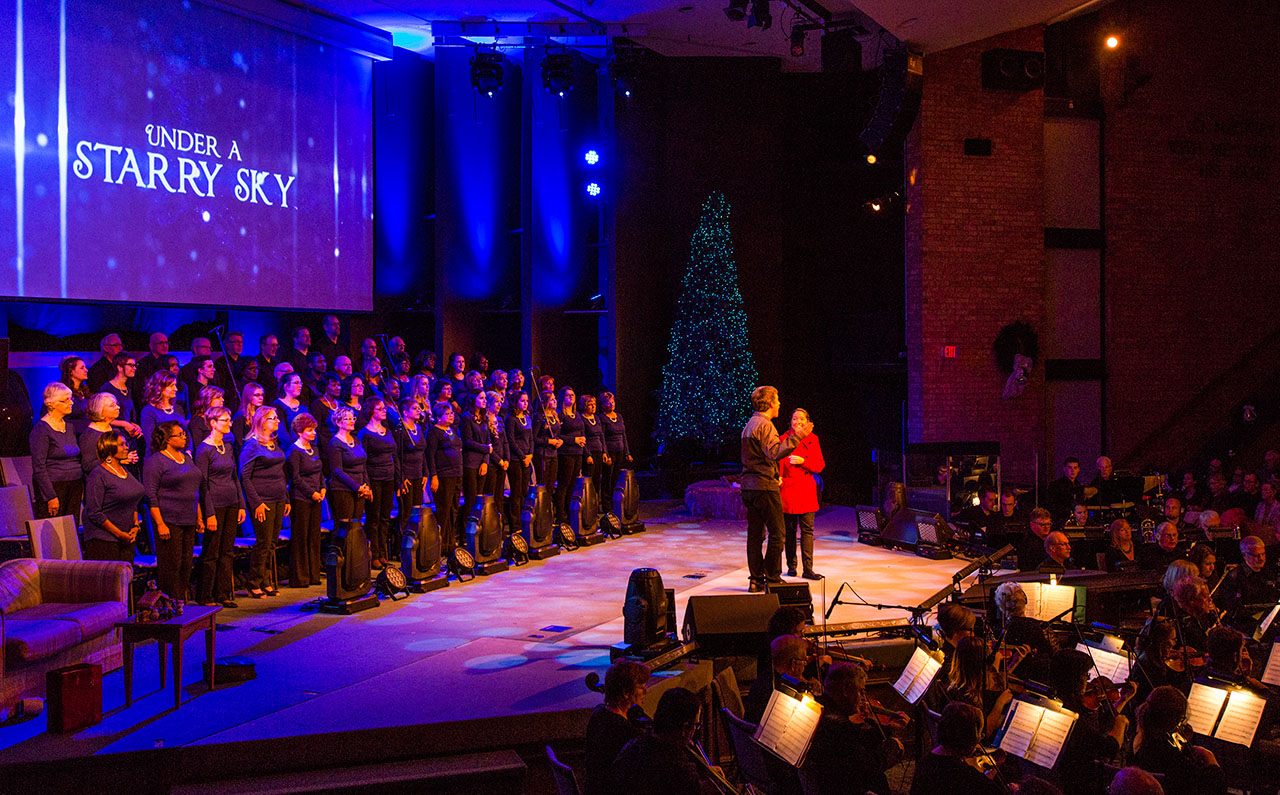
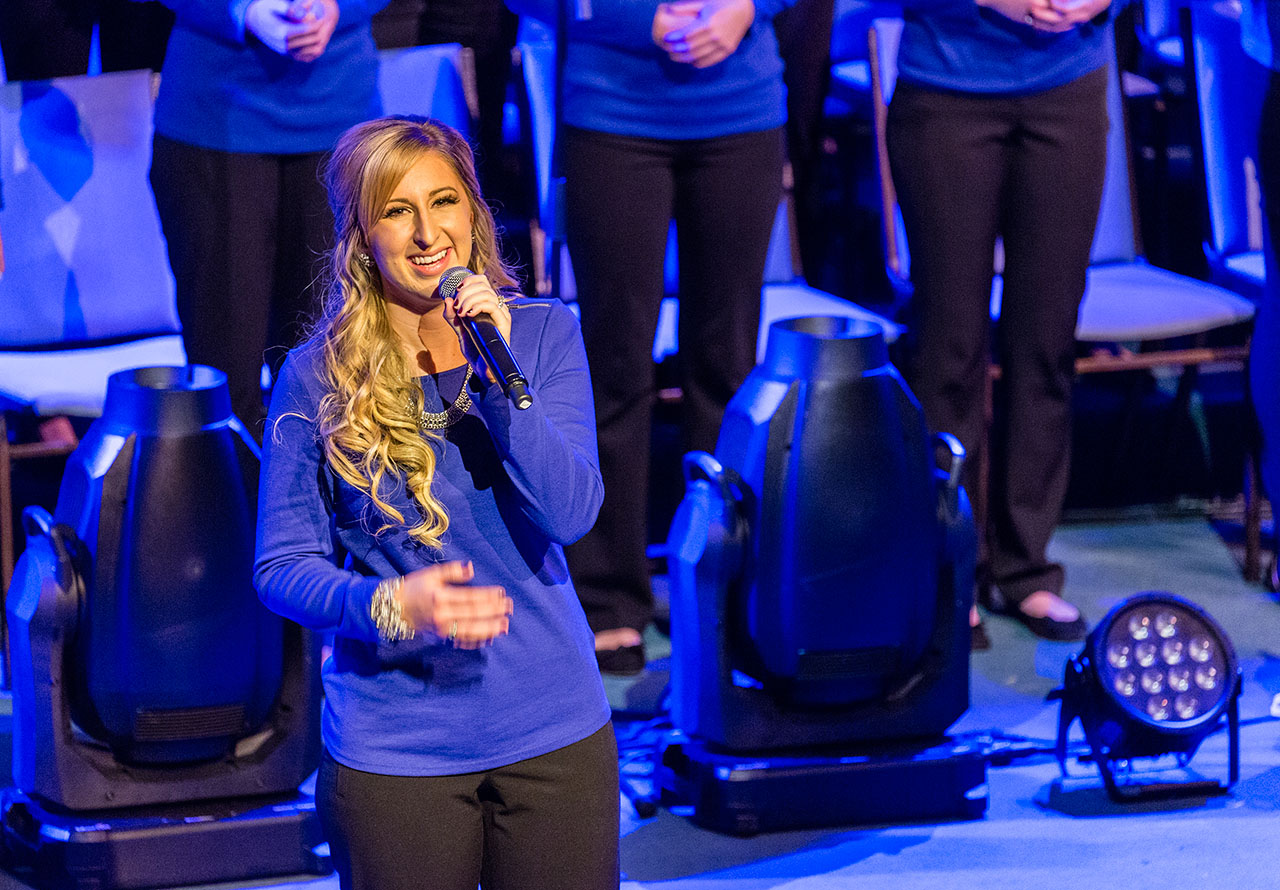
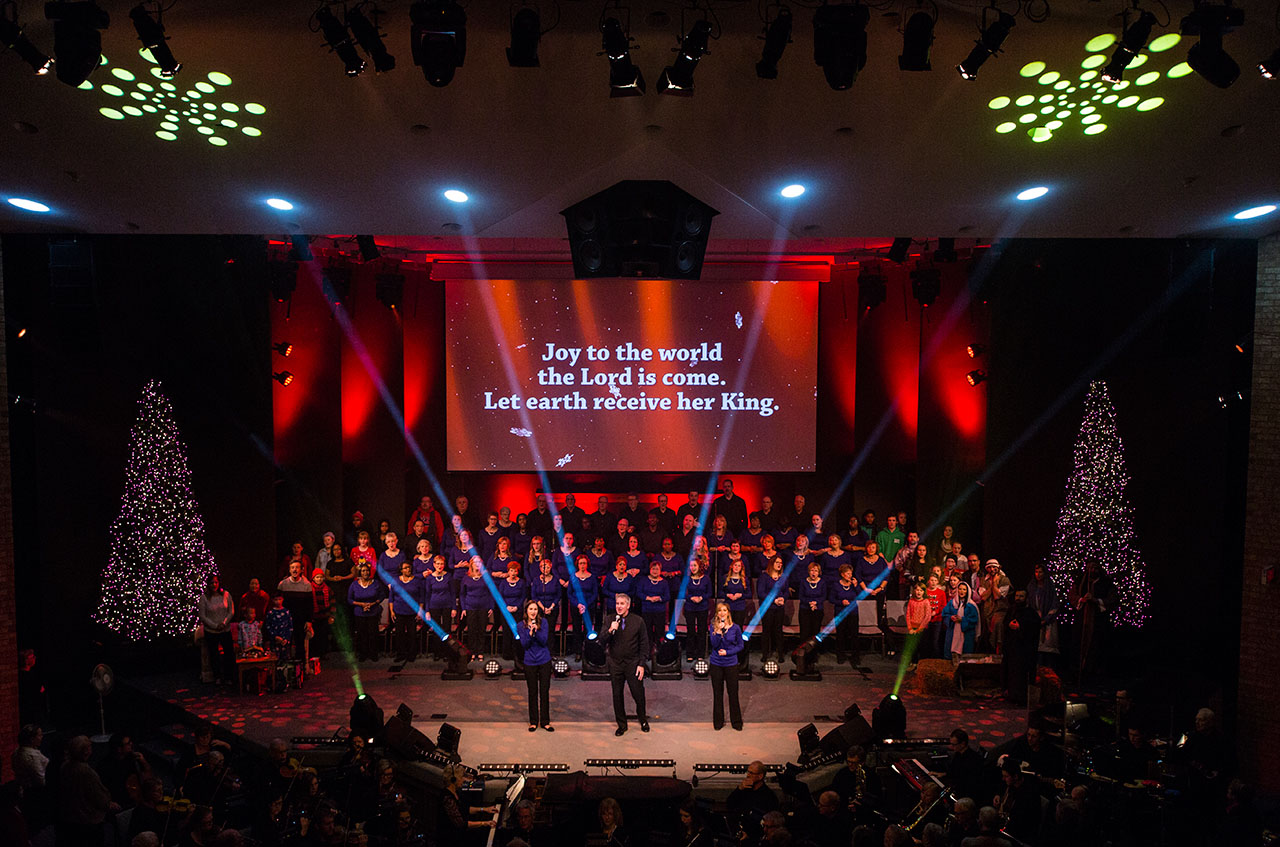
Regular followers of this blog will notice this post concerns something very different from the usual landscape and wild life themes….indoor event photography. Our church, Calvary Baptist Church, in Oshawa Ontario, has a large worship and media arts department that as part of their ministry produces and performs a major musical/theatrical presentation every Easter and Christmas. This past weekend we officially kicked off the Christmas season with the powerful and moving musical “Under A Starry Sky”. The presentation was performed four times over the weekend with more than 4,000 people attending. I had the privilege of photographing one of the presentations and thought a blog post regarding the challenges of event photography would be of interest.
Theatrical event photography requires careful planning as unlike a sporting event, the audience remains seated and quiet and generally don’t welcome a photographer moving throughout the venue during the performance. The photographer must balance the responsibility of recording the event with excellence while remaining respectful of the audience and performers. This is a time when stealthiness is a good thing, not unlike wildlife photography! Gear planning is also important and given the challenges of very low light interspersed with bright spots and floods the fastest lenses possible must be used. For shooting Under a Starry Night, I primarily used a 5D Mk III with a 16-35/2.8 lens and a 1Dx with a 70-200/2.8 lens. This combination covered a good focal range and didn’t require lens changing although I did use Canon’s new 100-400 L IS II for a few images. Finally I used a Fuji X-E2 with an 8mm fisheye lens for some interesting ultra wide angle images.
The fisheye allows one to capture the entire venue in one photograph, however these images must have strong foreground representation to be effective. In this case the audio-visual control centre provides exactly that (X-E2, 8mm).
Don’t forget to get a pic of the audience, which also provides a good record of the venue as well (5D, 16-35).
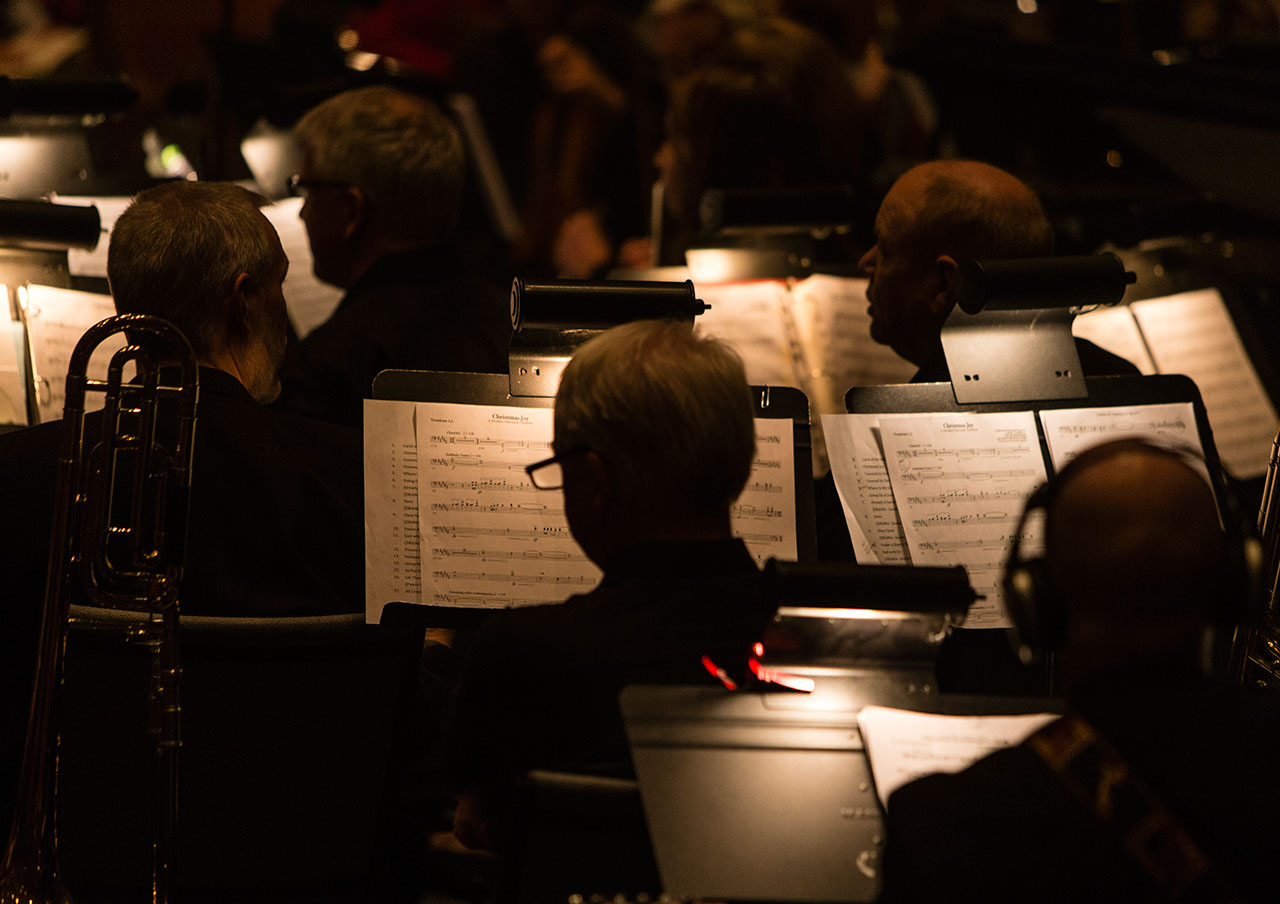
The music for the Christmas presentation was performed by an orchestra comprised of members of the church as well as guest musicians from the Oshawa Symphony. It hard to do the musicians justice with the camera but its important to show their invaluable contribution to the performance (1Dx, 70-200).
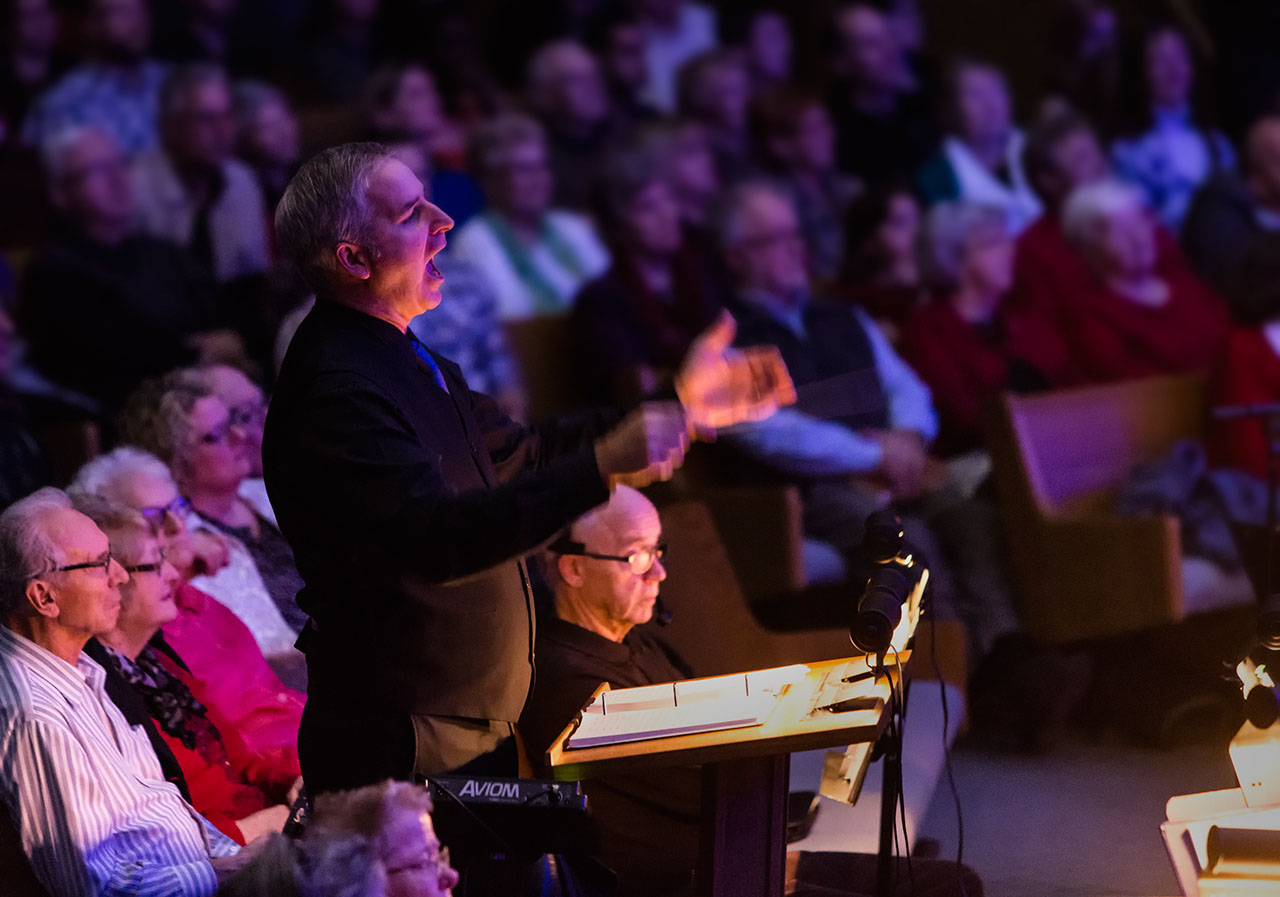
The technical challenges photographing this type of event revolve around the very difficult lighting inherent to them. The venue is typically dark while the actors and musicians are lit with spotlights that are of varying intensity, colours and temperatures creating extreme ranges of contrast and fluctuating white balance as can be seen in this image.
The tendency with event photography is to overexpose the performer’s faces which makes the resultant photograph unacceptable. This is certainly the case most of the time when using a camera on automatic settings, whether it be with your iPhone, point and shoot or expensive DSLR. The problem is caused by the mixed lighting confusing the camera’s light meter so the camera chooses an exposure that overexposes the faces of the performers. In order to prevent overexposing people’s faces, or ‘blowing out the highlights’ you need to shoot manually and underexpose every image by two to three stops. It’s a good habit to watch the histogram on your camera and turn on the highlight alert feature to quickly see if you are overexposing the faces. This next image was taken three stops underexposed from the meter reading.
The lack of ambient light in concert venues necessitates taking all measures available to shoot at shutter speeds fast enough to stop the motion of the people in the frame and prevent movement of the camera during the exposure. We don’t have time in this post to discuss these in detail, however they involve; using the widest possible aperture allowing the most light possible into the lens (f/2.8 for most the images in this post); using high ISO’s which make the camera sensor more sensitive to light (ISO’s ranging from 2000-4000 in this case); and shutter speeds close to 1/focal length which is the rule of thumb for the minimum shutter speed to prevent hand held camera shake during the exposure (this problem can also be minimized by using lenses with image stabilization or vibration reduction). Even still, if the subjects in the image are moving, they will be blurry at slow shutter speeds which is never acceptable, so you must also have a shutter speed fast enough to stop the action. From experience, shooting a concert type event like Under A Starry Sky requires a minimum shutter speed of ~1/80 second. A good outcome with slower shutter speeds is a result more of good fortune rather than good technique! So always get to an exposure that keeps things sharply in focus and be prepared to deal with the shallow depth of field created by the wide apertures and the increased noise created by the high ISO’s.
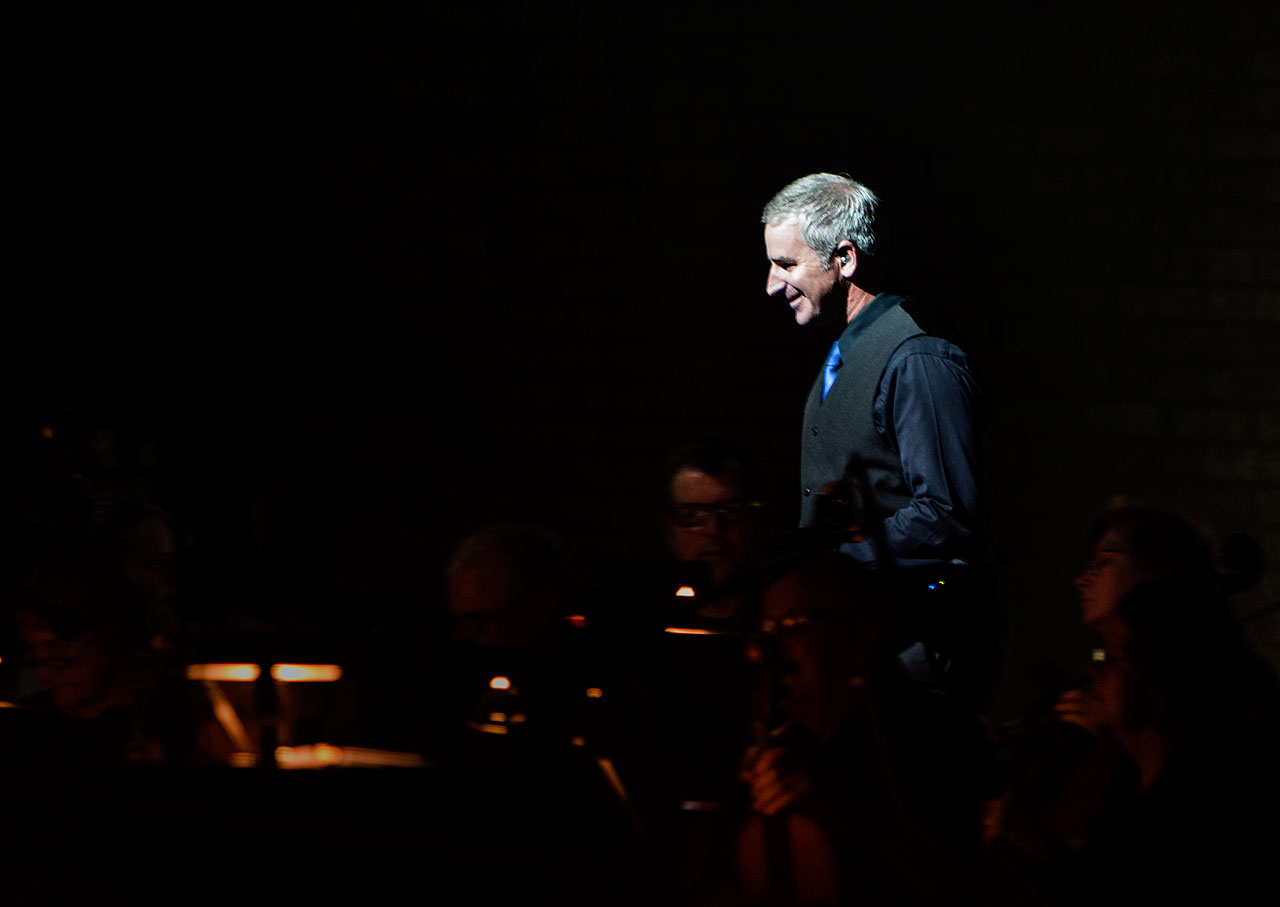
Having said all that, the improved technology with today’s high end cameras allow the taking of acceptable shots at extremely high ISO’s. This provides the luxury of obtaining shots in low light without the use of a flash in places that were not possible even two or three years ago. This next image was illuminated with only the podium light reflecting off the director’s score. It was taken at ISO 12,800, 1/60 sec, f/2.8 and 200mm!
The last technical issue to mention is white balance, which is something that every photographer and videographer deals with all the time. We could write pages on the complexities of white balance, but that will be left for another post. In a nutshell, it is important to set the camera white balance correctly so that what appears white to your eye when you took the photo also appears white in the resulting image or video. If the white balance is not set correctly an annoying colour cast becomes visible in the image. This is most evident by the skin tones appearing ‘off’ in the image. All light sources have an inherent frequency and temperature, both of which affect the colour of the light in the visible spectrum. The camera sensor must determine what that temperature is in order to calculate what white balance is required to accurately render the colours. This is very easy for the camera to figure out when there is only one light source, like the sunshine, however it is virtually impossible for the camera to calculate the white balance when the scene is lit by many different light sources and many different types of lights among those sources. Such is the case with a concert which utilizes literally hundreds of different lights, of different styles (temperatures) and different colours to create the dramatic effects necessary for an excellent performance. So what is the photographer’s solution? What I do is always shoot complicated lighting events in RAW format (a true digital negative that records all of the digital information captured on the sensor at the time of the exposure) and then adjust each image when processing the images on the computer. This takes a lot of time but helps tremendously in creating an image that best represents what your eye was seeing at the time of the exposure. Even still, as you look at the images in this post and in the gallery with all of the images, you will notice that skin colours are not consistent throughout. When you see a picture or video in which the colours just don’t look right or appear natural, it is almost always because the white balance was not set correctly, or the light sources were so mixed that it was impossible to set the correct white balance.
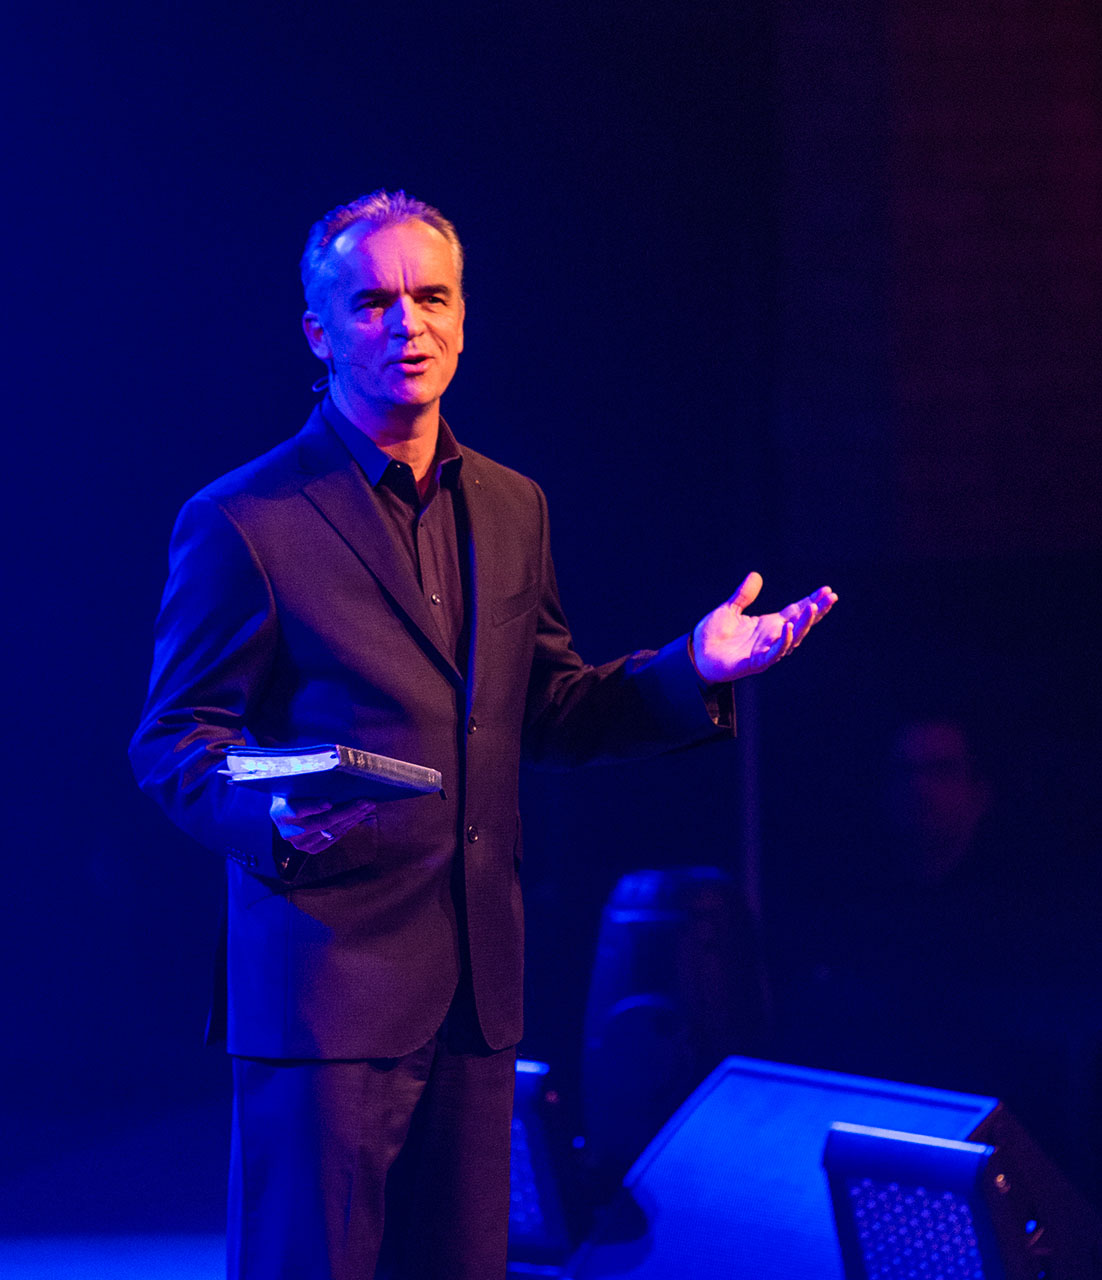
So enough of the technical discussion, lets look at some of the images from Calvary’s presentation of Under A Starry Sky.
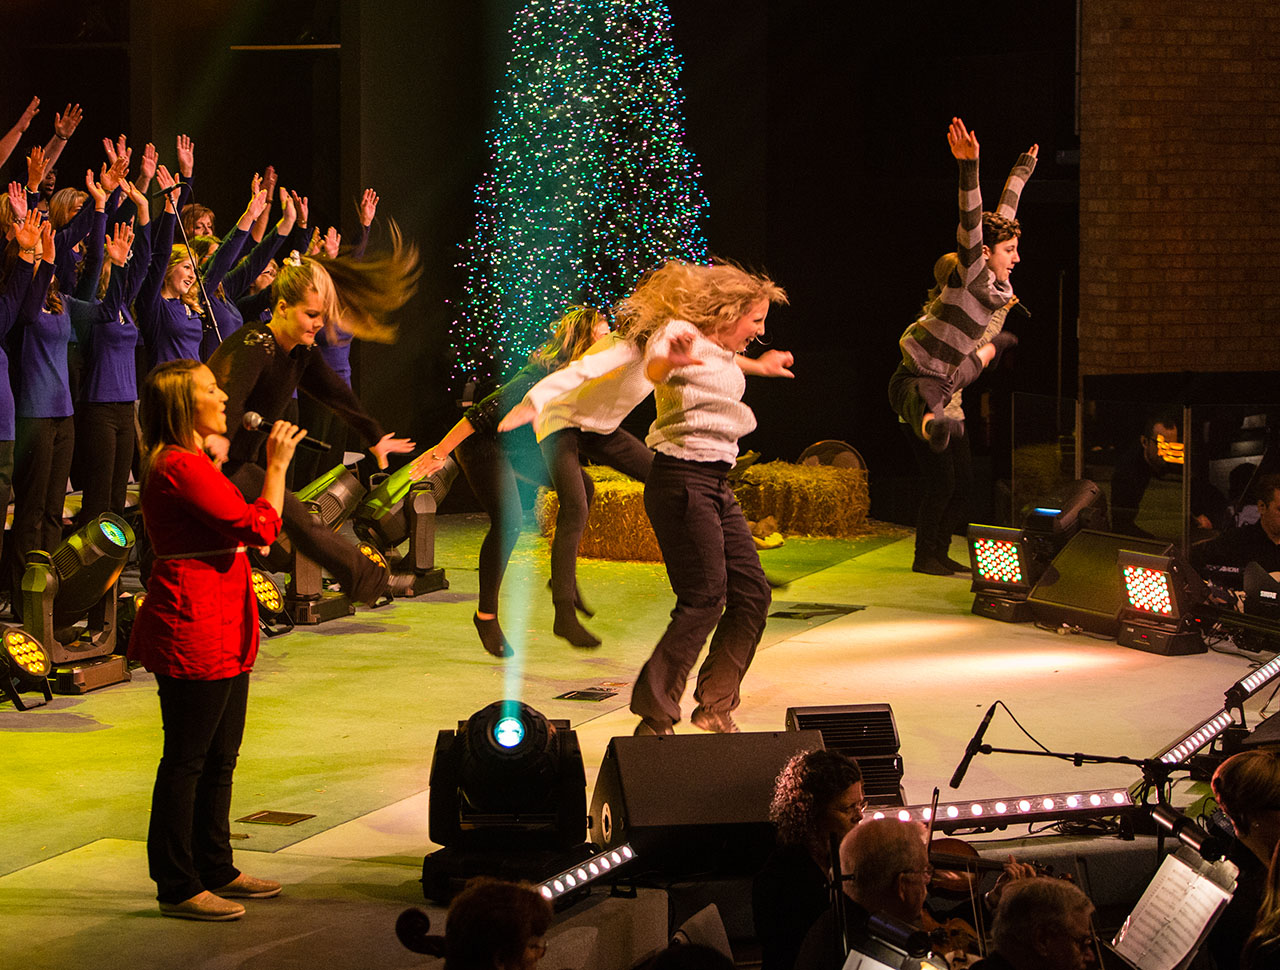
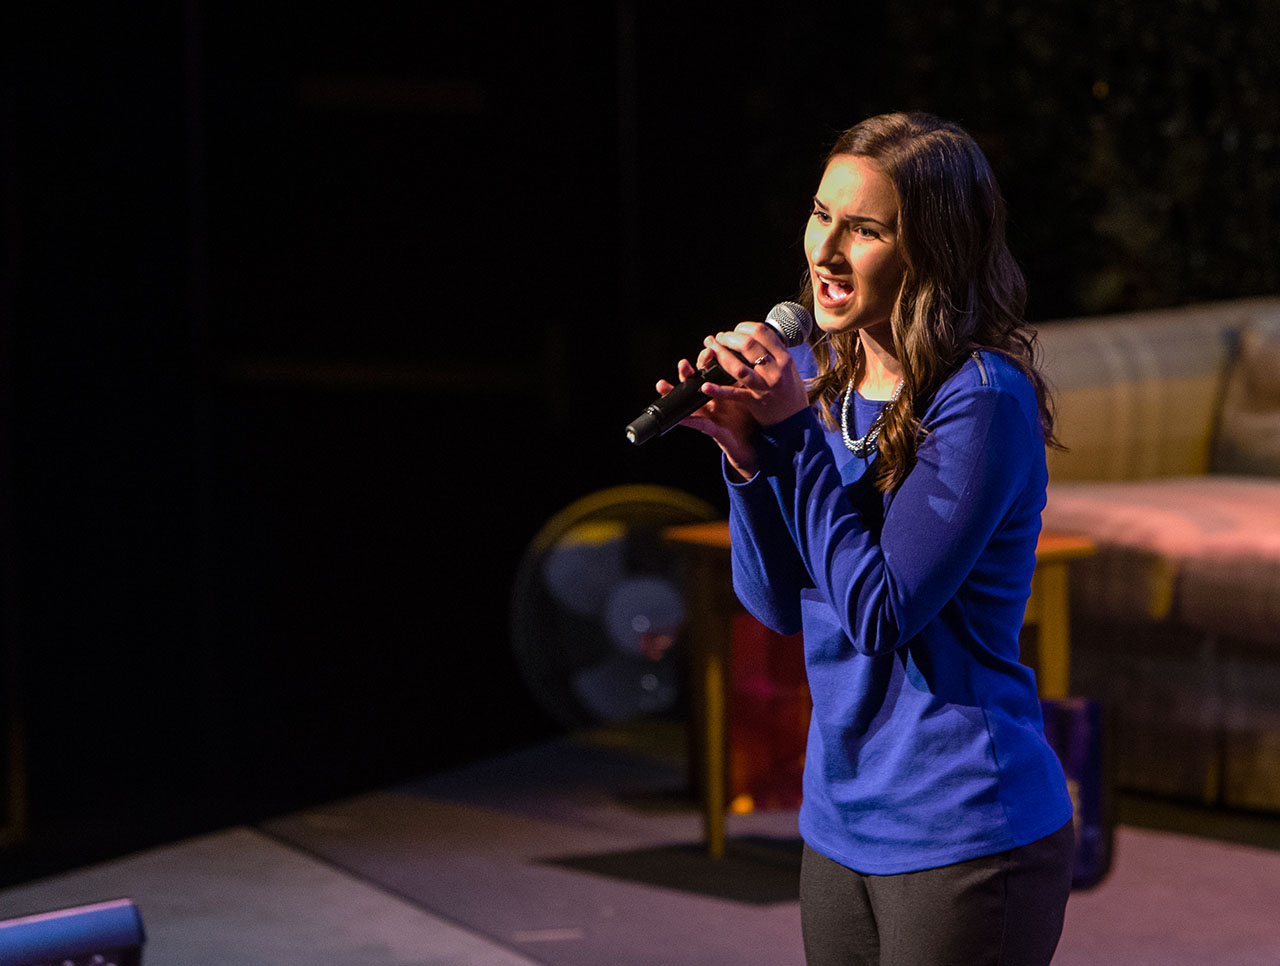
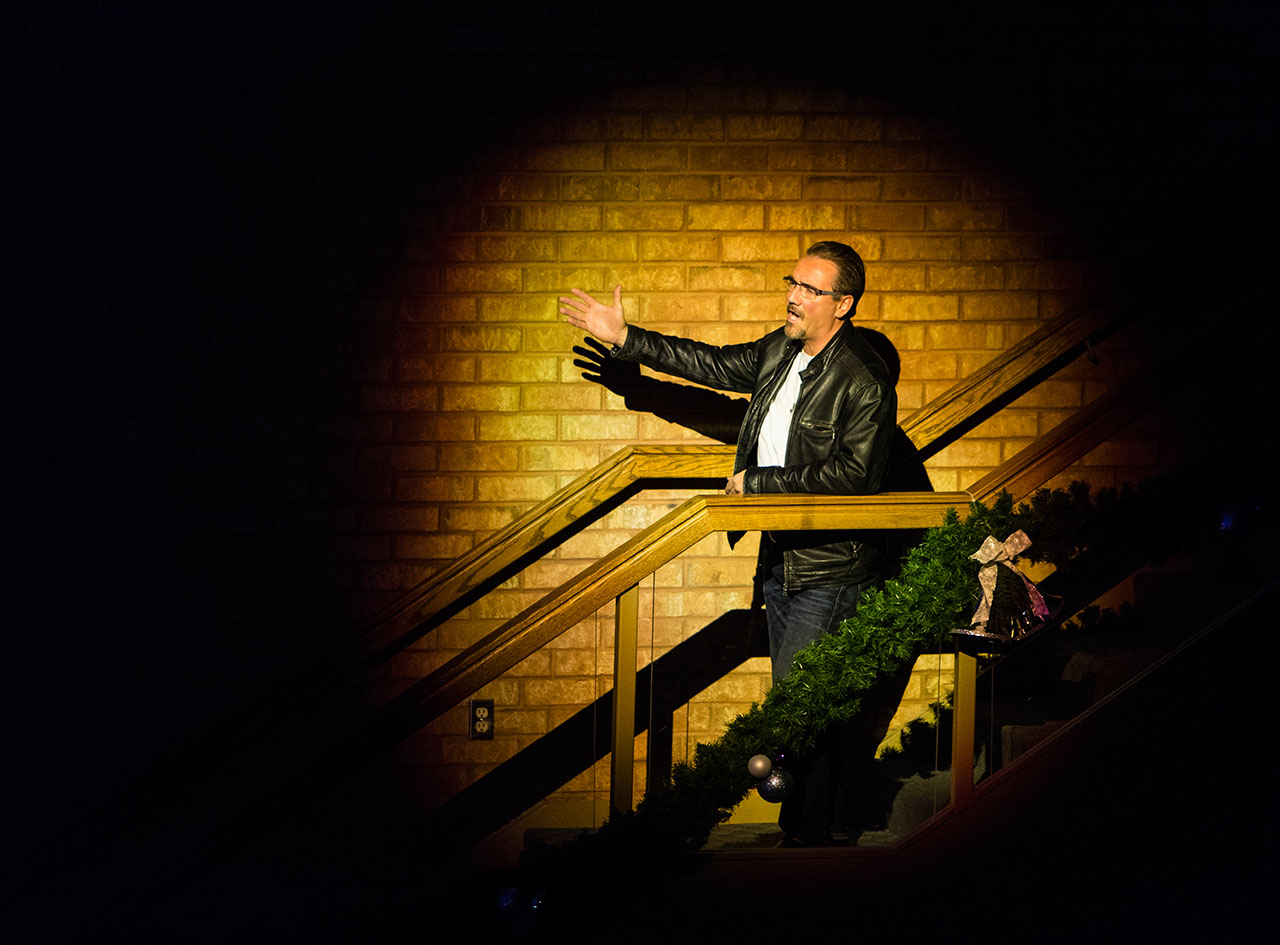
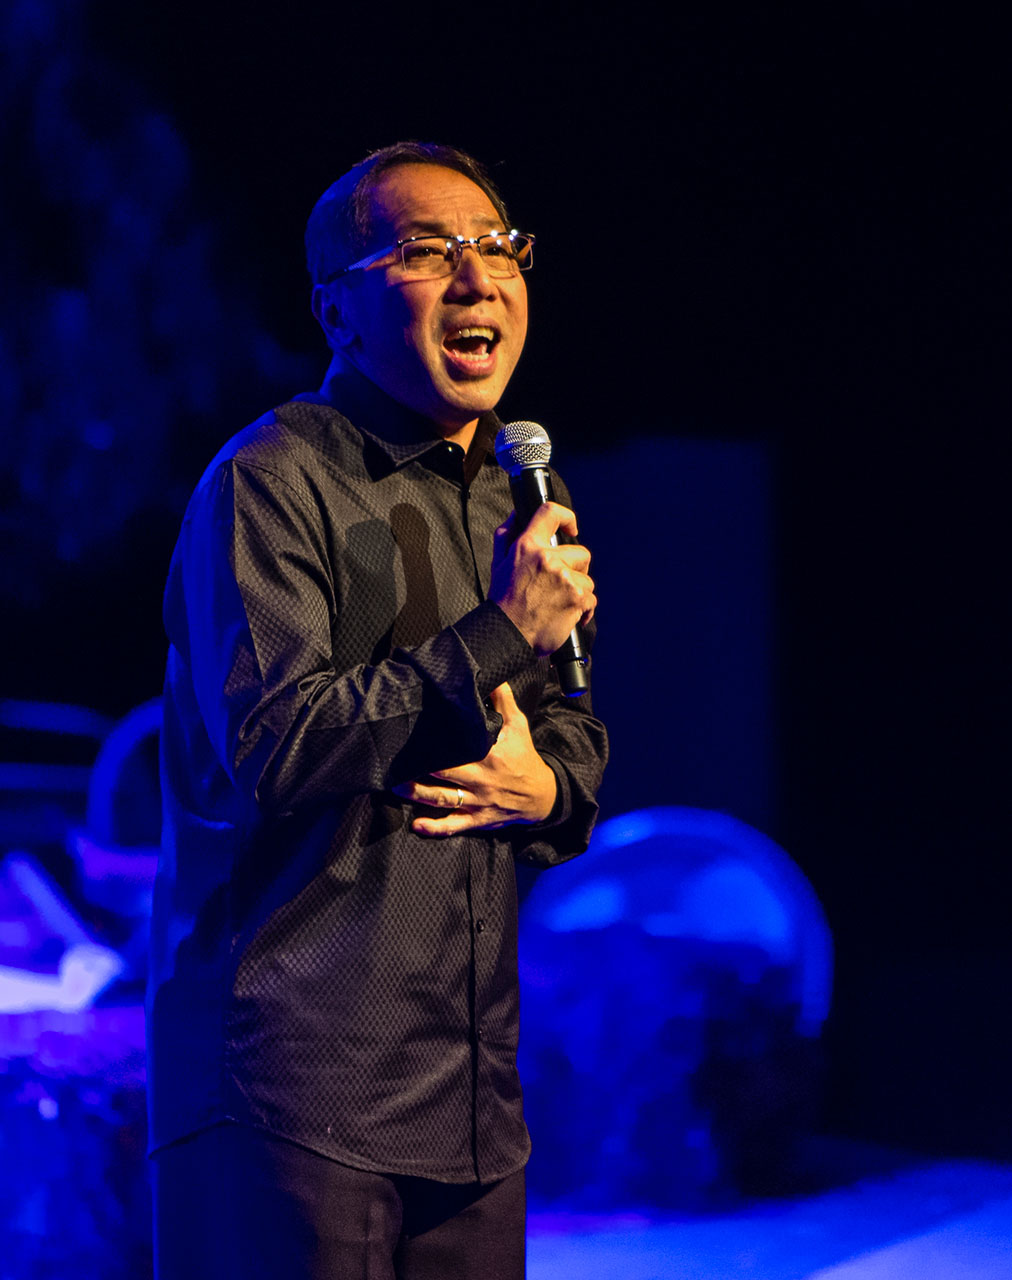
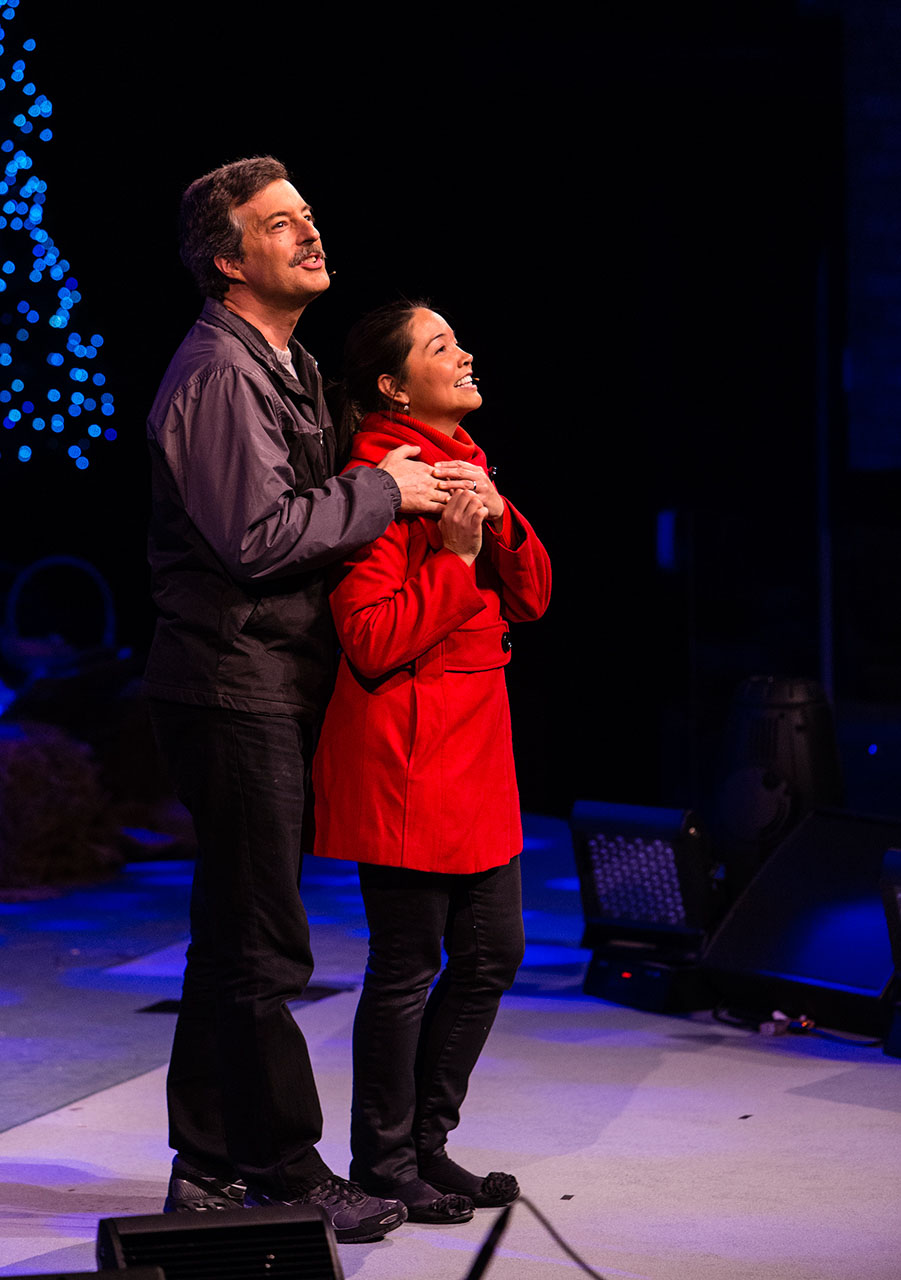
Under a Starry Sky is a powerful seven scene musical that follows the spiritual journey of Melody, a young wife and mother who questions God’s presence as her family faces a bleak Christmas due to the loss of her husband Travis’ job just before Christmas. In this title slide we see Melody and Travis along with the Sounds Of Praise choir and the Calvary orchestra.
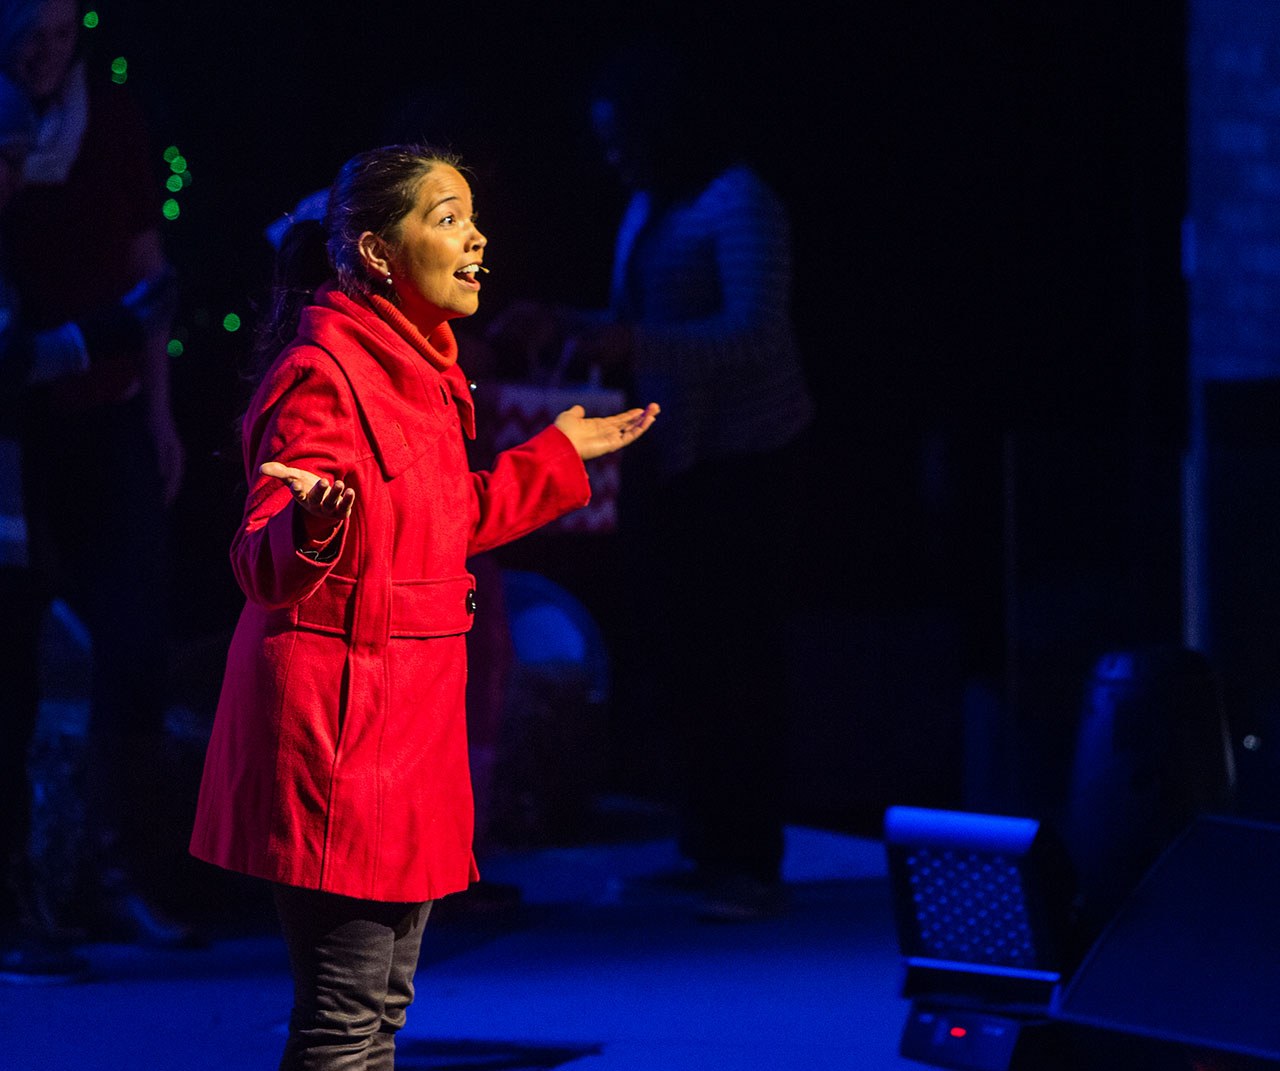
Melody
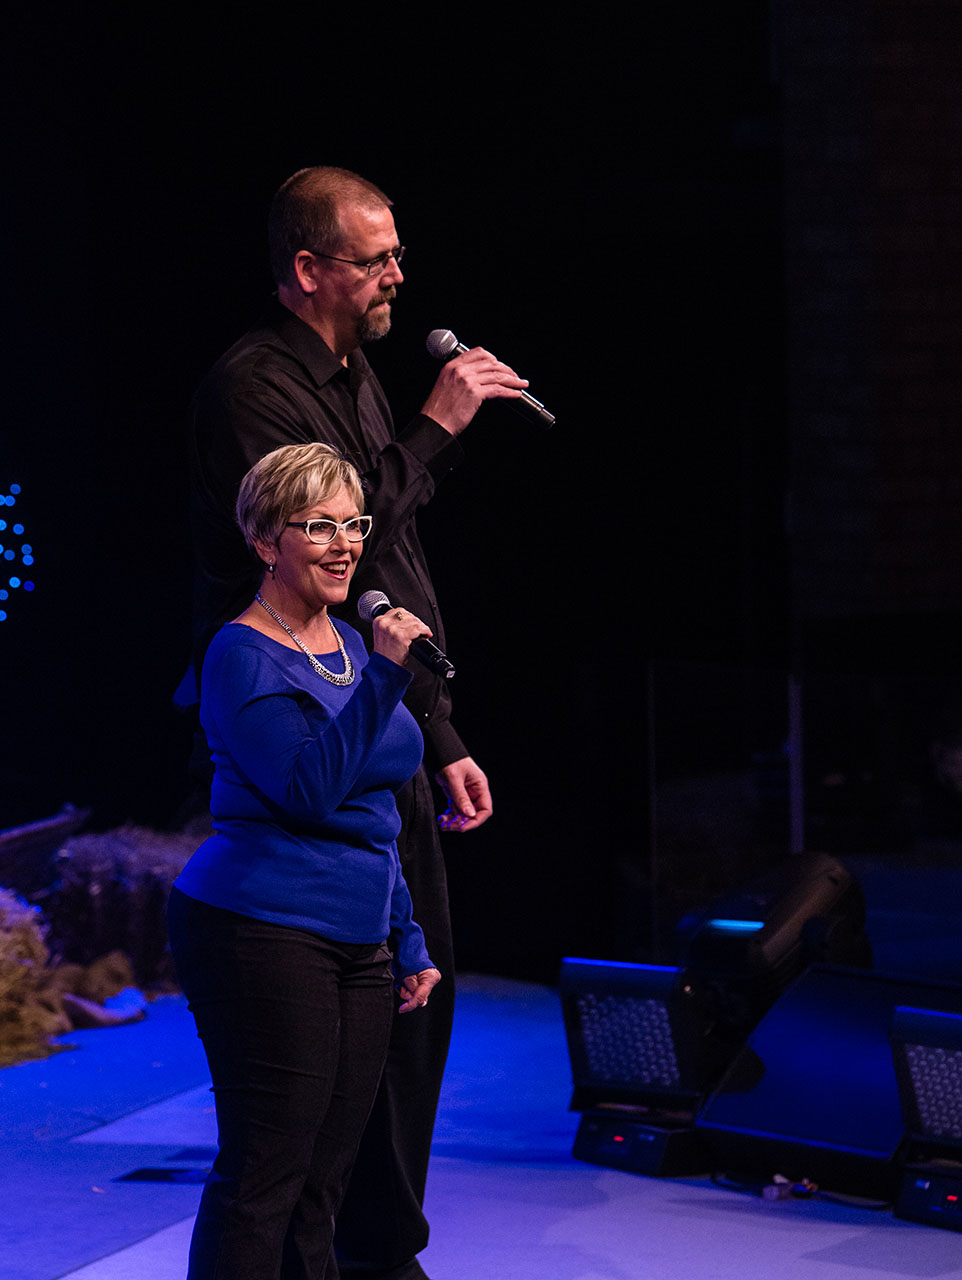
Travis
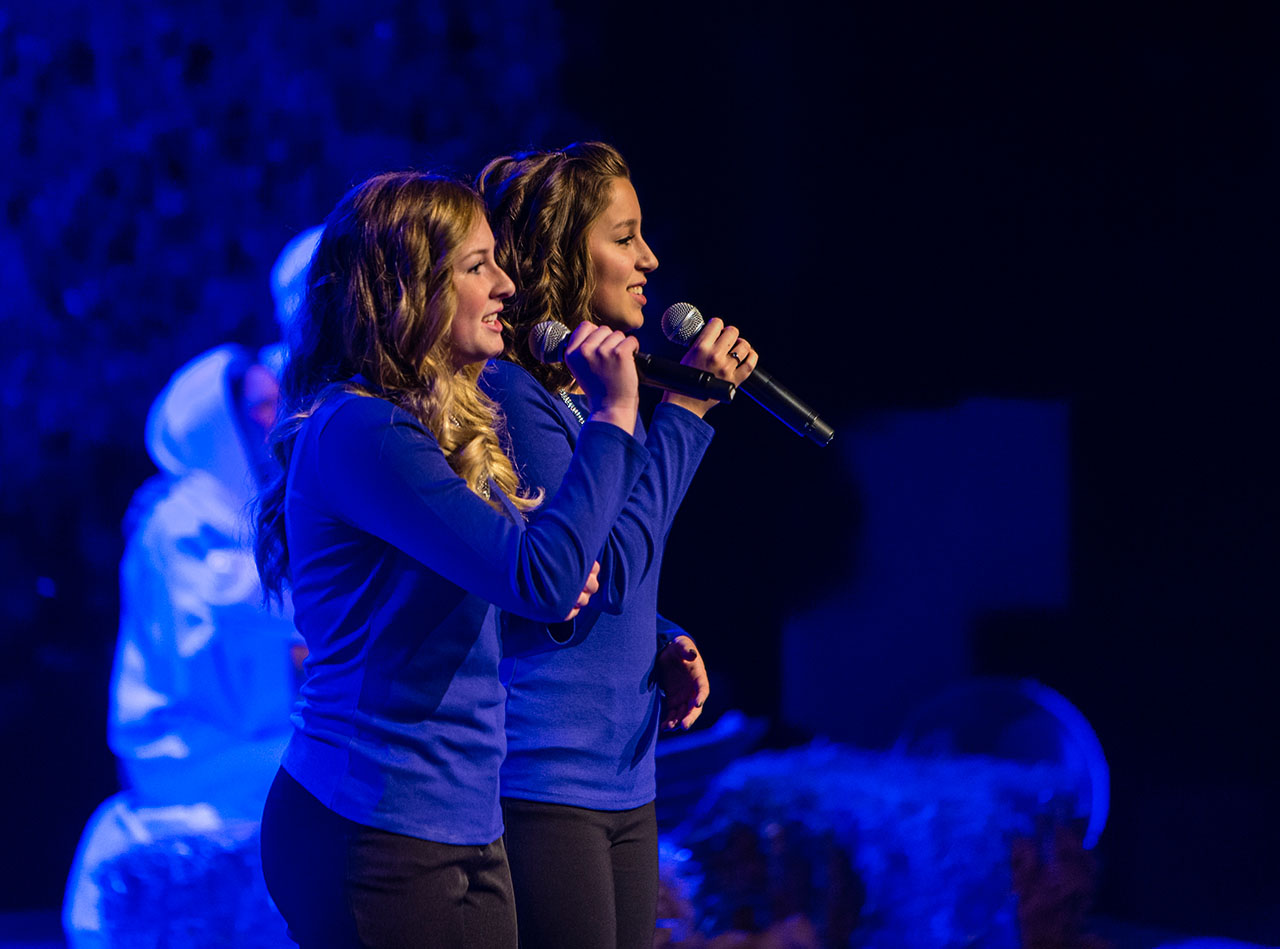
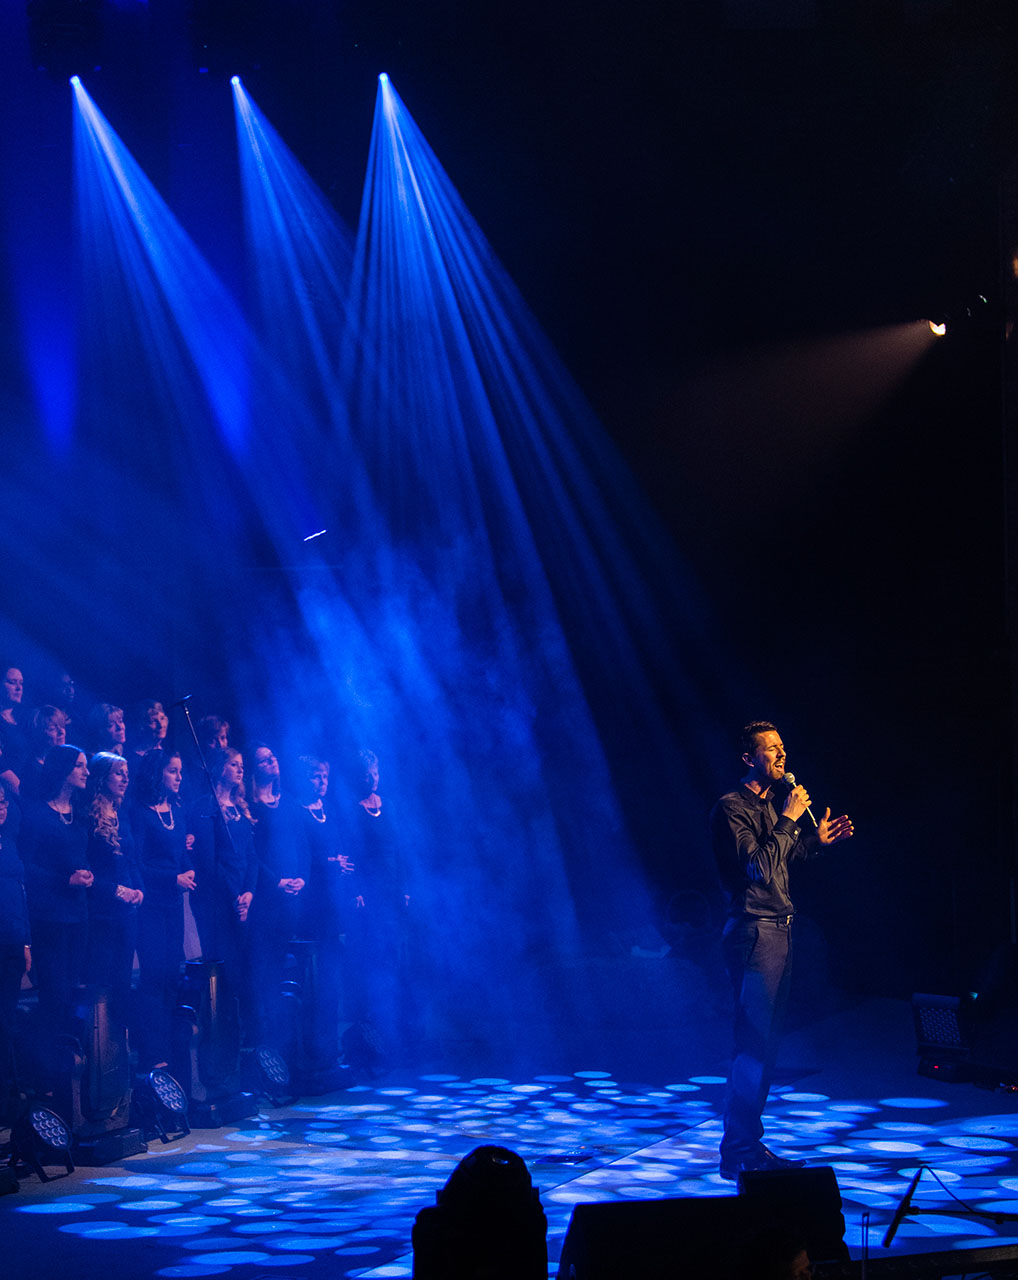
Throughout the musical many soloists, duets and ensembles were featured.
.
.
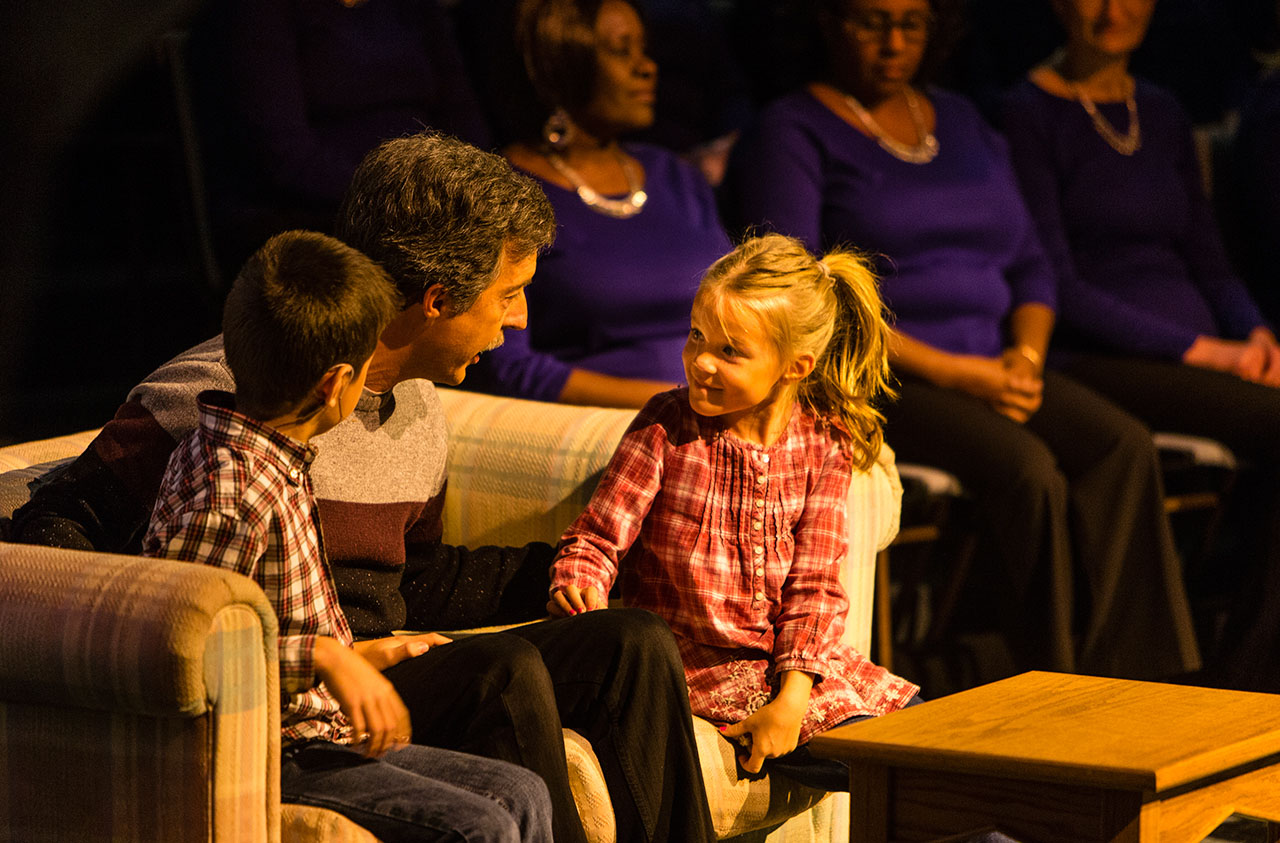
Travis, Josiah and Evie.
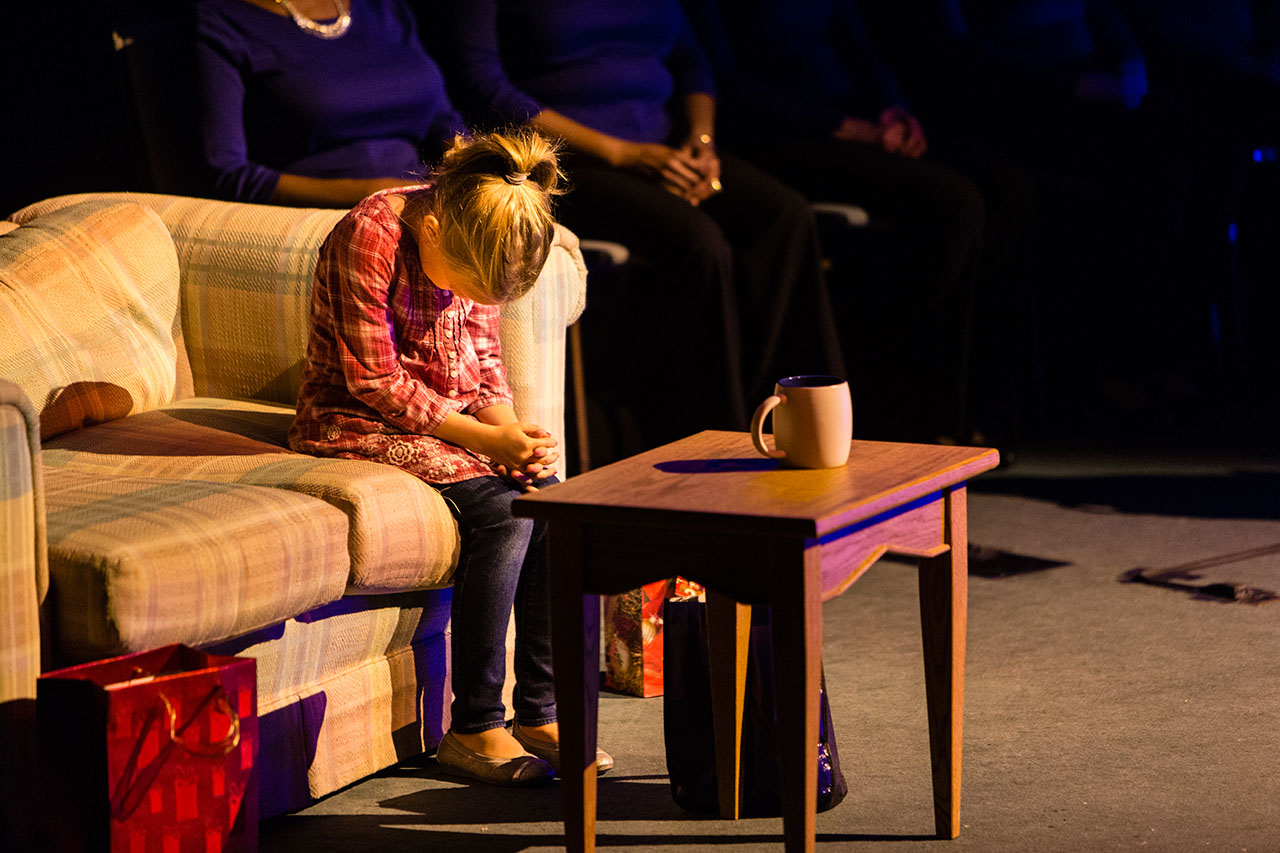
Travis & Melody’s daughter Evie, praying for her mom….that she would know she was loved, by them and God. This is my favourite image from the musical.
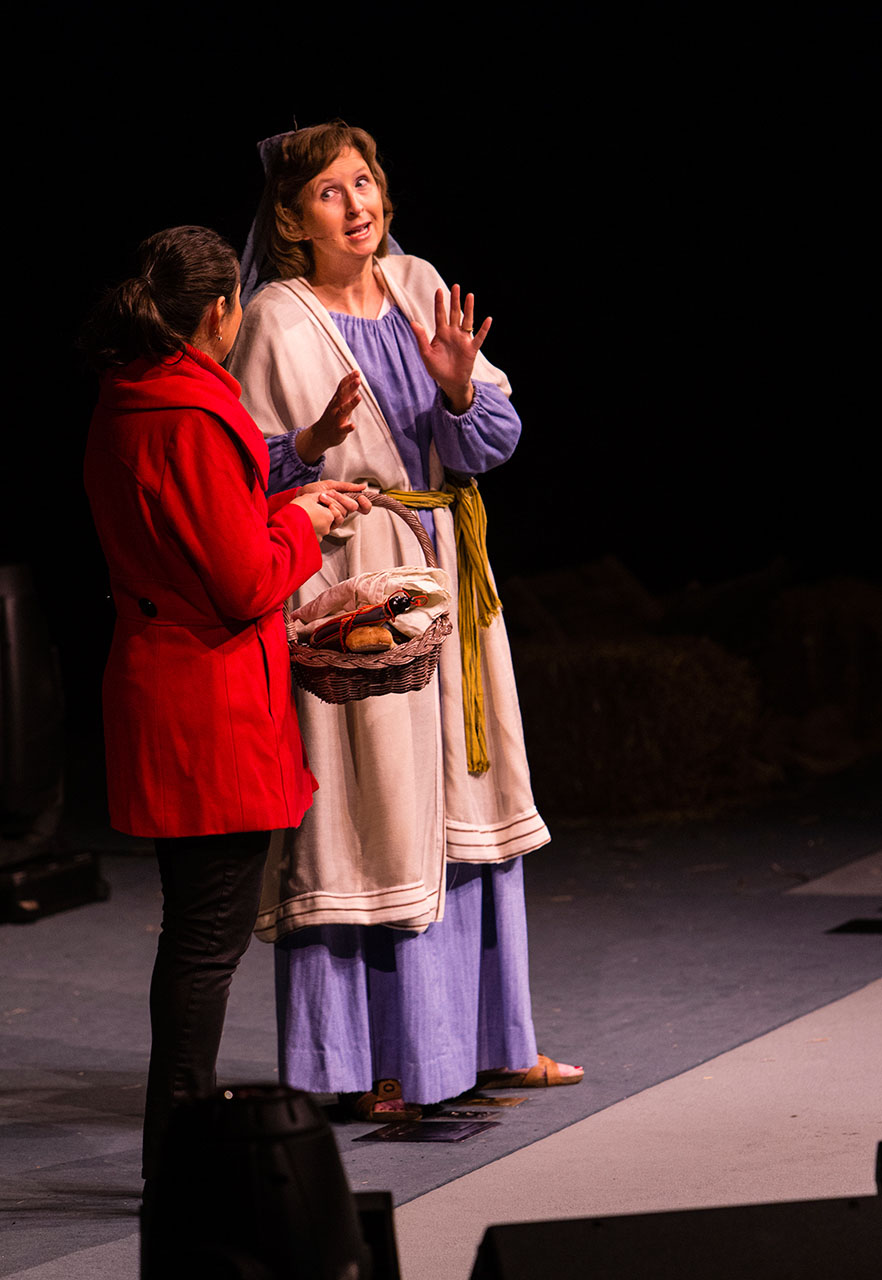
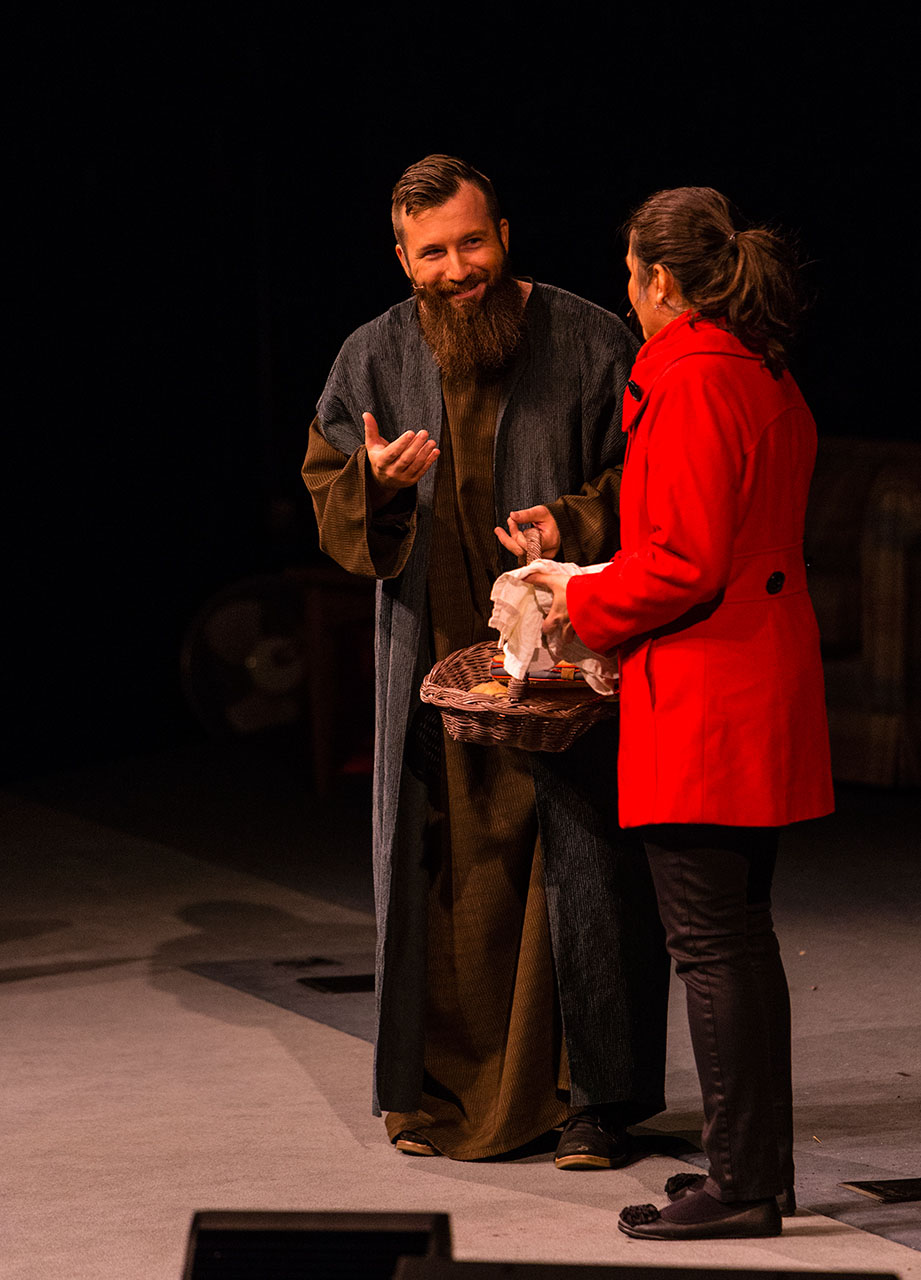
Melody is transported back in time to that first Christmas when Jesus was born. Here she meets Anna, Mary’s mother.
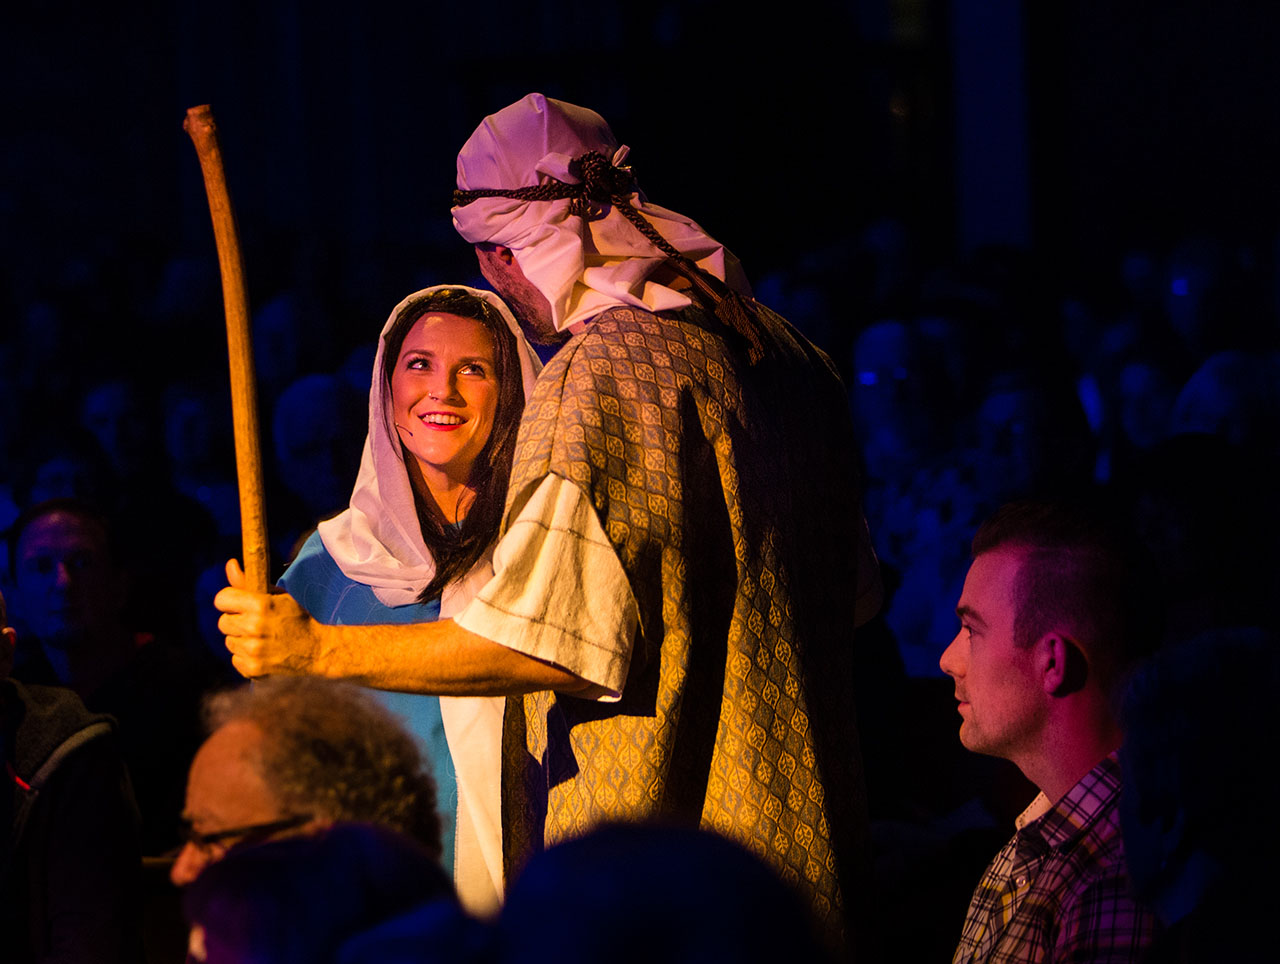
Mary and Joseph making their way to Bethlehem and the stable where Christ would be born.
Melody meets an angel, Cleo, who was tasked with announcing the baby’s birth to the shepherds.
.
Another of my favourites.
Melody meeting Harvey, one of the shepherds who took her to the manger.
.
.
.
Melody returns to her family a changed person after having met Jesus, her Saviour.
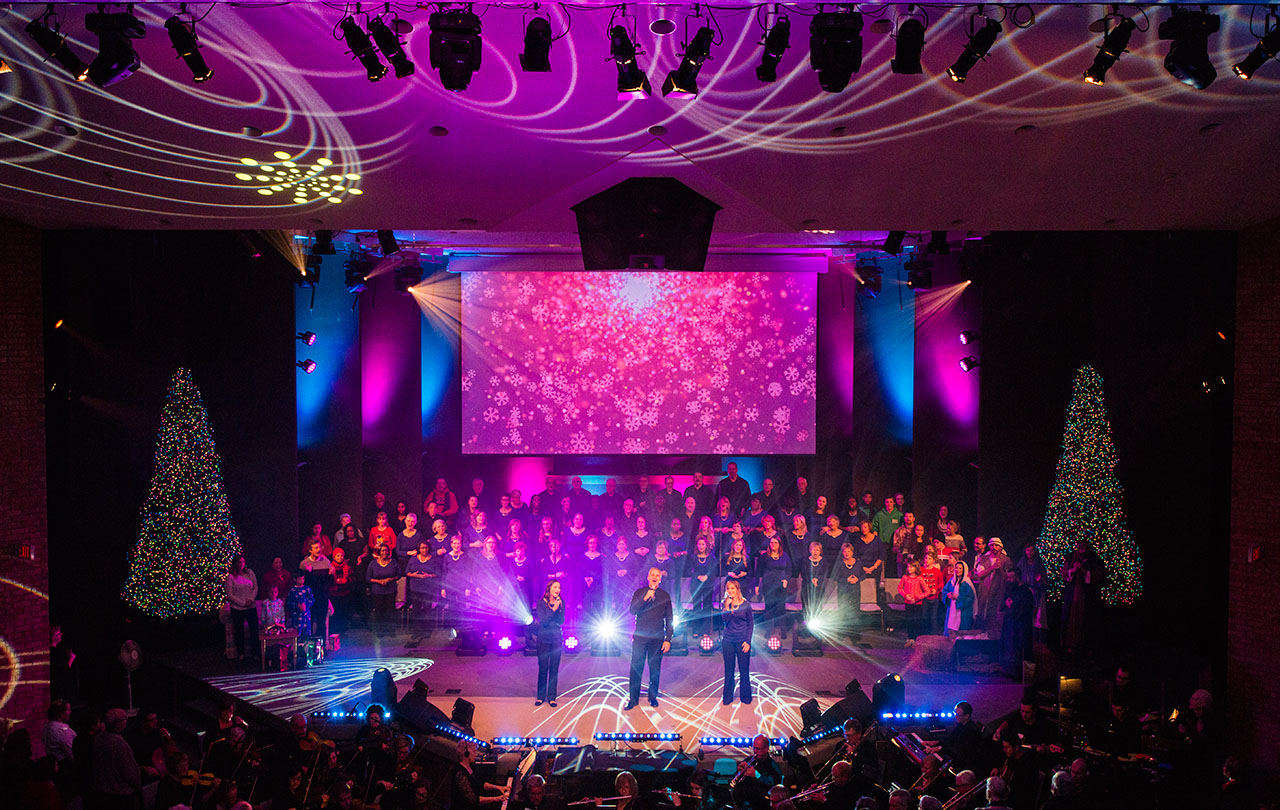
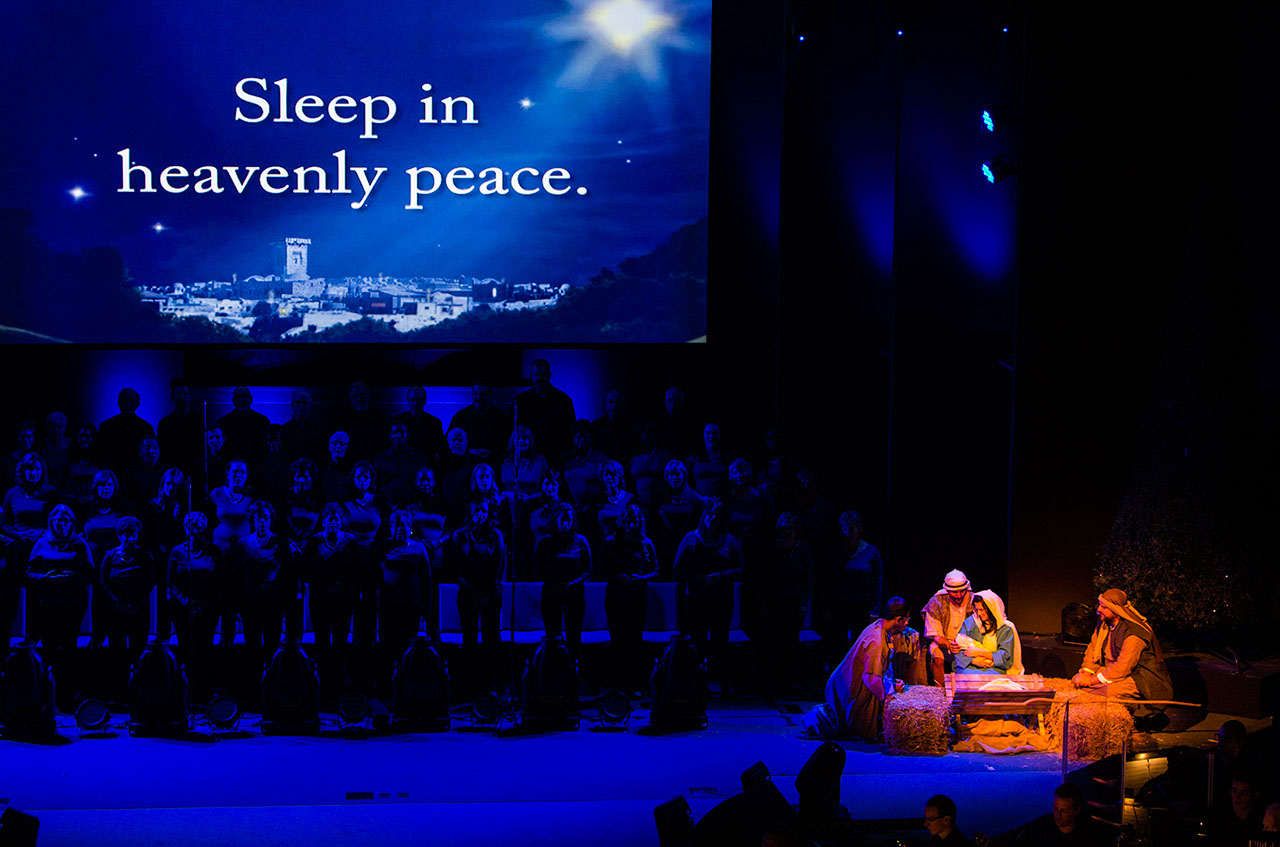
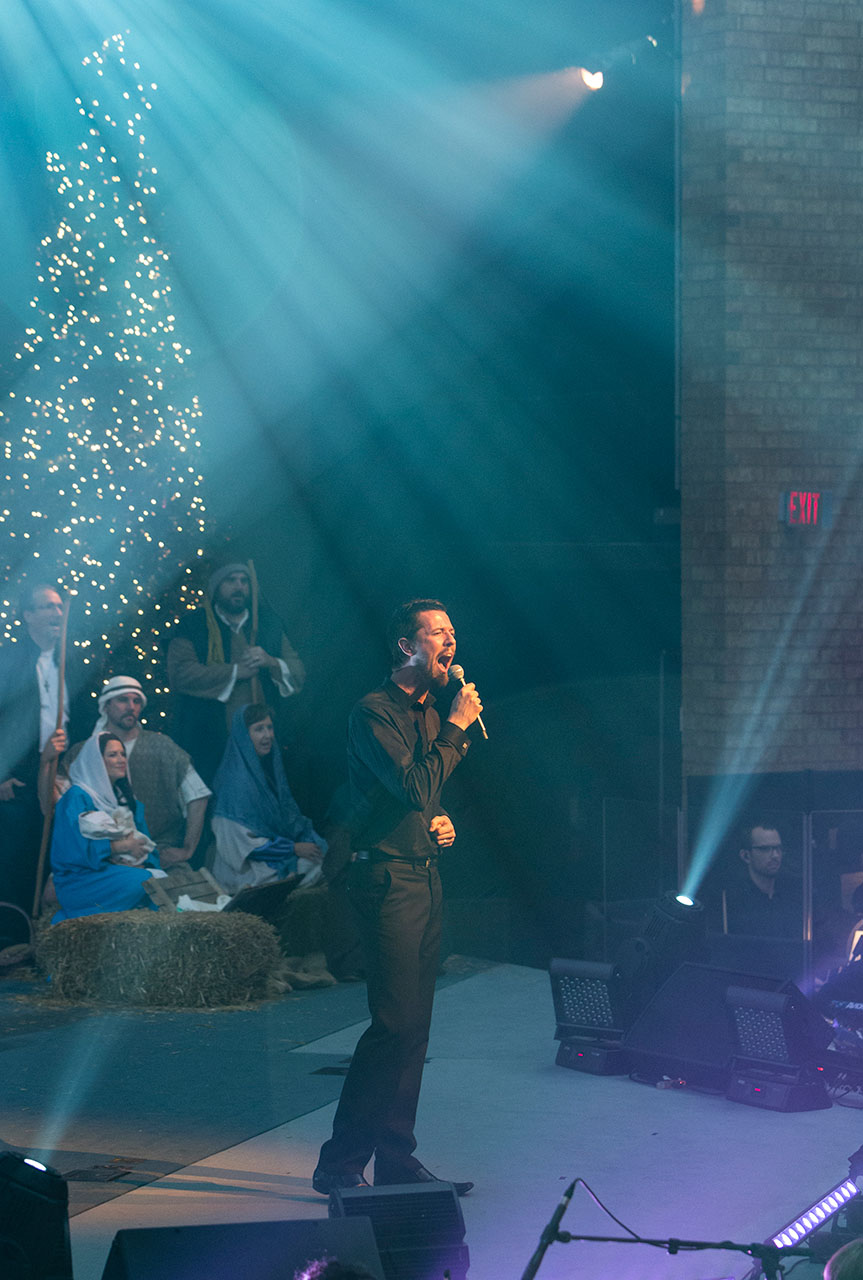
The closing solo of the musical was Let There Be Light, a powerful vocal and visual presentation of Christmas, celebrating the birth of Christ, the Light of The World.
.
.
.
I trust you have enjoyed this post and learned enough to give event photography a try….shoot RAW, take your fastest lenses, shoot wide open, turn up the ISO and get to a shutter speed that stops the motion on the stage and in the camera. Then have fun and try to capture the significant moments that help preserve people’s memory of the event.
Every year the Martin family Christmas season begins with Calvary’s Christmas presentation which is always a powerful presentation of why we celebrate Christmas, the birth of Christ our Saviour, over two thousand years ago. As the words of the Christmas carol pictured above so clearly say “Joy to the world, The Lord has come. Let earth receive her King”. Thank you to everyone who has followed this blog for another year. Your encouragement and support is much appreciated; we wish you a Merry and Blessed Christmas and look forward to an exciting New Year.
My apologies for the length of time that has elapsed since the last blog post but my intent is to be more punctual as we head into the New Year….perhaps that should even be a resolution!
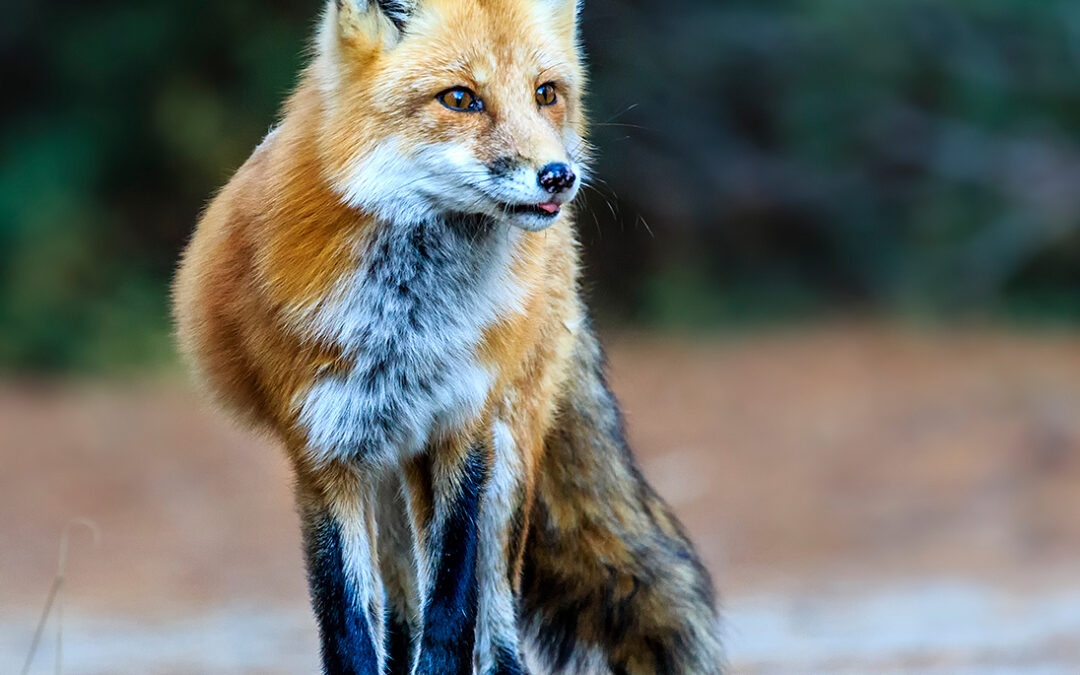
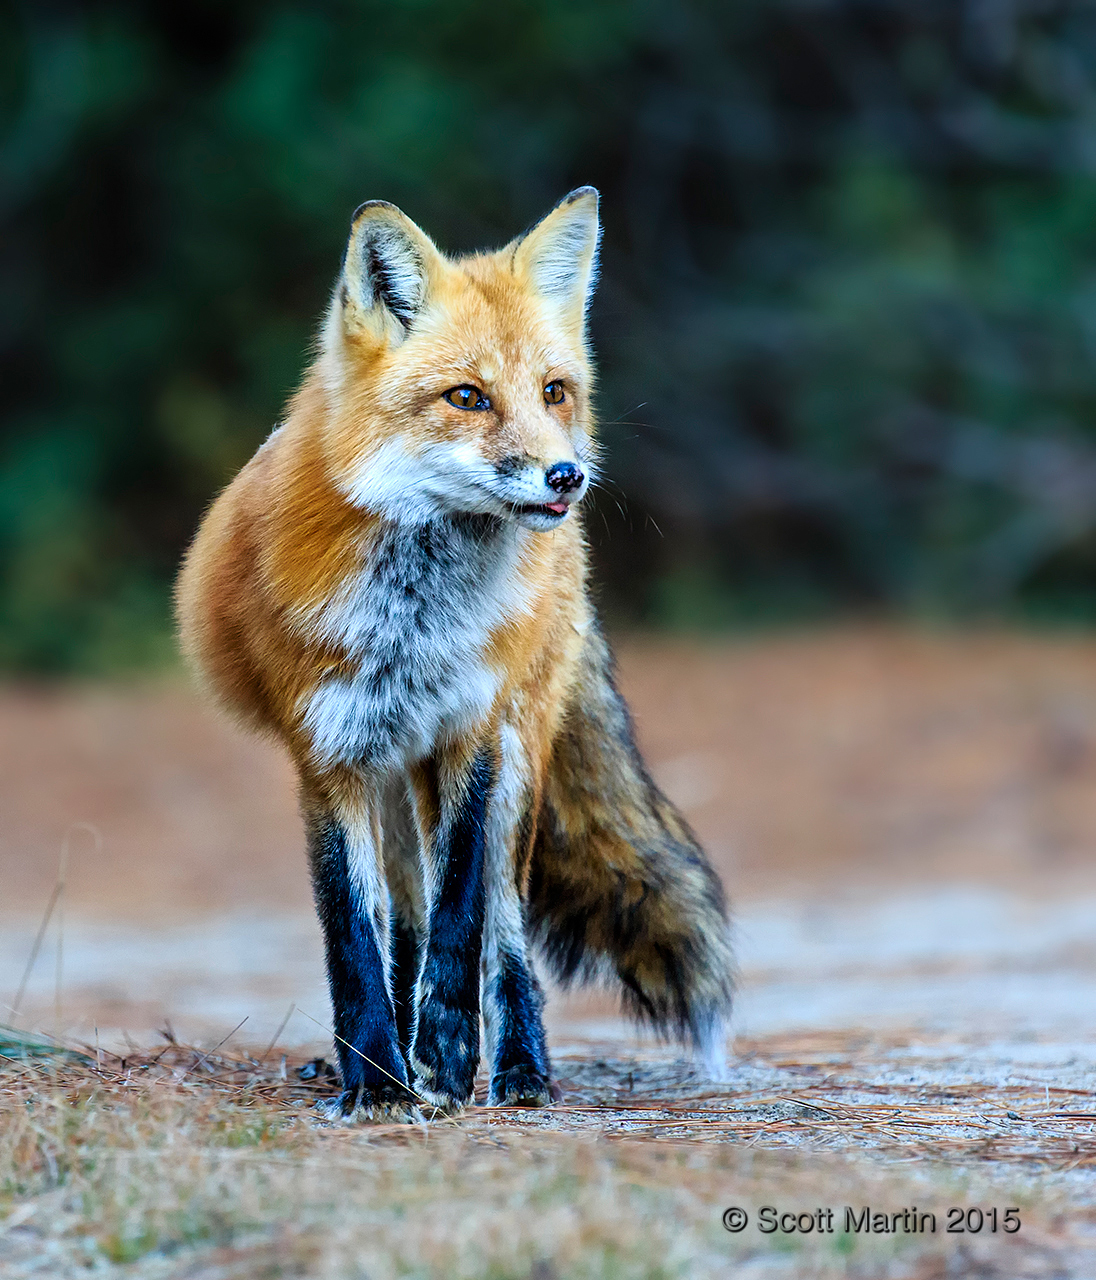
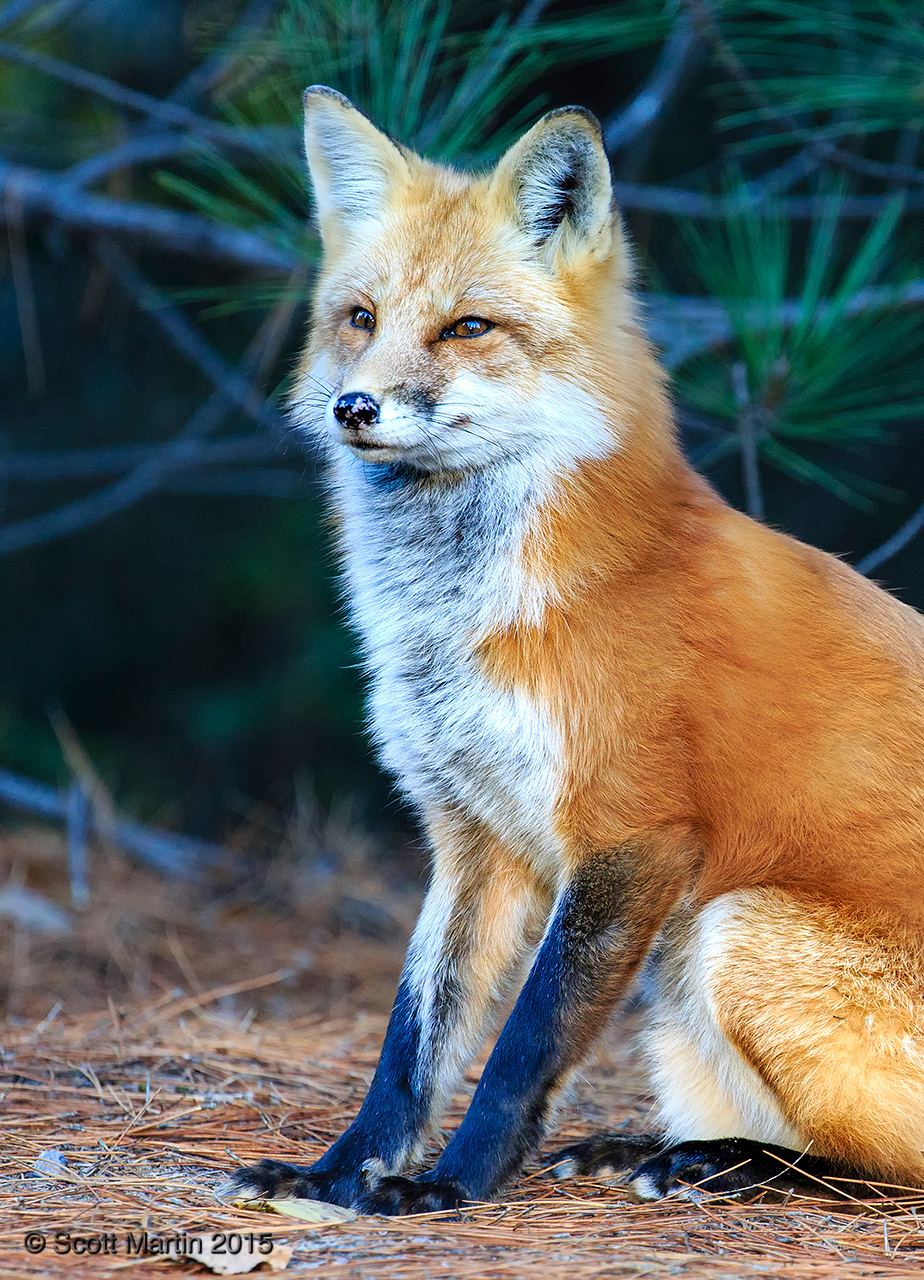
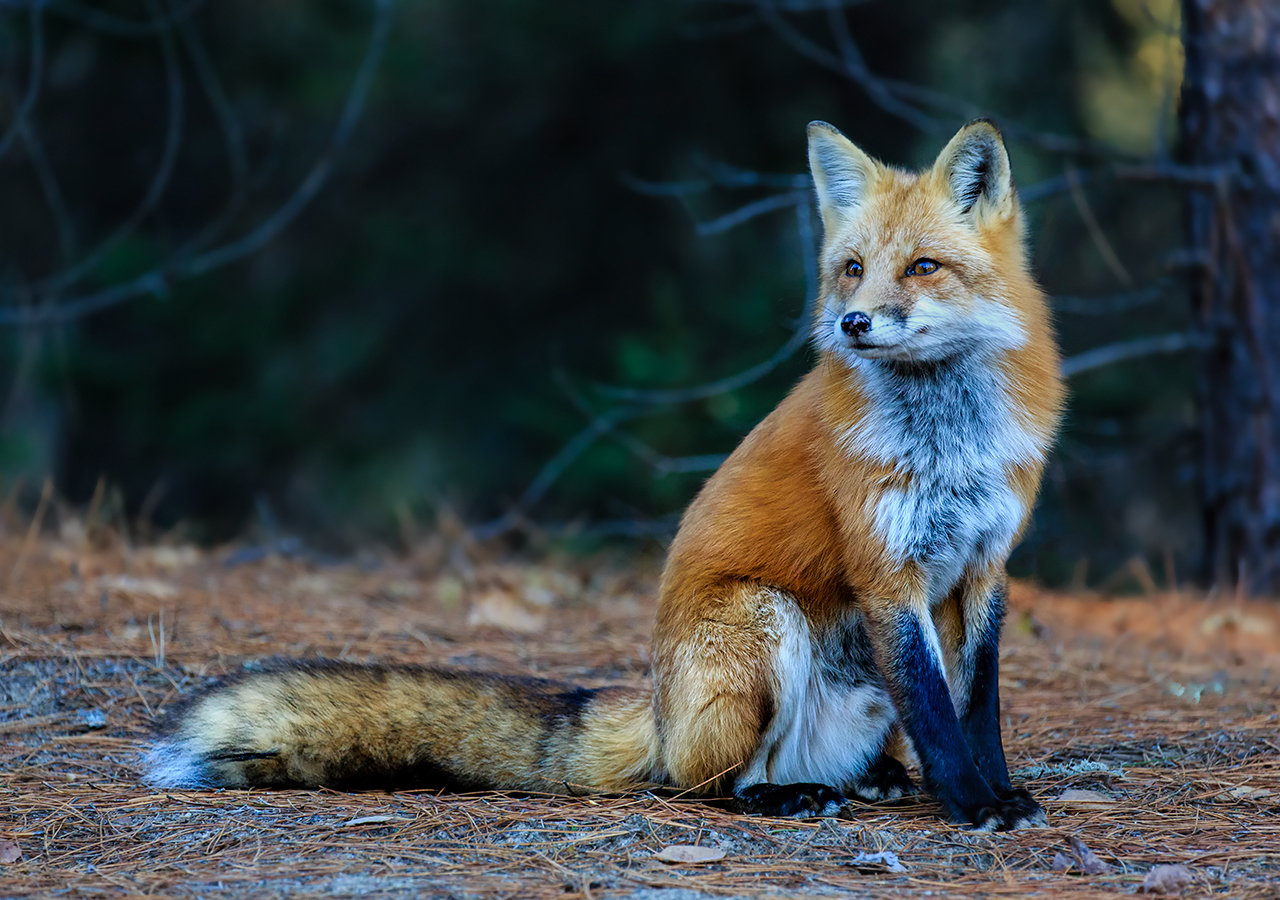
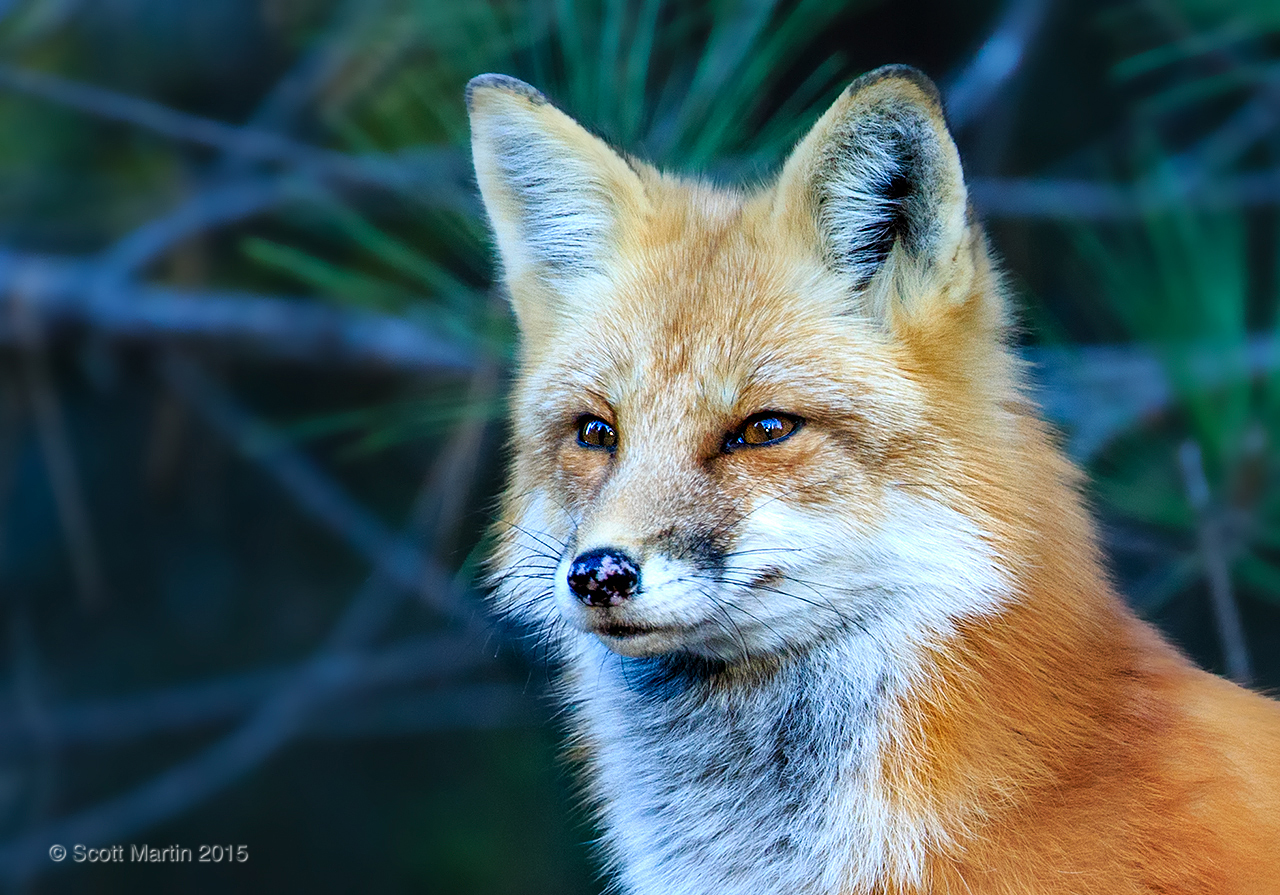
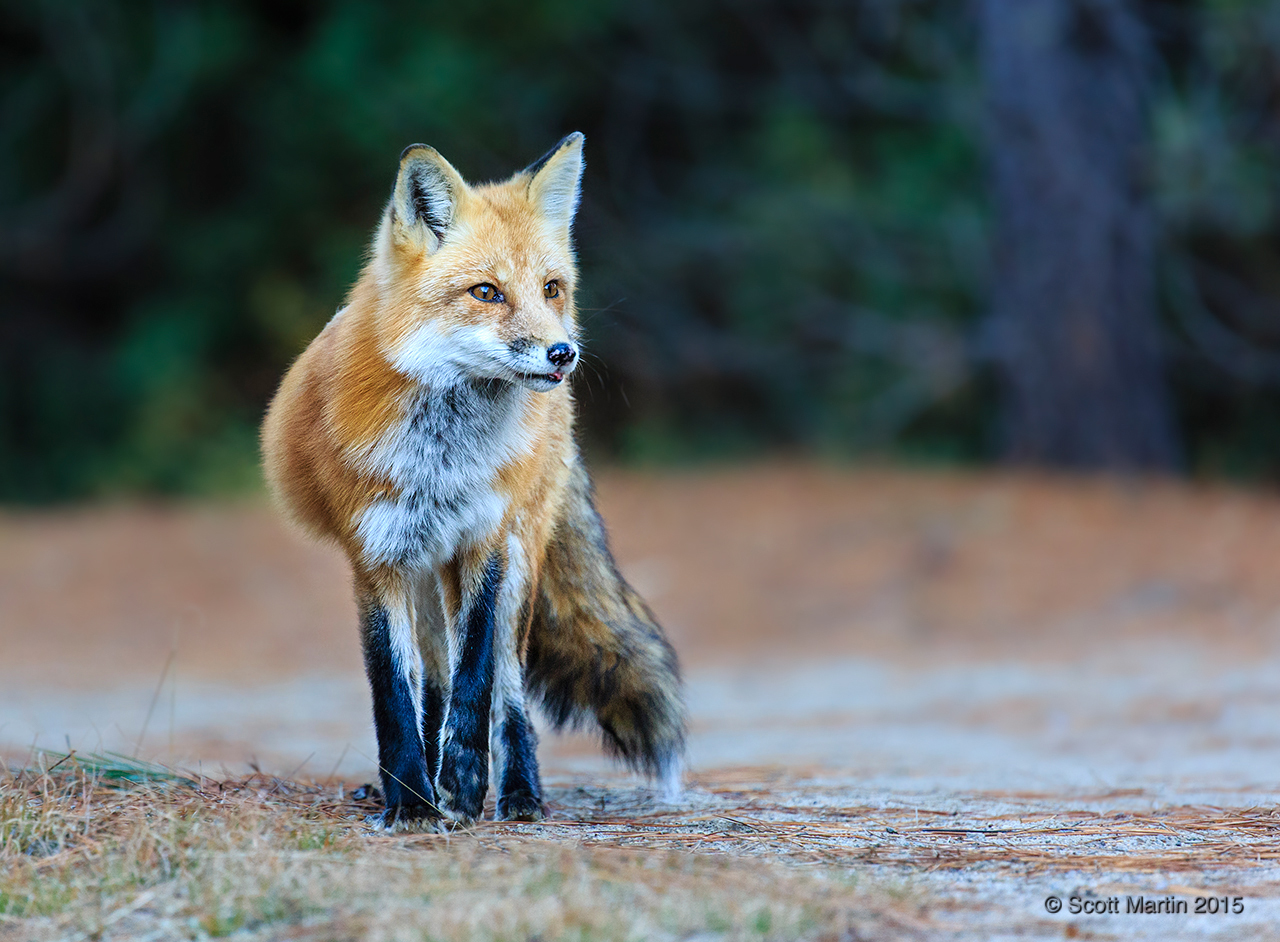
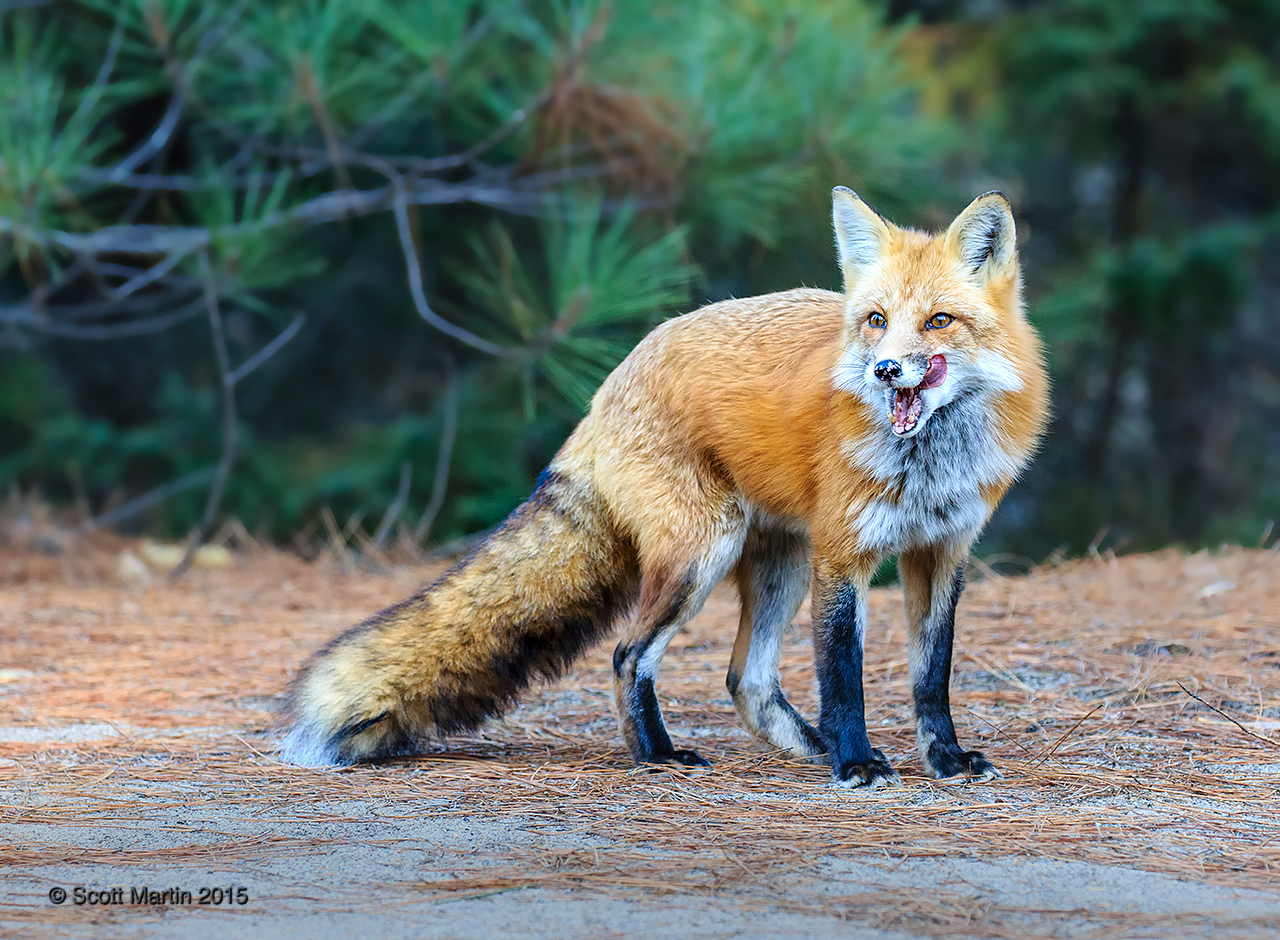
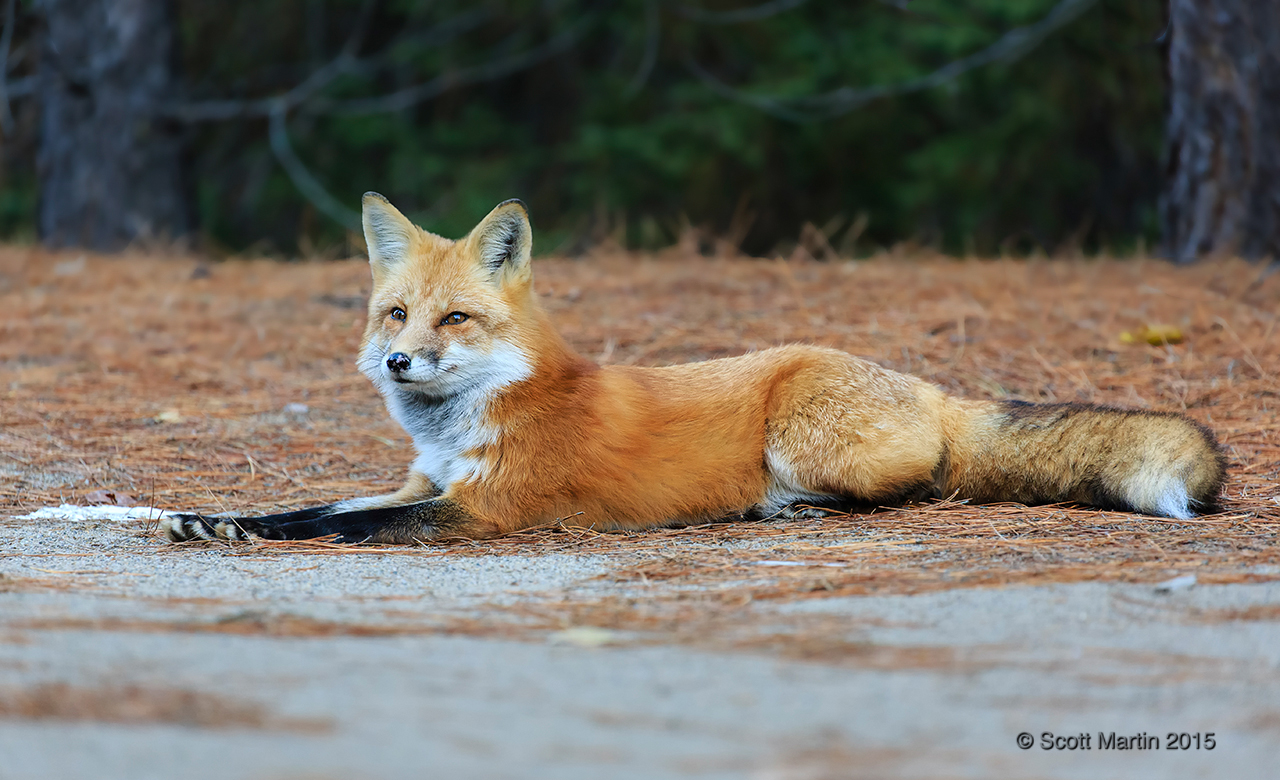
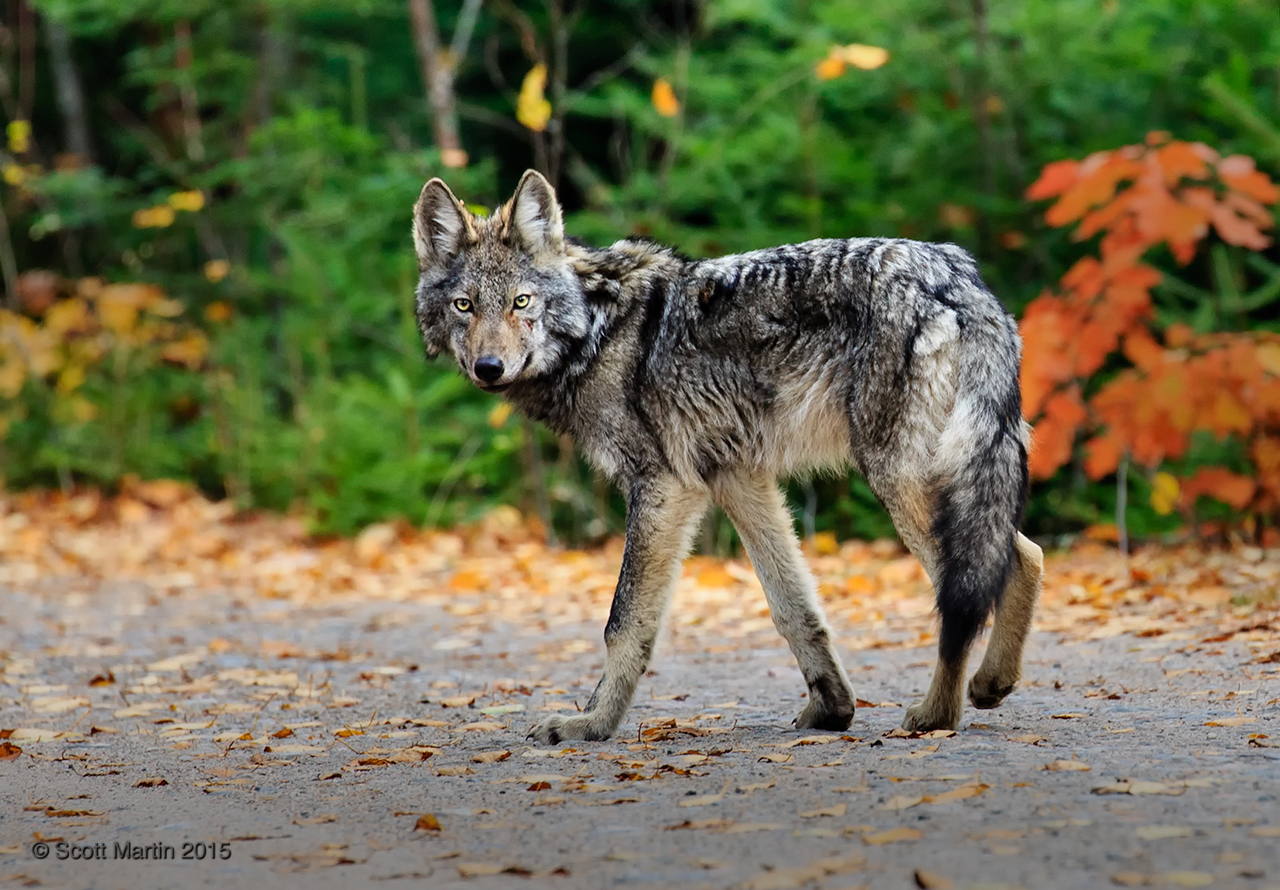
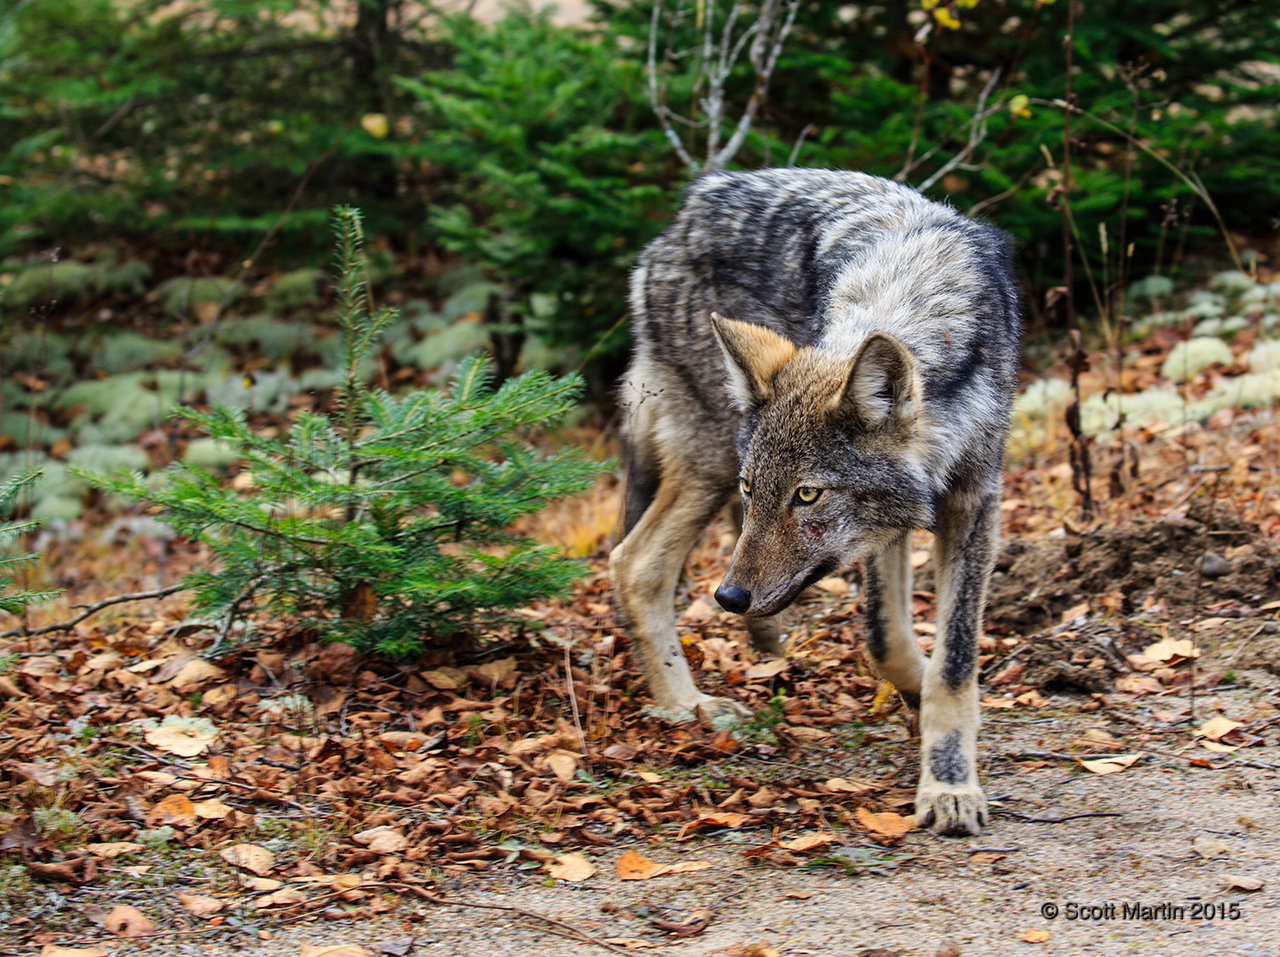
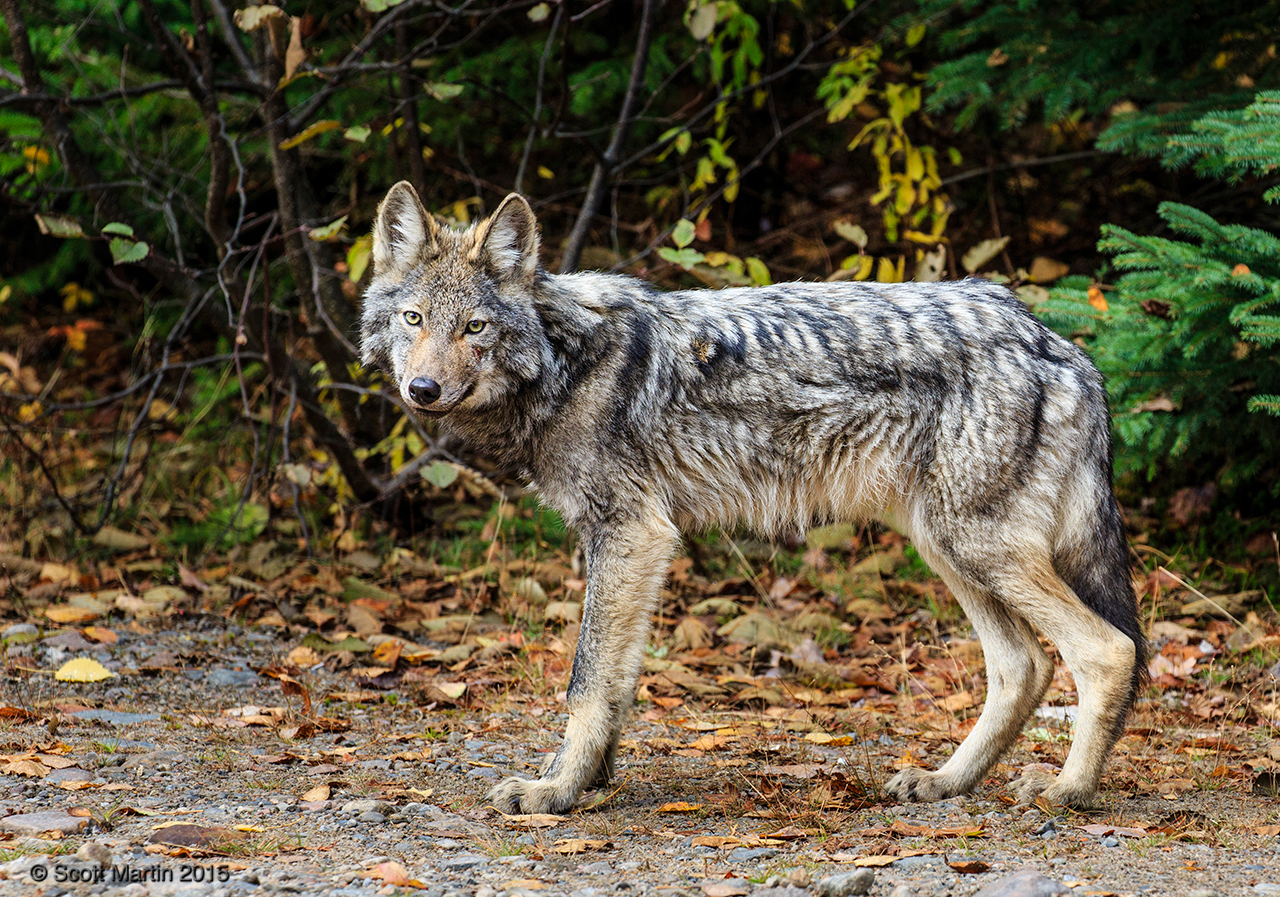
One of the wildlife photographer’s most prized animal to capture is the moose and fortunately I’ve been able to spend some time photographing them in Algonquin Park which you can see via this link to a previous blog post. This fall the goal was to photograph a Bull Moose during the rutting season; you know, that classic Bull Moose with a huge rack of antlers looking directly into the camera. To that end I spent two consecutive Fridays in the park last month looking for that elusive moose and unfortunately was unsuccessful on both days. Even when a plan doesn’t unfold as expected it is always a pleasure getting out of the city and spending time enjoying the outdoors. The bonus was seeing an Eastern Wolf on the first Friday and a Red Fox the second as well as having the privilege to photograph both of them.
The Red Fox is common in Ontario and in fact common around the entire Northern Hemisphere. It is the largest of the foxes and a truly beautiful animal with a heavy red coat and seemingly oversized tail.
.
.
Who can deny what a majestic looking animal they are.
Animals that are introduced into foreign ecosystems generally (if not always) upset the delicate balance that exists within that ecosystem, often with devastating results. The introduction of the Red Fox to Australia in the 1830’s is such an example and the 6.2 million Red Foxes that now live in Australia make it one of the most damaging invasive species on that continent.
The Red Fox is a predator that typically eats small rodents, but will also take rabbits and game birds given the opportunity.
The Red Fox itself is a target of the larger predators in its ecosystem, which in Ontario includes wolves, coyotes and even some of the uncommon big cats.
The fox images in this post were taken late in the day as the light started to subside so an ISO of 2000 was required in order to arrive at a high enough shutter speed. For this reason I also chose the 5D Mk III body which is very good at high ISO’s. The lens was the new Canon 100-400mm IS zoom which is proving to be a wonderful lens. A number of other Red Fox images can be seen in the Wildlife Gallery.
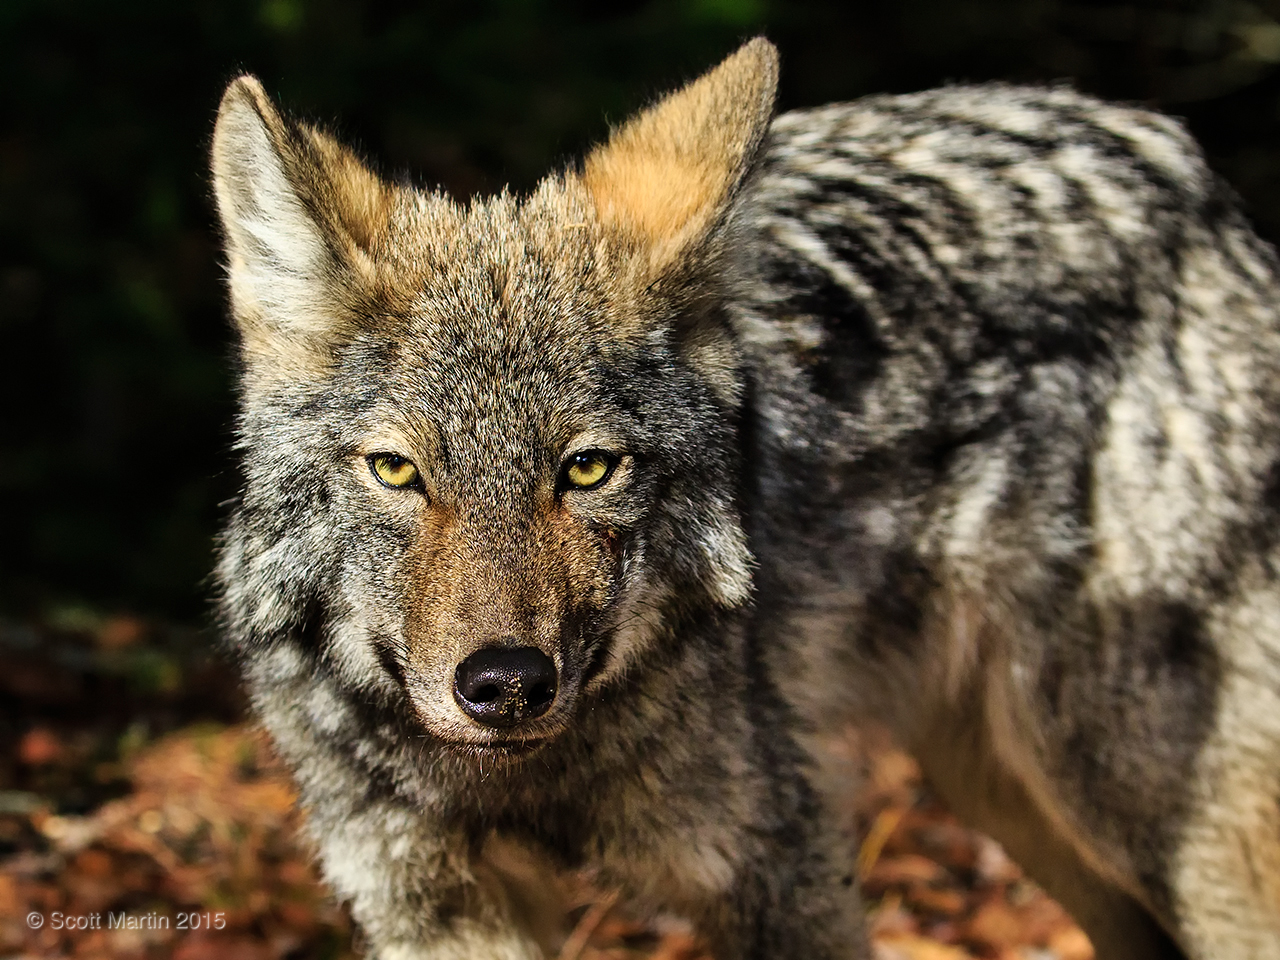
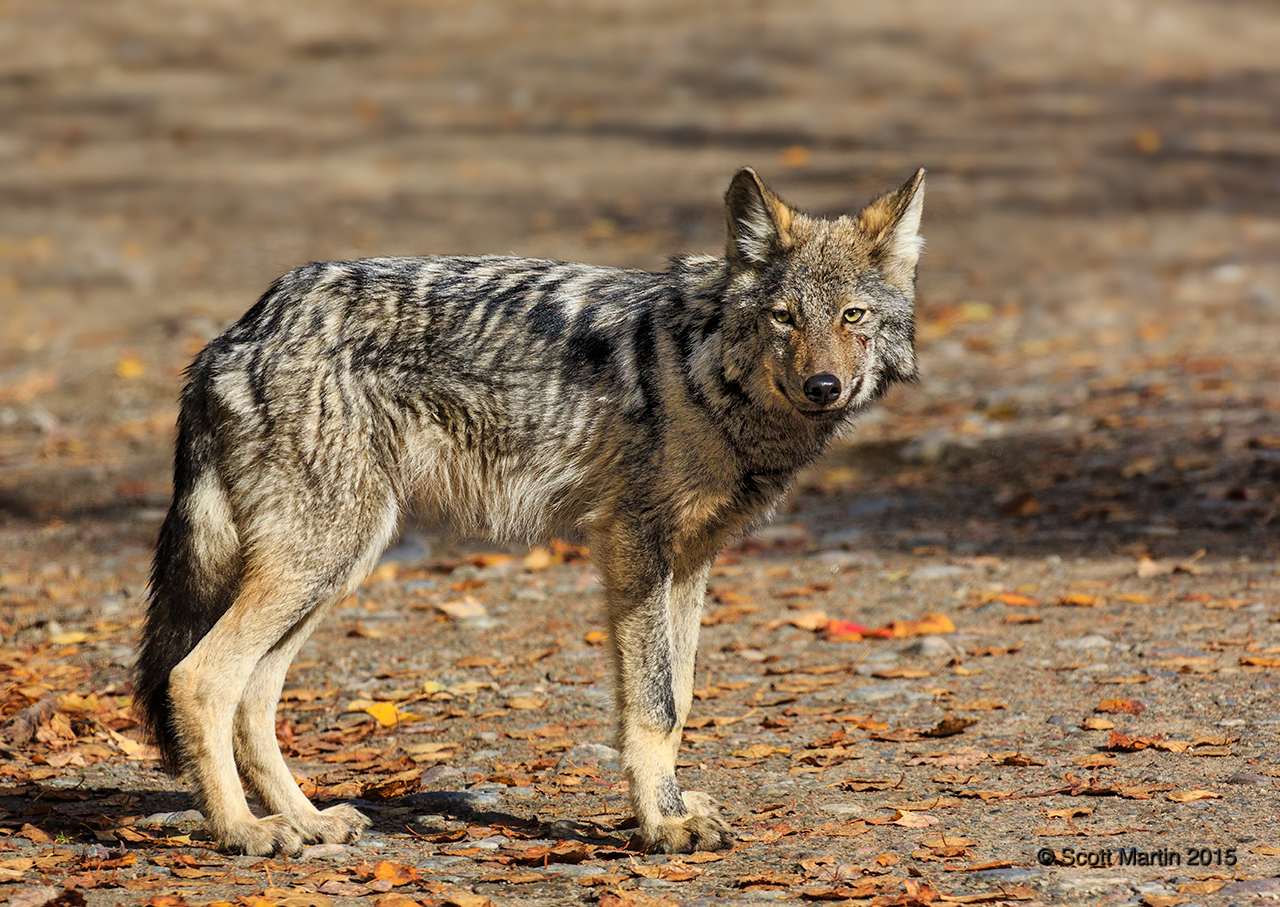
The Eastern Wolf is a member of the dog family and is an important part of the Algonquin Park ecosystem, which is unique to the rest of the province as the wolves of Algonquin are not culled and are protected within the confines of the park. Although Deb and I have spent countless days in Algonquin Park over the years this was the first time either of us had seen a wolf in the wild and it was an unexpected pleasure.
Wolves typical live in packs of five to seven in Algonquin Park. Pack size is usually determined based on the primary food source of the wolves. In the park the wolf’s primary food source is the White tailed deer, which is of a size that can only support five to seven wolves, hence the average pack size in Algonquin Park (the two secondary food sources are the moose and the beaver). In parts of Canada where the primary prey is much larger (i.e. Bison) the packs are greater in number.
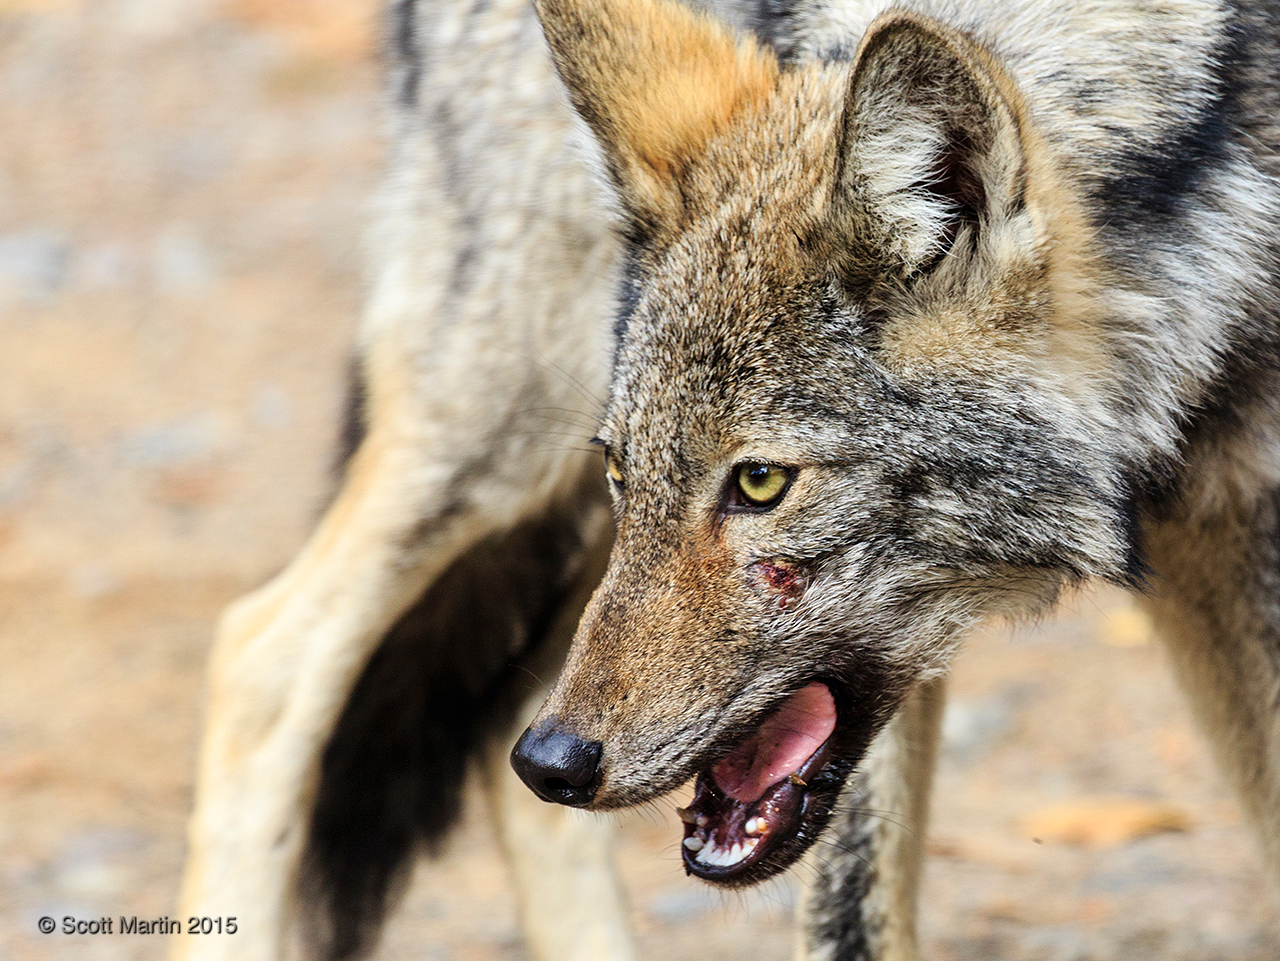
This wolf was probably a lone wolf or sigma wolf. The lone wolf is one who has left the comfort of his or her pack, by choice or eviction. Either way the lone wolf must fend for itself, which makes it difficult, if not impossible, to hunt the White tailed deer. Thus the lone wolf will scavenge for food and often become a nuisance if near a farm or community. Although this wolf has a healthy looking coat, it does appear thin and is probably is less than the average 30 kilogram weight of an Eastern Wolf.
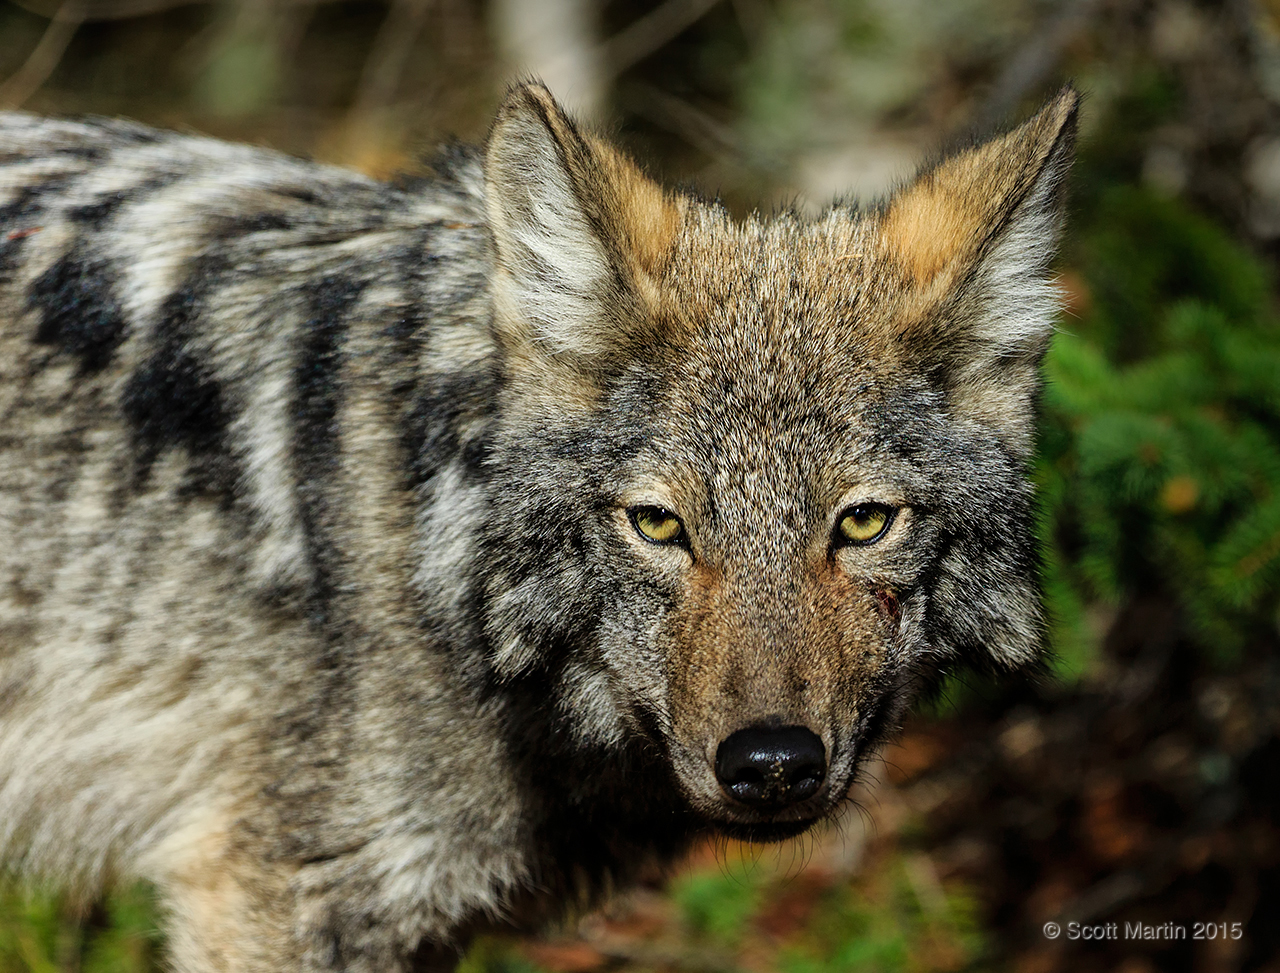
There is often significant discussion and disagreement around the identification of wolves and coyotes and the differentiation between the two. The fact that this animal was seen in Algonquin Park virtually assures that it is an Eastern Wolf and not a coyote. Coyotes tend to prefer more open areas (farming communities) and don’t hunt well in heavily forested regions. They are also preyed upon by wolves when then enter their domain. Having said that, there were coyotes that interbred with Eastern wolves in Algonquin Park, most likely in the mid to late 1800’s when extensive sections of the park were cleared by logging operations, providing a more suitable environment for the coyote than what exists today. So although this animal may contain some coyote DNA it is surely an Eastern Wolf.
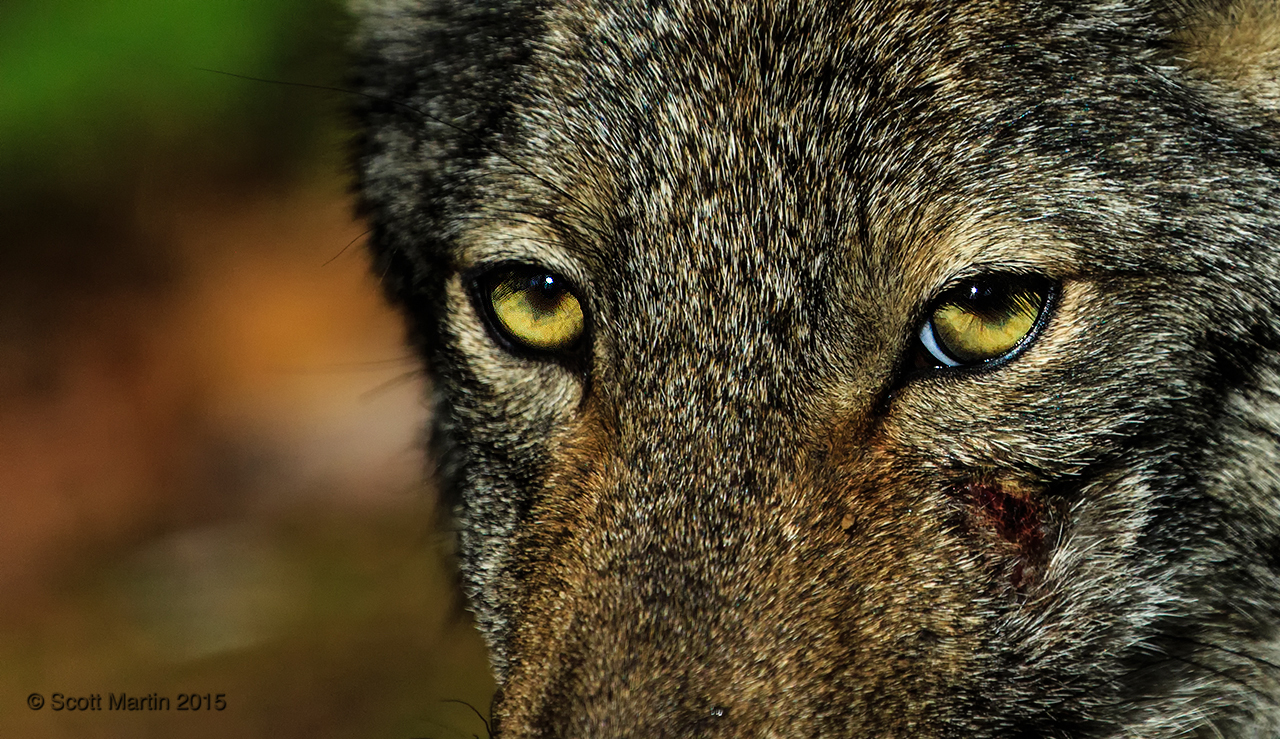
The eyes of the wolf create an intense stare.
.
Wolves will actually migrate during the winter and follow the White tail deer to their winter deer yards. On the east side of the park the deer head to the Round Lake area and are followed by the wolves, where they were vulnerable to being shot by farmers and hunters. Recognizing the human threat to the wolf population, hunting bans were placed in thirty townships surrounding Algonquin Park in order to protect the wellbeing of the wolves.
I trust you have enjoyed this brief look at two of the smaller predators that occupy very important positions within the Algonquin Park ecosystem. As always, your questions, comments and shares of this post are very much appreciated.
Time Lapse Photography is an area of photography that has intrigued me for many years however I hadn’t seriously attempted any until recently. Time lapse photography is a method of compressing a long period of time into a short video of 10-15 seconds. The concept is quite easy; take a few hundred still images over a predetermined time period and then place them sequentially into a video format. That said the technical challenges required to record the images are often difficult and the post processing and video formatting can be quite complex. An impressive final result is only obtained after much practice and lots of time, both to obtain the photographs and to edit and assemble them afterwards.
The purpose of this post is not to get too technical in describing the details however to show a few of my early attempts at producing time lapses and hopefully encourage you to attempt some of your own. Basic time lapse photography does require an investment in gear however it certainly is not cost prohibitive. Besides the camera, you must have a tripod to ensure the camera is completely stationary throughout the recording period and an intervalometer to control the operation of the camera while it takes the photographs from which the time lapse will be compiled (some cameras have internal intervalometers in which case you won’t have to buy one). Advanced time lapse photography allows the camera to move in up to three axes during the recording of the images and although the gear required to accomplish this is expensive the results are impressive.
The easiest time lapses to create are those in which the exposure remains the same throughout the recording period. This first time lapse is of the Muskoka Bible Centre Marina near our cottage. There were 330 images taken at three second intervals over approximately thirty minutes with exposure settings of 1/500 sec, f/2.8 and ISO 50.
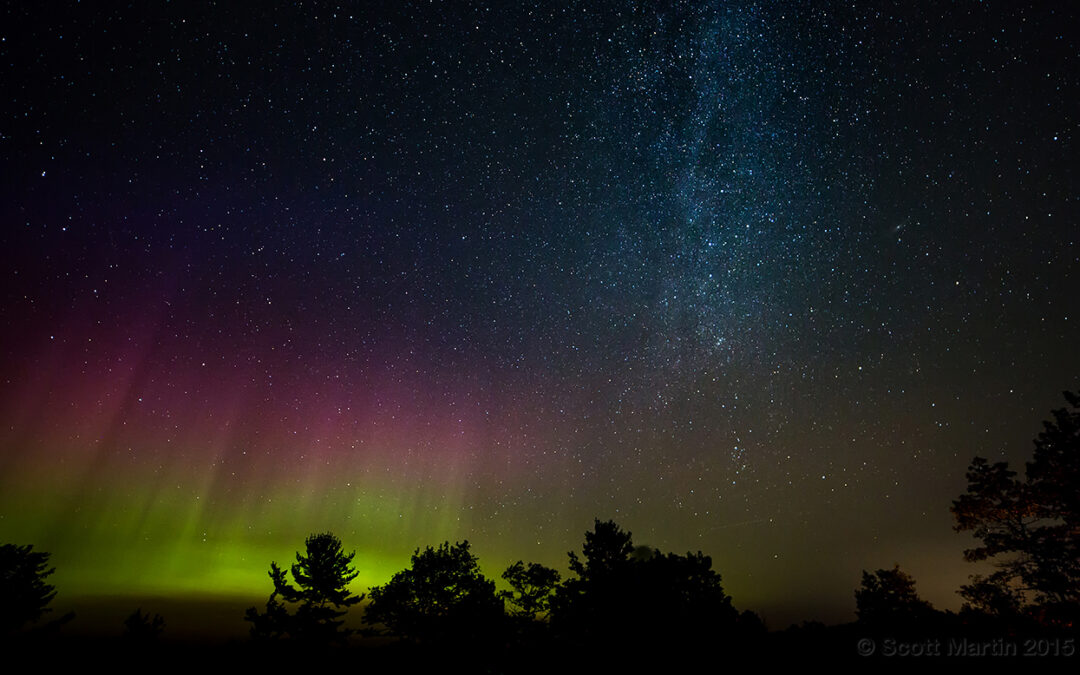
Taking a time lapse at night employs the same technique as during the day however the length of exposure required and the ambient temperature changes create some interesting challenges that must be addressed in order to be successful. This next time lapse of the Aurora Borealis (Northern Lights) and Milky Way is a series of approximately 450 images taken over a four hour period at thirty second intervals at Torrance Barrens Dark Sky Preserve in Muskoka. The exposure data was 25 seconds at f/2.8 and ISO 3200 using a Canon 5D Mk III and 14mm Rokinon ultra wide angle lens. The camera lens was wrapped with three winter hand warmers to keep the lens barrel temperature above the Dew Point in order to prevent condensation on the lens which immediately ruins the time lapse. This time lapse was also recorded at the end of the Perceid Meteor Showers season so if you look close you will see a number of meteor trails.
Most photographers have more than one camera body, so if you get interested in time lapse photography, I would highly recommend setting up two cameras every time out. It doubles your practice opportunity and helps pass the time babysitting two projects while you are trying to stay awake through the night :). This next time lapse was taken at the same time as the previous one, the only difference being the direction the camera was pointed. The first was pointed north to record the Northern Lights while the second was trained on the Milky Way. The exposure data for both time lapses was the same however the Milky Way was shot with a Fuji X-E2 and 8mm Samyang fish eye lens with a 180° field of view which creates the curved horizon. The lens was wrapped with a hand warmer to prevent condensation.
As mentioned earlier the easiest time lapses to create are those in which the exposure remains unchanged throughout the entire duration, as was the case with the first three time lapses in this post. The reason for this is that with any change in exposure from one image to the next, the different exposure causes a noticeable difference in the luminescence of adjacent frames in the time lapse sequence which appears as flickering in the final video. Flicker is the bane of every time lapse photographer and we go to great lengths to get rid of it. You may think that slight changes in exposure from frame to frame would not be noticed but I can assure you it is. We always take exposures manually and fix the aperture so that the diaphragm remains motionless at all times. The micro variability in exposure caused by the diaphragm stopping down to the same aperture for each frame (as it does if you use automated settings for your camera) is readily seen as flicker in the time lapse video.
So what do you do if your desired time lapse demands changing exposures, such as recording the sunset followed by the appearance of the stars? These types of time lapses are very impressive yet technically difficult to create, in fact amongst time lapse aficionados they are known as the holy grail of time lapses. There are a number of methods for creating flicker free changing exposure time lapses and they fall into two broad categories, one in which the exposures are highly controlled in the camera with special intervalometers that allow for bulb ramping and another that uses software solutions to smooth out the exposure changes evenly from frame to frame. To date I have experimented with a few of this type of time lapse, which is just enough practice to get an understanding of how difficult they are to do well (which I have yet to do). I have tried both methods and reluctantly will share a sample of each method.
The first is a sunset to starry night transition using a bulb ramping technique. Bulb ramping is when you connect a highly specialized intervalometer to the camera’s USB port which gives the intervalometer the ability to control the exposure, aperture and ISO of the camera in infinitesimal increments so that frame to frame luminescence variations are not noticeable. You set your camera to bulb mode (meaning the shutter remains open and is controlled by the intervalometer) and the intervalometer ramps up the exposure times and ISO over the course of the time lapse based on light readings from sensors in the intervalometer. Hence the term ‘bulb ramping’. I use a Timelapse+ intervalometer which is a terrific piece of equipment that can be used for any type of time lapses as well as for multi image HDR’s and rapid light sensing triggers for photographing lightning bolts. If you are looking for the ultimate intervalometer, look no further than the Timelapse+.
This was taken at the cottage and not an ideal location for a starry time lapse as there is quite a prominent light dome created by the town of Huntsville approximately ten kilometres away. The bright ‘star’ that dominates the dark sky is actually Venus, the brightest object visible in the sky that night.
The above time lapse was made from approximately 520 images over a 4.5 hour period during with the intervalometer modifying the exposure time, ISO and interval between exposures. The exposure times ranged from 1/20 sec to 30 seconds. The ISO varied between 50 and 4000 while the aperture was fixed at f/2.8 (Canon 5D Mk III & Rokinon 14mm lens).
The second sunset to night transition was taken from our hotel balcony in Percé, Quebec this past July. For this time lapse I manually changed the exposure time and the ISO during the recording of the images. The aperture was fixed at f/4. As a general technique I began the time lapse overexposing approximately one stop and would manually decrease the shutter speed or increase the ISO when the camera meter indicated the scene was one stop underexposed. This resulted in approximately six to eight ‘major’ exposure changes over the four hour period I was recording the time lapse. The images were captured with a Canon 5D Mk III and EF 24-105mm f/4 L IS lens and processed using Adobe Lightroom and a fabulous programme called LRTimelapse which is designed to process time lapse images and render high quality video files of the time lapse. There is a bit of a learning curve to the software but once you understand how it works the results are incredible. In fact I almost deleted all of the images from this project before processing them as I was so unhappy with the results, but decided to give them a try with LRTimelapse. I was more than impressed with the results as the original work product was very poor.
At this point, there is much learning and practice to be done to improve in the area of time lapse creation, however its a fascinating niche within photography that has attracted my intention and I hope to produce many more. Over the short term my intent is to utilize both the software and bulb ramping techniques for day to night transitions as well as hopefully adding one, two and then three axes of motion into the mix.
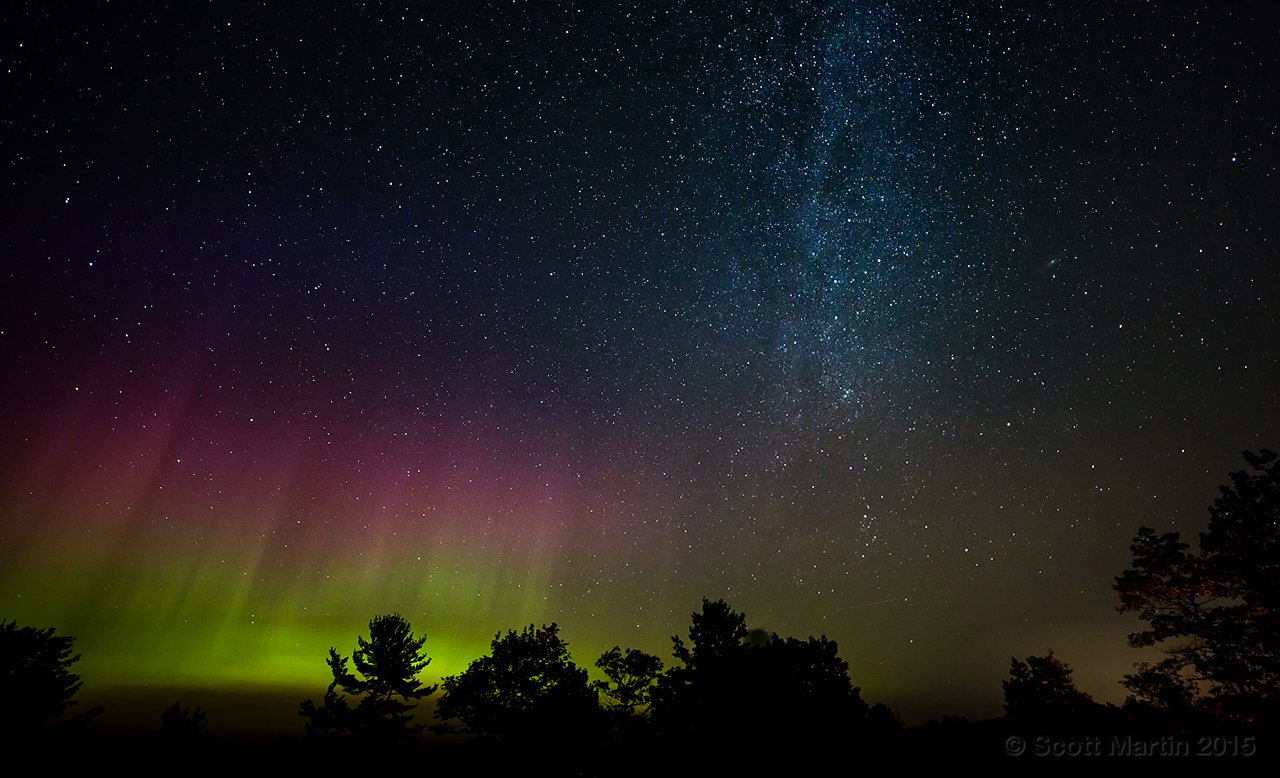
When you have finished recording the 300-500 images required to produce a time lapse video there are some added bonuses to be had from the individual frames. For one, there should be a few good frames amongst the many which stand alone as an acceptable image or print. Here is one frame from the Aurora Borealis time lapse above.
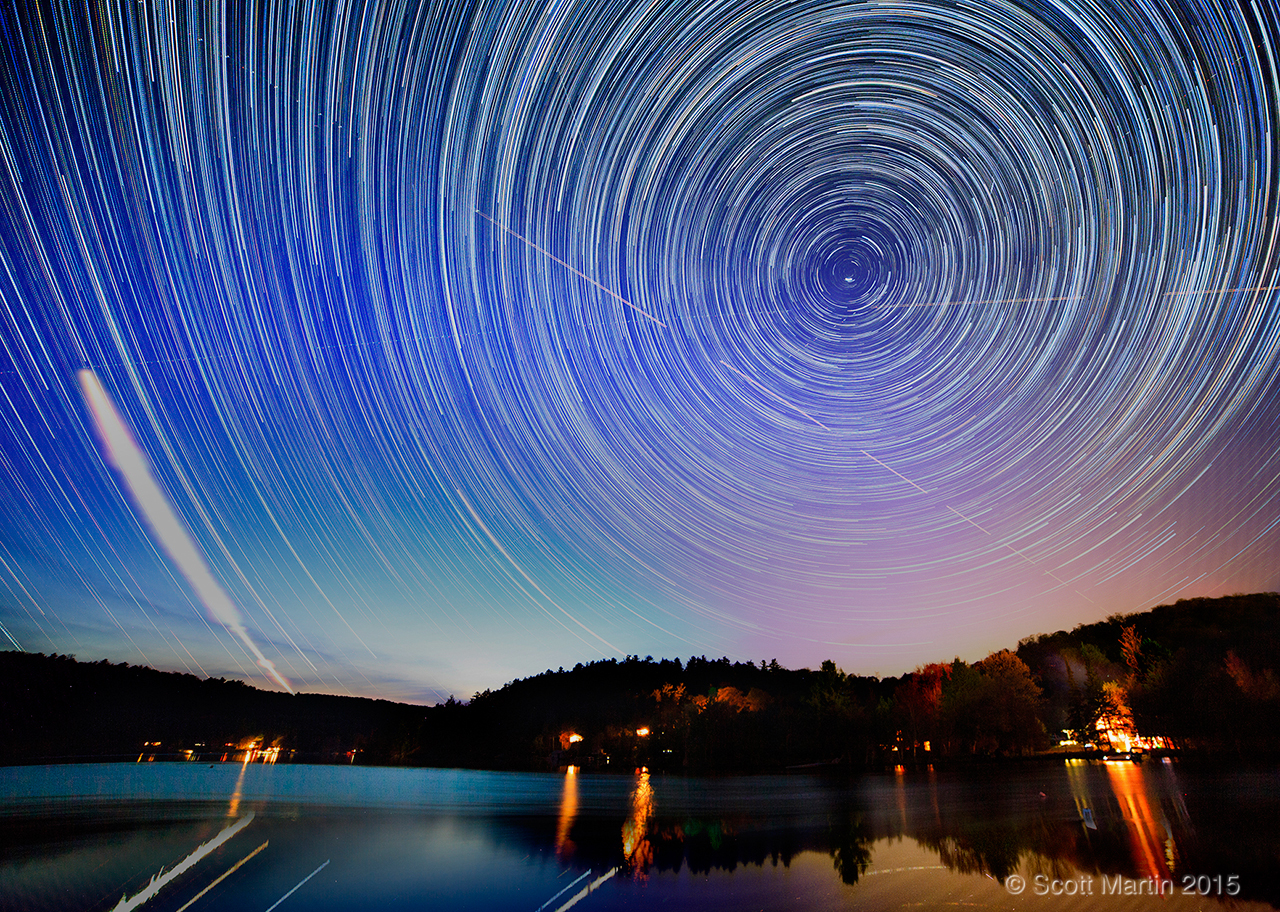
Another interesting possibility, made easy with Adobe Photoshop, is to ‘stack’ all of the images from the time lapse into one single image. Although this creates a gargantuan file, the movement of the stars over the recording period create star trails when stacked into the same image. As all the stars in the Northern Hemisphere revolve around the North Star it makes for a very interesting result as seen by this stacking of 530 images into a single image. These are the images from the Mary Lake Sunset to Night Sky Time Lapse.
I trust this brief introduction to the world of time lapse photography has piqued your interest enough to give it a try. Beside your camera all you need is a tripod, an intervalometer and a big memory card to record all those images….oh wait….and a pot of coffee to keep you warm and awake while you stay up all night photographing the stars!
Well we find ourselves in the middle of September and realizing that another summer has slipped away seemly a little faster than the one that preceded it. For me also came the sad realization that there has not been a blog post on this website since May which certainly wasn’t by design. I will do my best to get caught up processing the images that have been taken over the past few months, starting with the Loons that Deb and I had the privilege of photographing in Algonquin Park in June of this year.
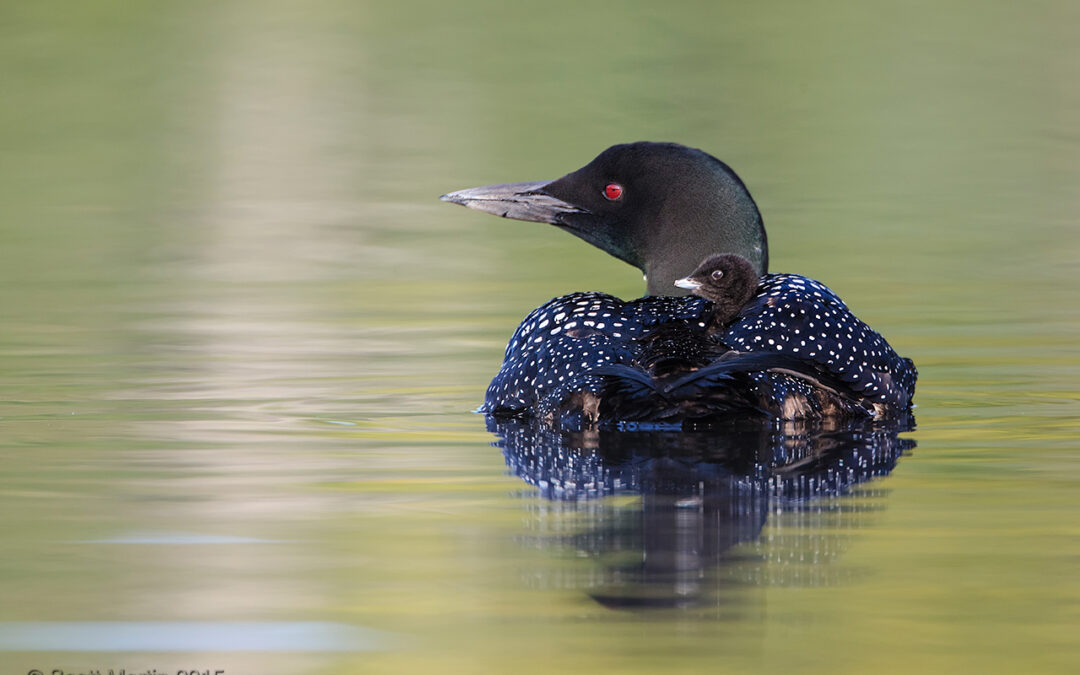
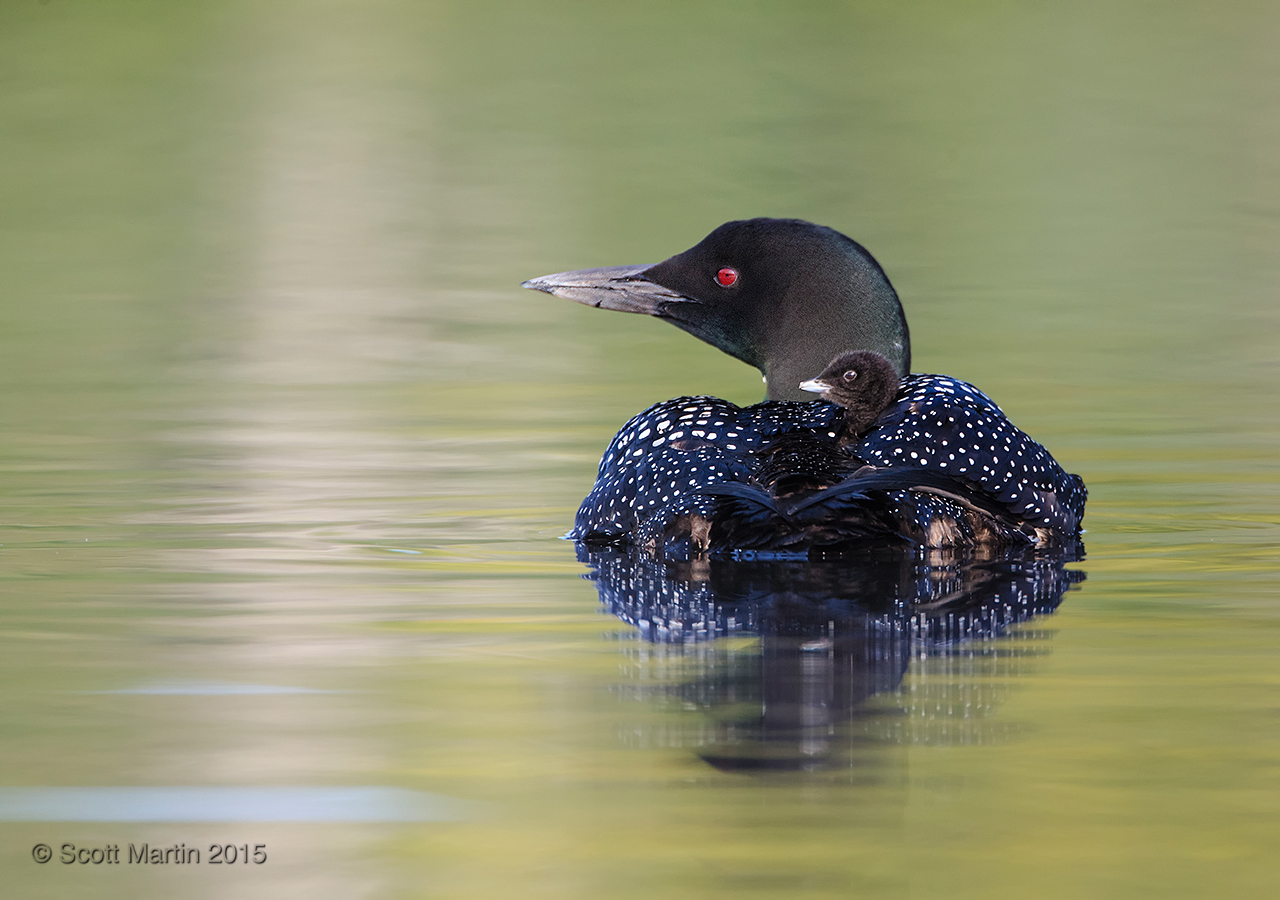
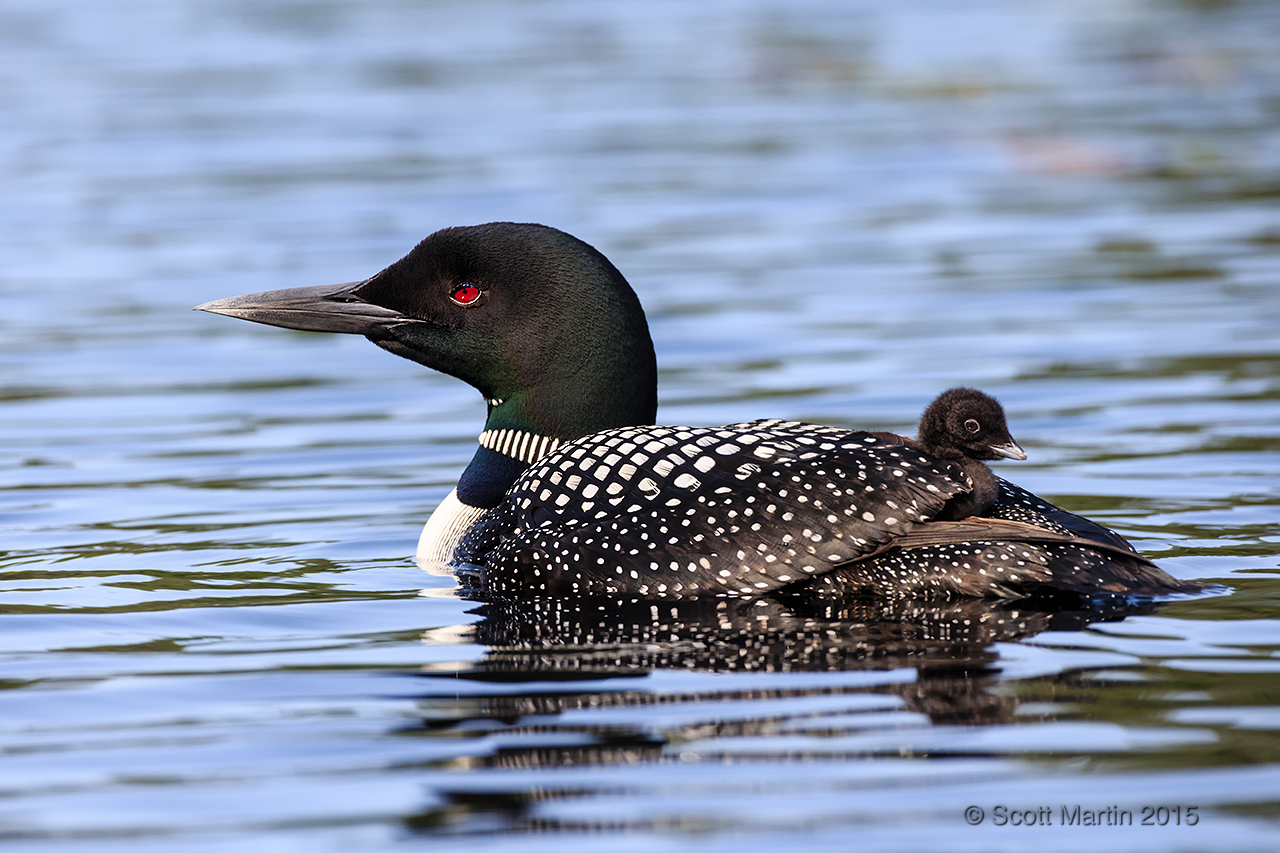
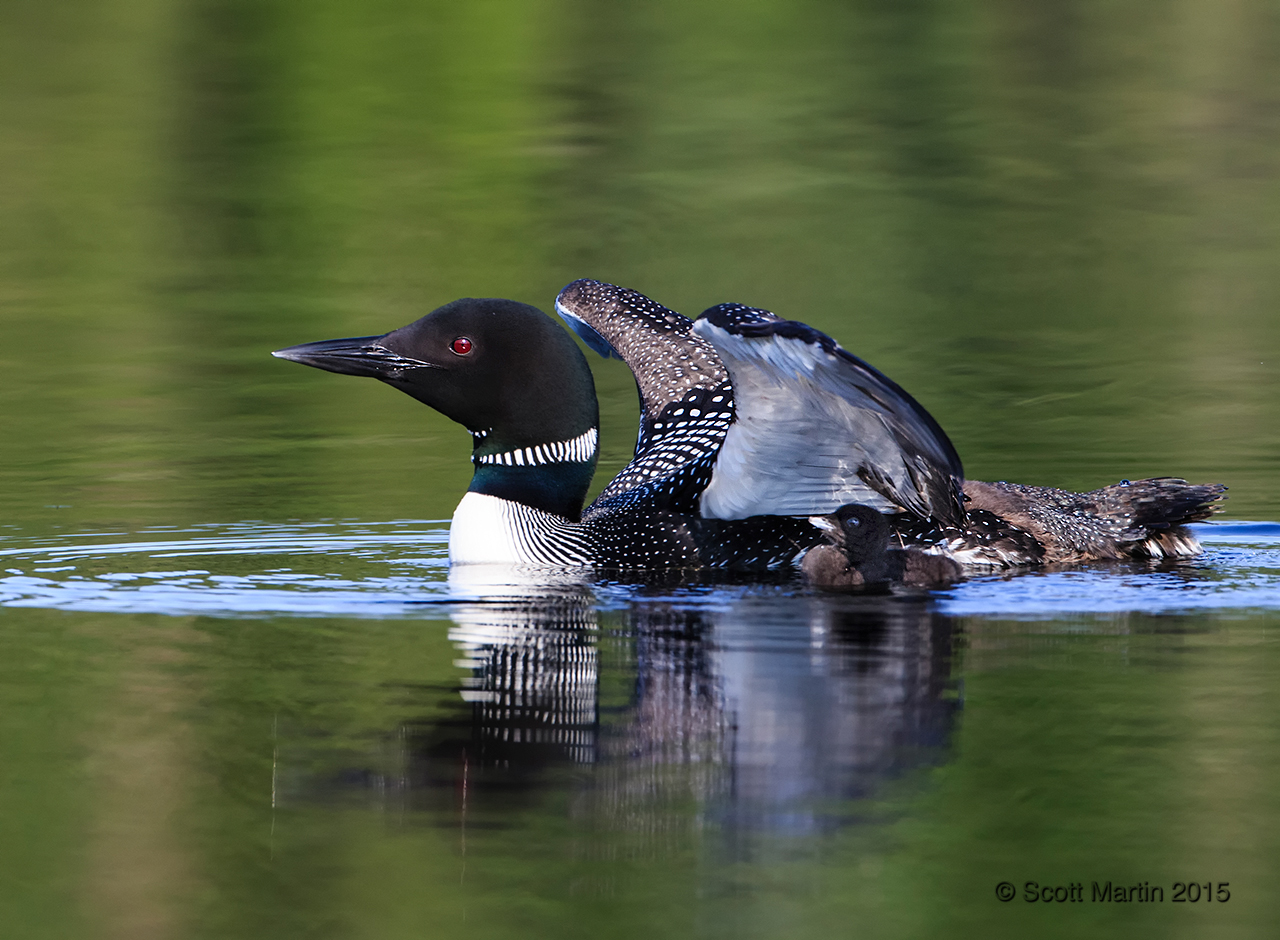
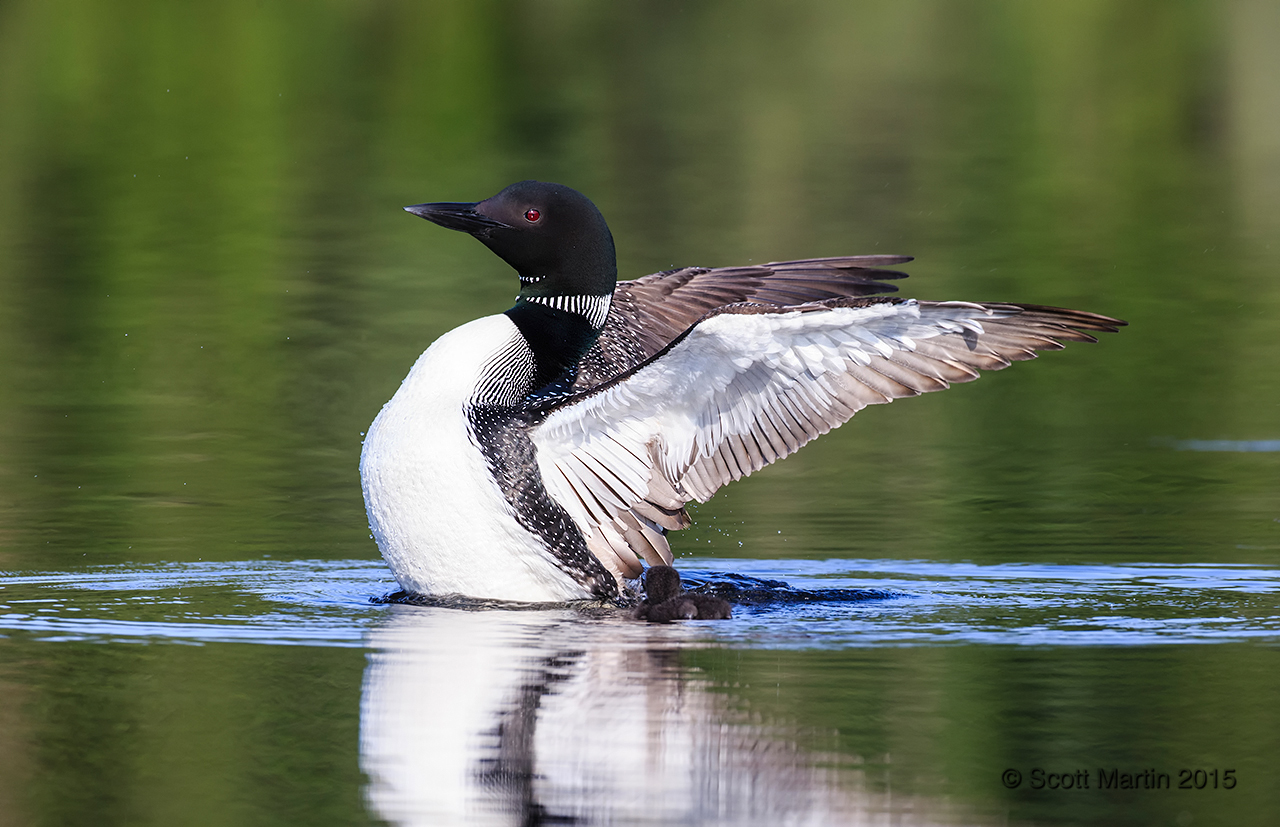
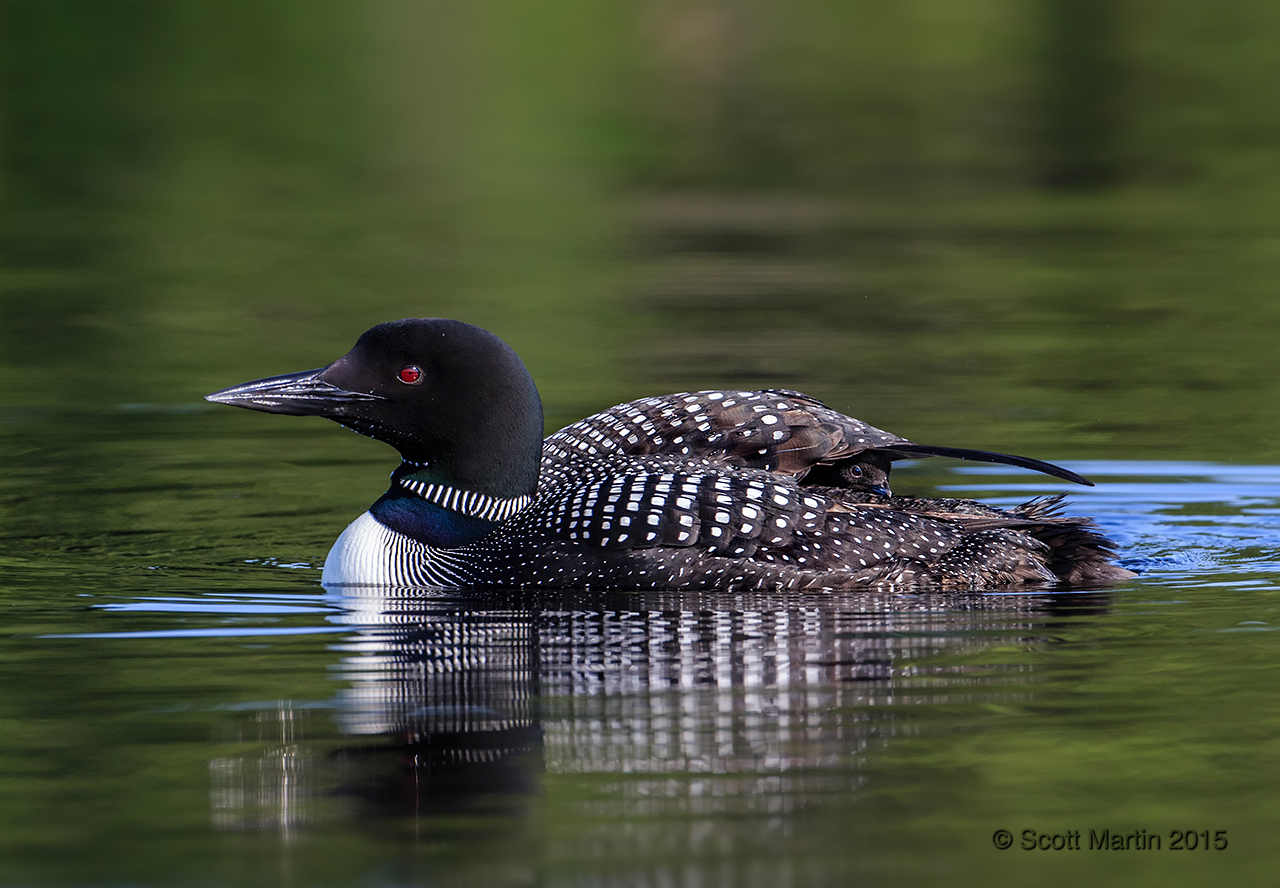
There is nothing ‘common’ about the Common Loon. One of our country’s favourite birds whose presence on our dollar coin provides its nickname; the Loonie. Deb and I have been following nesting Loons in Algonquin Provincial Park for a number of years now and this year it was a pleasure to time our trip perfectly to be able to capture some photographs while the babies were still small enough to enjoy riding on the parent’s back.
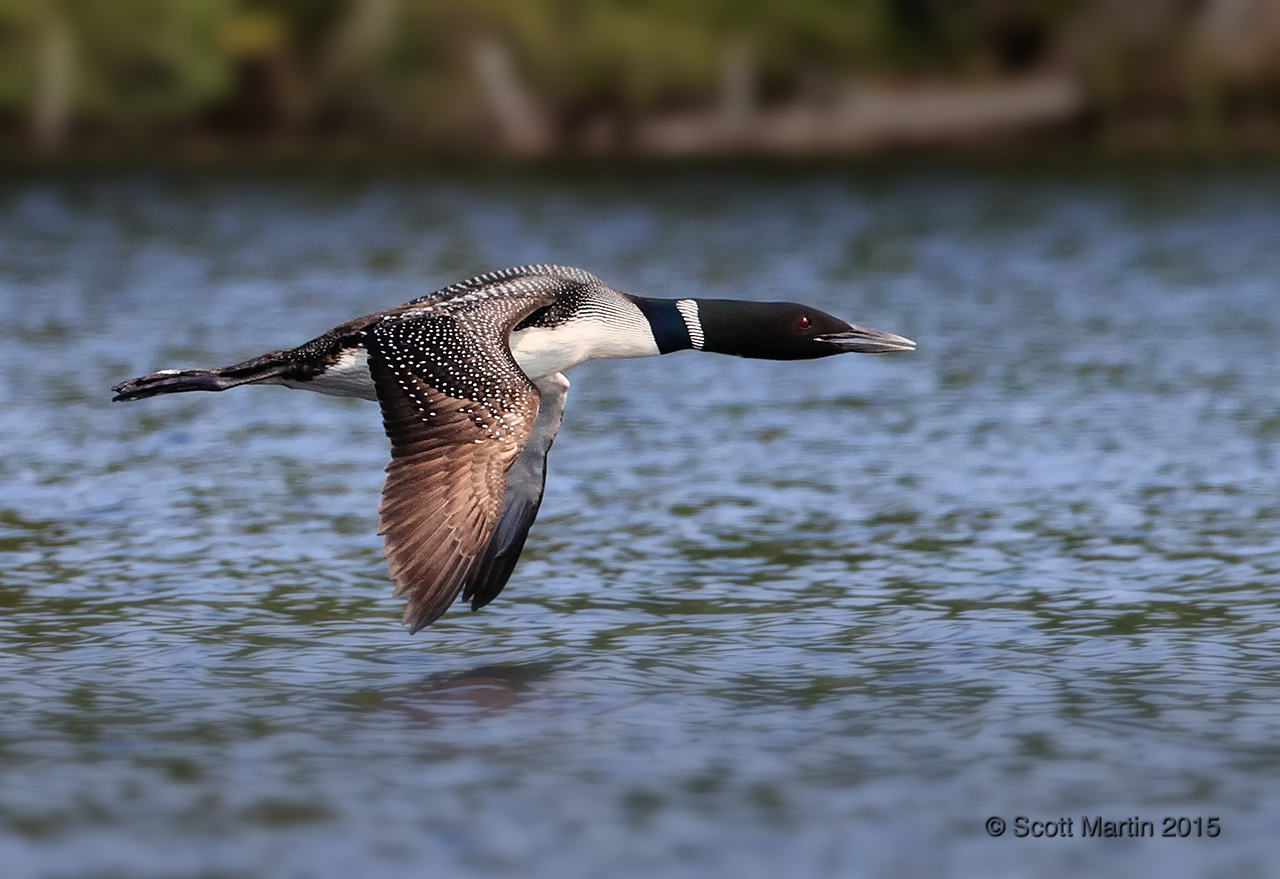
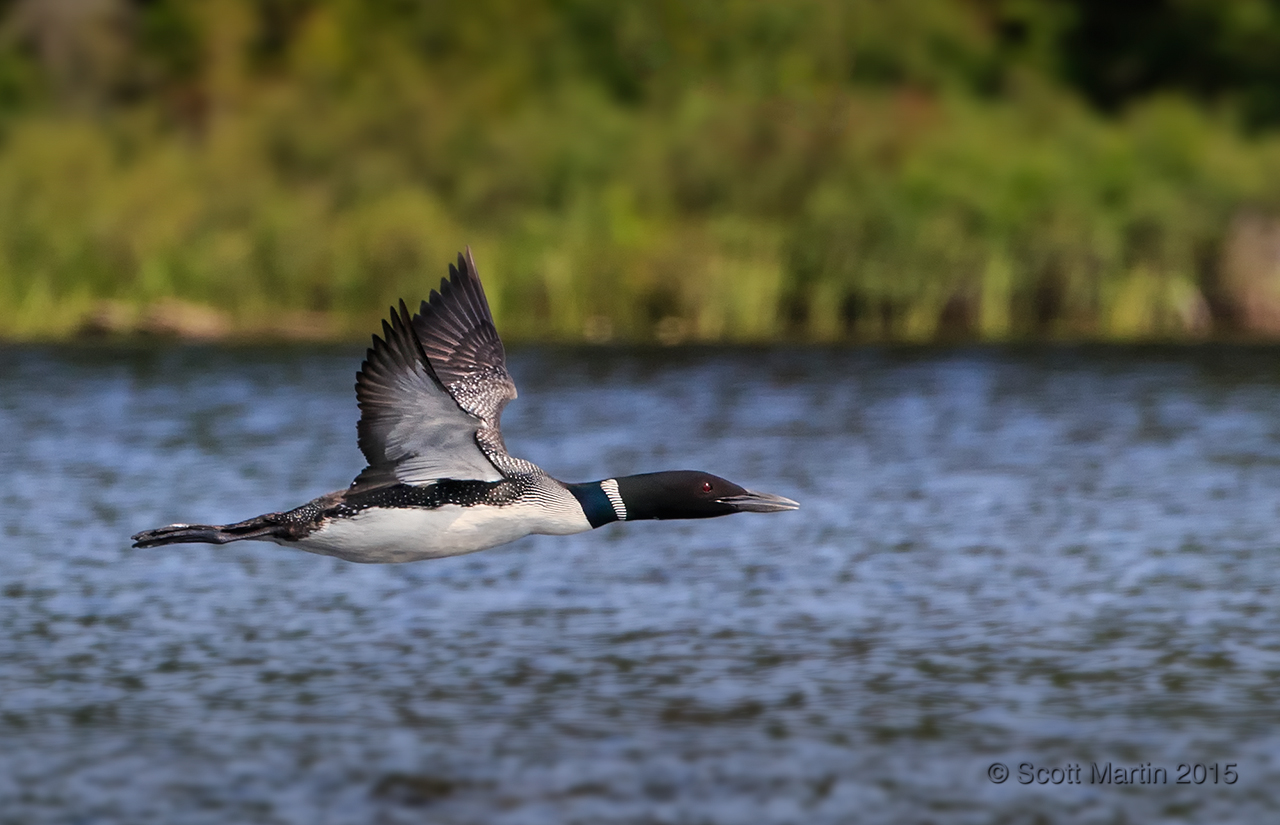
All of the images in this post were taken handheld from a canoe, providing a nice low angle of incidence which is appealing for bird photography.
Early morning is the best light for photographing Loons with the low sun highlighting their deep red eyes and typically the waters are calm making for nice reflections. The green back ground is created by the reflection of the shoreline vegetation on the water and when possible it is always a good idea to position yourself to create different combinations of lighting on the bird and back ground colour. The effects can be dramatic. These next two images are of the same Loon with a very different look due to the back ground colour.
.
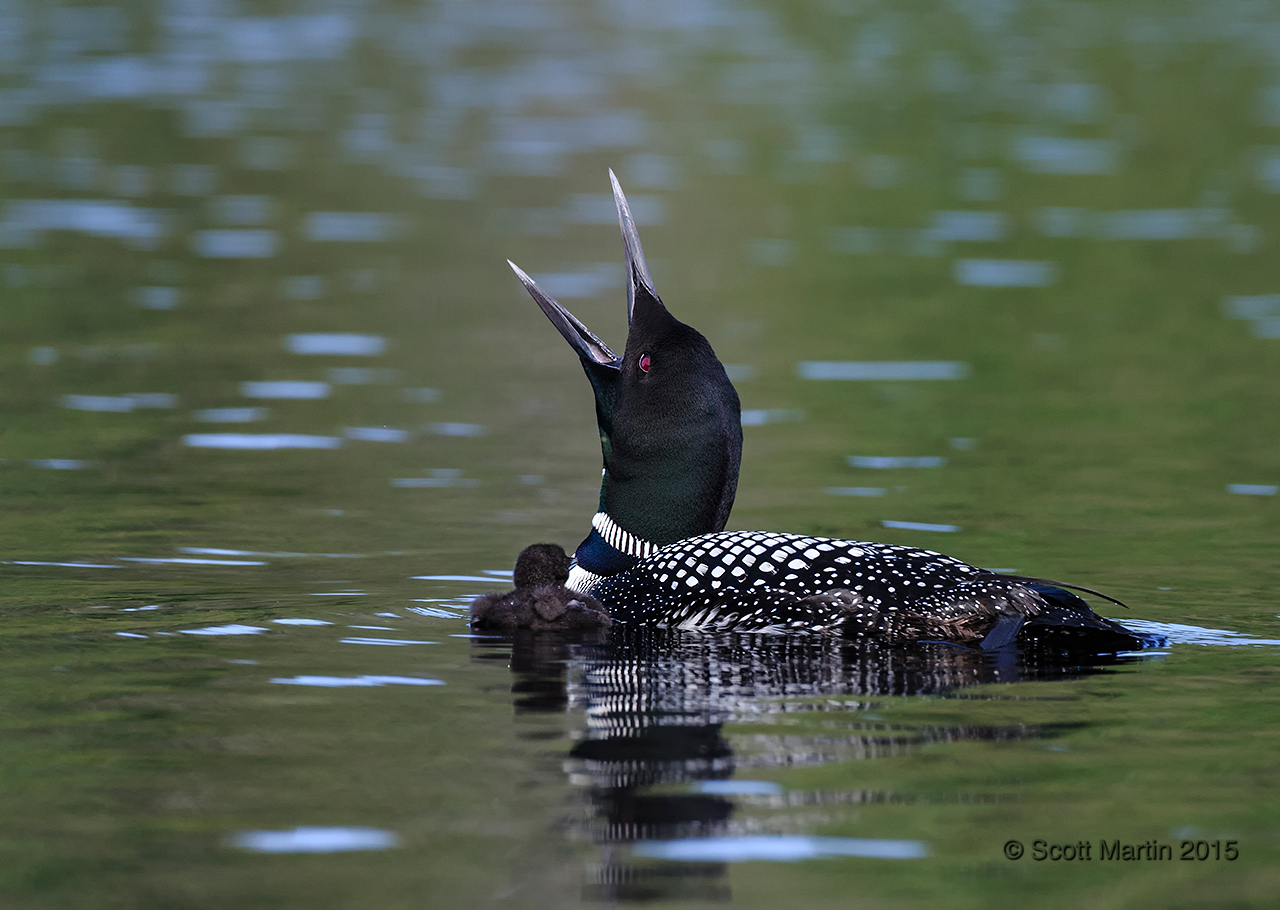
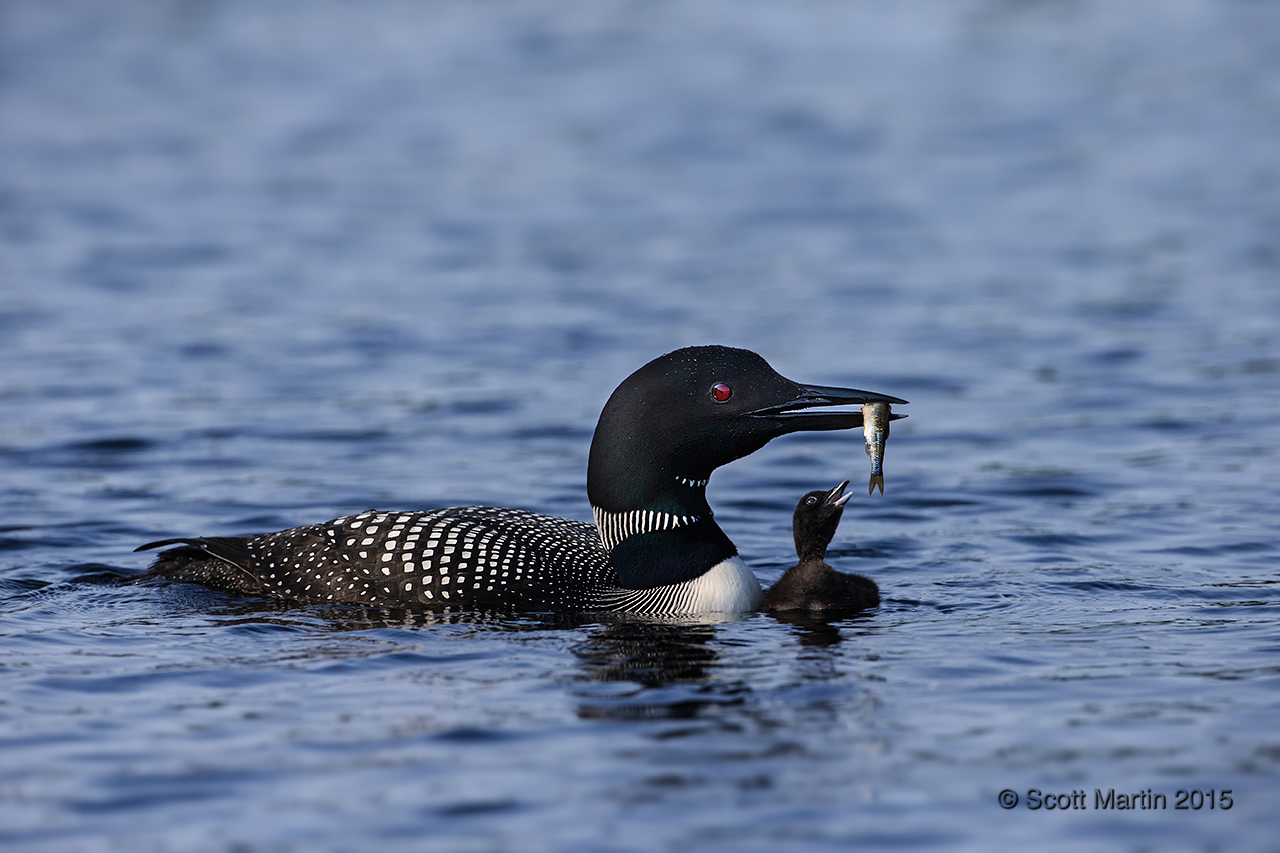
Common Loons are a pleasure to watch and hearing their distinctive calls is like no other bird. The following images are an attempt to capture the activities of these beautiful birds.
.
.
.
.
As hinted in the title of this post, this Loon photography excursion was also the first practice session with a new camera body; the Canon 1Dx. This particular body is design optimized for sports and wildlife photography or any activity where you are attempting to capture objects moving quickly through the field of view. It accomplishes this by having a very high frame rate. The 1Dx is capable of taking exposures at 12 frames per second in RAW format and 14 frames per second in JPEG format. This makes the camera ideal for photographing birds in flight and I was glad that a Loon obliged us with a fly by close to our canoe. Here are two in flight captures of the Loon taken with the 1Dx and Canon EF 500mm f4 IS lens, handheld from the canoe which is quite a challenge, however like anything, practicing enhances the results.
.
Now that I have upgraded to the new camera, my Canon 1D Mk III is up for sale and if any of you are looking for a great camera body and looking to move up to a professional grade body, this could be the perfect opportunity for you. It comes with all the original packaging and is looks just like it did when it was brand new. Send me an email if you are interested and I will send the details and pics of it. The 1D Mk III is a 10 frame per second, 10 megapixel camera.
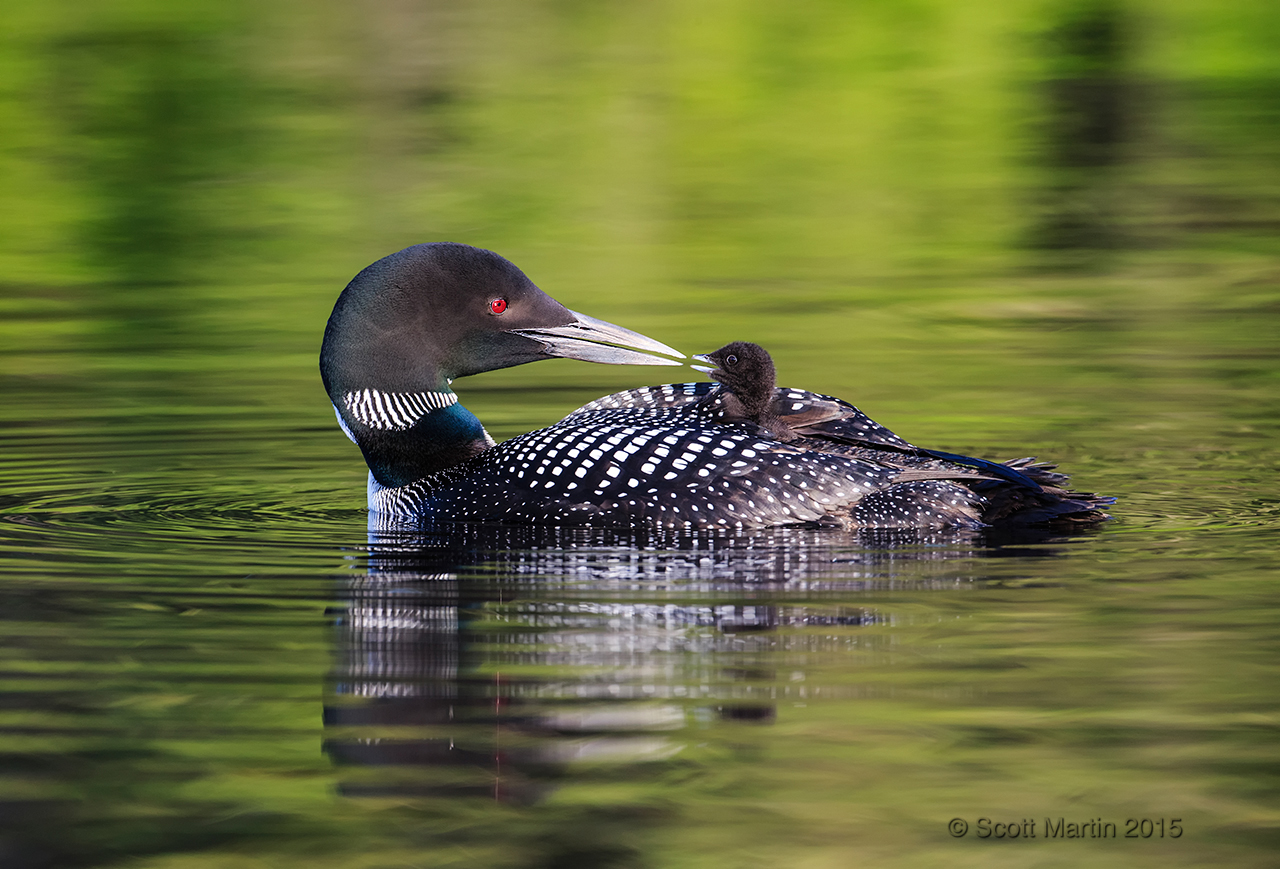
Sometimes when you take a lot of pics you get some pleasant surprises when processing the images. This next image, and the last one in today’s post, is one of those shots and its become my favourite photograph from our morning with the Loons. The reason being, I didn’t notice the day old chick poking its head out from under the protective cover of mom or dad’s wing until seeing the image displayed on the monitor. I trust you enjoy it as well.
Peek-A-B00
There are a number of other Loon images from our day in Algonquin Park posted in the Loons & Grebes Gallery as well as Loon photographs taken at other times.
Thanks for taking time to work through this post and as always your comments are welcomed.
More than a couple of months ago, when the mercury was hanging around in the mid -20°C range I met up with my good friend and fellow bird photographer Arni long before sunrise and headed towards Niagara Fall’s for a day of winter photography. If you have never ventured out with your camera in the dead of winter, I would highly recommend that you give it a try. There are a few minor technical challenges the cold presents, with reduced battery life and condensation when bringing the gear back into a warm temperature being the primary ones, however these are easily dealt with. Take spare batteries with you and keep them in pockets close to your body to keep them warm and before taking the cold gear back indoors, make sure you pack lenses and cameras back into their cases and don’t take them out until you’ve allowed enough time for the gear to reach room temperature. I always take the CF cards out of the camera while outside so I can start processing the day’s work without waiting for the gear to get re-acclimatized to the house temperature! By far the biggest challenge in winter photography is keeping yourself warm, so always have lots of layers of good clothing, warm boots, gloves and head coverings. A supply of hand warmers always comes in handy.
We arrived at a cemetery in Burlington before sunrise looking for Eastern Screech Owls, where both red morph and the more common grey morphs have been known to nest. We were unable to find the owls so headed on to Niagara Falls and arrived at Dufferin Island which is about a kilometre from the brink of the Horseshoe Falls and home to many birds.
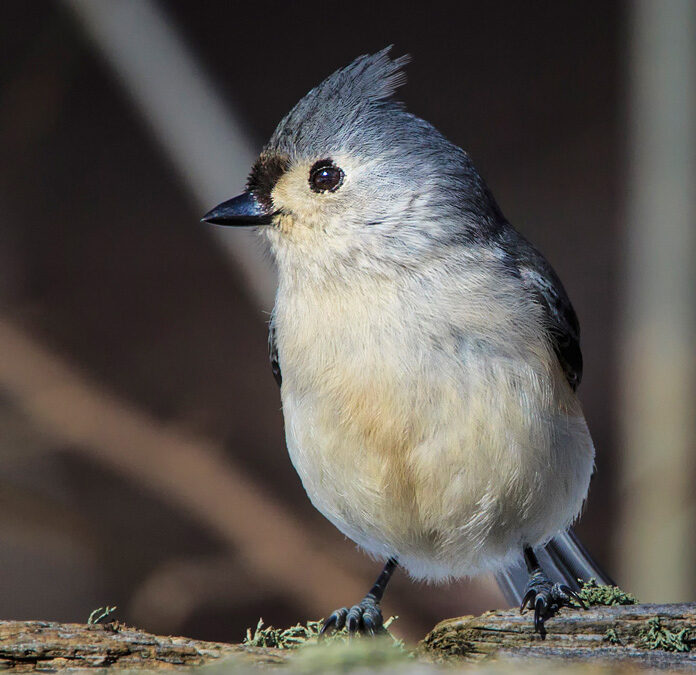
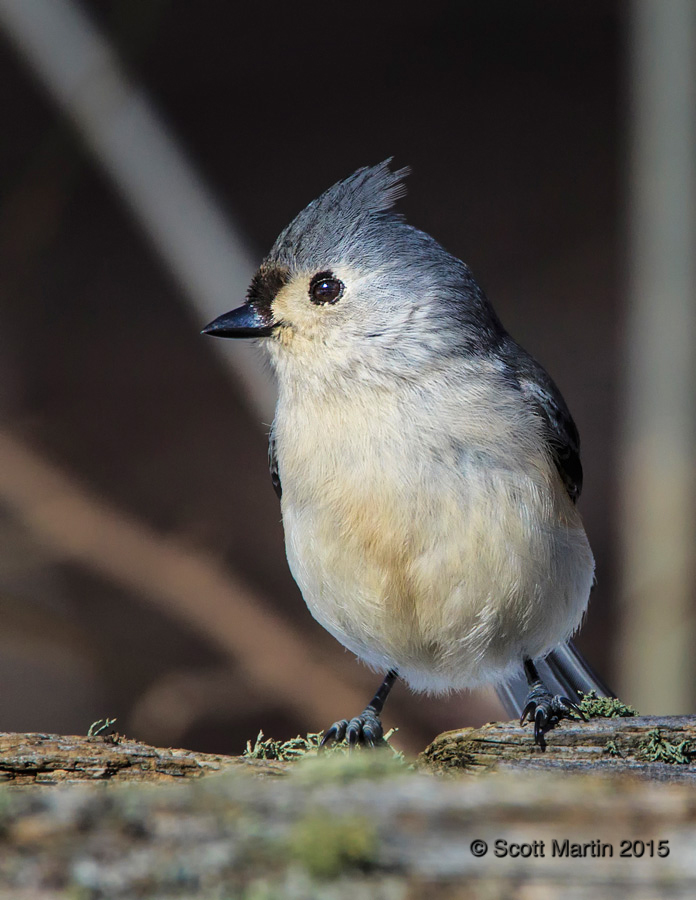
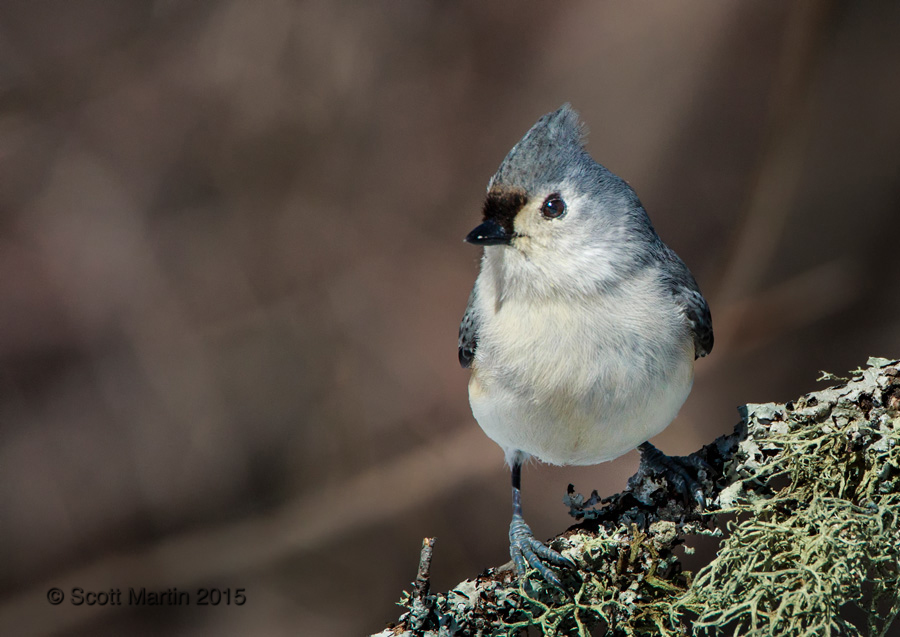
The primary bird we were looking for was the Tufted Titmouse, a non-migratory bird whose historic range was in the central and eastern United States, however as winter food supplies have become more available, the Tufted Titmouse has been slowly moving its range northwards into Canada, primarily in the eastern Great Lakes region. The Titmouse prefers a wet climate and in fact you only find them in areas with more than 24″ annual rainfall, and even more common in areas with 32″ or more of annual rainfall. The Tufted Titmouse rarely ventures more than two kilometres from the nest in which it was born (which accounts for why the expansion of their range takes place very slowly).
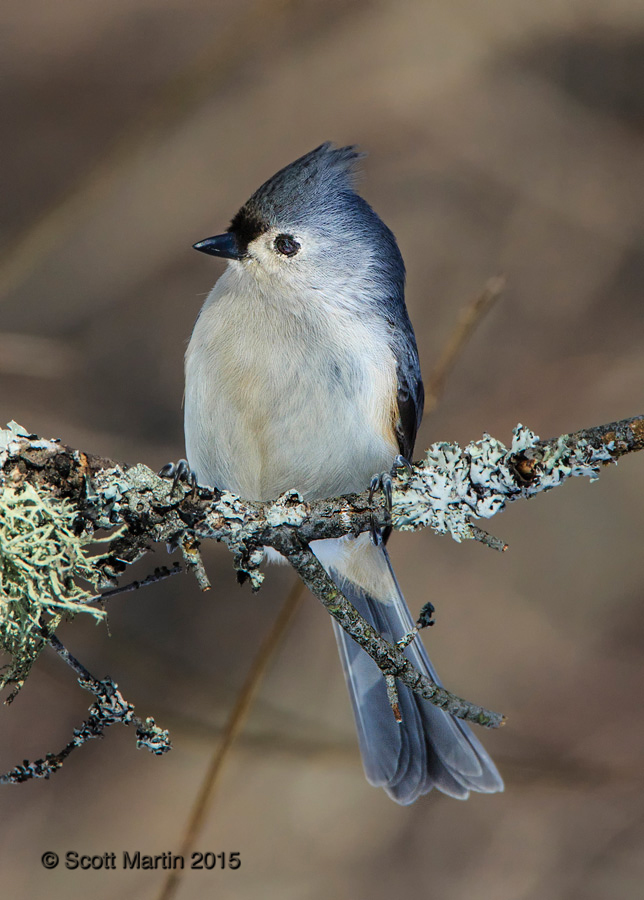
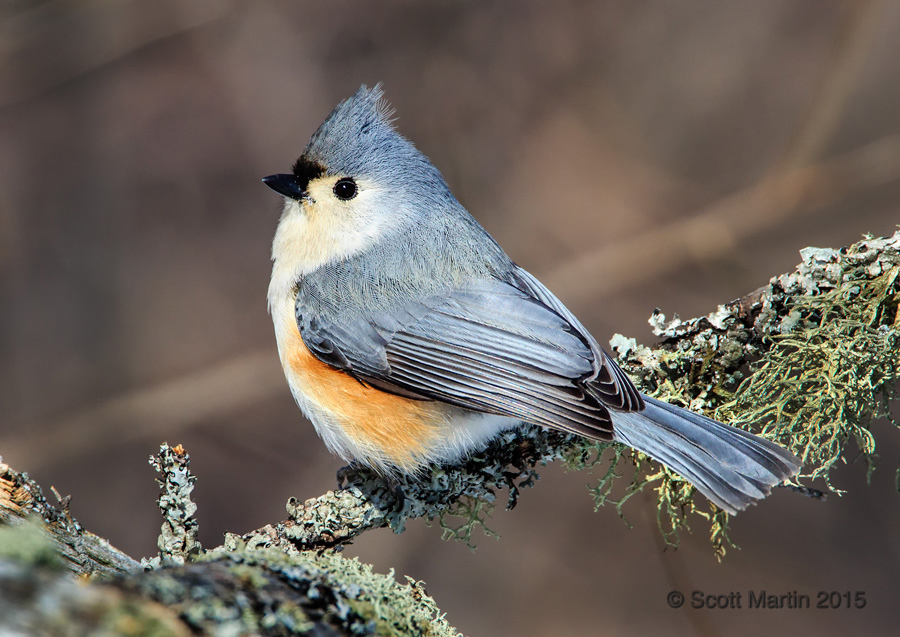
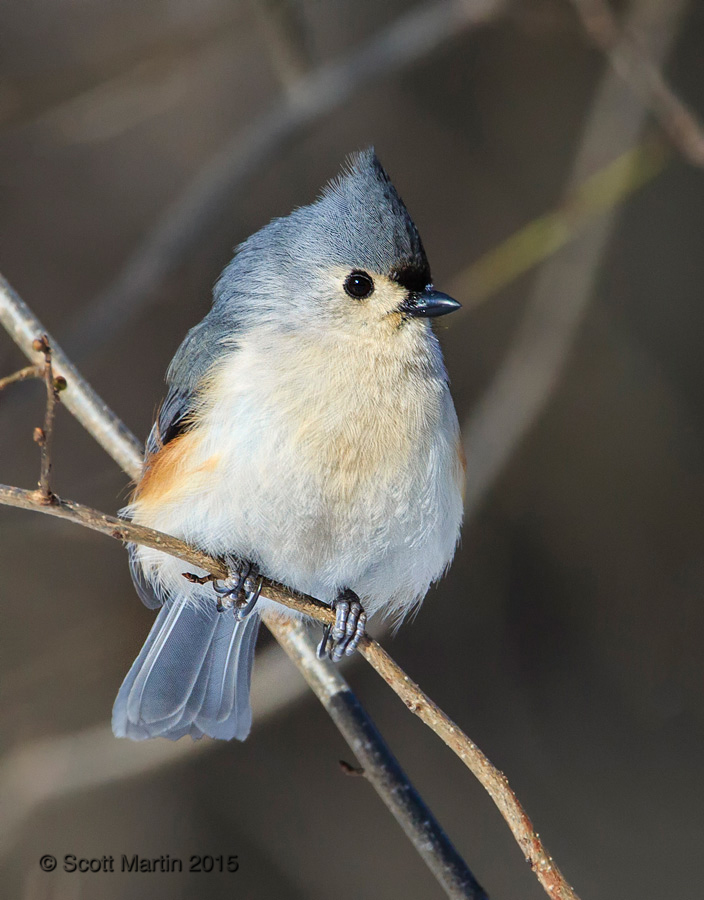
Soon after picking a location on the island where the light and back ground were both ideal, we were able to attract a number of these beautiful birds with a little bird seed (there are numerous feeders in the area that are maintained through the winter months to ensure adequate food for the local birds). We were able to get a few decent images of the Tufted Titmouse. The following images were taken with a Canon 5D MkIII and 500mm f/4 lens (some with an attached 1.4x TC for an effective 700mm focal length). As much as possible I tried to use an aperture of f/8 or greater in order to provide enough depth of field to keep the whole bird in focus….at least in profile!
The Tufted Titmouse is the largest of the Titmouse family and they are easily recognizable by their crest and black patch above the upper mandible.
Their colouring is relatively subdued although mature adult birds have a golden yellow flash along the sides of their chest. Juvenile birds lack this colouration.
The appearance of the males & females is very similar, so differentiation between the two is difficult.
The normal diet of spiders & insects is not available in the winter months so the Titmouse release on seeds and frozen berries in the winter. The presence of winter feeders is important for them in the winter as they are non-migratory birds.
The above image was taken at f/10 in order to get as much depth of field (DOF) as possible to keep the whole bird in sharp focus. With long telephoto lenses the DOF is very thin even at small apertures; in this case about 4cm (700mm focal length with a full frame camera at about 25′ away from the bird). I really needed an even smaller aperture as the tip of the tail appears soft. The next image was also taken at f/10 which is OK as all of the body of the bird is within the DOF so everything is sharp. Managing DOF with telephoto lenses is one of the most important factors in getting great photographic results yet is often overlooked by many. Fortunately with today’s cameras that are so good at high ISO’s it is much easier to balance the tricky relationship between shutter speed, aperture & ISO in order to get the best possible results.
It was a cold but beautiful winter day in Niagara and we were treated by a number of other birds who provided some great poses for Arni & me. Here are a few of them.
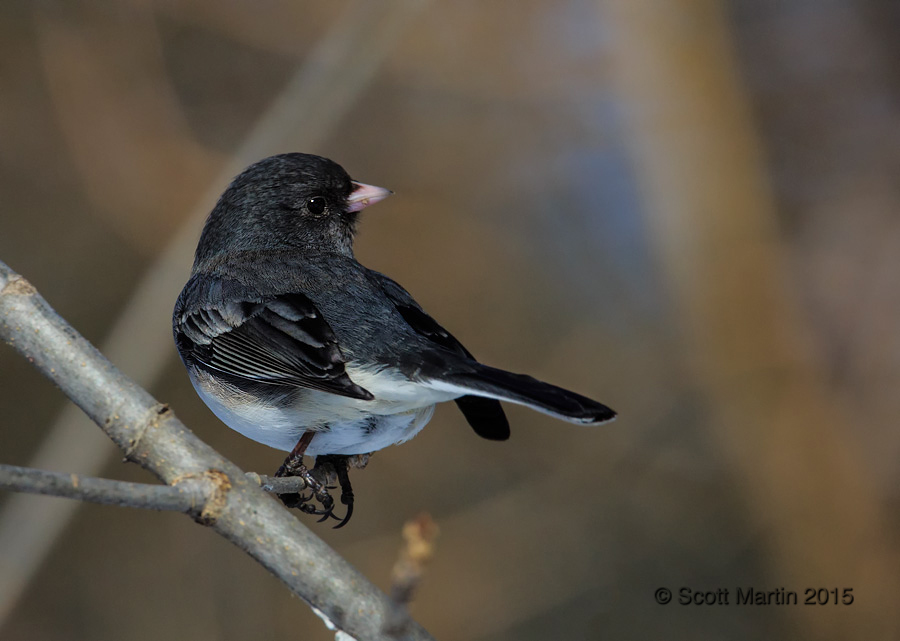
A Dark-eyed Junco with an over the shoulder look.
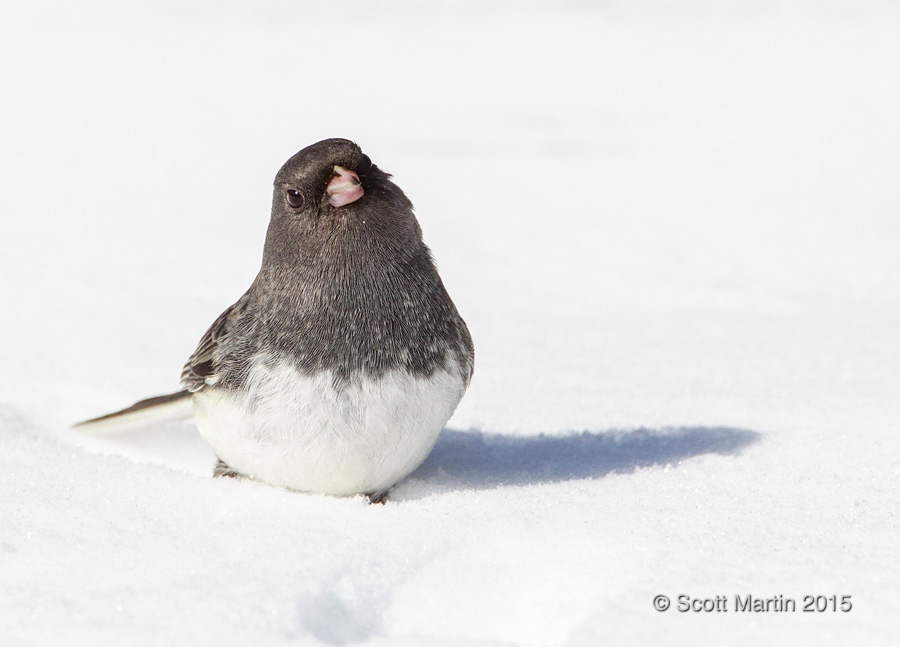
….and another Junco enjoying the snow.
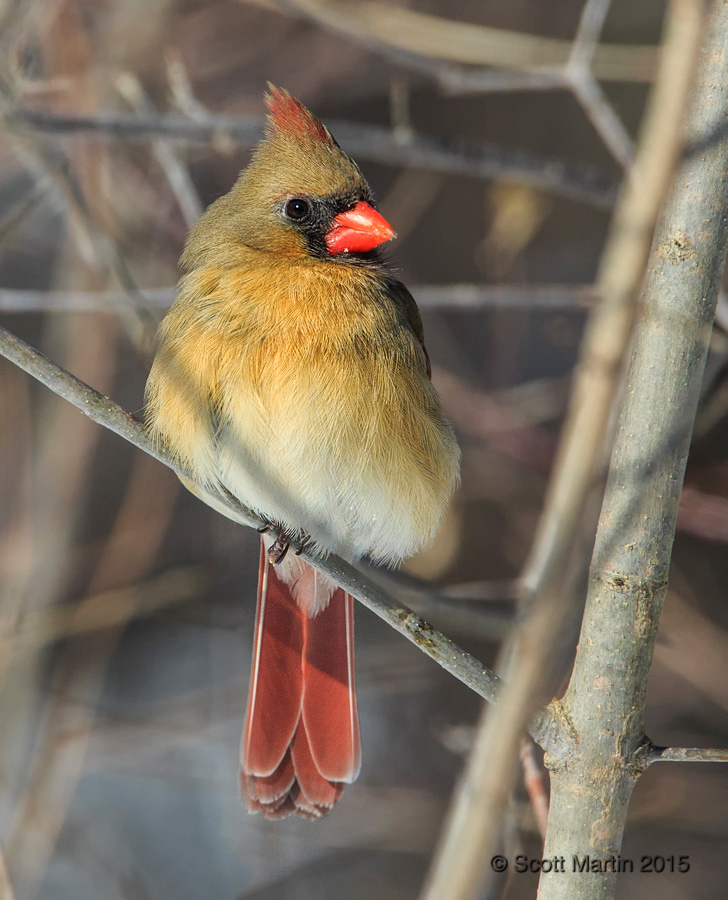
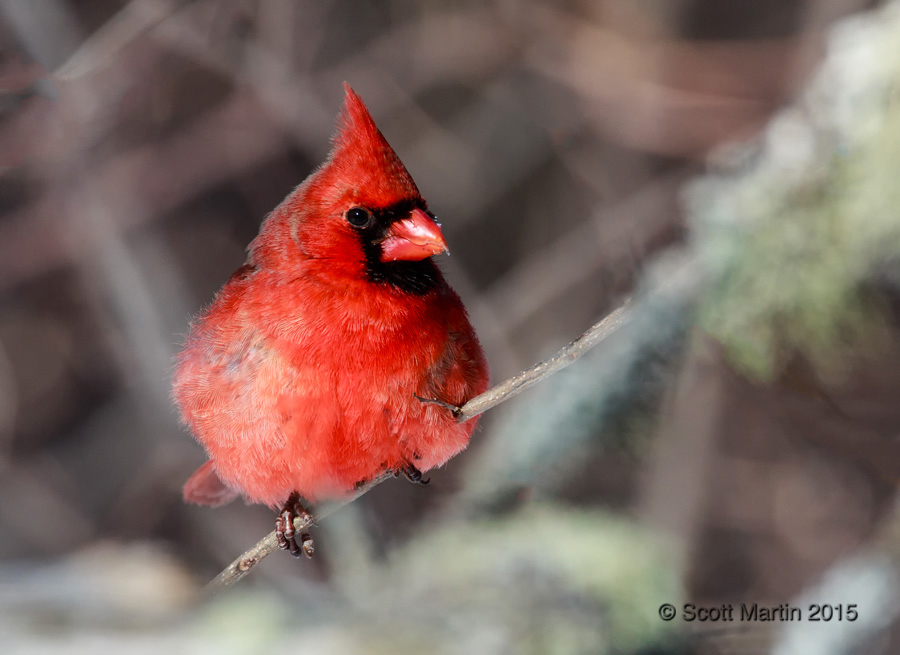
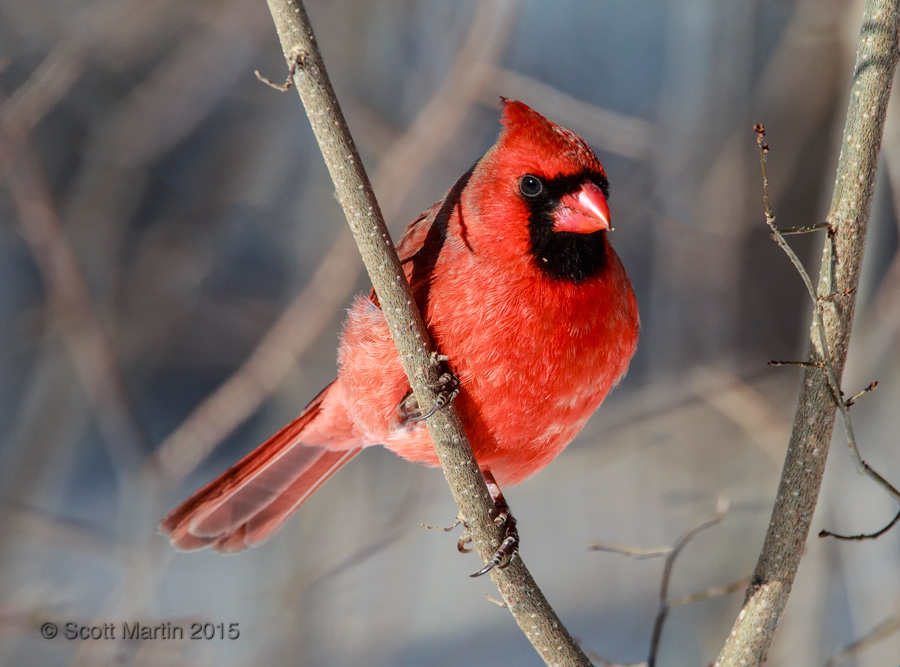
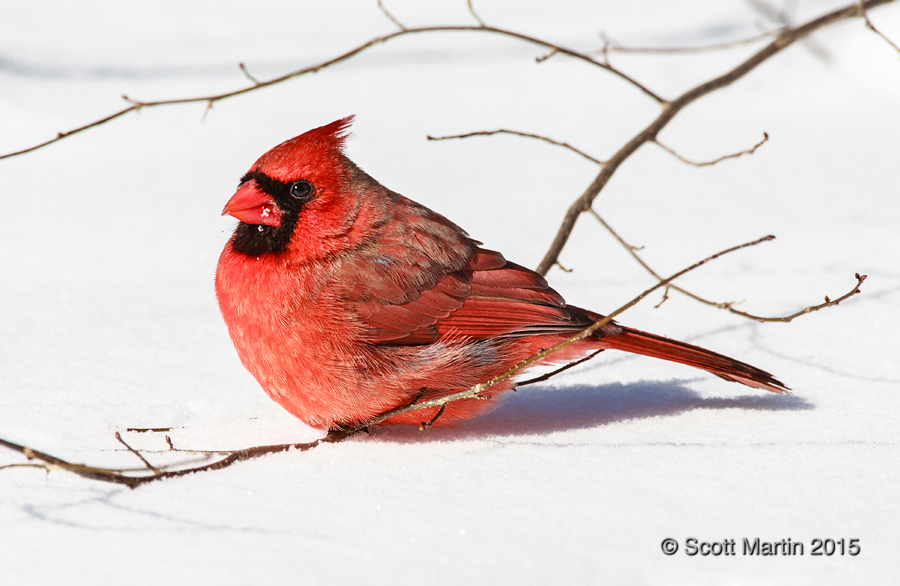
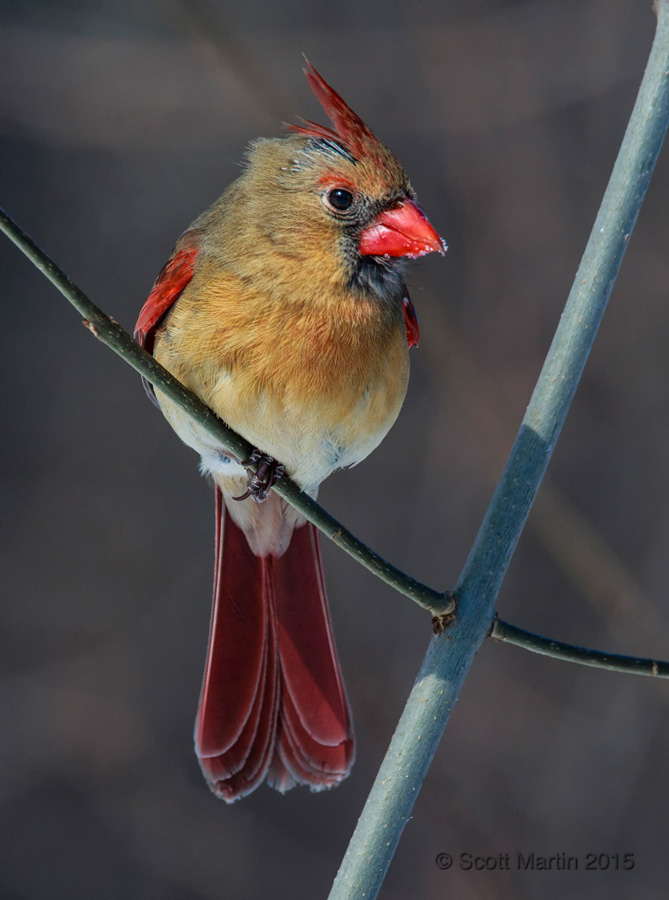
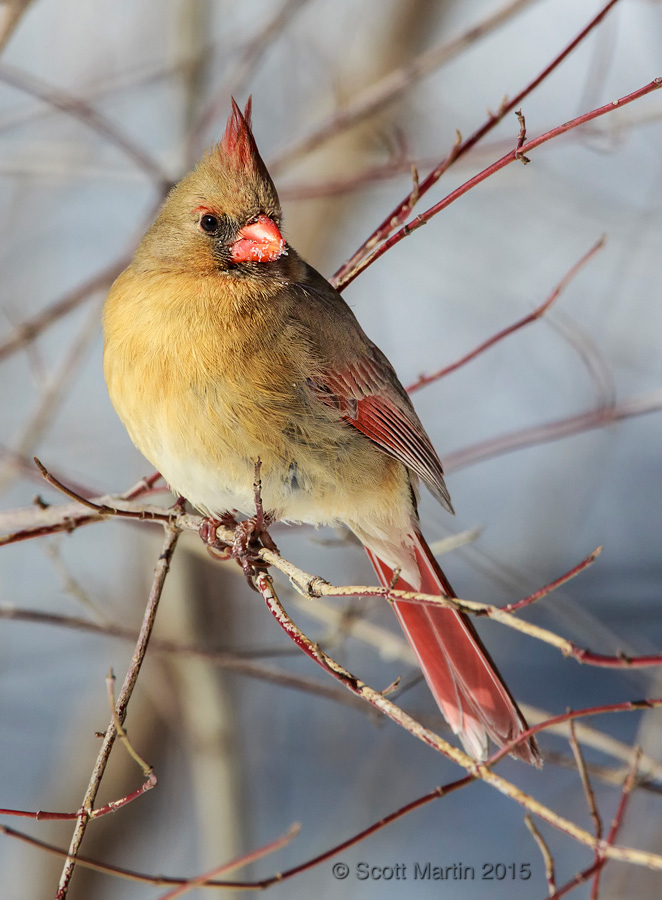
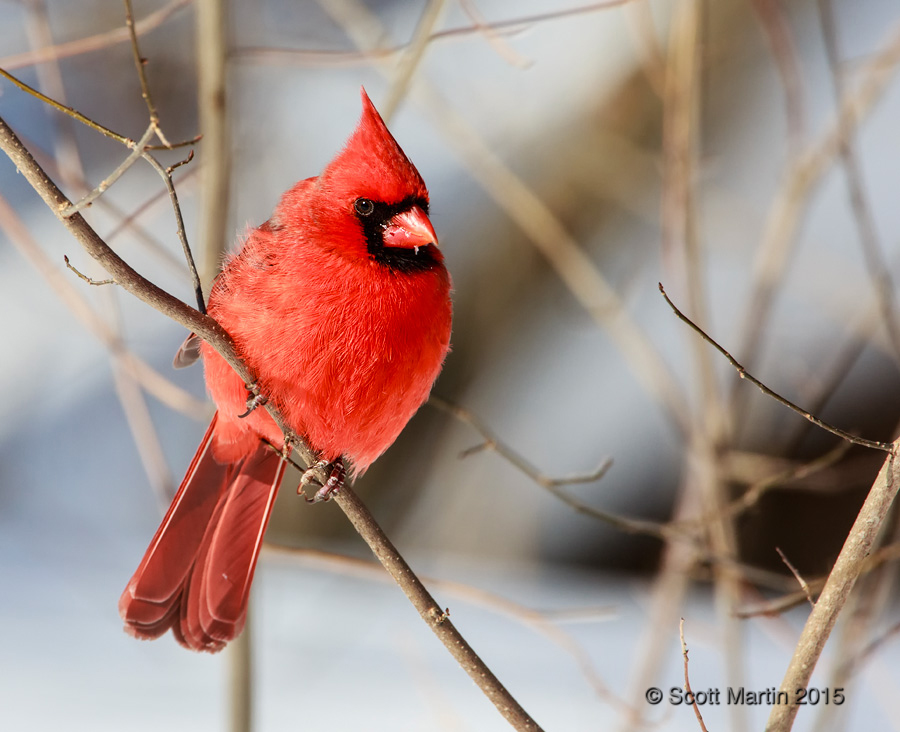
Cardinals often top the list of people’s favourite birds, and in fact the Cardinal has the unique distinction of being the official state bird of seven American States, far more than any other bird. At one point in time there were four pairs of Cardinals at our location. The male Cardinal is best known for its vibrant red colour but the female with its more subdued colours is equally, if not more photogenic.
.
.
.
The ice crystals on the beaks of these next few birds shows just how cold it was!
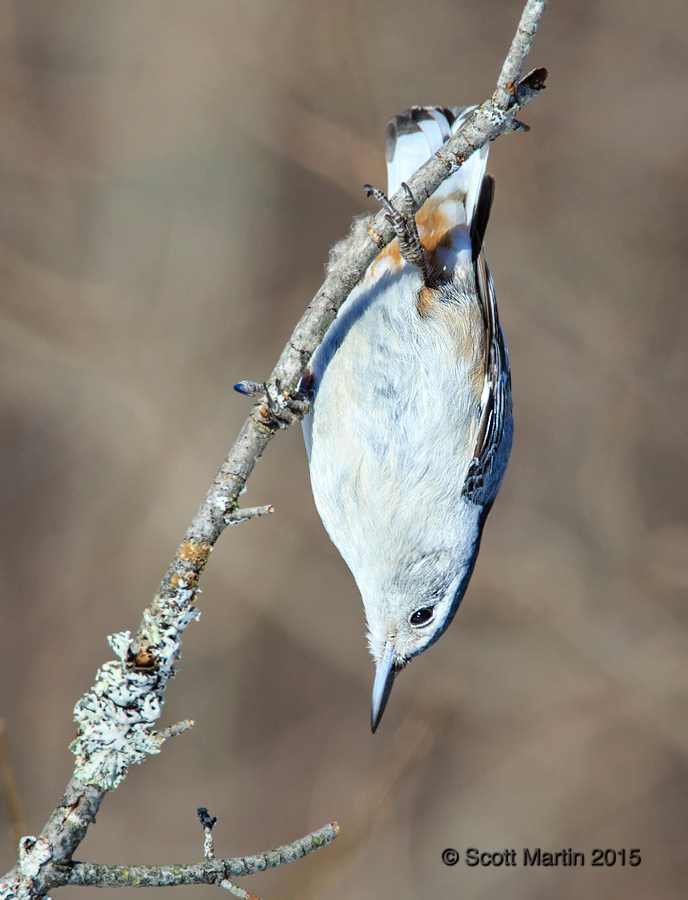
The White-breasted Nuthatch is a common bird however its propensity to be upside down most of the time always presents an interesting photo-op.
On almost every perch they are facing in the downward direction.
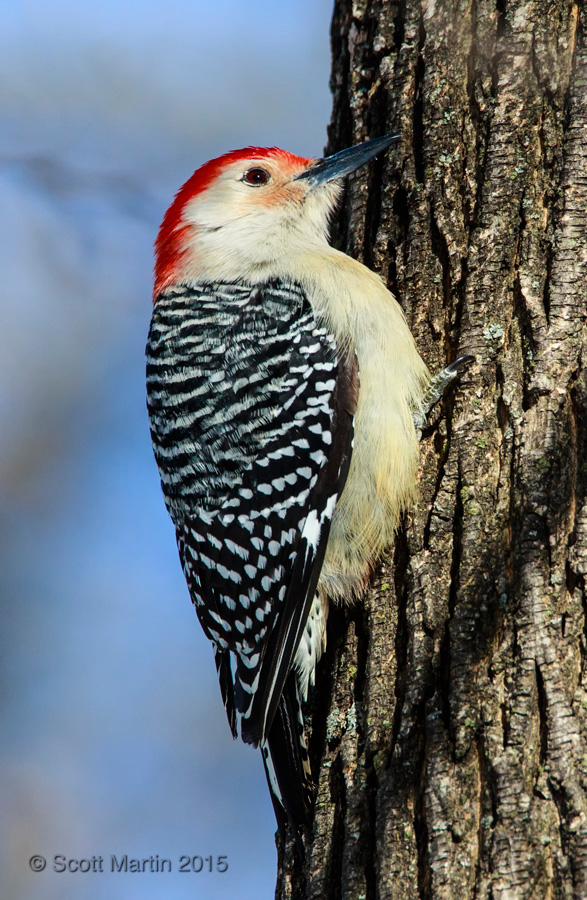
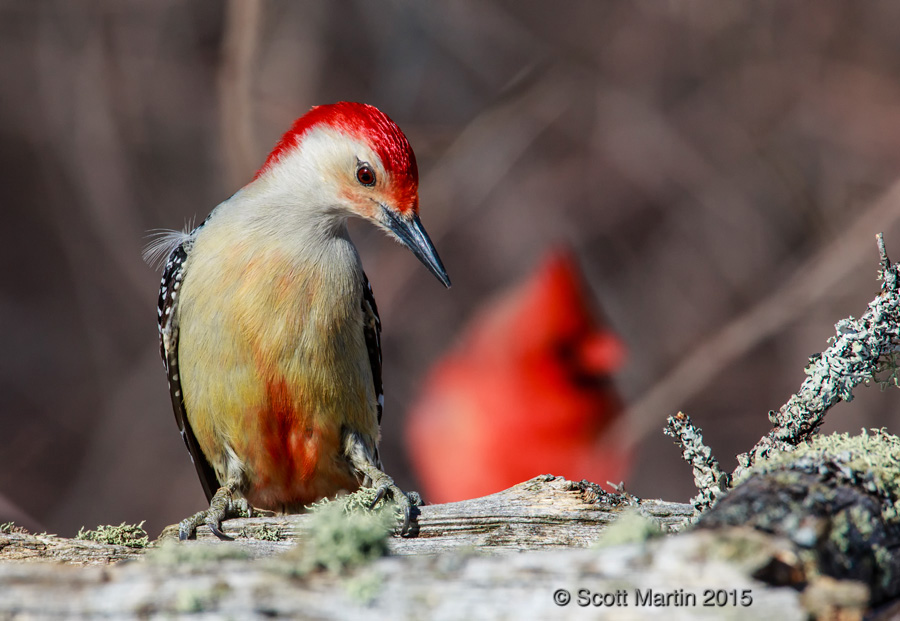
We also enjoyed a visit from a male Red-bellied Woodpecker.
This particular male had a very vibrant red head and belly patch compared to others I’ve seen. The next image shows both patches with a complimentary red back ground provided by one of the male Cardinals! Check out the Woodpecker Gallery for more images.
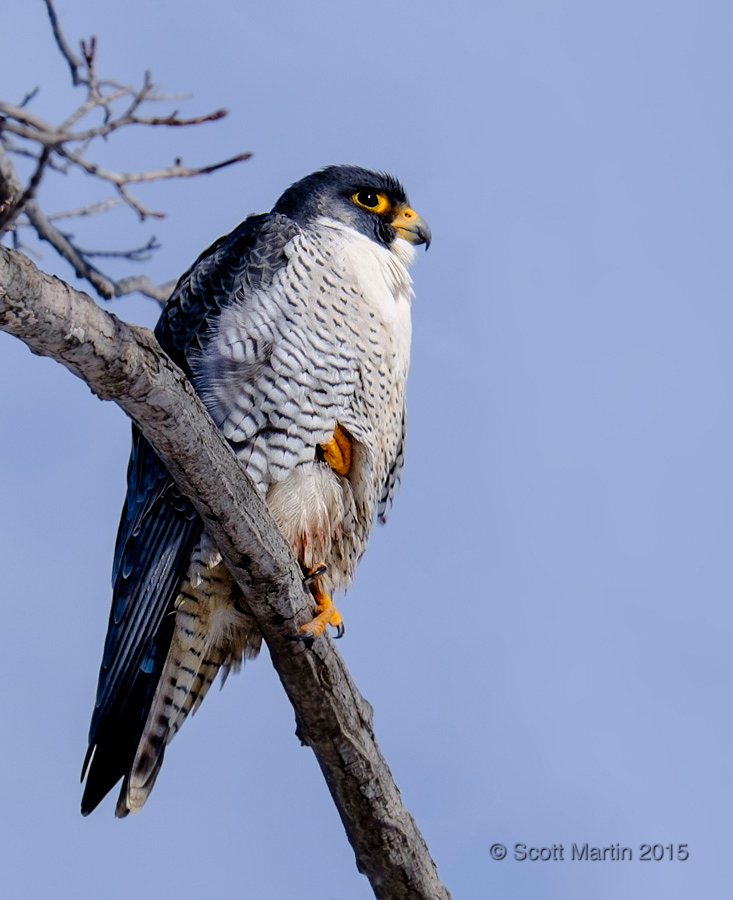
After a couple of hours in the freezing temperatures we warmed up at a local Tim Horton’s with lunch and large coffees and then just couldn’t resist a walk along the Niagara gorge from the Horseshoe Falls to the Rainbow Bridge. This was mostly to photograph Niagara Falls and the Niagara River, which was completely frozen over this year due to the uncharacteristic cold temperatures. Frozen falls images will be the subject of an upcoming blog post. From a birders perspective it was an unexpected surprise to see the fastest animal on the planet perched in a tree along the rim of the gorge…the Peregrine Falcon. As we were only expecting to use wide angle lenses along the gorge we were not prepared to photograph birds, so this Peregrine Falcon was captured with a Fuji X-E2 and 55-200mm zoom lens.
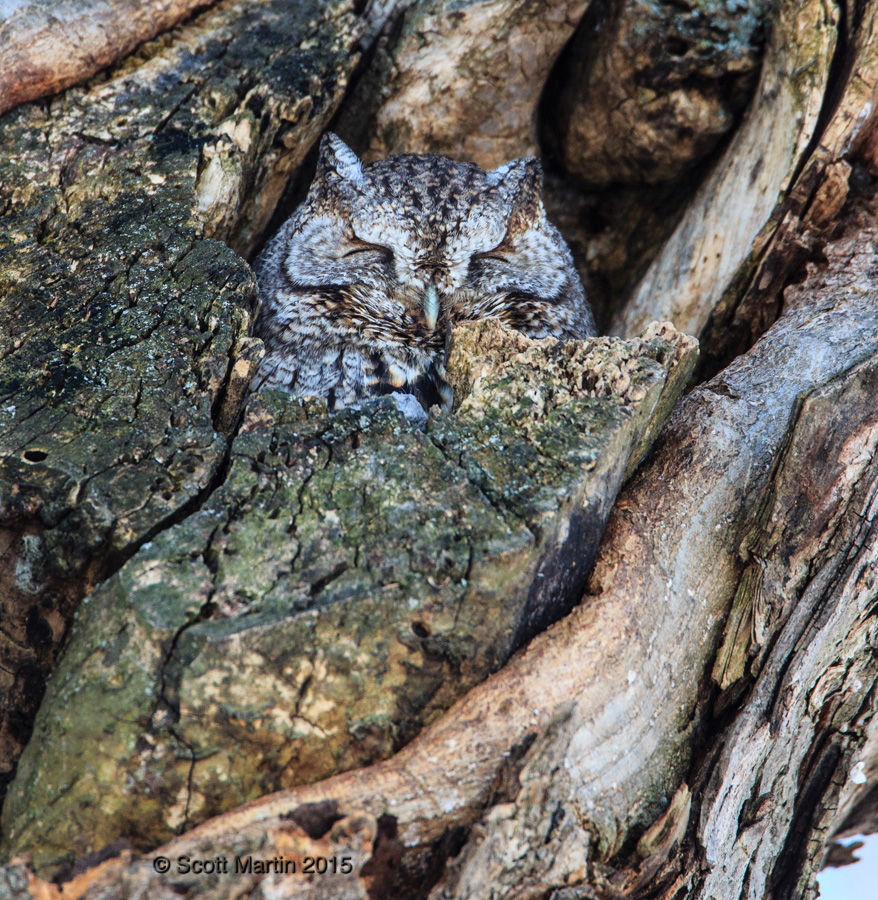
After a cold but productive day at the falls Arni and I headed back home, taking a brief detour back to Woodland Cemetery in hopes of seeing the Screech Owl. Fortunately we were able to find the grey morph sleeping in his tree. Not the most photogenic poses, but it’s always great to see another owl.
Sleeping in a gnarly tree cavity.
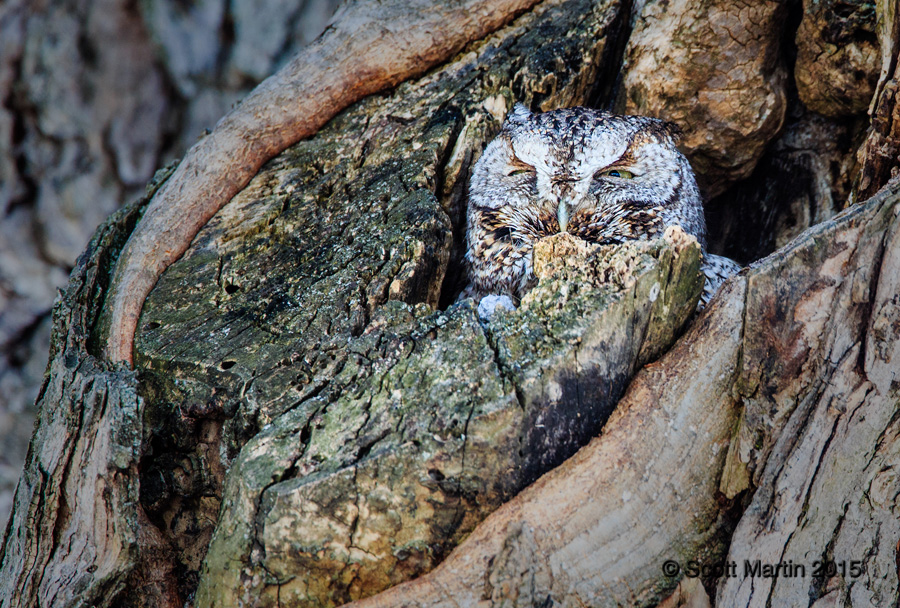
….and a rare day time peak from the very nocturnal Screech Owl.
More of this owl as well as pictures of a red morph Eastern Screech Owl can be seen in the Owl Gallery.
I trust you all have an enjoyable summer and didn’t mind this blog post looking back on the very cold winter we experienced this year.
 .
.
 .
.
 .
.


Follow Scott Martin Photography