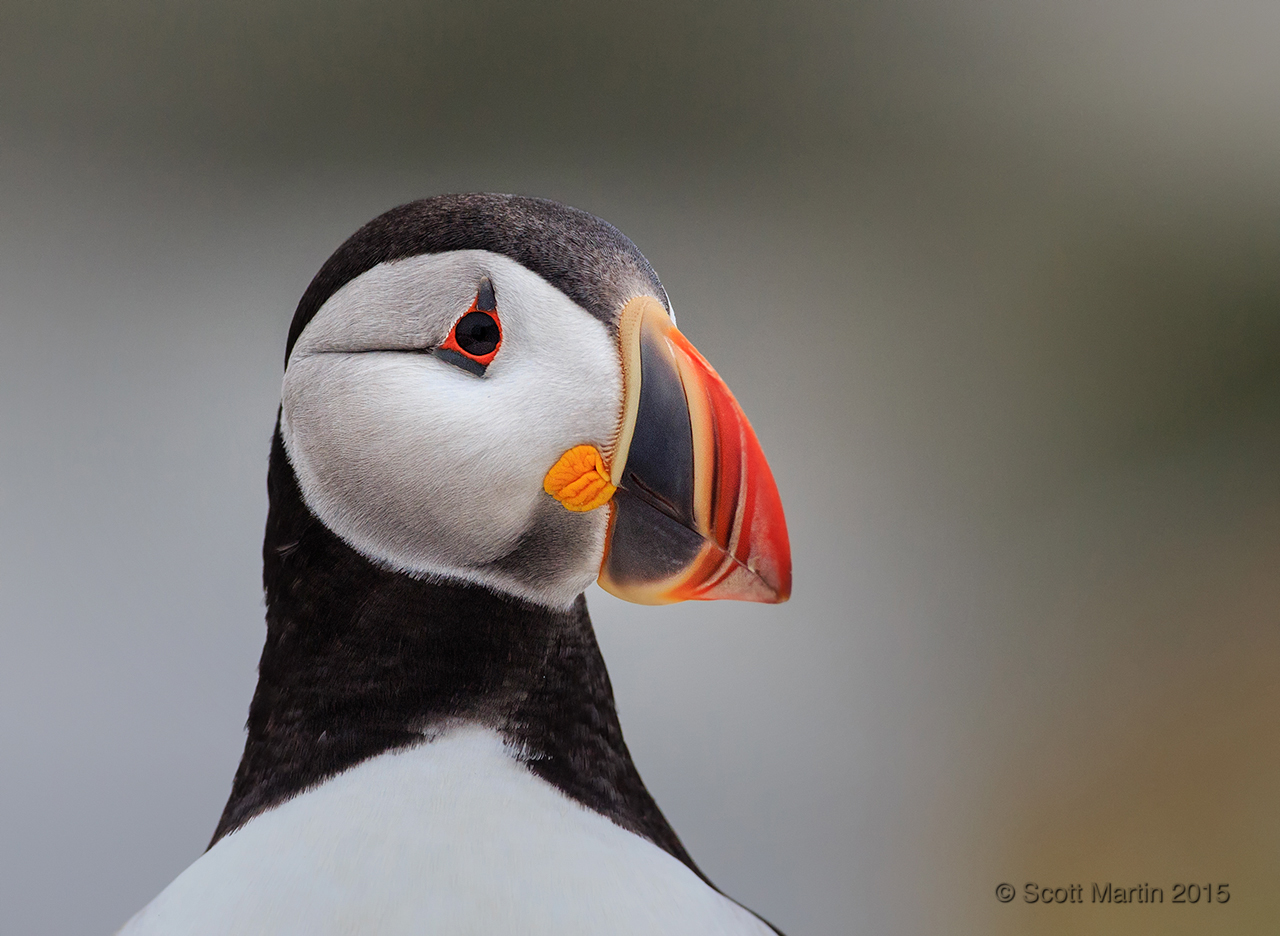
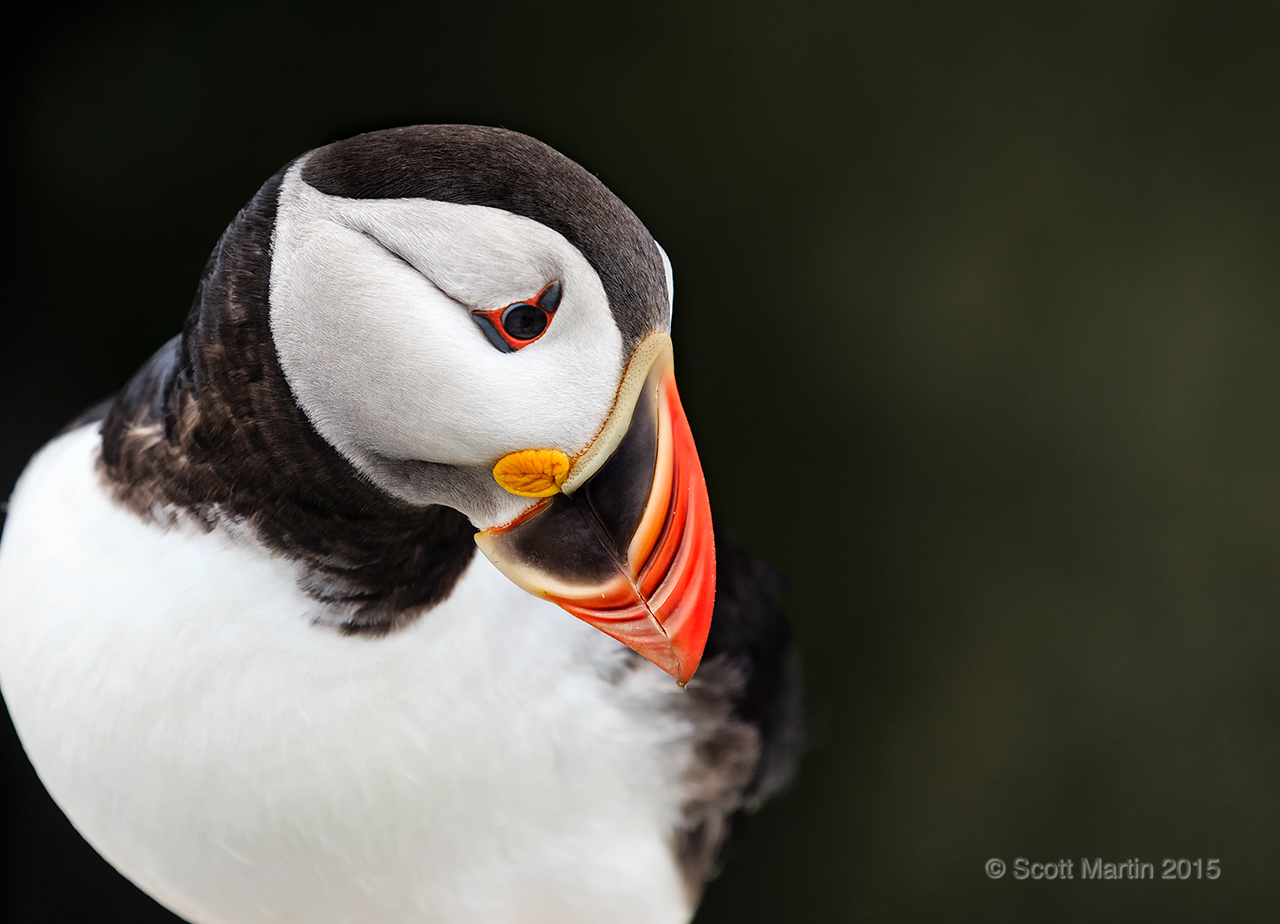
This past summer Deb & I ticked an item off the bucket list by travelling to Machias Seal Island to observe and photograph some of the 5,000 pairs of Atlantic Puffins that return to the island every summer to nest. While on the island we also had the privilege of seeing Arctic Terns, Common Murres and Razorbills.
Machias Seal Island is a small island located in the Lower Bay of Fundy about 12 miles south west of Grand Manan Island, New Brunswick and 10 miles south east of Cutler Maine. Access to the island during nesting season is restricted to fifteen people at a time who are allowed on the island for a two hour period, most of which is spent in one of four blinds to which you are escorted by the lighthouse keeper who is the only resident of the island. There has been a Canadian lighthouse keeper on the island almost continually since the first lighthouse was built in 1832.
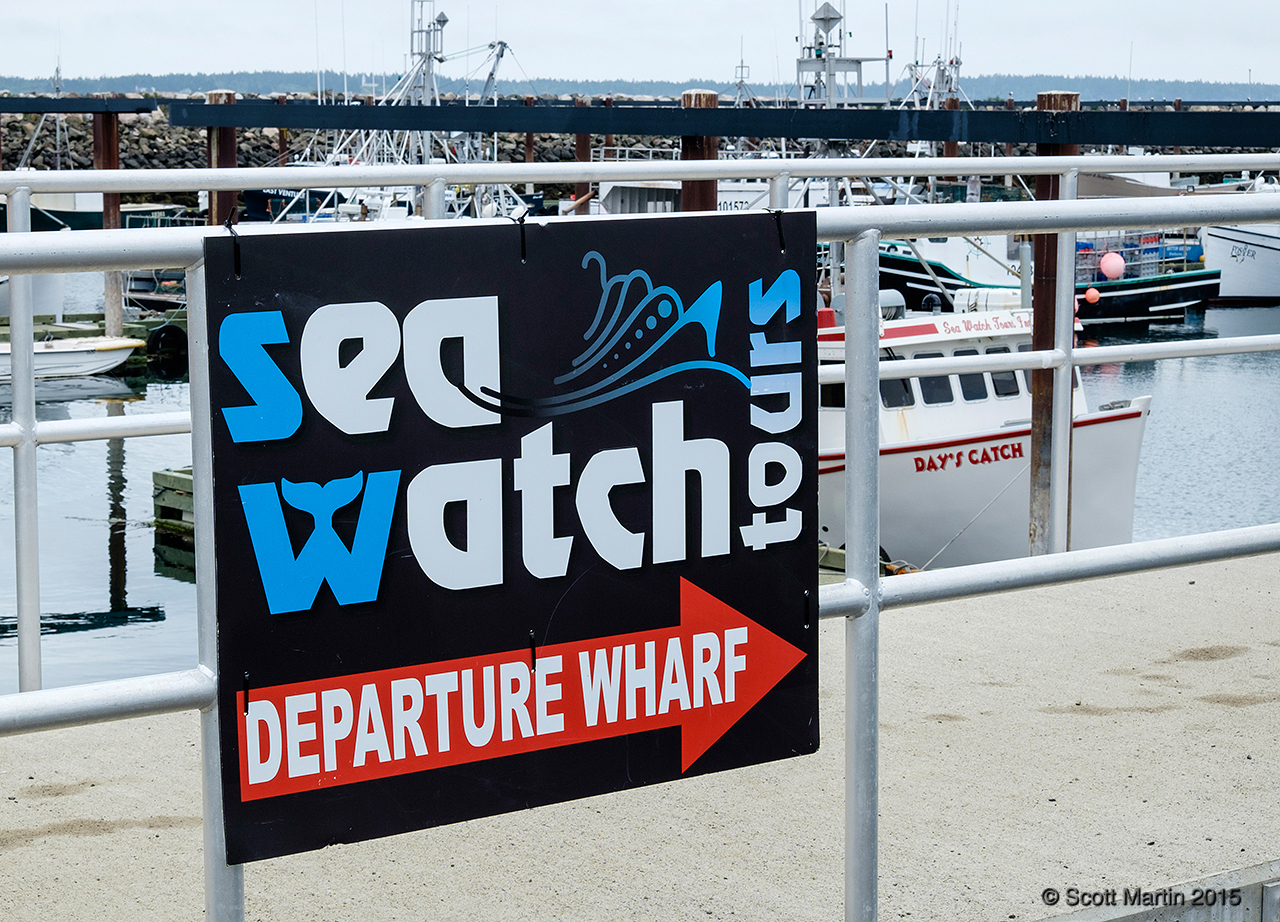
Only two charter companies have permission to deliver people to Machias Seal Island. Bold Coast Charter Company departs from Cutler Maine and Sea Watch Tours, with whom Deb & I went with, operates from Seal Cove on Grand Manan Island in the Canadian province of New Brunswick.
Grand Manan Island by itself is a destination location for anyone wishing to experience maritime life and cuisine at its finest. Deb & I stayed for a couple of nights at The Inn at Whale Cove Cottages and it was the perfect spot.
Arriving at the Sea Watch Tours dock in Seal Cove we met Captain Peter Wilcox, who owns Sea Watch Tours, and his First Mate Durlan Ingersoll.
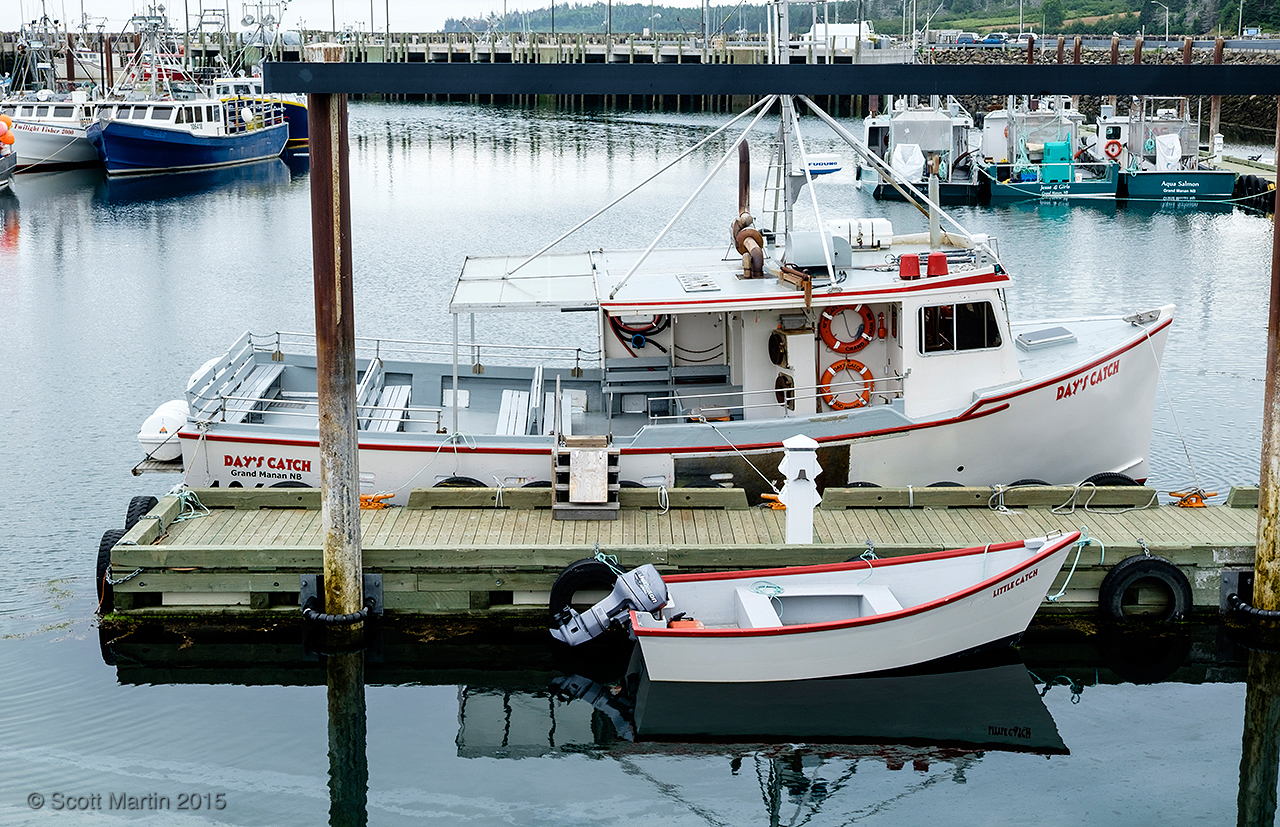
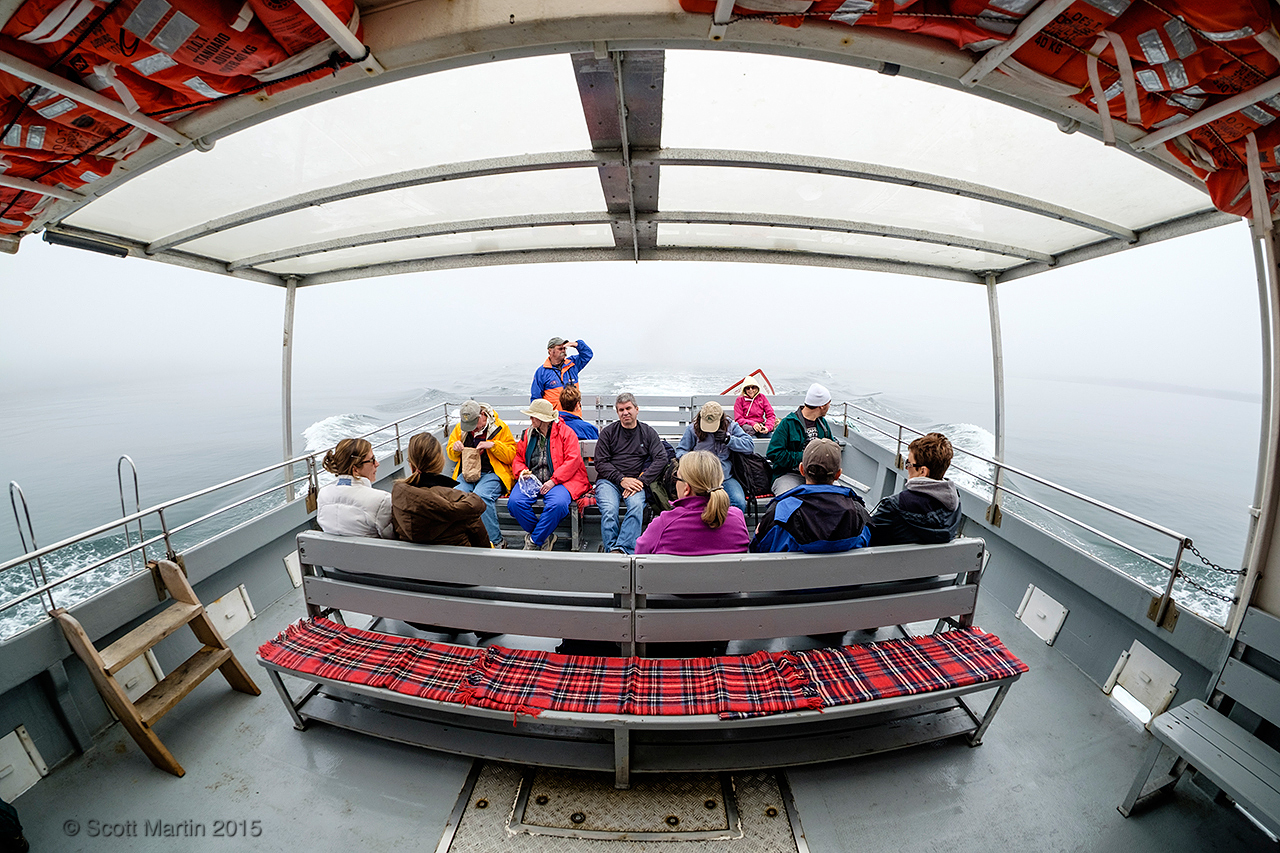
Our boat, The Day’s Catch, is a lobster fishing boat that Captain Wilcox converts for taking bird watchers and photographers to Machias Seal Island during the Puffin nesting season in July. As there are only minimal landing facilities on Machias Seal Island, the Day’s Catch tows a small tender, The Little Catch, which shuttles people from the big boat to the rocky shore of the island. Below are our rides for the day, the Day’s Catch and the Little Catch.
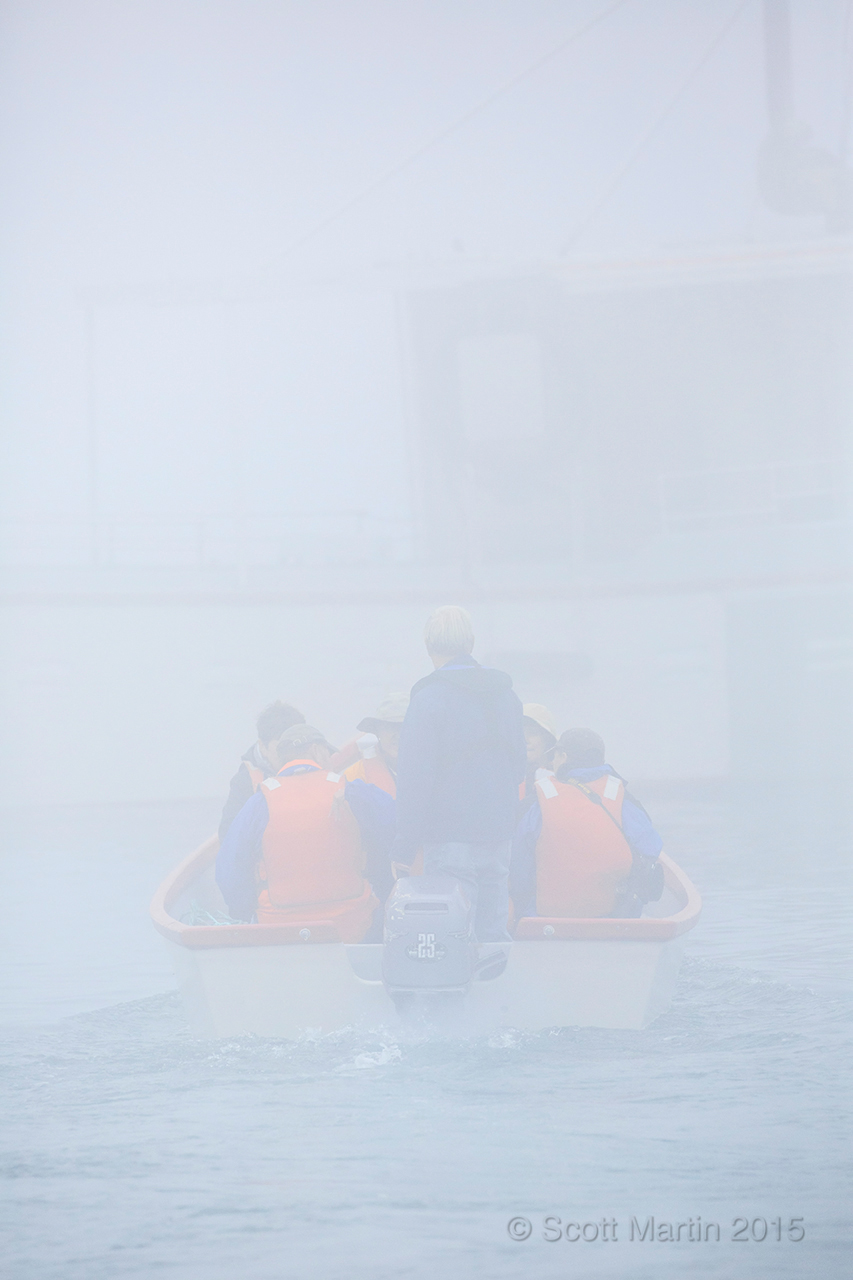
Due to rough seas and primitive docking facilities successful landing on the island occurs about 60% of the time so although it was very foggy we were thrilled to be able to set foot on the island. Here is Deb with the Little Catch in tow behind her.
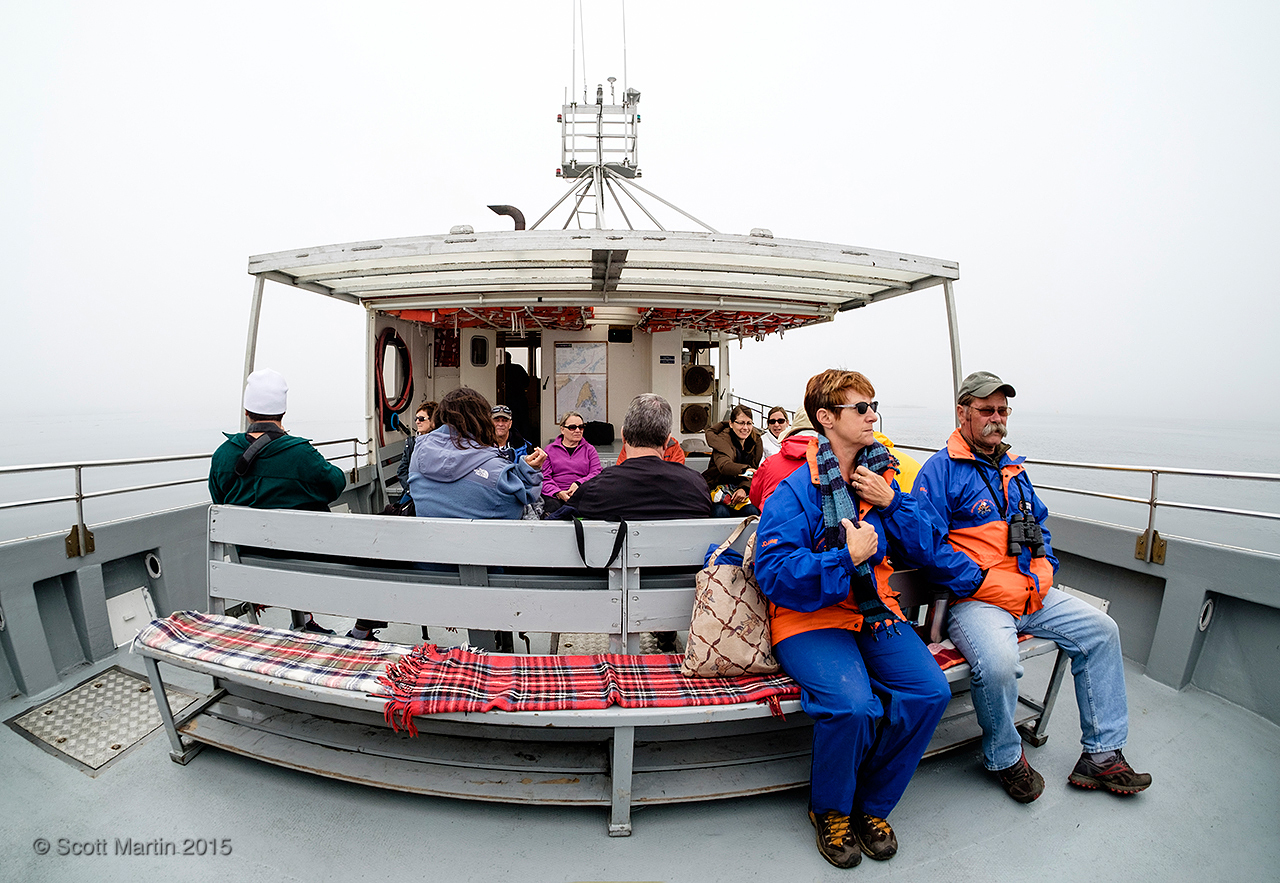
The Day’s Catch, although spending most of its time fishing for lobster, became the perfect boat for the ninety minute trip to Machias Seal Island from Grand Manan, with plenty of room for the 15 passengers on board as seen by these next two images taken with the Fuji X-E2 and 8mm Samyang fisheye lens.
If you have never used a fisheye lens I would highly recommend getting one. They have surprising versatility and the unique perspective they provide often results in compelling images.
After the fifteen excited birders and photographers were successfully shuttled from The Day’s Catch to the shore we were escorted by the lighthouse keeper to a staging area where the practices and procedures were explained to us. This video follows our brief walk to the lighthouse and you will see and hear some birds flying overhead.
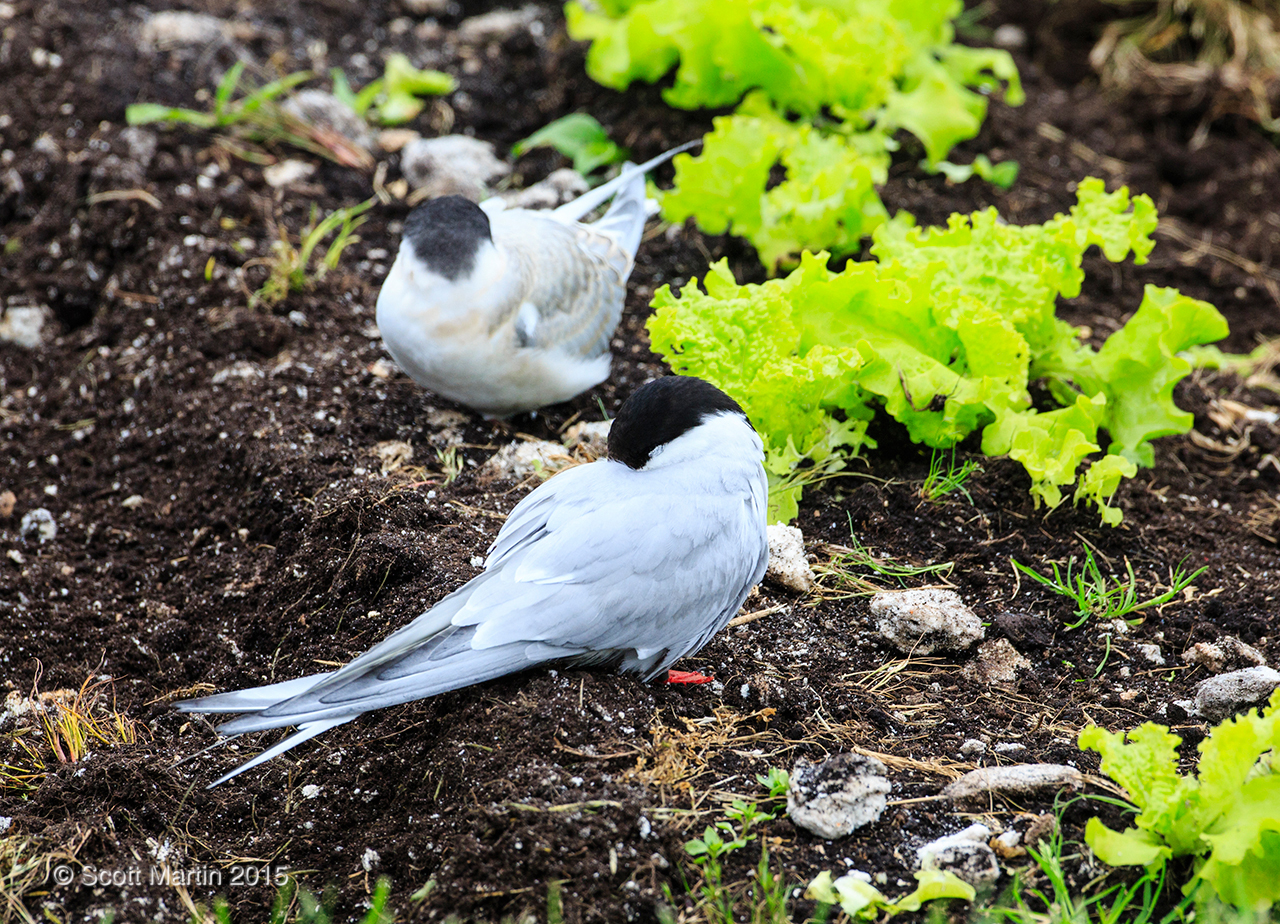
If you looked closely at the video you will have noticed the birds are not Puffins but surprisingly were Arctic Terns. These birds from the north had successfully nested in the lighthouse keepers vegetable garden….the first time Arctic Terns had done so in quite a while. Here is a young Arctic Tern and one of its parents sleeping in the garden. A rare sight.
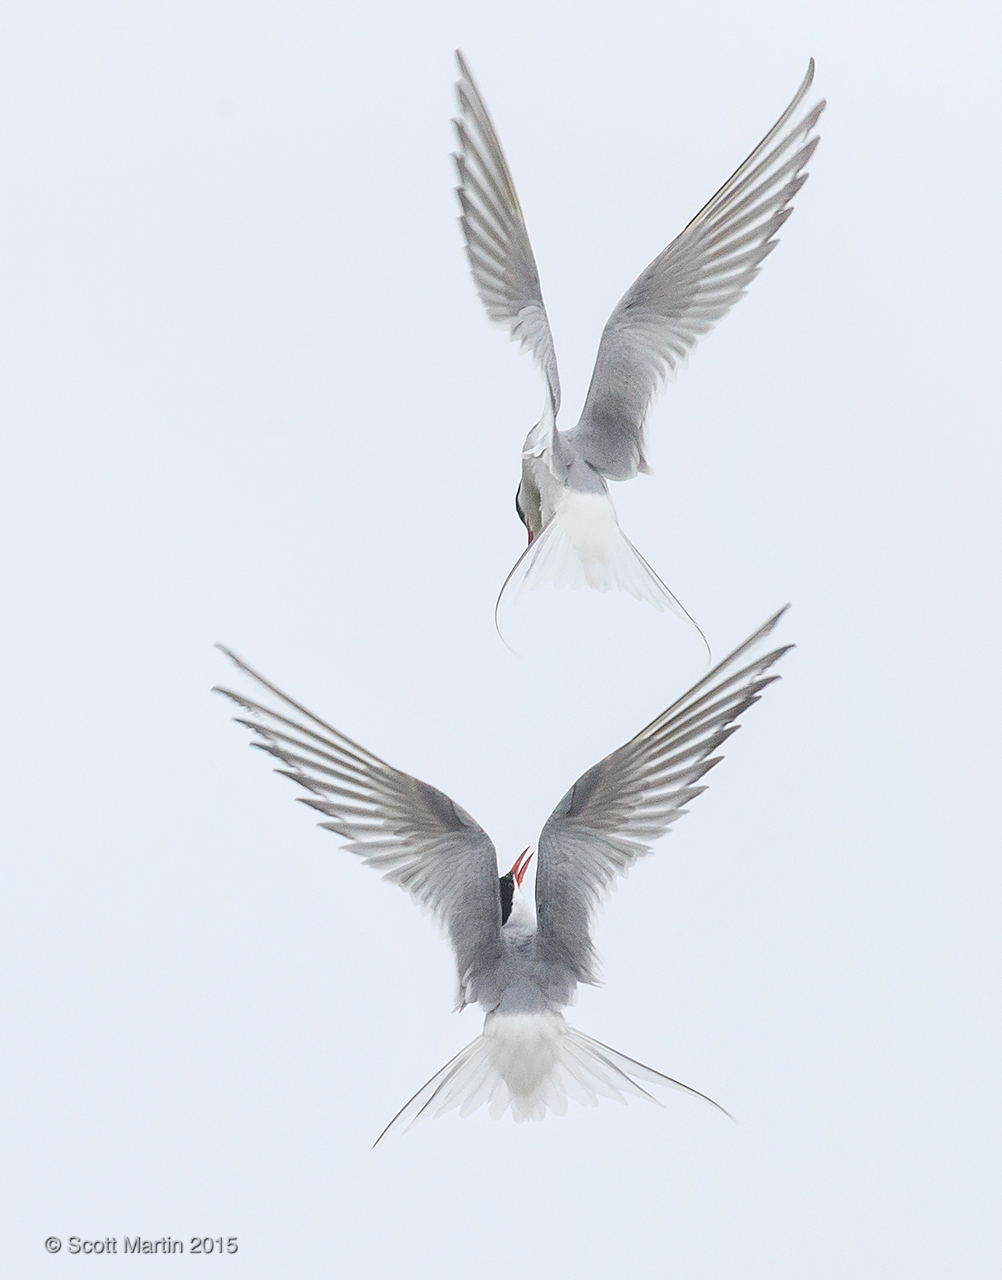
It was a pleasure to capture two adults in an overhead aerial display. They are beautiful birds, not often observed at such close range. Always have your camera at the ready!
The next video shows one of the four blinds on the island and gives you an idea of how many Puffins are in the area and also how vocal they are. Notice the very small size of the ports in the blinds, barely large enough for a big lens to peek through, but necessarily small so our human forms would not be visible to the Puffins and provide the opportunity for them to become acclimated to us. Care was taken to only open the camera ports on one side of the blind at a time to prevent creation of sight lines enabling the Puffins to see through the blinds which could result in them flying into the blinds as opposed to perching on the roof as seen in the video!
Great care is taken by those governing the island to ensure that human impact on the Puffins is kept to an absolute minimum, which is good practice at all times when interacting with animals in the wild.
It’s not my normal practice to shoot from a blind, so it was difficult to know what gear to select for that critical hour during which I didn’t want to waste any time with the wrong lens combinations. After much thought it was decided to take three bodies; a Canon 5D MkIII with a 500mm lens for portraits (plus a 1.4 x TC for an effective 700mm if needed), a Canon 1Dx with the new 100-400mm zoom lens for capturing Puffins in flight and a Fuji X-E2 with a 55-200mm Fujinon zoom that Deb used for stills and video. The blind was too small for a tripod so we opted to bring a monopod however it proved impractical when shooting through such a small opening in the blind. This means that we spent the hour standing in the blind hand holding some pretty heavy equipment although it wasn’t that bad as the time raced by while we concentrated on getting that ‘perfect’ image (which has yet to happen after decades of trying). We utilized the first twenty minutes taking portraits and perched shots and the remaining time was devoted to my favourite photography niche, capturing birds in flight.
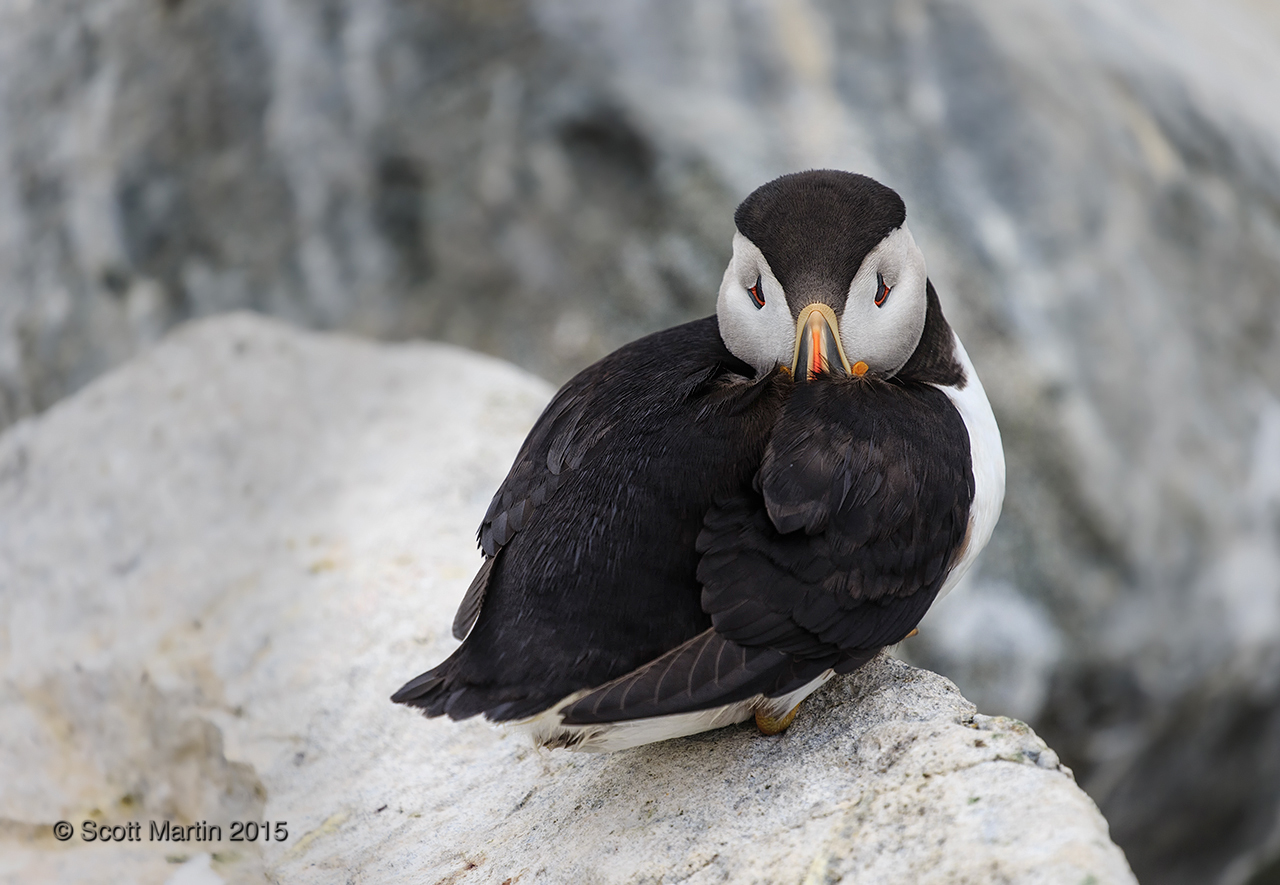
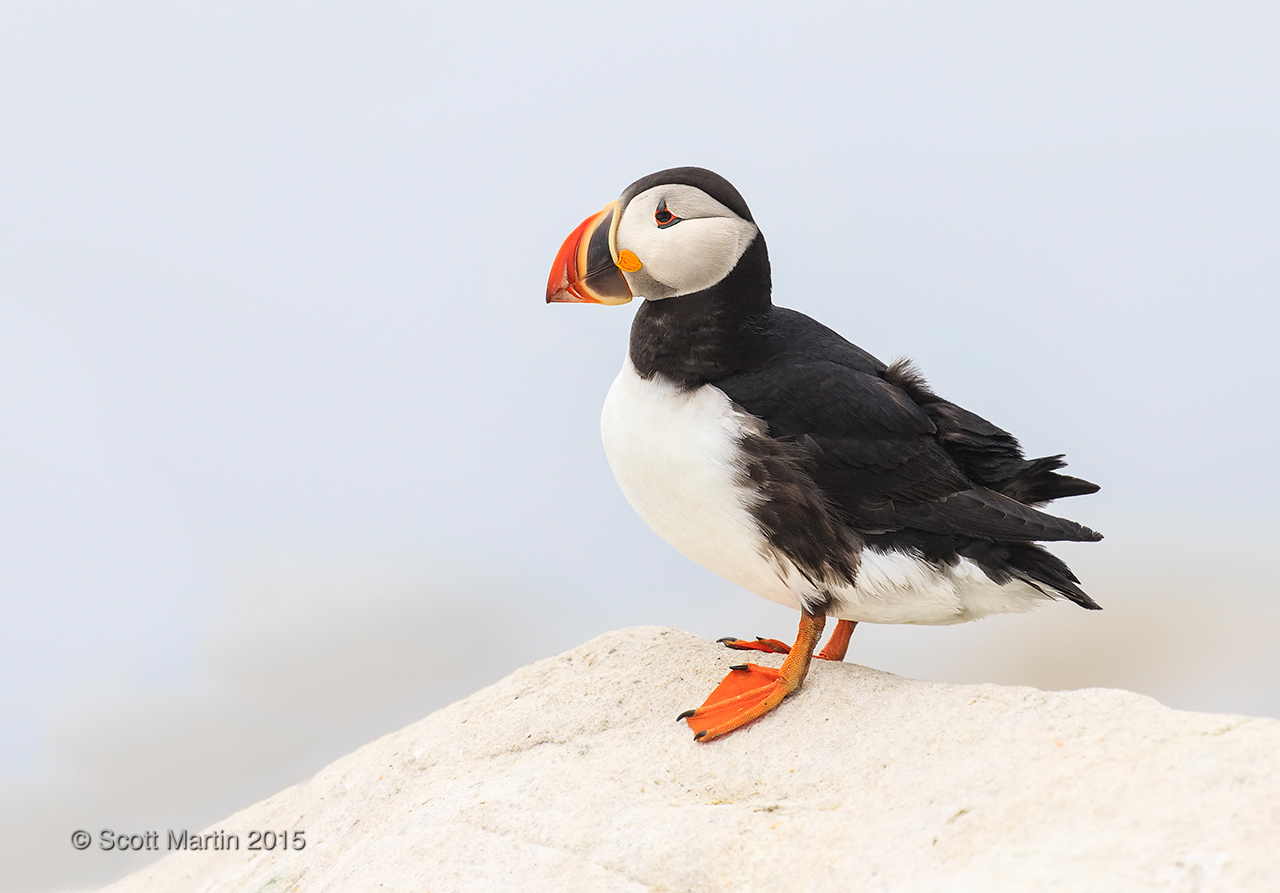
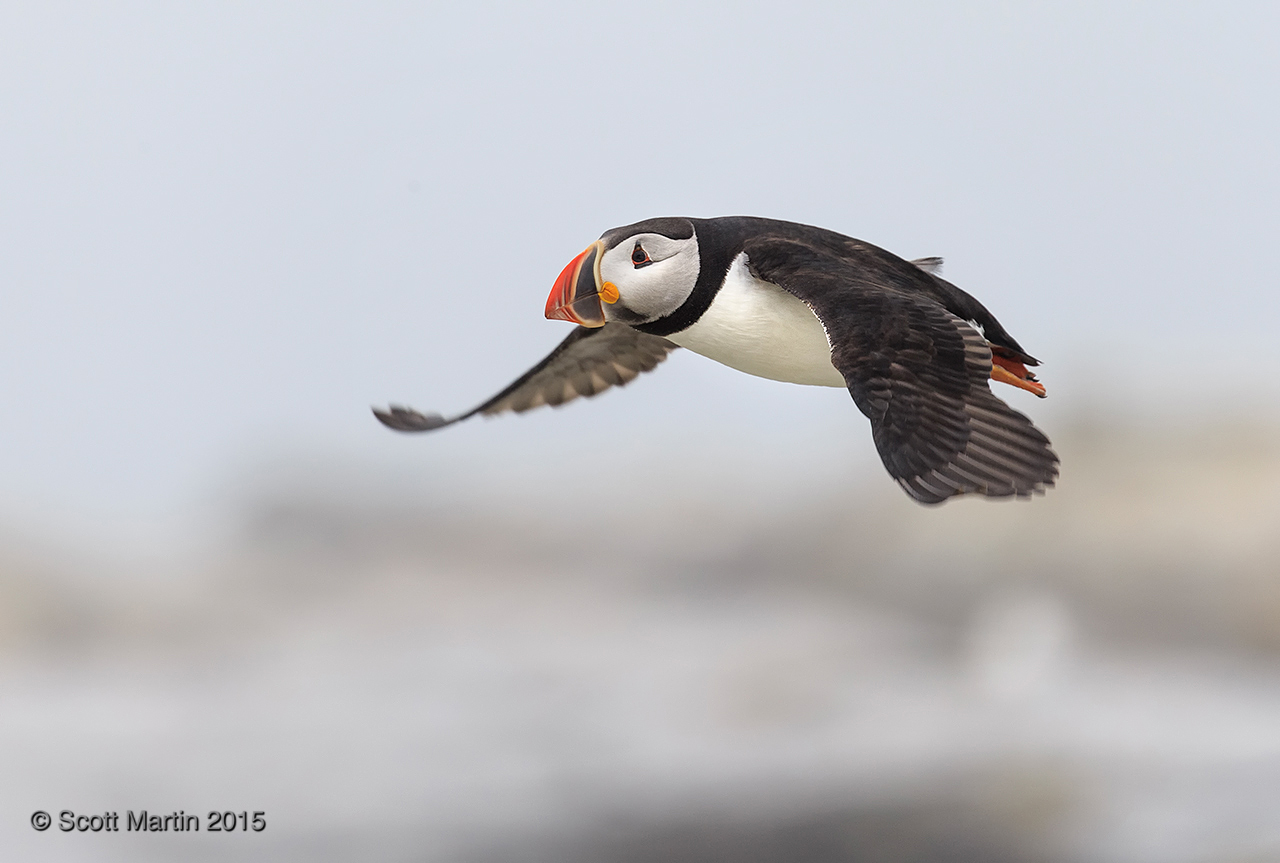
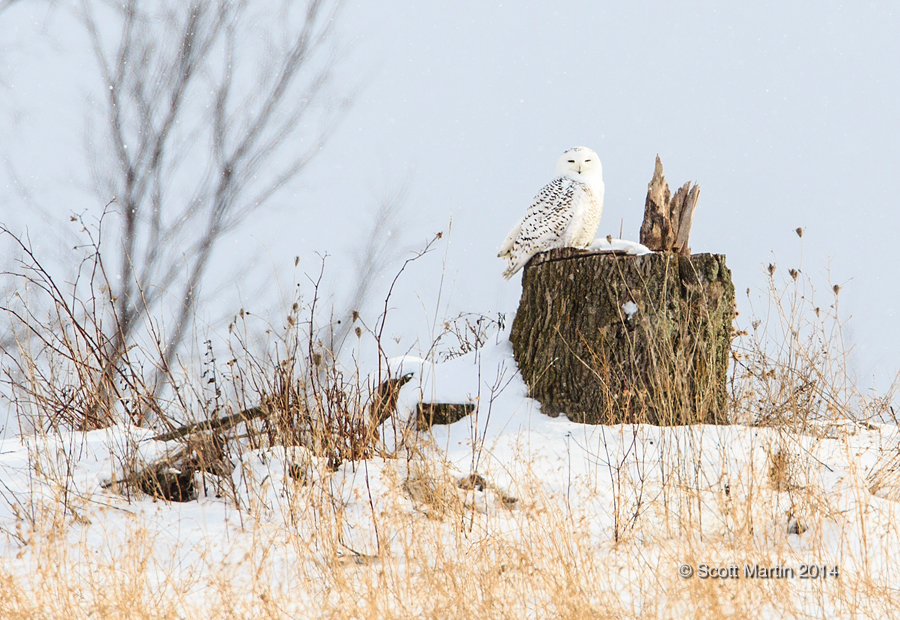
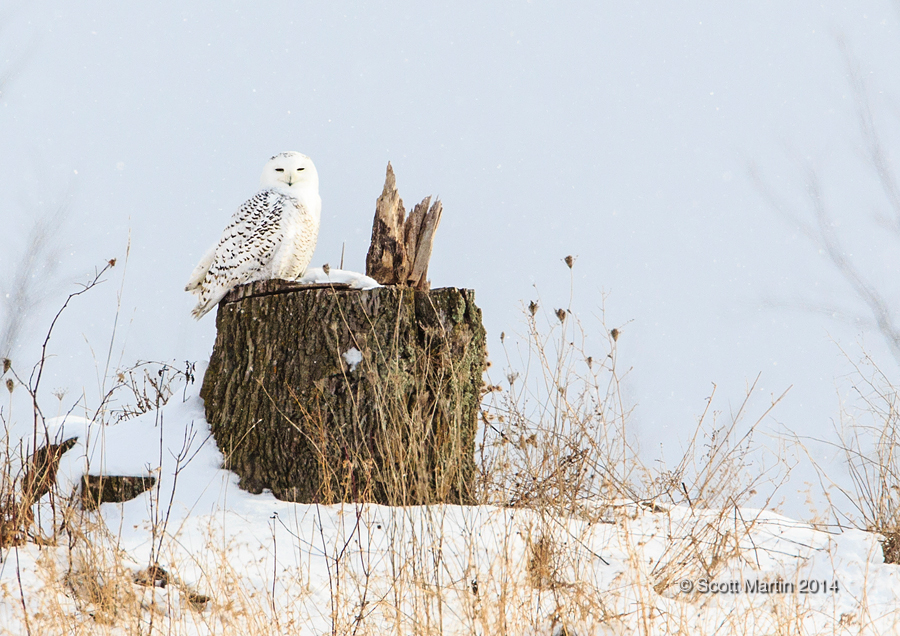
Puffins are sometime referred to as the parrots of the sea because of their appearance and affable character. They have a rather mischievous look even when they are resting which I think is captured in this first image.
Photographing black and white birds is technically challenging as it is difficult to find an exposure that retains detail in both the black and white feathers. Typically if you expose for detail in the blacks you overexpose the whites and if you expose for the whites you underexpose the blacks, both of which result in unacceptable results. Getting acceptable exposures in strong sunny lighting conditions is virtually impossible. So although we experienced a foggy overcast day, the subdued lighting created by the fog was a blessing for photographing the Puffins.
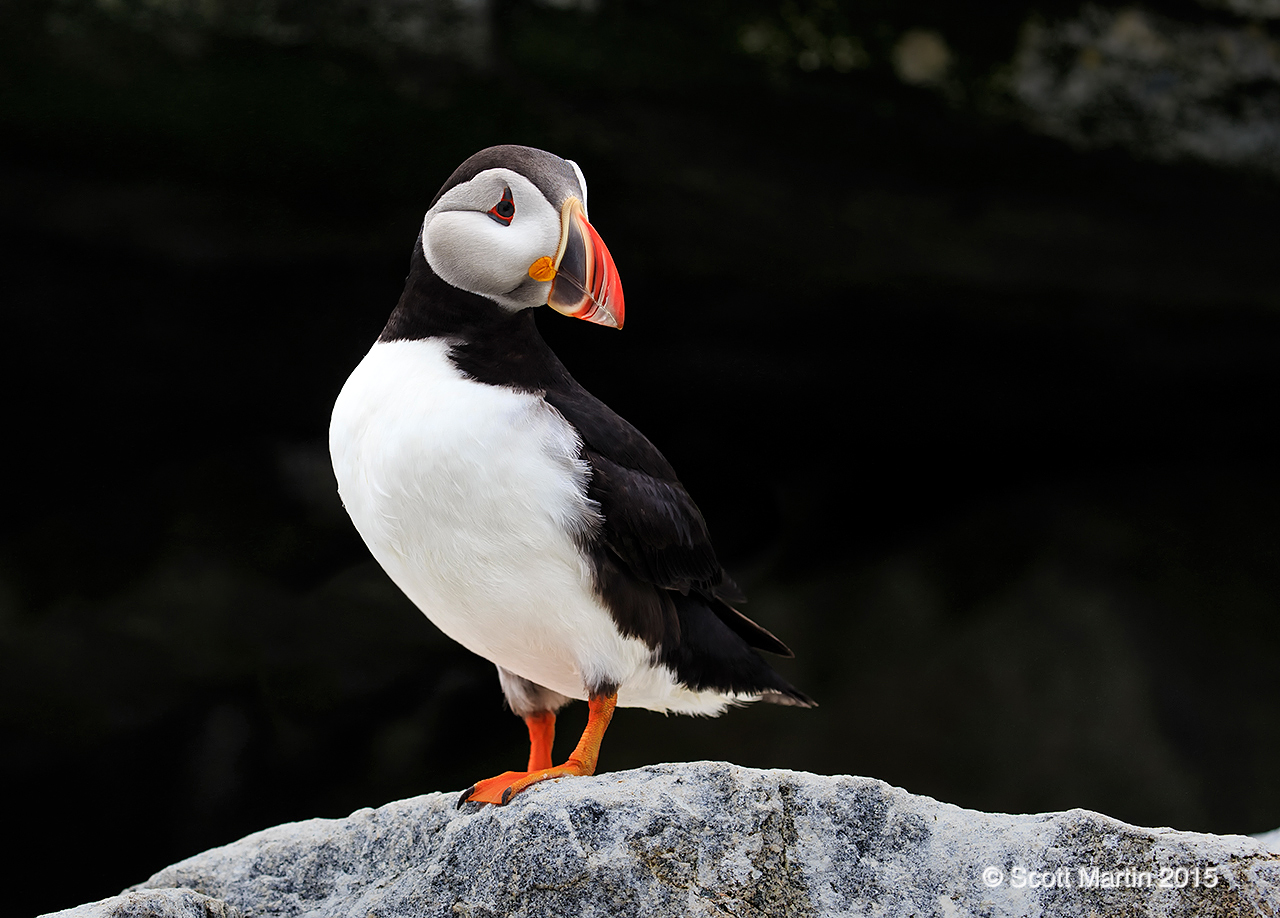
These next three images demonstrate the importance of thinking about back grounds and other elements in the image beyond the subject. Preference is subjective, but you must be intentional in acquiring a variety of backgrounds allowing you to enjoy the privilege of choosing that preference!
A mid-toned back ground.
A light back ground provided by the sky is fairly easily obtained by lowering the camera position and shooting in an upward trajectory. This changing angle of incidence also subtly affects the perspective of the bird as can be seen in these images.
The dark back ground. Care needs to be taken such that good differentiation exists between the bird (the black sections of the Puffin) and the dark back ground.
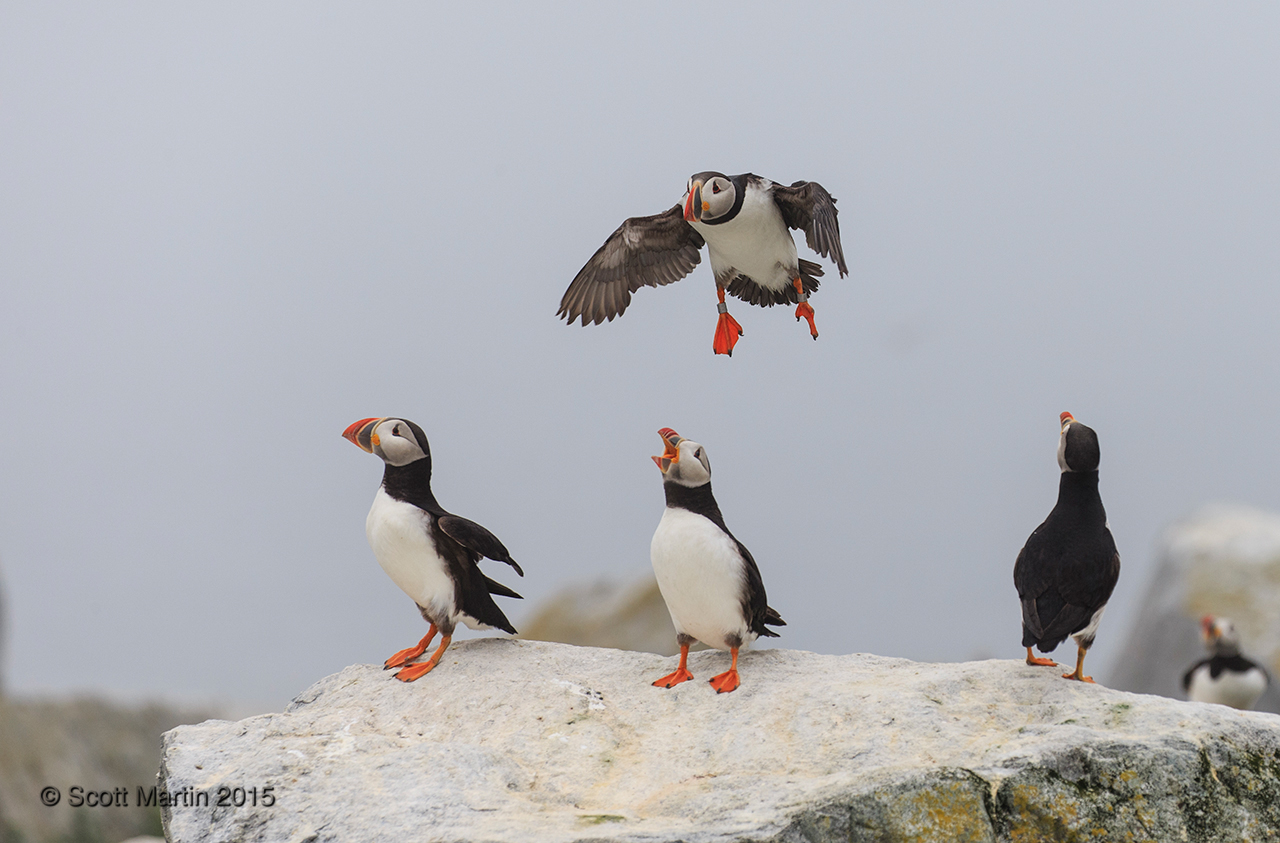
Although Puffins are quite independent while at sea, they are very social during the nesting season, clowning around with each other and creating a cacophony of sound that just can’t be described. It is difficult to capture the feel of the Puffin community with photographic stills but I trust these next few images provide a glimpse of Puffin life on Machias Seal Island.
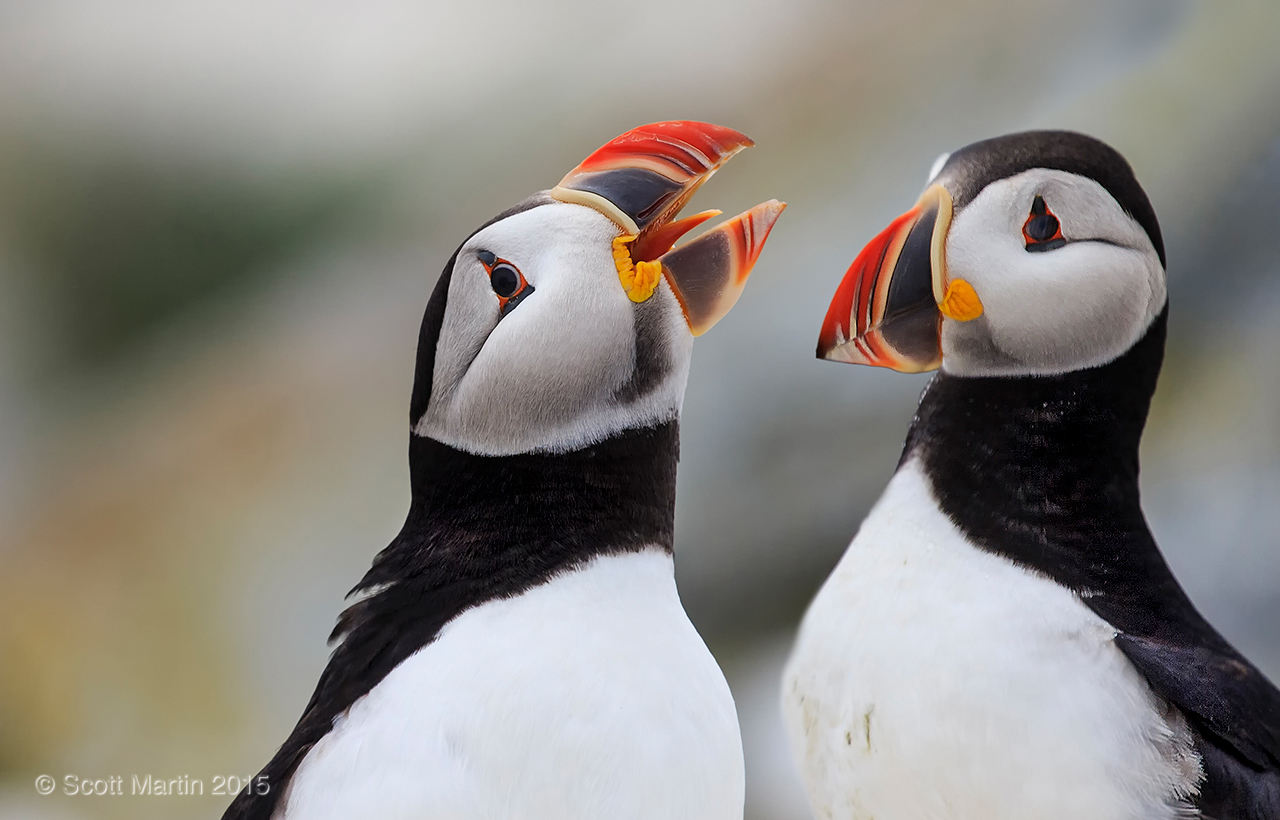
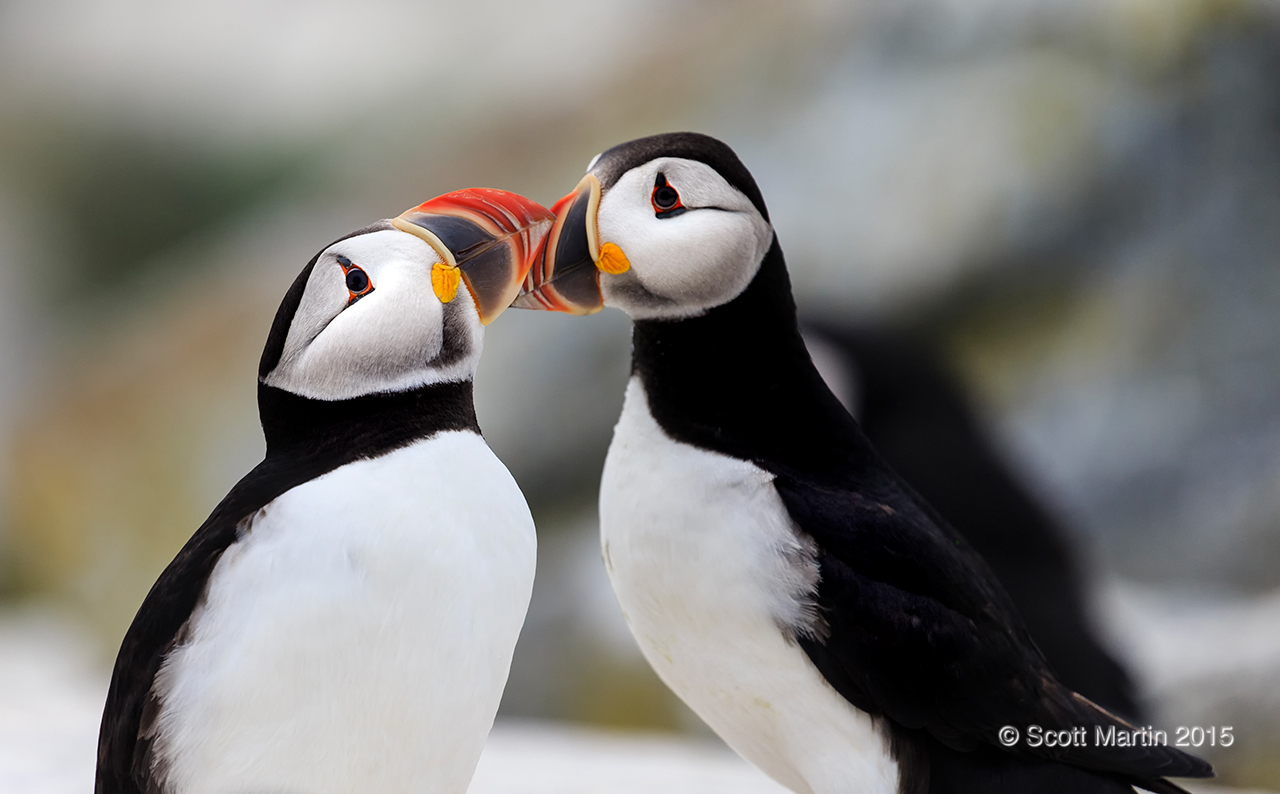
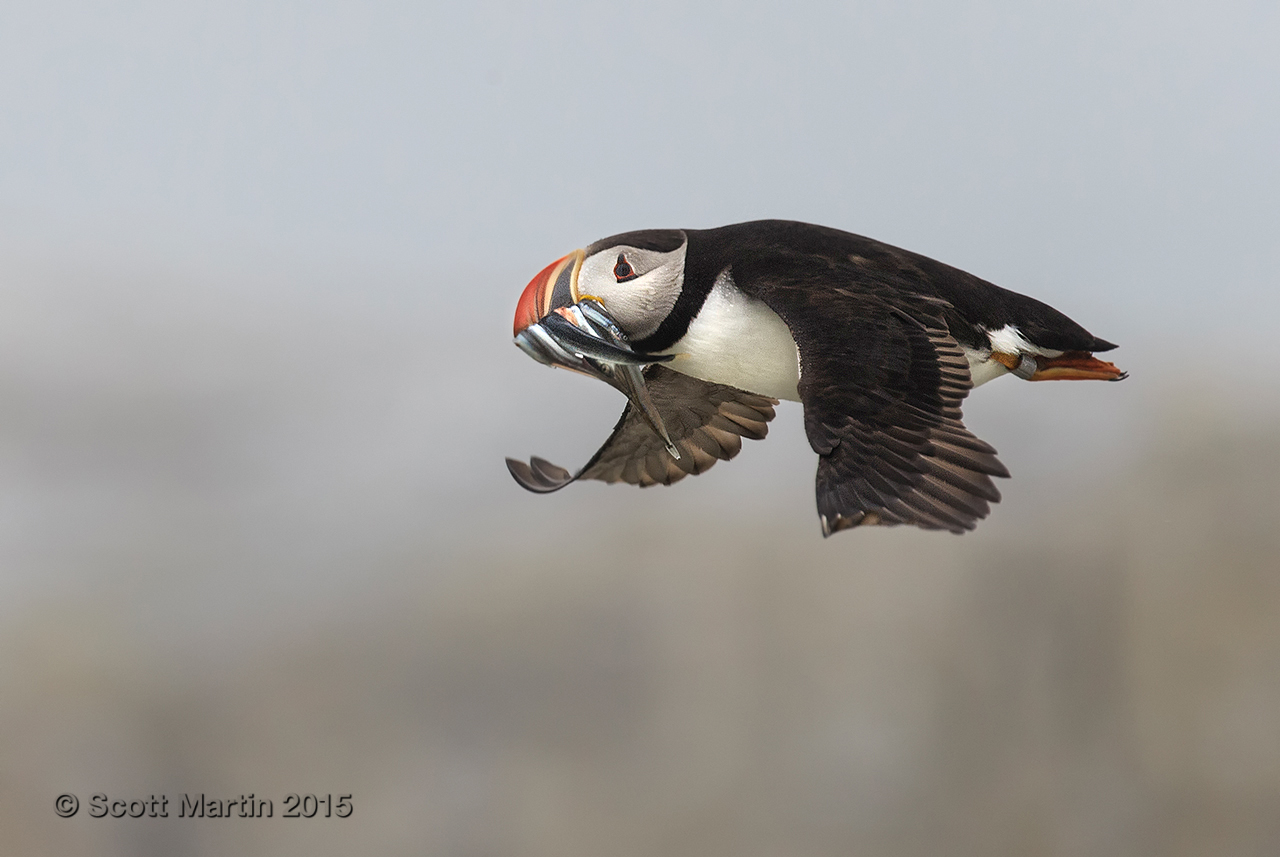
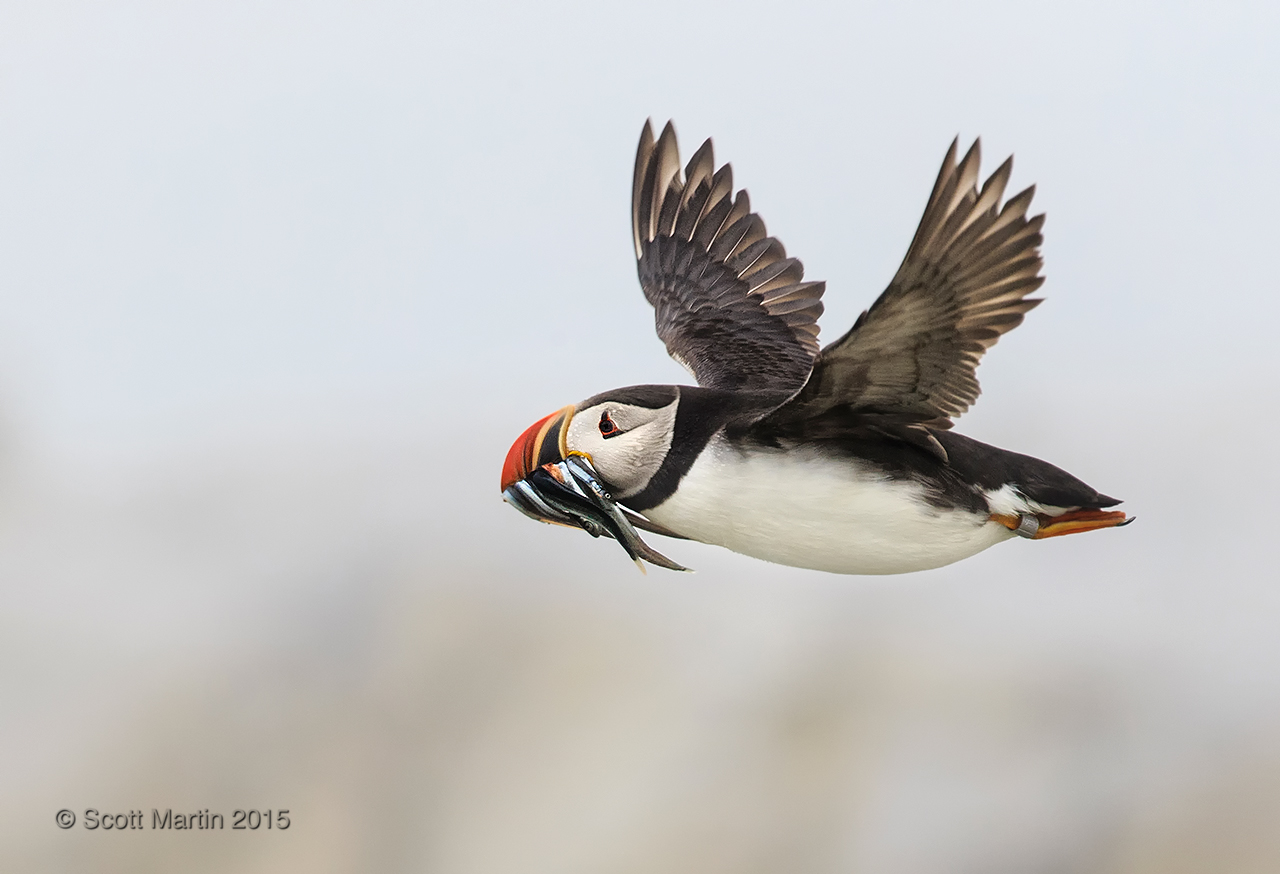
In the image below, if you look carefully along the lower edge of the upper mandible you will notice a number of spear like bristles towards the base of the beak. These serve as small spikes that the Puffin uses to hold fish sideways in its beak and transport them back to the nest to feed the hungry young chick. The Puffin is able to catch fish sequentially, lock each one into place and continue fishing until the beak is full. This amazing design also allows the Puffin to fish at great distances away from the nest if necessary. Although the record number of fish observed in a single Puffin’s beak is 62, they typically average about ten.
Puffins often playfully spar with their beaks creating a percussive clacking sound.
As with people, each group appears to have a contrarian!
The Puffins seem quite inquisitive towards each other, perhaps because other than during nesting season they are primarily solitary birds. They are highly interactive making them a pleasure to watch.
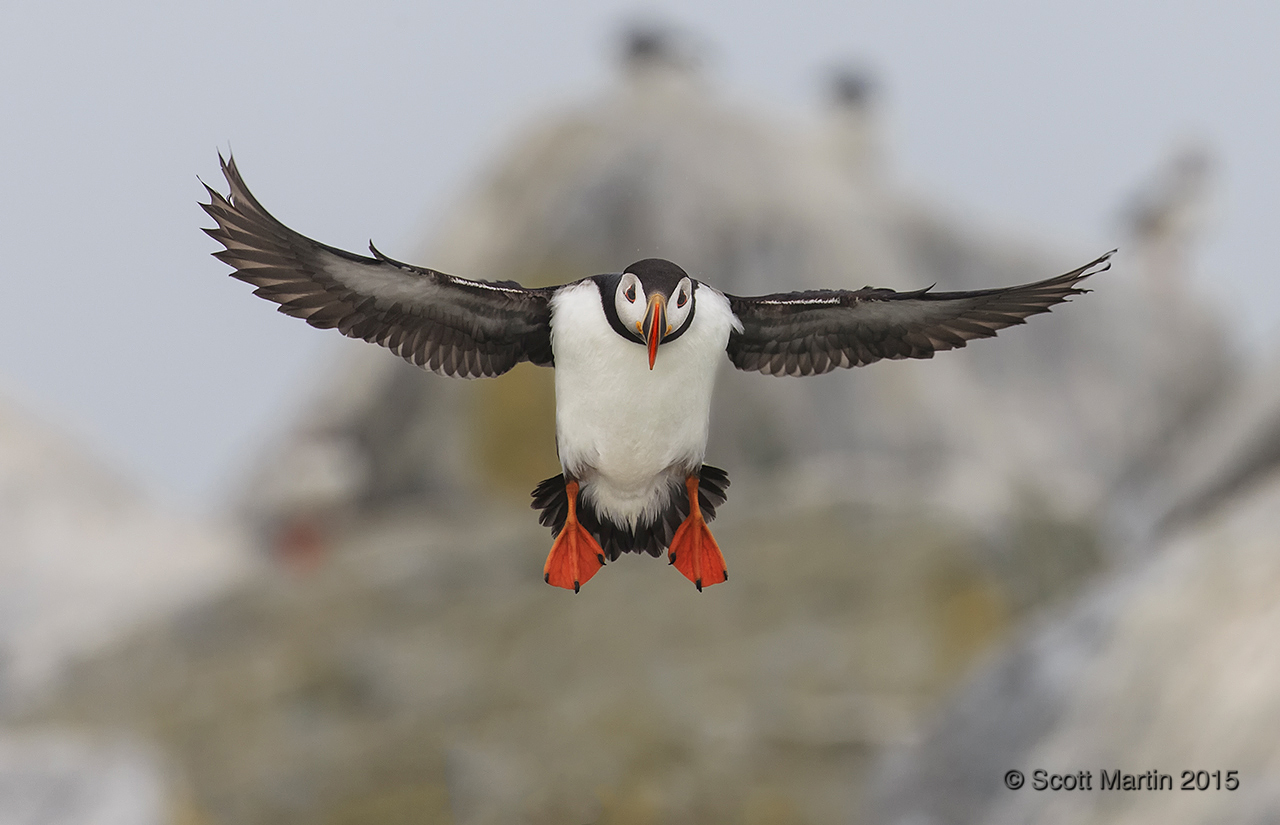
Capturing birds in flight is a passion of many bird photographers and most of our time in the blind was spent attempting to get that special shot of a Puffin in flight. In-flight bird photography is technically difficult as it involves panning the camera to follow the target as flies through your field of view. It is also a challenge for the auto focusing system of the camera to keep tracking the bird and keeping it clearly in focus. Attempting to capture good in flight images while shooting through the small window in the blind complicated things significantly, however when you deal with the challenges presented and get a few decent images, it is always worth the effort.
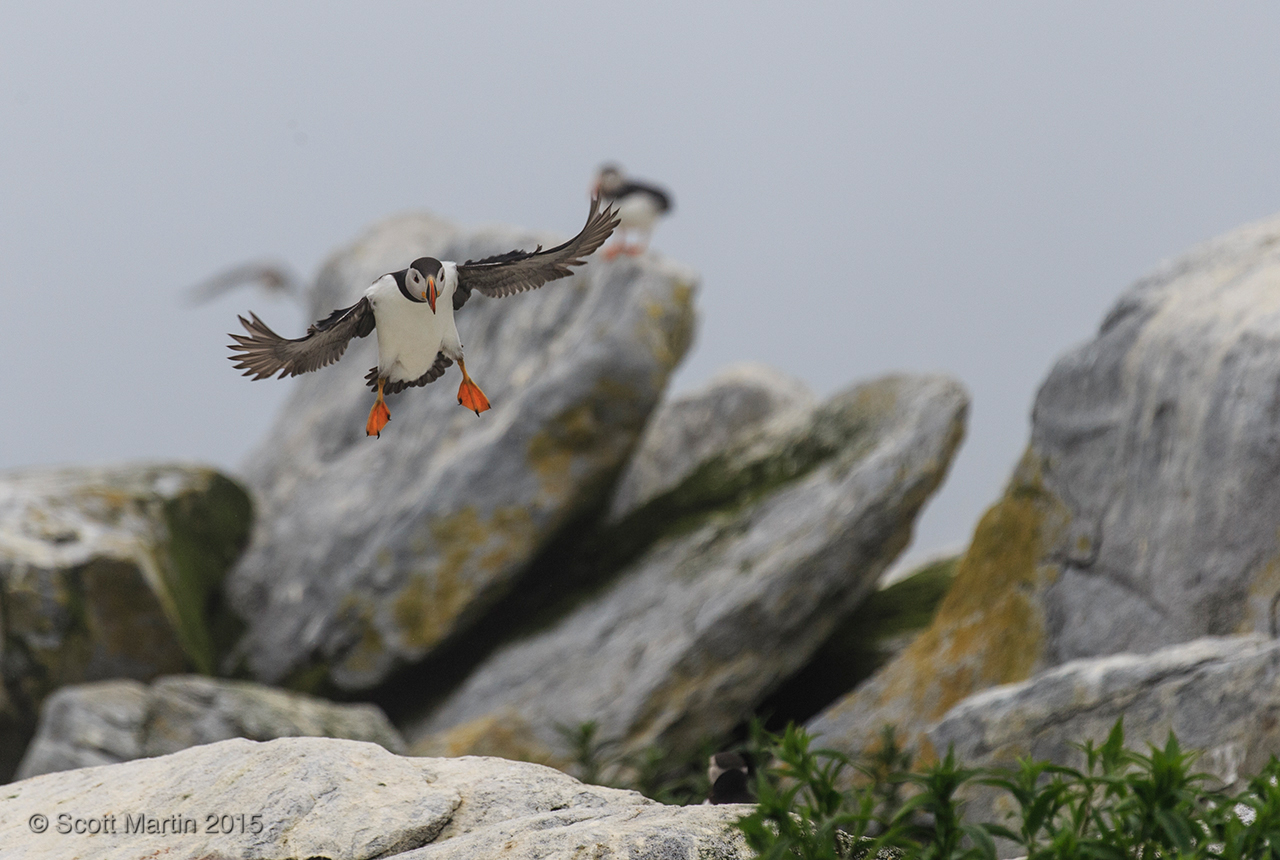
This first image is more to show the bird’s environment than the bird itself. It is always good to begin with a few ‘environmental’ images of every species you photograph as it helps provide a better context for understanding of the animal’s world. During breeding season Puffins build their nests on the ground deep in the crevasses between the boulders that rim the island. If you look closely you will see this incoming Puffin’s mate poking her head above the rock that is protecting their nest and its precious contents (Puffins typically lay one egg and thus raise one new bird each year).
The little wings and rather rotund bodies suggest Puffins would be awkward in the air, but the opposite is the case as they are very quick straight line flyers reaching speeds of up to 55 mph with a wing beat frequency of 400 per minute.
Puffins are not large birds at about ten inches in length and weighing around a pound. The only time they are together is during nesting season. During the rest of the year they are typically solitary birds on the ocean, not meeting up with their mate until they arrive at same nest they left the year earlier.
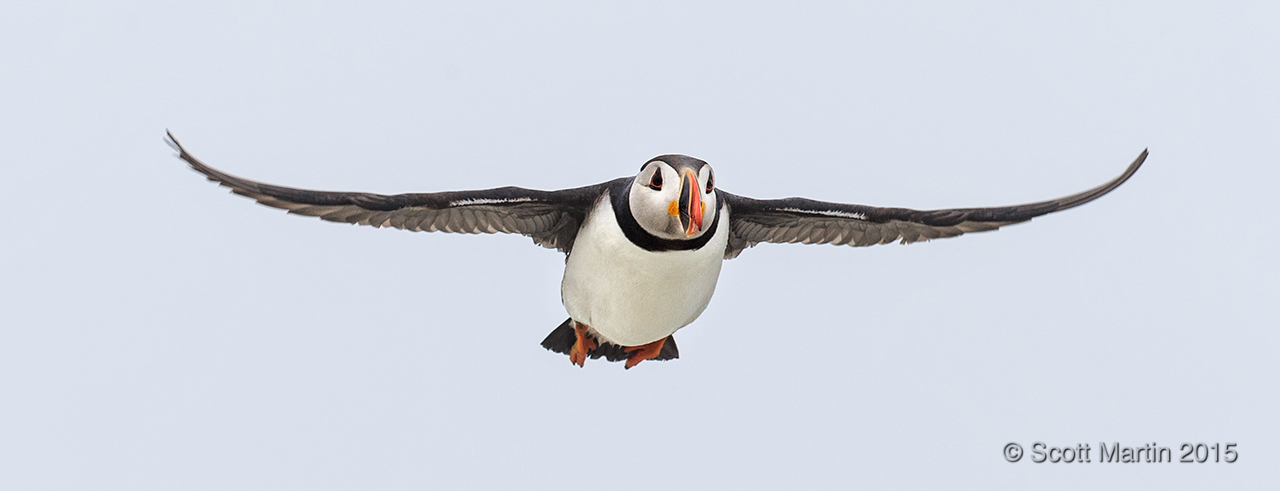
When photographing birds in flight it is desirable to record captures with various wing positions creating uniquely different images that also allows one to study the primary feather characteristics thoroughly. The ventral under side of the wing is generally lighter in colour.
While the dorsal or top side is typically darker. It is thought that the white underside and dark top side of the Puffin provides protection from predation by making the Puffin hard to visualize from below by water dwelling predators and equally hard to see by raptors from above.
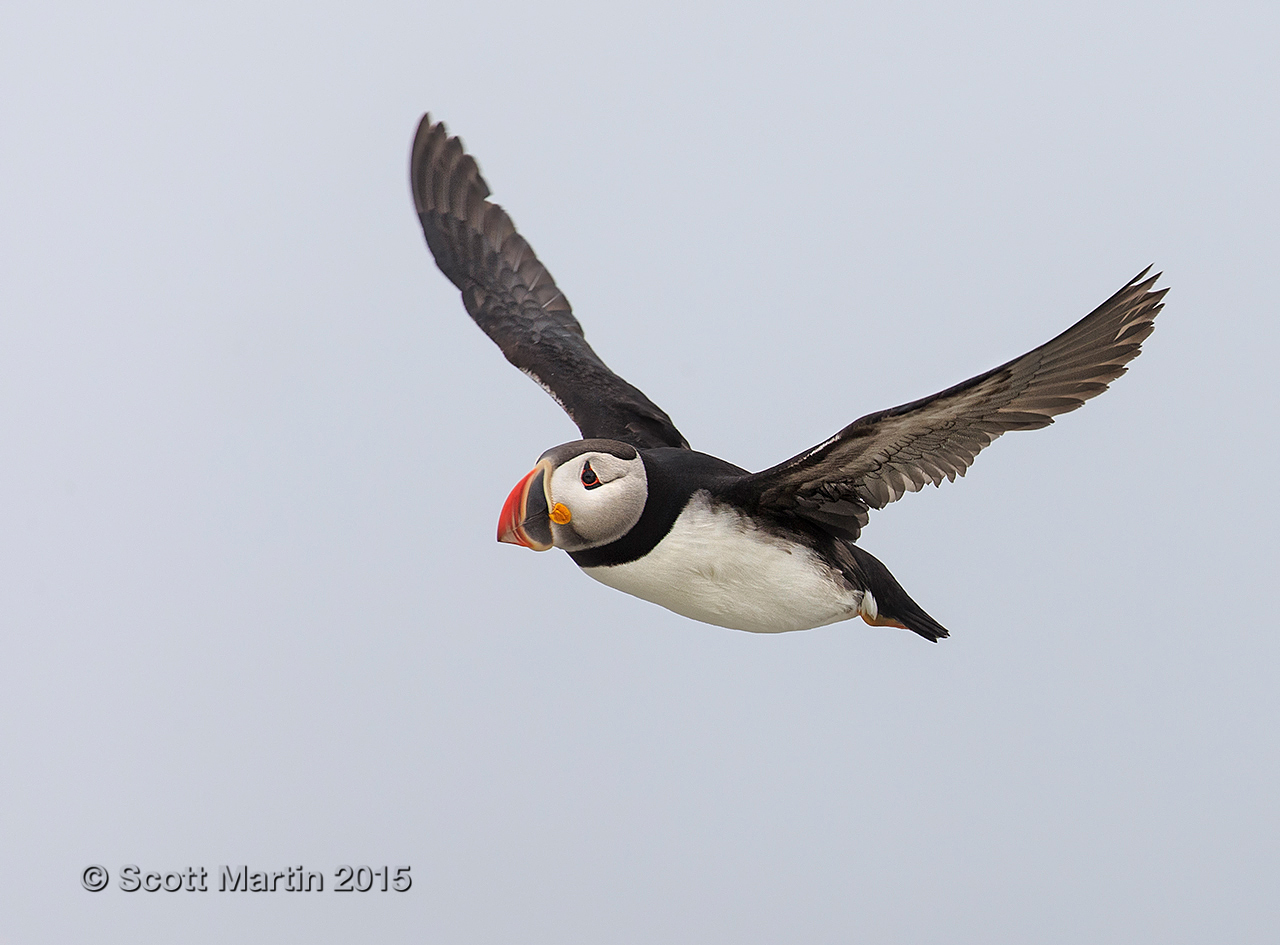
The bright orange feet of the Puffin are tucked neatly under the tail feathers during flight however they are exposed as the Puffin prepares to land at its nesting site. Located towards the end of the bird and with their large size they are ideally suited for swimming. Puffins are very agile swimmers and have been recorded at great deaths below the surface.
Normally Puffins consume the Sand Eels and Herring they enjoy as they catch them. The exception to this pattern occurs every summer when they are feeding the new addition to their family. For a period of six weeks or more after the chicks hatch and before they fledge, the parents take turns heading out to sea and returning with a beak full of fish. This small window of time also affords the photographer the opportunity to catch a Puffin in flight returning to the nest with a fresh supply of fish for the young Puffin chick. This was the reason we planned our summer road trip when we did….to hopefully be provided the opportunity to capture this classic image of a Puffin with its catch.
Seeing these images on the camera LCD was a thrill and well worth the time and effort required to get to Machias Seal Island.
Given the uniqueness of the Puffin’s appearance it is impossible not to take some tight portraits. There well deserve their nicknames of ‘ocean clown’ or ‘parrot of the sea’.
.
Even though we planned well and were good stewards of our time in the blind, the hour passed very quickly and it was soon time to be escorted back to the docking area where Captain Peter was waiting to shuttle us back to the Day’s Catch for the return trip to Grand Manan. The video that follows provides a glimpse of just how foggy it was. The gentleman in the green T-shirt is Ralph Eldridge, one of the lighthouse keepers who lives on the island for one month at a time. He is also a superb photographer and Puffin expert. You can see his impressive photography via this link to his website.
It was a foggy trip home but the Day’s Catch was filled with fourteen people excited to share their Puffin stories with each other and looking forward to see what they had captured on their CF & SD cards.
After spending one more night at the Inn at Whale Cove Cottages we boarded the ferry for the return trip to Blacks Harbour, continuing on to Prince Edward Island and then the little town of Percé on the tip of the Gaspé Peninsula, famous for Percé Rock and Bonaventure Island – home to the second largest Northern Gannet colony in the world and our next bird photography adventure. If you haven’t already subscribed to our mailing list, please take time now to do so and we will let you know when the Gannet blog is posted.
Thanks for taking time to check out this post which I trust has piqued your interest in these wonderful little birds…. hopefully enough for you to plan a trip to Grand Manan and Machias Seal Islands for your next summer holiday.
Time Lapse Photography is an area of photography that has intrigued me for many years however I hadn’t seriously attempted any until recently. Time lapse photography is a method of compressing a long period of time into a short video of 10-15 seconds. The concept is quite easy; take a few hundred still images over a predetermined time period and then place them sequentially into a video format. That said the technical challenges required to record the images are often difficult and the post processing and video formatting can be quite complex. An impressive final result is only obtained after much practice and lots of time, both to obtain the photographs and to edit and assemble them afterwards.
The purpose of this post is not to get too technical in describing the details however to show a few of my early attempts at producing time lapses and hopefully encourage you to attempt some of your own. Basic time lapse photography does require an investment in gear however it certainly is not cost prohibitive. Besides the camera, you must have a tripod to ensure the camera is completely stationary throughout the recording period and an intervalometer to control the operation of the camera while it takes the photographs from which the time lapse will be compiled (some cameras have internal intervalometers in which case you won’t have to buy one). Advanced time lapse photography allows the camera to move in up to three axes during the recording of the images and although the gear required to accomplish this is expensive the results are impressive.
The easiest time lapses to create are those in which the exposure remains the same throughout the recording period. This first time lapse is of the Muskoka Bible Centre Marina near our cottage. There were 330 images taken at three second intervals over approximately thirty minutes with exposure settings of 1/500 sec, f/2.8 and ISO 50.
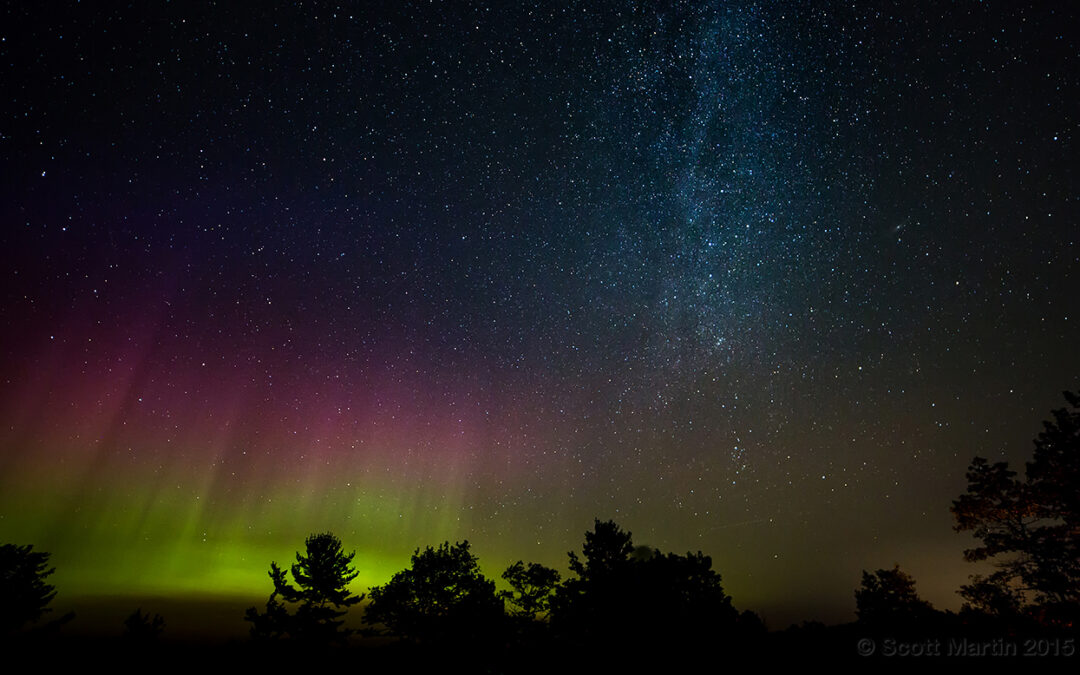
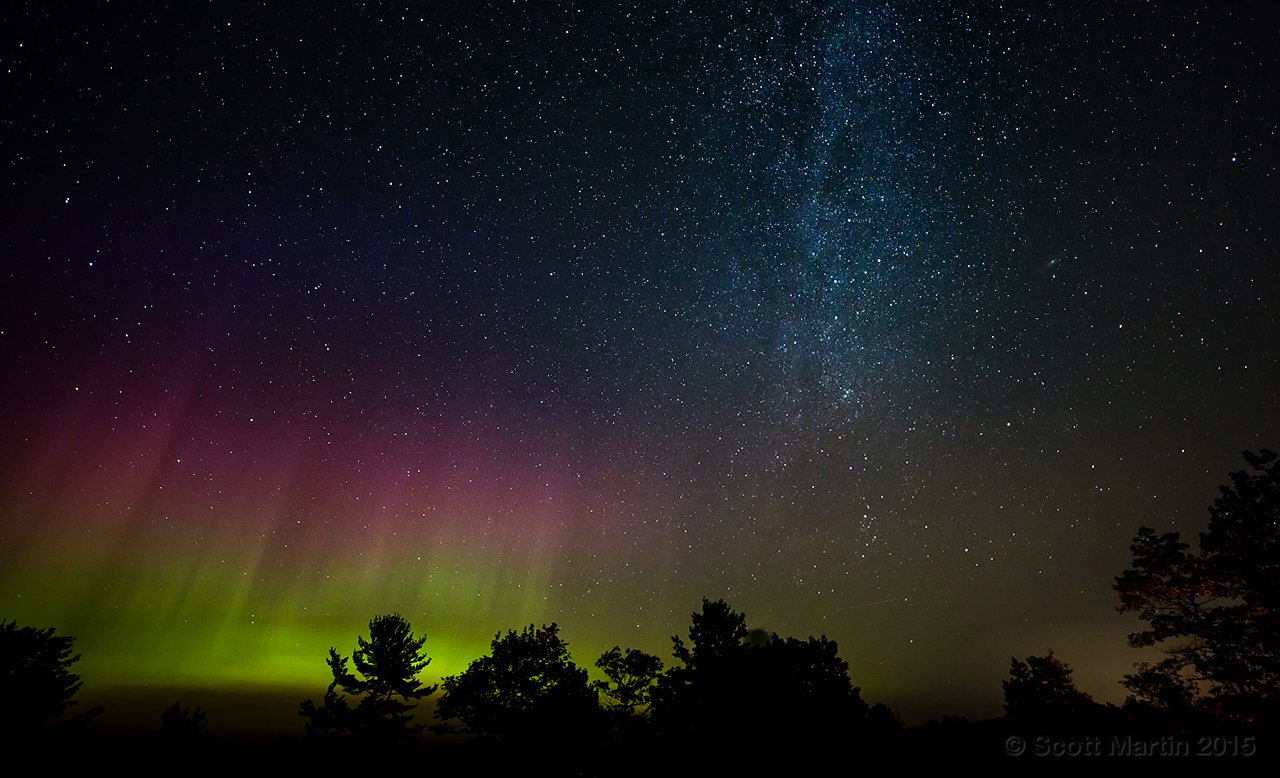
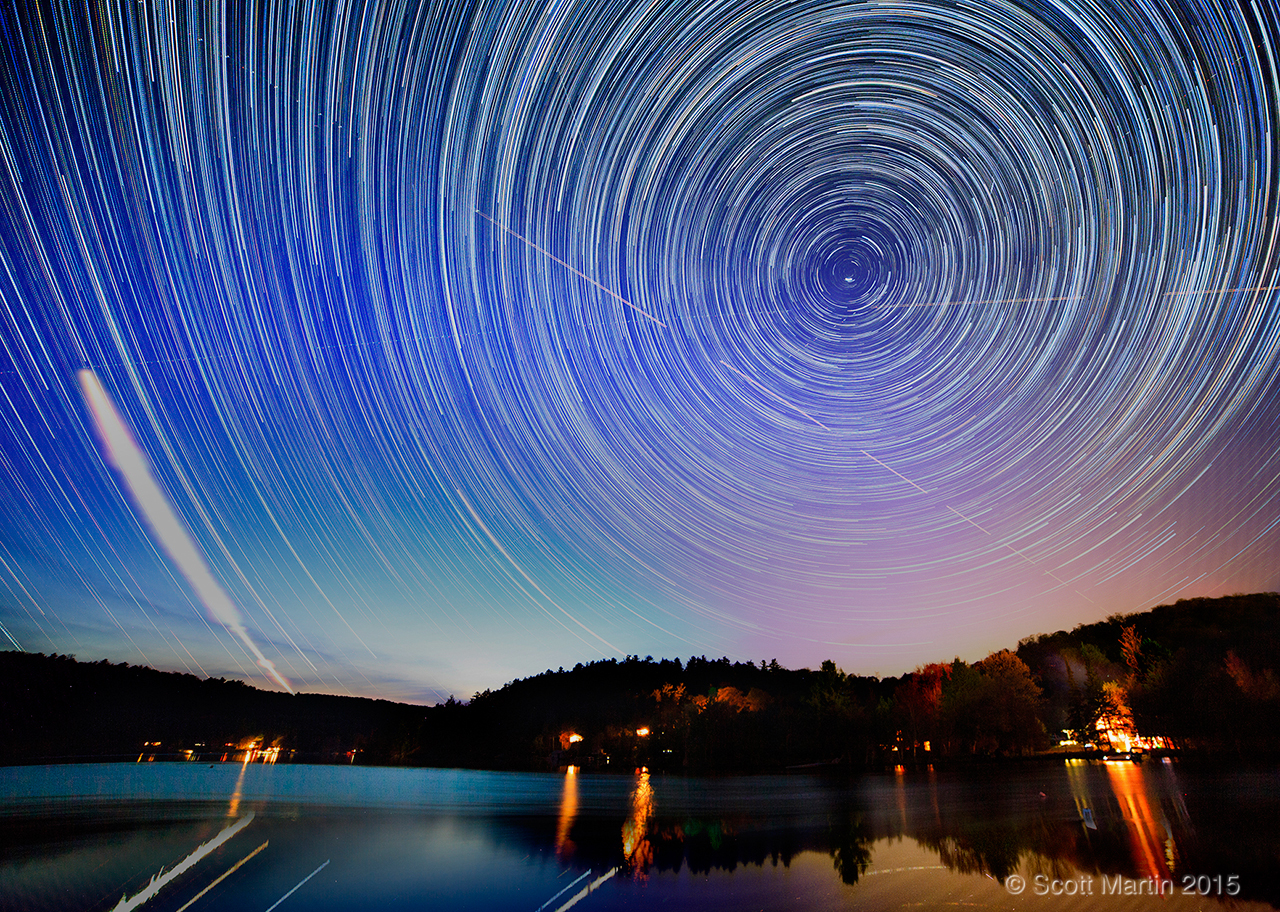
Taking a time lapse at night employs the same technique as during the day however the length of exposure required and the ambient temperature changes create some interesting challenges that must be addressed in order to be successful. This next time lapse of the Aurora Borealis (Northern Lights) and Milky Way is a series of approximately 450 images taken over a four hour period at thirty second intervals at Torrance Barrens Dark Sky Preserve in Muskoka. The exposure data was 25 seconds at f/2.8 and ISO 3200 using a Canon 5D Mk III and 14mm Rokinon ultra wide angle lens. The camera lens was wrapped with three winter hand warmers to keep the lens barrel temperature above the Dew Point in order to prevent condensation on the lens which immediately ruins the time lapse. This time lapse was also recorded at the end of the Perceid Meteor Showers season so if you look close you will see a number of meteor trails.
Most photographers have more than one camera body, so if you get interested in time lapse photography, I would highly recommend setting up two cameras every time out. It doubles your practice opportunity and helps pass the time babysitting two projects while you are trying to stay awake through the night :). This next time lapse was taken at the same time as the previous one, the only difference being the direction the camera was pointed. The first was pointed north to record the Northern Lights while the second was trained on the Milky Way. The exposure data for both time lapses was the same however the Milky Way was shot with a Fuji X-E2 and 8mm Samyang fish eye lens with a 180° field of view which creates the curved horizon. The lens was wrapped with a hand warmer to prevent condensation.
As mentioned earlier the easiest time lapses to create are those in which the exposure remains unchanged throughout the entire duration, as was the case with the first three time lapses in this post. The reason for this is that with any change in exposure from one image to the next, the different exposure causes a noticeable difference in the luminescence of adjacent frames in the time lapse sequence which appears as flickering in the final video. Flicker is the bane of every time lapse photographer and we go to great lengths to get rid of it. You may think that slight changes in exposure from frame to frame would not be noticed but I can assure you it is. We always take exposures manually and fix the aperture so that the diaphragm remains motionless at all times. The micro variability in exposure caused by the diaphragm stopping down to the same aperture for each frame (as it does if you use automated settings for your camera) is readily seen as flicker in the time lapse video.
So what do you do if your desired time lapse demands changing exposures, such as recording the sunset followed by the appearance of the stars? These types of time lapses are very impressive yet technically difficult to create, in fact amongst time lapse aficionados they are known as the holy grail of time lapses. There are a number of methods for creating flicker free changing exposure time lapses and they fall into two broad categories, one in which the exposures are highly controlled in the camera with special intervalometers that allow for bulb ramping and another that uses software solutions to smooth out the exposure changes evenly from frame to frame. To date I have experimented with a few of this type of time lapse, which is just enough practice to get an understanding of how difficult they are to do well (which I have yet to do). I have tried both methods and reluctantly will share a sample of each method.
The first is a sunset to starry night transition using a bulb ramping technique. Bulb ramping is when you connect a highly specialized intervalometer to the camera’s USB port which gives the intervalometer the ability to control the exposure, aperture and ISO of the camera in infinitesimal increments so that frame to frame luminescence variations are not noticeable. You set your camera to bulb mode (meaning the shutter remains open and is controlled by the intervalometer) and the intervalometer ramps up the exposure times and ISO over the course of the time lapse based on light readings from sensors in the intervalometer. Hence the term ‘bulb ramping’. I use a Timelapse+ intervalometer which is a terrific piece of equipment that can be used for any type of time lapses as well as for multi image HDR’s and rapid light sensing triggers for photographing lightning bolts. If you are looking for the ultimate intervalometer, look no further than the Timelapse+.
This was taken at the cottage and not an ideal location for a starry time lapse as there is quite a prominent light dome created by the town of Huntsville approximately ten kilometres away. The bright ‘star’ that dominates the dark sky is actually Venus, the brightest object visible in the sky that night.
The above time lapse was made from approximately 520 images over a 4.5 hour period during with the intervalometer modifying the exposure time, ISO and interval between exposures. The exposure times ranged from 1/20 sec to 30 seconds. The ISO varied between 50 and 4000 while the aperture was fixed at f/2.8 (Canon 5D Mk III & Rokinon 14mm lens).
The second sunset to night transition was taken from our hotel balcony in Percé, Quebec this past July. For this time lapse I manually changed the exposure time and the ISO during the recording of the images. The aperture was fixed at f/4. As a general technique I began the time lapse overexposing approximately one stop and would manually decrease the shutter speed or increase the ISO when the camera meter indicated the scene was one stop underexposed. This resulted in approximately six to eight ‘major’ exposure changes over the four hour period I was recording the time lapse. The images were captured with a Canon 5D Mk III and EF 24-105mm f/4 L IS lens and processed using Adobe Lightroom and a fabulous programme called LRTimelapse which is designed to process time lapse images and render high quality video files of the time lapse. There is a bit of a learning curve to the software but once you understand how it works the results are incredible. In fact I almost deleted all of the images from this project before processing them as I was so unhappy with the results, but decided to give them a try with LRTimelapse. I was more than impressed with the results as the original work product was very poor.
At this point, there is much learning and practice to be done to improve in the area of time lapse creation, however its a fascinating niche within photography that has attracted my intention and I hope to produce many more. Over the short term my intent is to utilize both the software and bulb ramping techniques for day to night transitions as well as hopefully adding one, two and then three axes of motion into the mix.
When you have finished recording the 300-500 images required to produce a time lapse video there are some added bonuses to be had from the individual frames. For one, there should be a few good frames amongst the many which stand alone as an acceptable image or print. Here is one frame from the Aurora Borealis time lapse above.
Another interesting possibility, made easy with Adobe Photoshop, is to ‘stack’ all of the images from the time lapse into one single image. Although this creates a gargantuan file, the movement of the stars over the recording period create star trails when stacked into the same image. As all the stars in the Northern Hemisphere revolve around the North Star it makes for a very interesting result as seen by this stacking of 530 images into a single image. These are the images from the Mary Lake Sunset to Night Sky Time Lapse.
I trust this brief introduction to the world of time lapse photography has piqued your interest enough to give it a try. Beside your camera all you need is a tripod, an intervalometer and a big memory card to record all those images….oh wait….and a pot of coffee to keep you warm and awake while you stay up all night photographing the stars!
Well, as it is for everyone, time slips by at what seems like an ever increasing pace and we find ourselves already into February while Christmas feels like it was only yesterday. It’s also been over a month since our last blog post and although I have a number planned for the upcoming months, there just hasn’t been enough time to prepare them, so I thought I would post a few quick bird images taken over the last month or two.
Before Christmas I spent a morning at Lynde Shores Conservation Area with Joe & Harv, two wonderful photographers who I’ve known for many years and have learned much from when it comes to capturing great bird photographs. We had a terrific time kibitzing, telling stories, arguing over camera gear and even taking a few pictures in the process. The images that follow are a few of them.
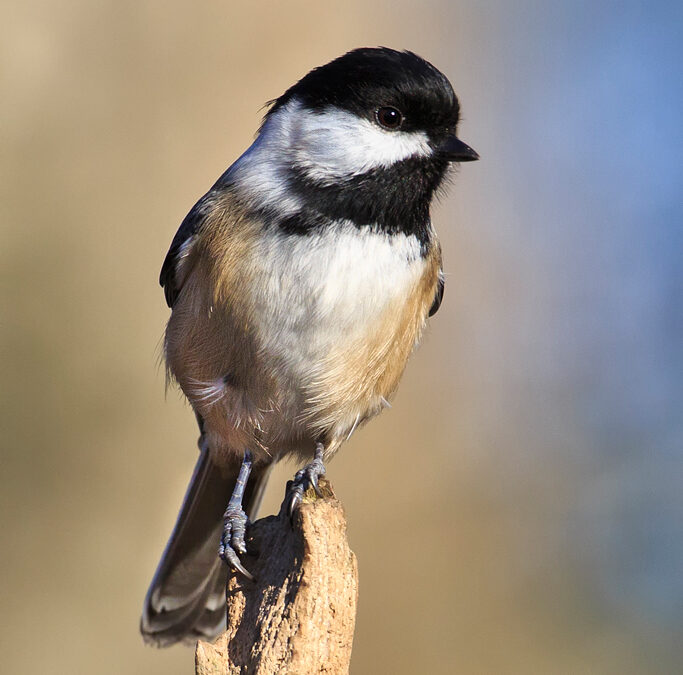
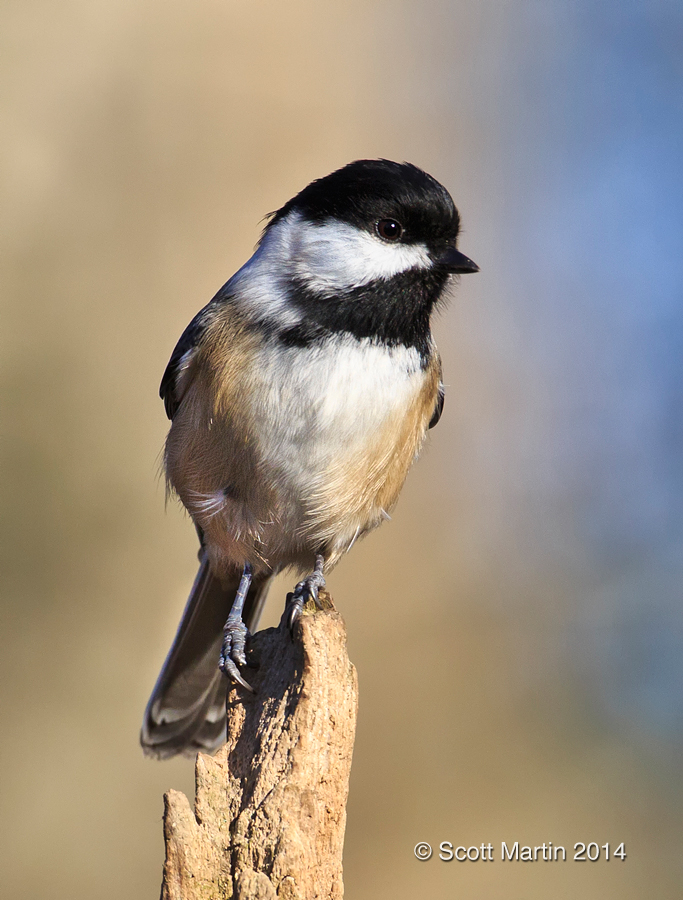
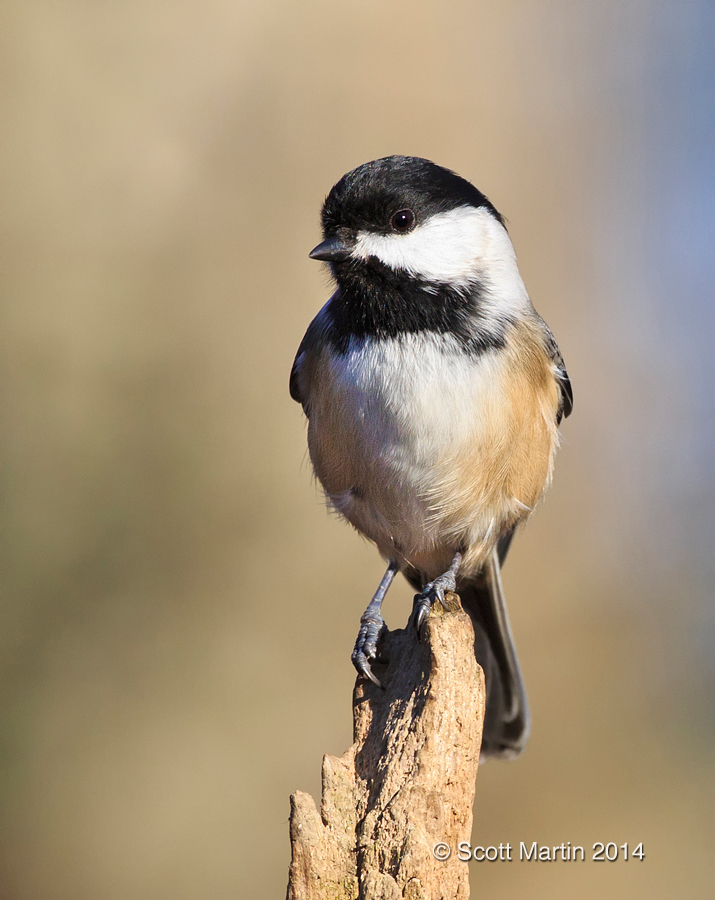
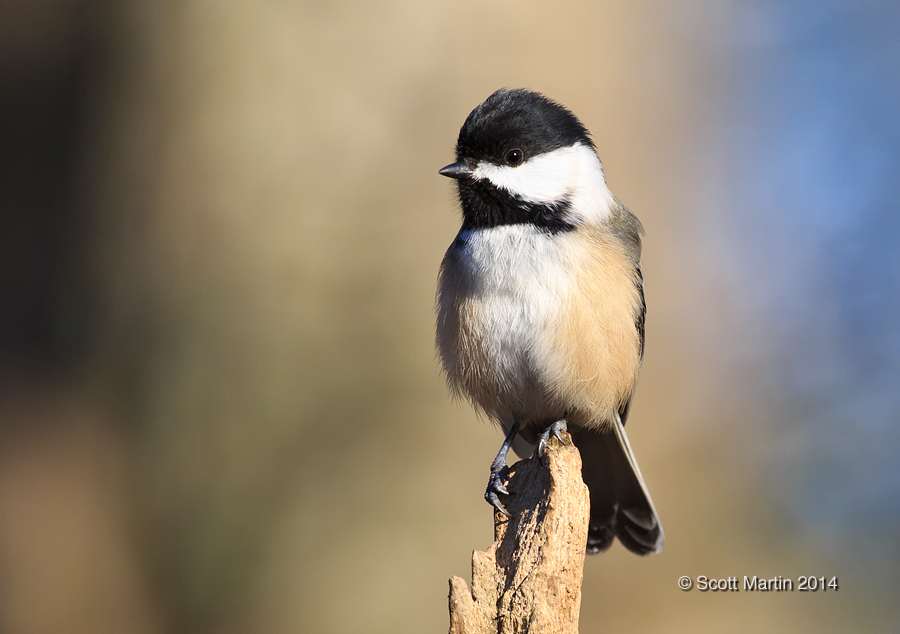
Deb’s favourite bird is probably the Black Capped Chickadee (BCCH) and I never tire of trying to get a good picture of one. They are extremely cute and friendly little birds that dart from branch to branch and follow you along through the forest paths and readily landing on your hand if it contains some black oiled Sunflower seeds.
From a technical perspective, the close proximity of blacks and whites on the Chickadee presents an exposure challenge. How do you preserve the details in the whites without underexposing the blacks and how do you expose to see detail in the blacks without blowing out the highlights in the whites? The short answer is that you can’t, especially in strong light. An overcast sky is your best friend in cases like this! Personally, overexposed whites that present as white areas with no visible detail ruin pictures more than anything else, so my rule of thumb is to always expose for the whites and if needed improve the dark areas in post processing (this is another reason to always shoot in RAW format as doing so provides about 3-4 stops of exposure adjustment on the computer).
Compositionally, practice taking shots in both landscape and portrait orientations. This is easy with birds like Chickadees that will allow you to get close to them and provide you the privilege of ‘cropping in the camera’. When getting this close make sure you move your focus point to allow for proper positioning of the bird in the frame. There is nothing worse that being treated to taking full frame images of a bird in portrait orientation only to find you’ve placed the bird in the middle of the frame and have no margins left for cropping on the computer. With today’s high megapixel camera sensors, you may be happy to shoot everything in landscape orientation and simply crop for portraits later but doing so always costs by way of reduced detail.
The following four images show two portrait and two landscape images with the bird facing in opposite directions for each similar orientation. If you make a practice of getting these different views in the field, you can be relatively certain of getting some good ‘keepers’ every time out.
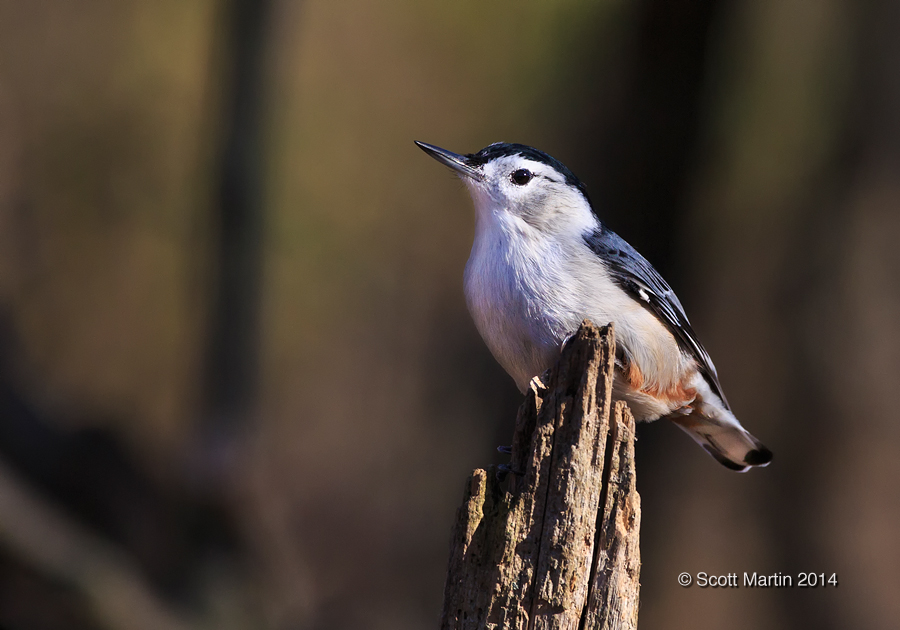
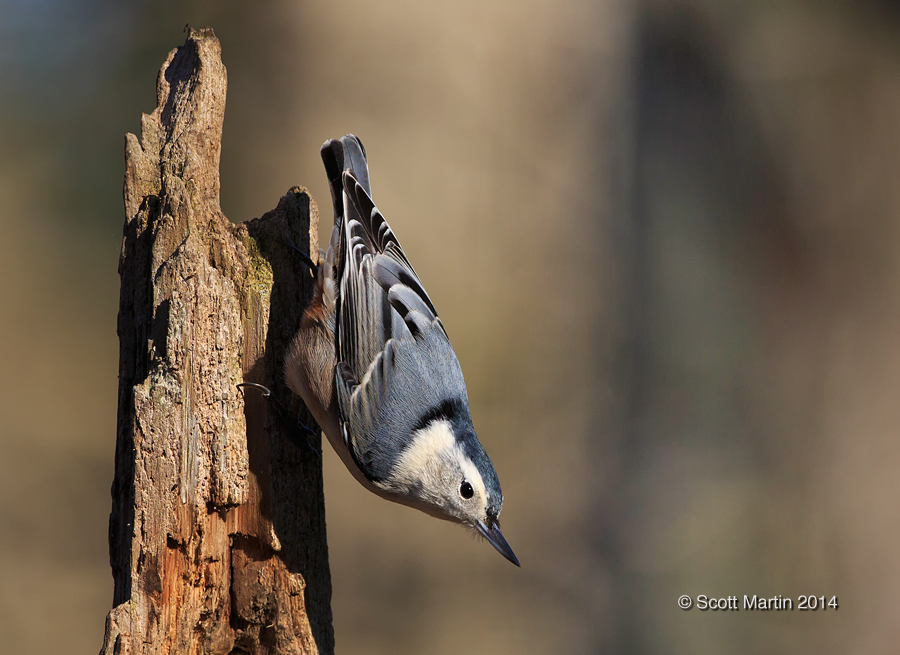
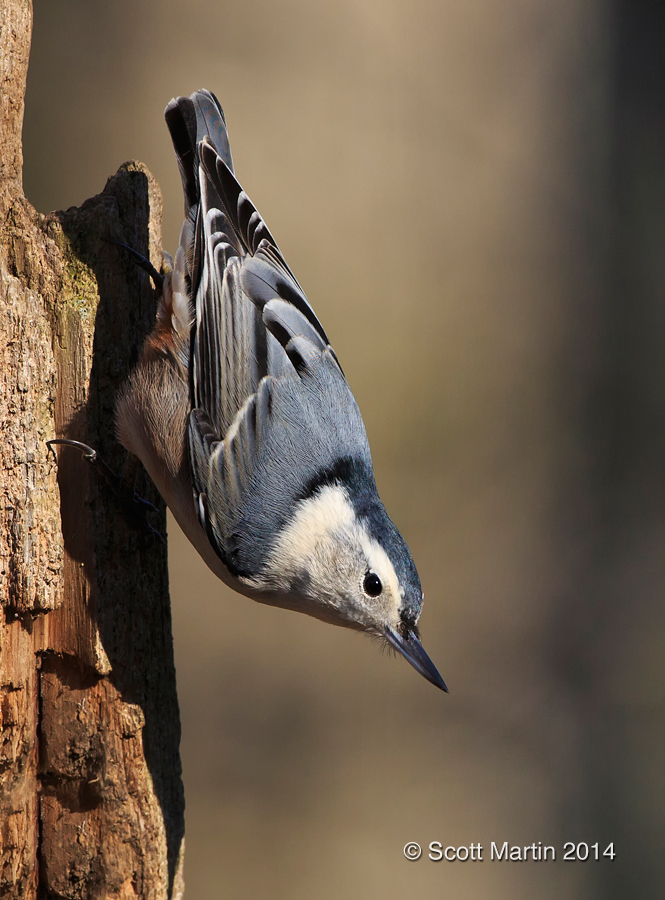
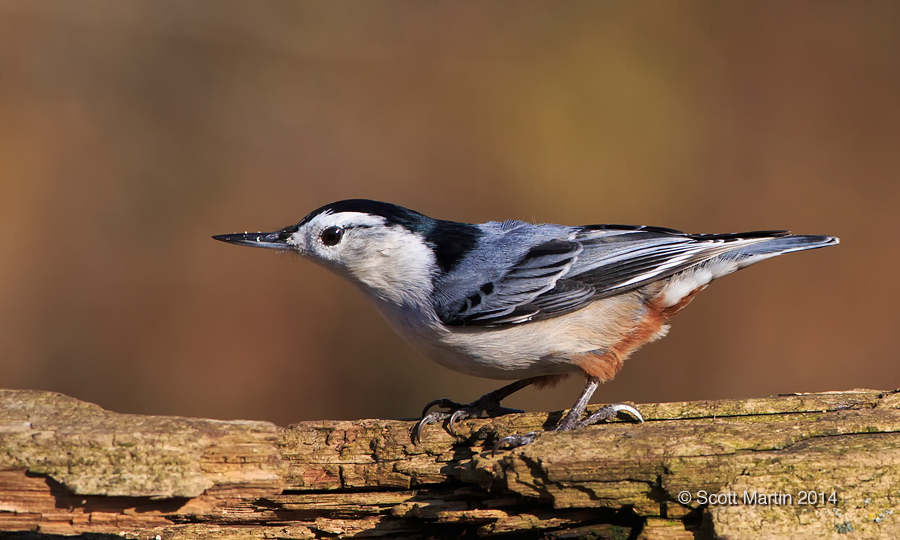
In the same family of birds as the Chickadee we find the White-breasted Nuthatch (WBNU), which happens to be my Mom’s favourite bird.
They are known for spending most of their time upside down on three trunks. In fact you may not recognize the bird when perched as it is above, but it certainly looks more familiar in the next two images as that’s the way we see them most often.
They look very different when foraging for bugs the way the other birds do as seen below.
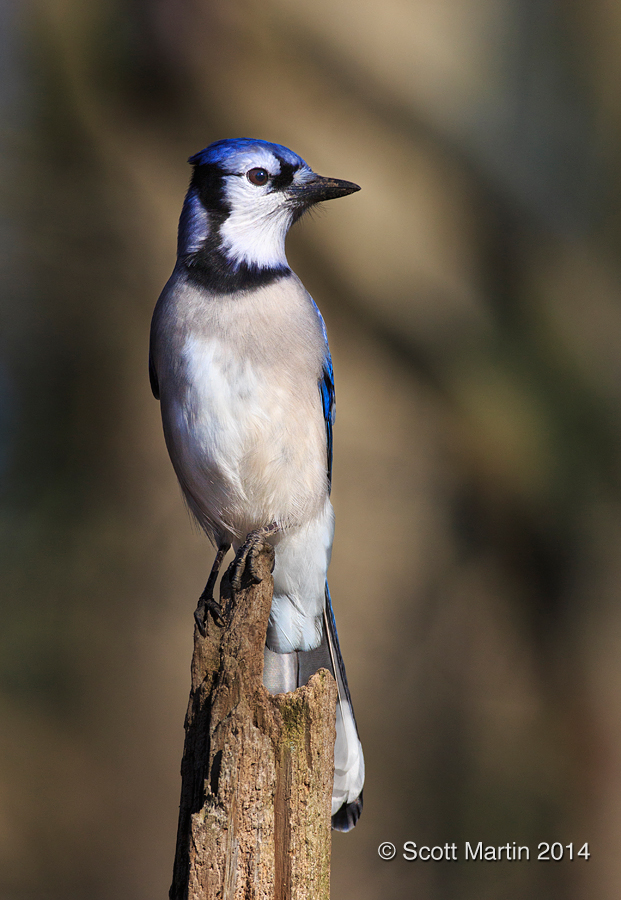
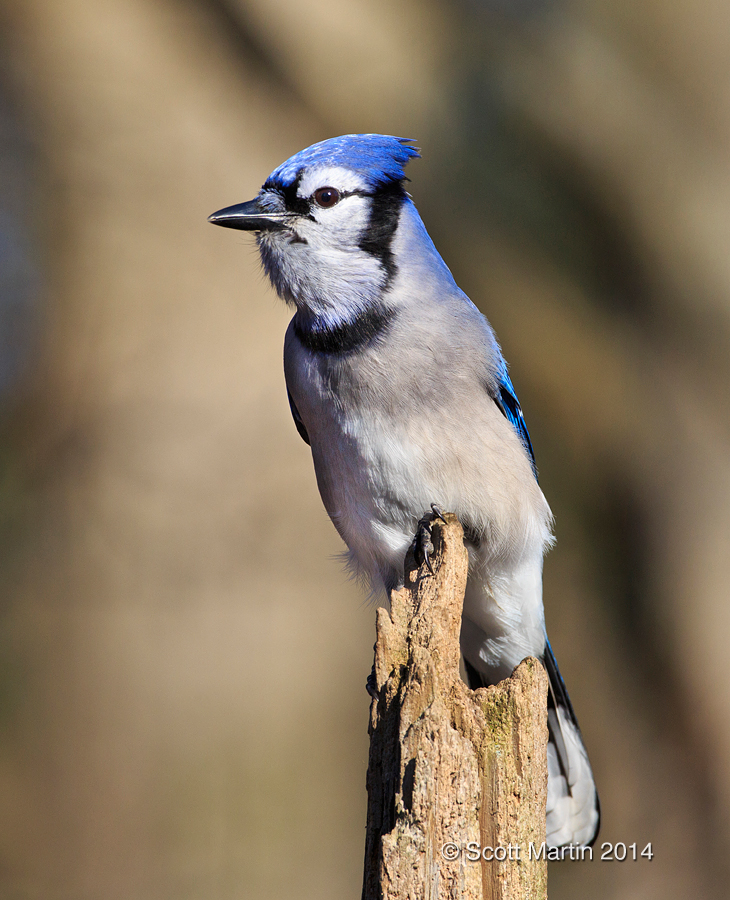
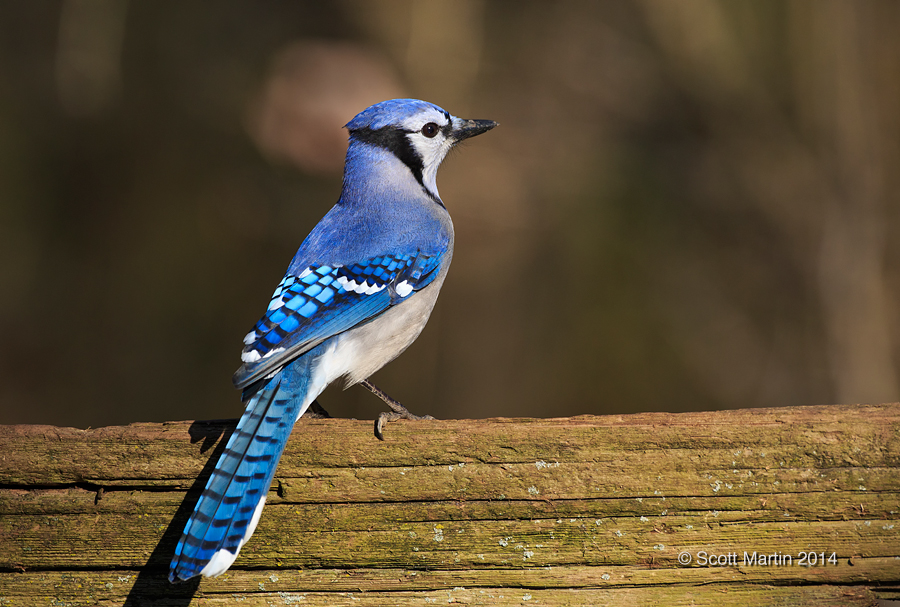
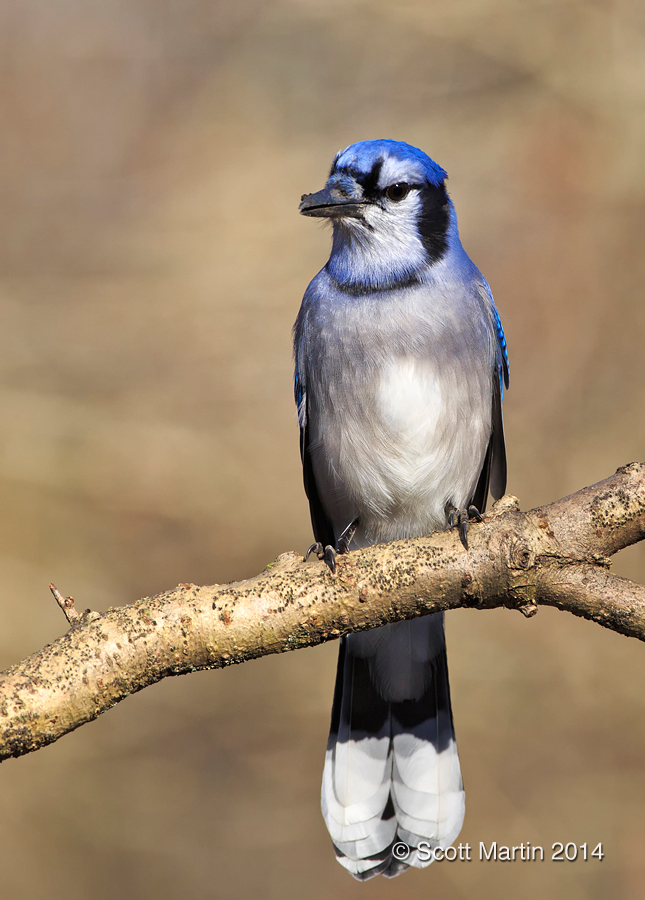
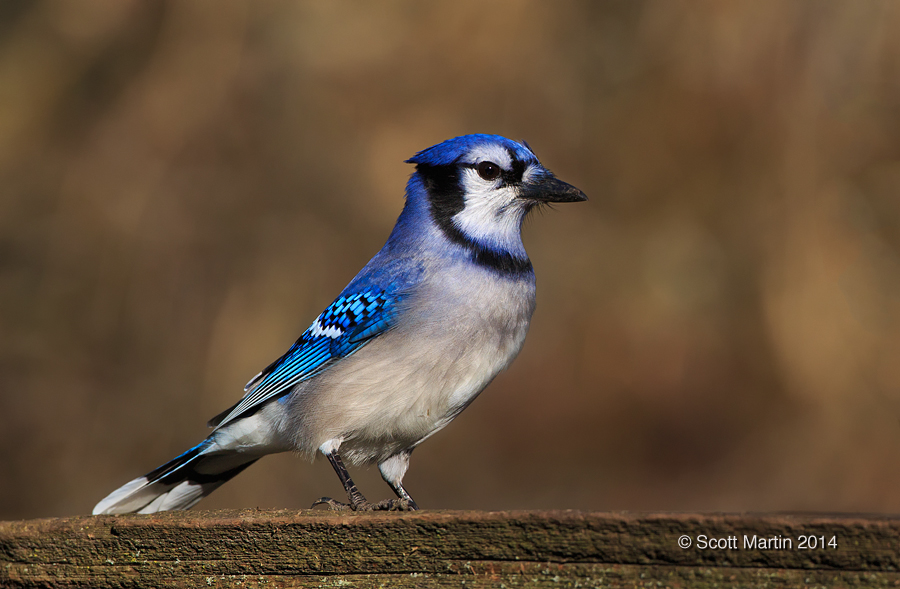
Another friendly bird in our area is the Blue Jay (BLJA) which will gladly take peanuts from your hand. Their brilliant blues and superb primary wing feather patterns also make them very photogenic. The first two Blue Jay images are very similar portraits however the first is a much better photograph due to the more natural appearing body shape of the bird (the disproportionately wide neck in the second created by the forward posture of the head is distracting). Also the dark back ground along the lateral edges of the first frame provides a natural vignette effect which is pleasing. It’s enjoyable to be able to choose from a number of similar images to pick the best one and this can only happen by taking lots of images!
The beautiful blue, white and black feather patterns of the Blue Jay.
The Blue Jay gets its vibrant blue hues as light is refracted when passing through the unique structure of its feathers and not from blue pigments in the feathers as most presume. The next time you find a Blue Jay feather on a trail, crush it up with your hand and watch the blues turn grey as you alter the structure of the feather and hence the refractive properties of the feather. You will be surprised!
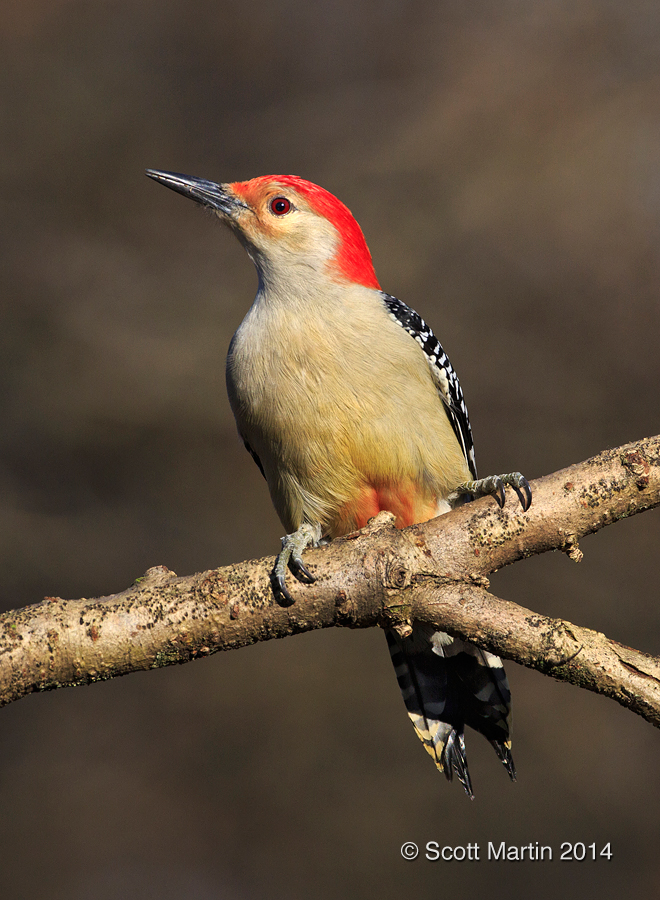
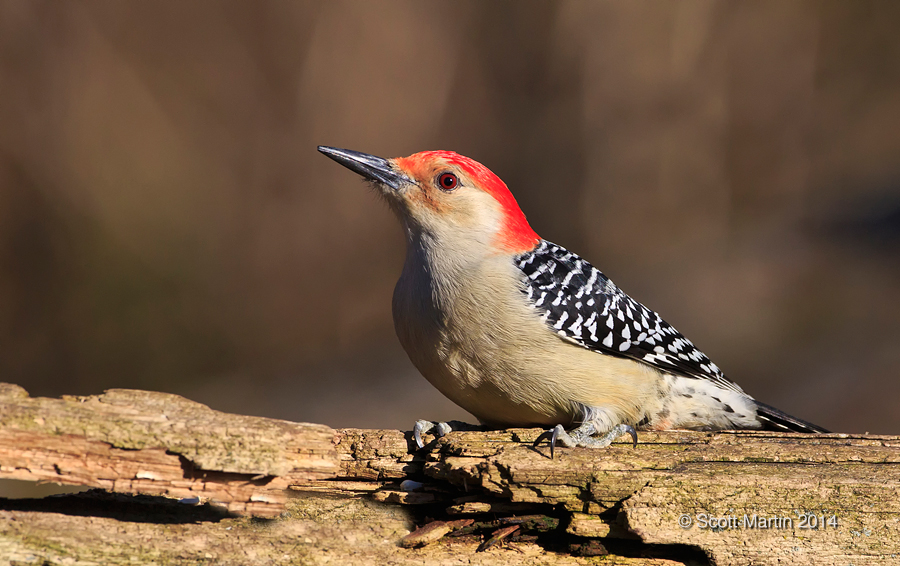
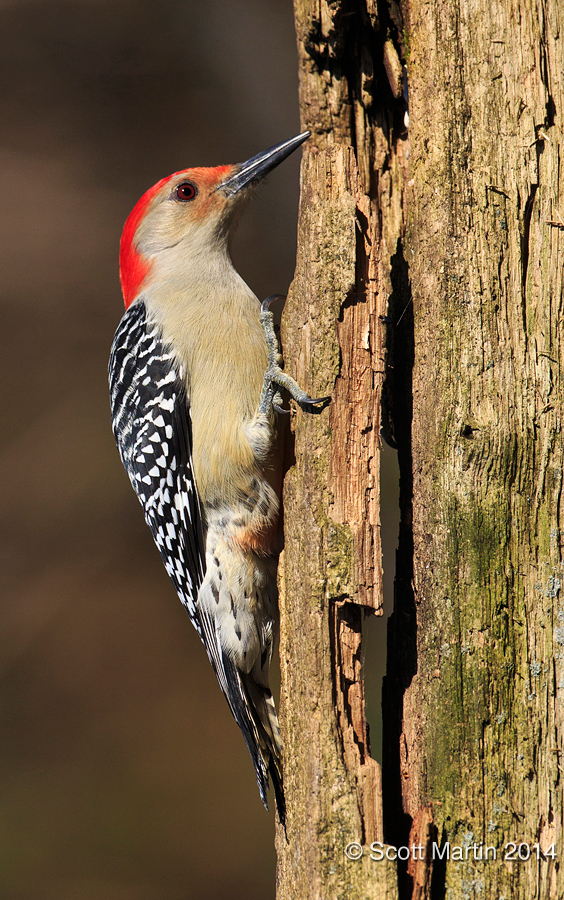
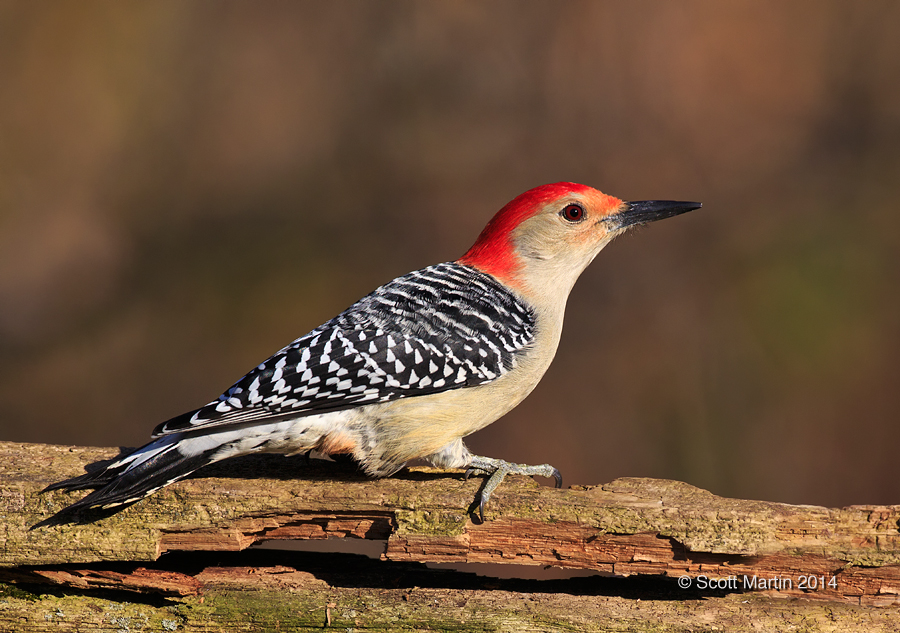
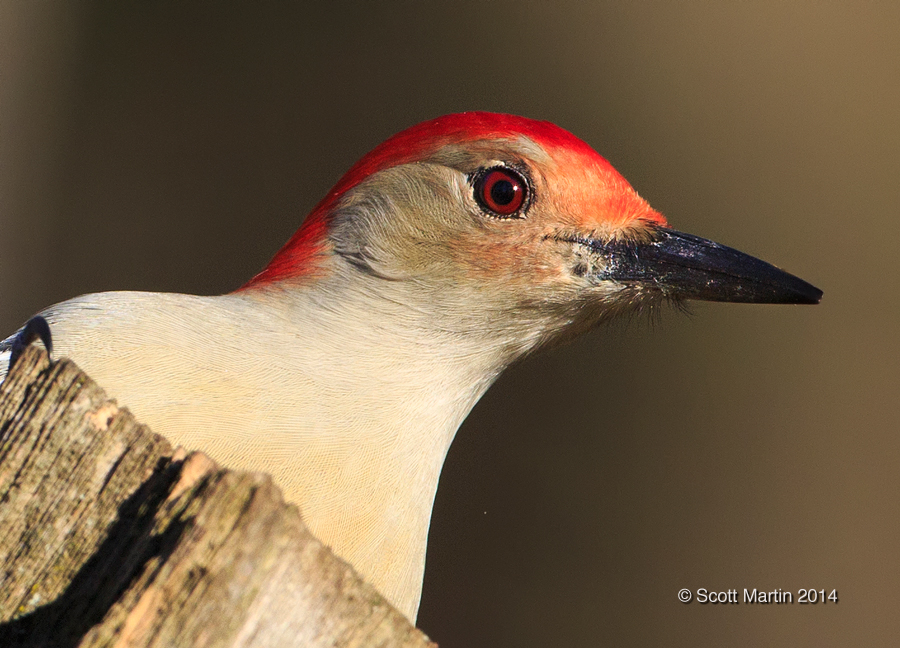
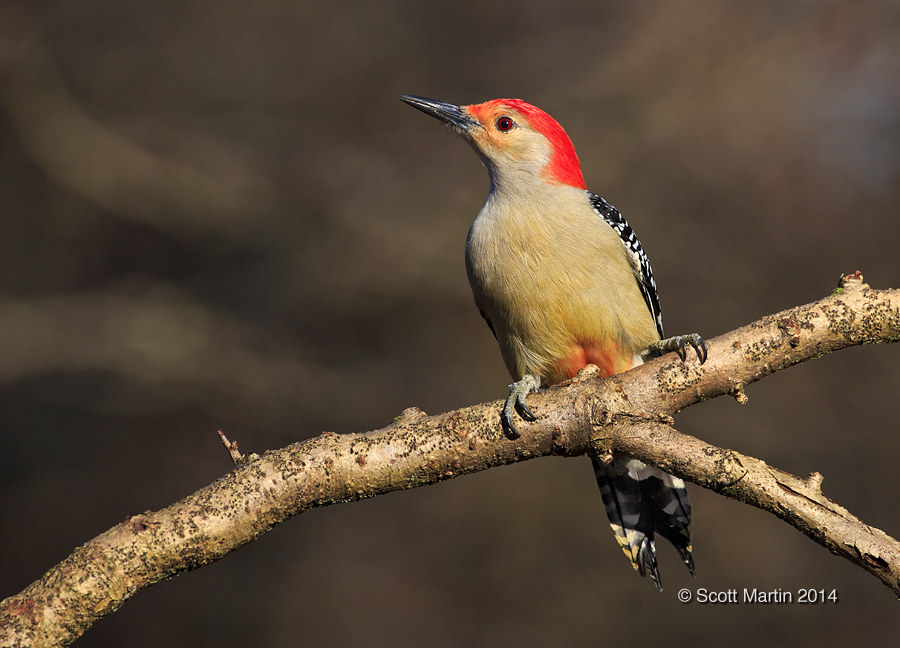
This Red-bellied Woodpecker has been a popular resident at Lynde Shores for a while now, however this was the first time I’ve been able to photograph this beautiful bird. This first image shows the characteristic red belly from which it gets its name.
The male and female of this species are similar other than the cap, the male has a red cap while the female’s is grey. These images are of the male.
Interestingly, the males forage on tree trunks while the females prefer the tree limbs. Males also have longer beaks and wider tongues than females.
The Red-bellied Woodpecker is near the northern limits of its normal range so we don’t often get a chance to see them around the Durham region .
The darker brown eye of this bird indicates that it is an adult.
Now that winter is upon us, bird photographers often turn their attention to owls, especially the Northern Owls (i.e., Great Grey, Snowy and Northern Hawk Owls) that will often get displaced southwards from their Arctic breeding grounds when food supplies are scarce. The environmental situations that arise to force more owls south tend to become acute about every eight to ten years. These years during which a disproportionate number of a given owl species arrives this far south s known as an irruption. This winter is an irruption year for Snowy Owls with many being found in Southern Ontario. So the goal this winter is to get some great images of the Snowy Owl. Unfortunately it hasn’t happened yet although we’ve been out looking a couple of times! The following two images were taken just after Christmas and are both cropped images taken at a distance of about 70 yards…..much too far away for a good image.
The most enjoyable part of this day, during which we traveled about 400km and saw ten or twelve different Snowy Owls was that were joined by our friends Arni & Dianne. So the times we spent standing out in the very sub-zero temperatures were off set by lunch in Angus and hot chocolate and coffee at Arni & Dianne’s place.
This past Friday Deb & I spent another day travelling around looking for Snowy Owls and although we saw one owl, there were no photo opportunities. That’s the nature of wildlife photography but it’s always fun to get a day out enjoying creation. Our day was cut short by the weather as an intense snow storm hit while we were travelling from Minesing to Orillia, forcing us to head south on HWY 400 to get out of the storm and head home. Here is a short clip of the snow we found while out looking for Snowy’s 🙂
Sometimes, when you take the time to scout out the perfect location, place a unique looking perch where the lighting is perfect and there is great separation from the background and you’ve created the ideal outdoor studio for bird photography, other ‘models’ come along with well groomed manes to show off their best poses for the camera…..always make sure you oblige them!
All the images in today’s post were taken with the Canon 5D Mk III body and Canon EF 500mm f4 L IS lens (the Snowy Owl images also used the 1.4X TC to provide 700mm). The video clip was taken with an iPhone 6.
Time lapse photography is something that has always been of interest and recently both my son and I have been experimenting with this fascinating niche in the photographic world. The basic premise of time lapse is quite simple; you record several images at regular intervals over an extended period of time and then after processing them, add the images into a video file. When you play the resulting video file, you have a video that shows everything captured in the still images over the period of time they were taken compressed into a few seconds. For example, if you take one image every fifteen seconds for an hour you will take a total of 240 images. Placing these 240 images into a video file of 24 frames per second will produce a video of ten seconds duration. Thus the resulting video will display in ten seconds what occurred over a period of an hour.
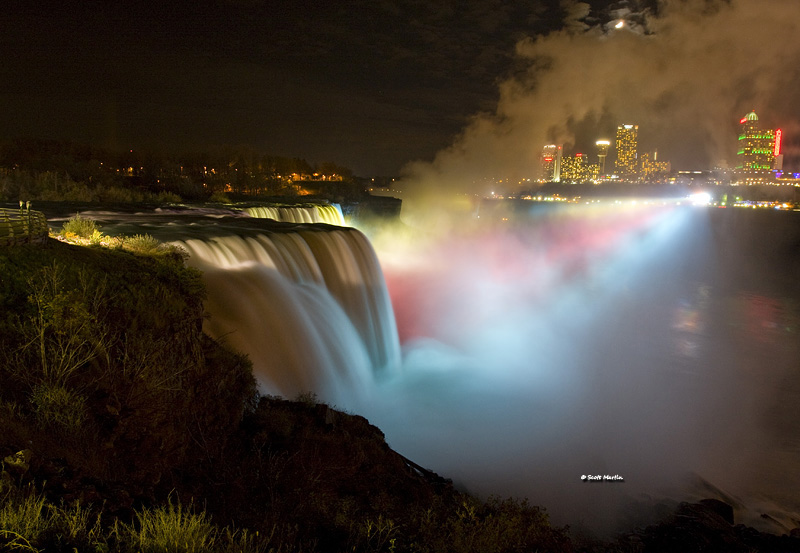
This first sample time lapse is exactly as described above; 240 images taken over an hour ending with sun down and displayed in a 24 fps video file. The images were taken from our hotel room in Niagara Falls.
Besides your DSLR you require two other pieces of equipment to get into the time lapse game, a tripod and an intervalometer.
The tripod is required to ensure that the camera is stable and records the exact same frame with every exposure over the time lapse period. Next to the camera and lens, the tripod is arguably the most important piece of equipment and I would certainly buy a tripod before a flash. As tripod technology hasn’t changed much since the advent of carbon fibre, I would recommend investing in the best possible as they will, for all intents and purposes, last a lifetime. I use Gitzo tripods which have proven very reliable over the years. They are well constructed, very stable and lightweight. As time lapse photography generally involves wide angle or short telephoto lenses, I use a smaller Gitzo 1542T traveller tripod with a Markins Q3 ball head.
The intervalometer is simply a timer remote switch for the camera that allows you to program a remote timer (delay from activation to shutter release), interval timer (the amount of time between successive exposures), long exposure timer (defines exposure time with camera on bulb setting) and exposure count setting (how many exposures will be taken). I use the Canon TC-80N3. Some of the new cameras have an intervalometer built into the camera itself so make sure you check for this feature on your camera before buying an intervalometer.
The easiest time lapses to take are those with a constant exposure over the duration of the time lapse. Changing exposures within the time lapse often causes flickering in the final product which is very distracting and must be avoided. Even slight exposure variations when shooting in any of the automatic exposure modes will result in flickering which is why it is essential to shoot time lapses manually. Similarly you want to disable the autofocus on the camera for time lapse photography to ensure that that the camera focus does not change during the shoot.
This next time lapse is of the American Falls and consists of about 380 images taken over a ninety minute period.
Moving from a CF card with hundreds of images on it to the finished time lapse is surprisingly easy as long as you have a video editing software program. I use Adobe Premier Pro CS6, but any editor will work fine. You are not too concerned with post processing the images and any post processing done must be applied equally to every image to avoid flickering in the video. My workflow is to open all the RAW files in ACR (Adobe Camera Raw), select all, level and crop if needed (but care should always be taken to do this in camera so it is not needed in post processing), adjust for lens correction, contrast, clarity and vibrance and save the images as jpegs in their own folder. Open a new file your video editor (I prefer 24 frames per second), import your time lapse images, render the file and export it as you like it and you are ready to go. I’ve been playing around with both YouTube and Vimeo formats (you can find me at both sites under Scott Martin Photography). When watching the time lapse videos on full screen on the desk top, the Vimeo format appears better than YouTube, however for embedding videos in WordPress blogs like this the YouTube plugins are infinitely better than any of the Vimeo plugins I looked at.
Here is a 240 image, ten second time lapse of the Horseshoe Falls, again taken from our hotel room window on the 44th floor of the Hilton Fallsview Hotel in Niagara Falls.
I would encourage you to experiment with time lapse photography. It provides a lot of enjoyment and is one of those things you can truly multi-task with. My intent is to set up a camera for time lapse when I’m out doing landscape photography and that way as I’m moving about shooting sunrises and sunsets or exploring an area for landscape images I can simultaneously be recording images for a time lapse of the same scene.
Although this last image is not a time lapse, it is a time exposure taken from the American side of the falls, looking across the American Falls towards the Horseshoe Falls in the back ground.
Deb and I got up early on Friday morning of the Thanksgiving Weekend and headed to Mizzy Lake in Algonquin Park to watch the sunrise and hopefully see a bull Moose. We didn’t see any Moose however enjoyed a wonderful morning and were able to take a few pictures along the way.
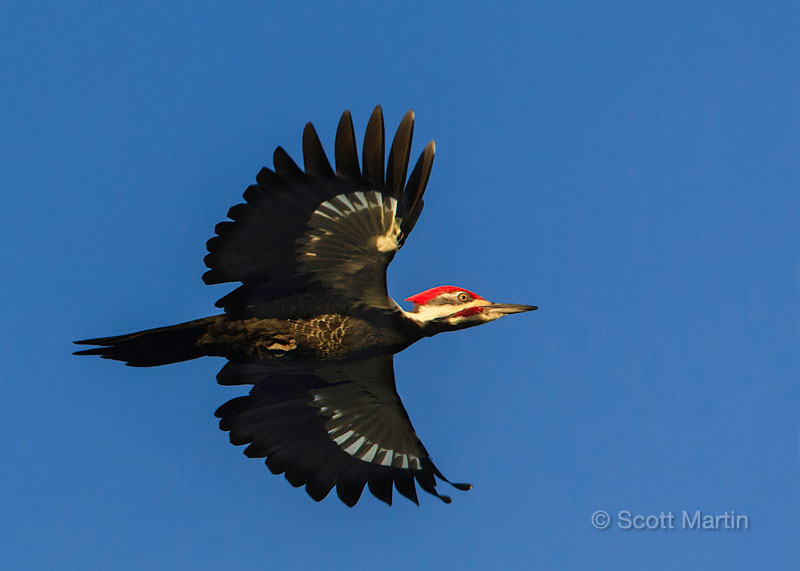
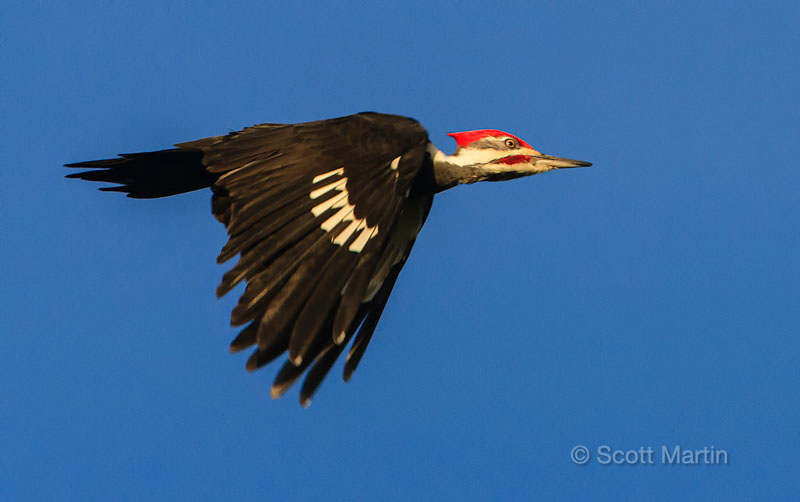
The Pileated Woodpecker is the largest woodpecker in North America and is about the size of a crow. Woody Woodpecker is perhaps the most famous Pileated Woodpecker! They are fairly common in Ontario however we don’t often get to see them up close. Deb spotted this one who was working on a fairly isolated Spruce tree, so it was just a matter of waiting for him to fly to another location allowing the opportunity to get some in flight images with a nice clear back ground, which is quite unusual as they are most often seen in the deep forest.
.
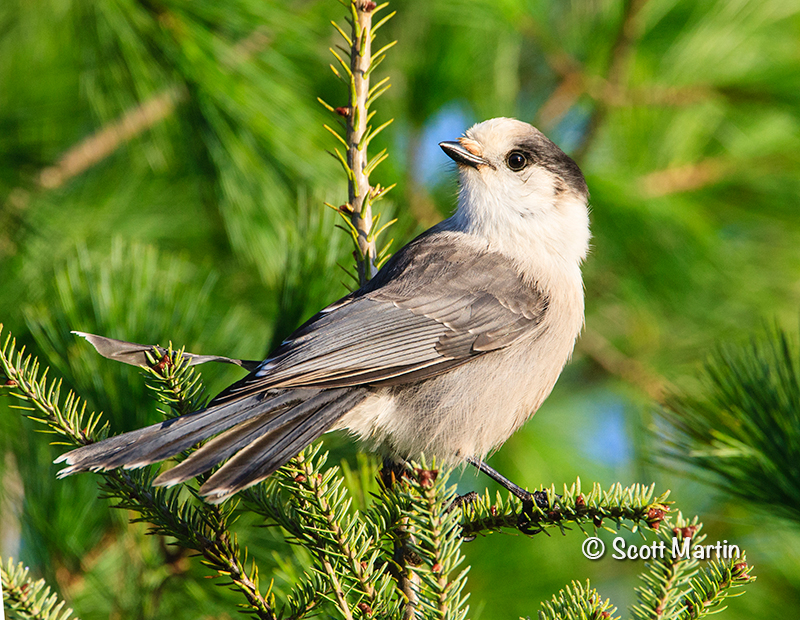
The Gray Jay is a common bird in Algonquin park and is a very friendly bird that readily comes to your hand for a peanut. In fact they often follow you along the trails, especially if you have food for them as shown in this short video clip taken with my iPhone.
Most of the Gray Jays in Algonquin Park are banded, usually with two coloured bands on one or both legs. The bands normally indicate the year and location the birds were banded which allows researchers to monitor the life spans and migration patterns of the birds. It was nice to find a few non-banded birds which make photographers happy as the bands create visual distractions in photographs.
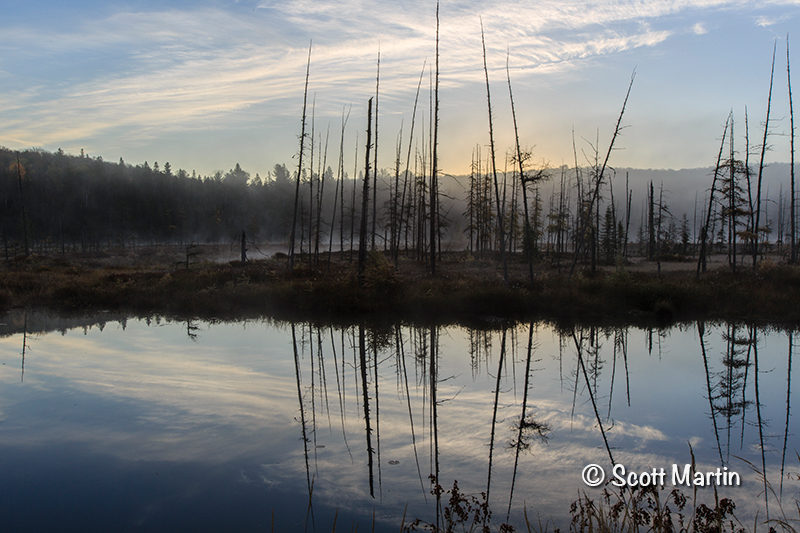
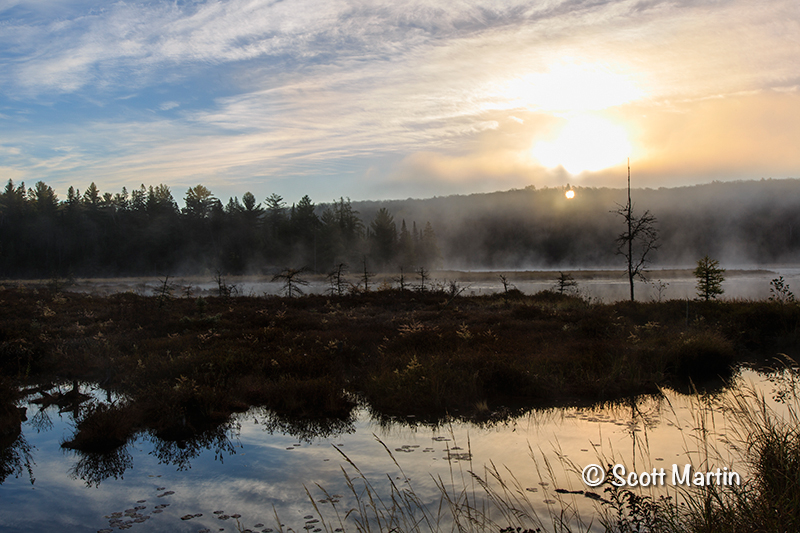
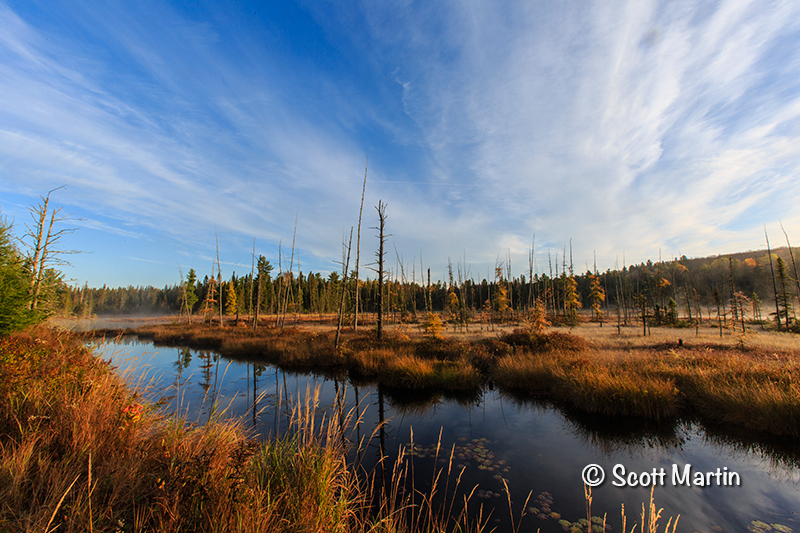
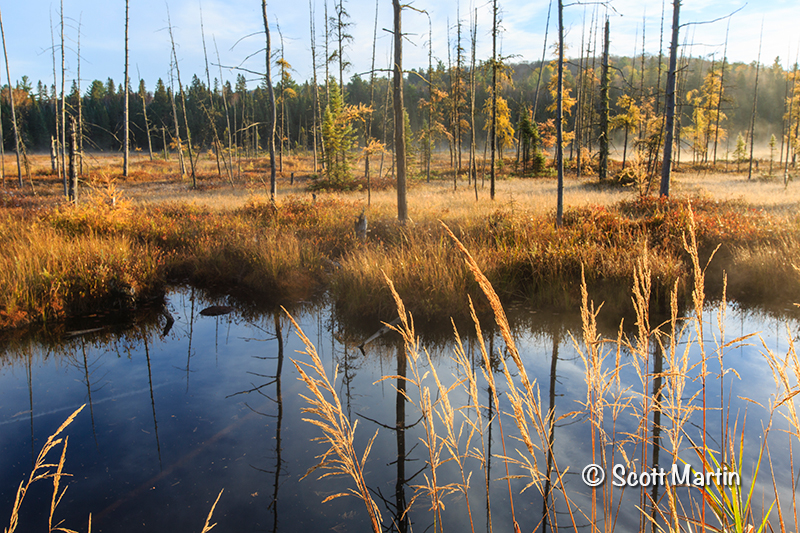
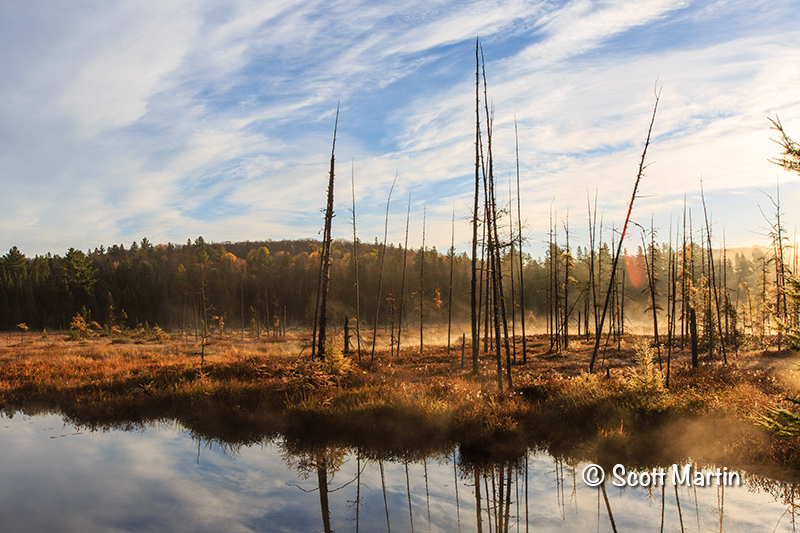
The Mizzy Lake Trail is one of our favourite trails in Algonquin Park and it is accessed from Highway 60 at the Arowhon Road. The trail, like much of Algonquin is characterized by Spruce Bogs. Below are some sunrise and early morning images.
Just before sunrise.
Sunrise
.
.
.
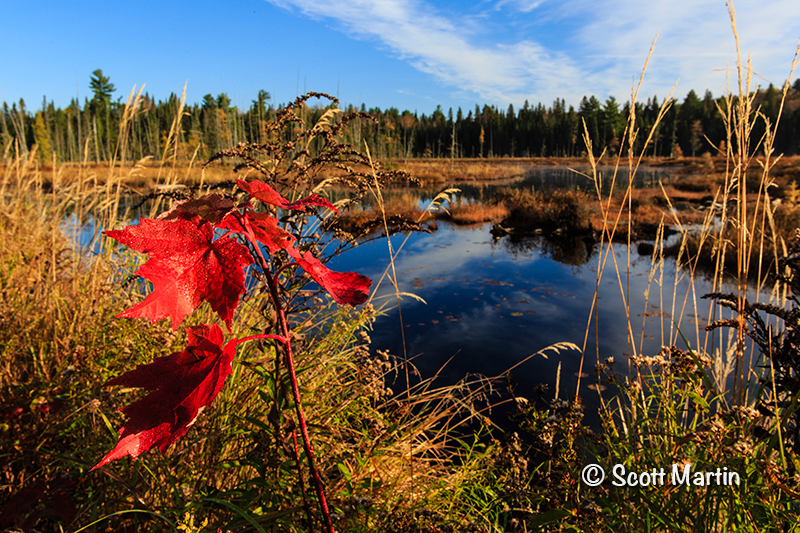
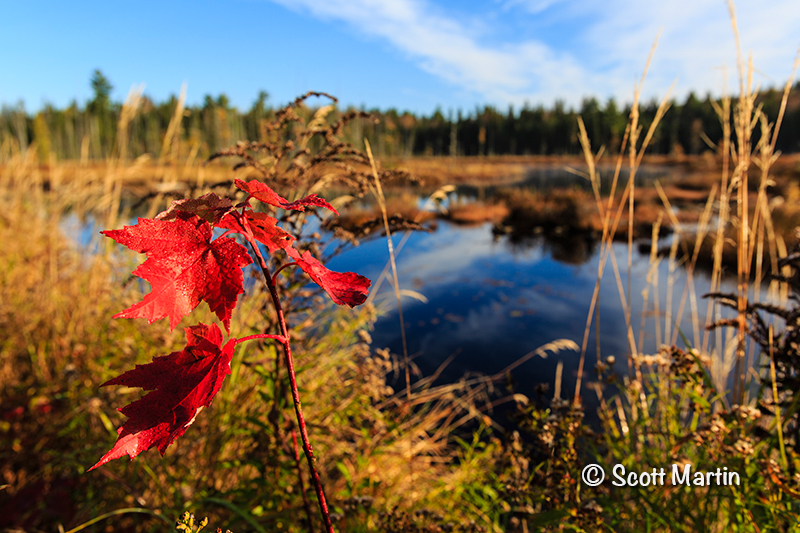
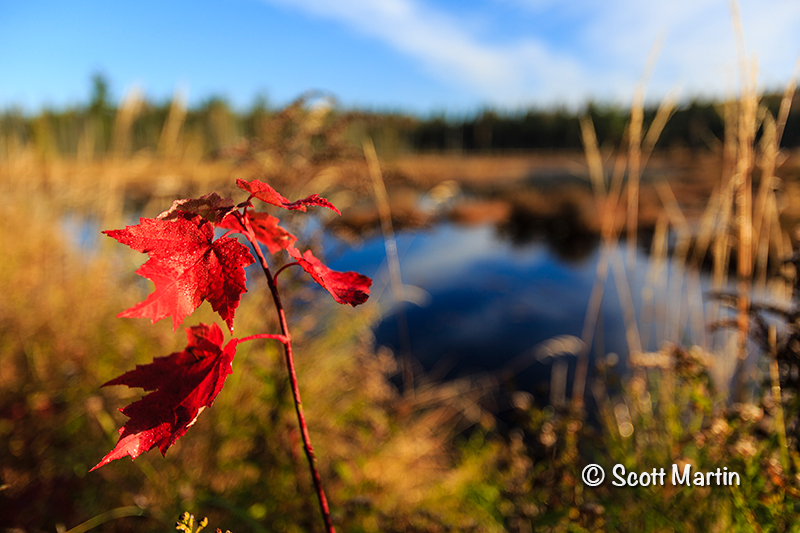
To conclude this post, let’s start a bit of a discussion on depth of field especially as it relates to landscape photography. Typically we want everything in a landscape image to be in focus which requires a small aperture in the range of f/18 to f/22. Also, the shorter the focal length of the lens the greater the depth of field is at the same aperture (compared to a longer lens). The small aperture and the desire to use low ISO’s for better image quality results in longer exposure times which is why it is mandatory for a landscape photographer to carry a tripod at all times. Also using a tripod makes you consider the composition and take more time to set up the best possible shot that achieves the goal you have in mind for the finished product. The next three images share the same composition and differ functionally only my the aperture at which they were taken.
f/22, 1/25, ISO100 ,29mm. Everything in the image is in focus. The whole scene is the object and your eyes wander throughout the image.
f/8, 1/160 sec, ISO100, 29mm. The shallower depth of field starts to make the red leaves become the object of the image.
f/2.8, 1/1250, ISO100, 29mm. The entire middle and back ground are out of focus and the red leaves become the only object receiving all of the observer’s attention.
So the question becomes, of the three images, which is your favourite? That is a very subjective question and there is obviously no right or wrong answer, it is simply a matter of preference. As a photographer it is good practice to take the same image at different apertures as well as focusing on different objects within the frame in order to use fluctuating depths of field to your advantage and achieving very different results. It is surprising how this practice will improve your landscape skills and help you develop a better eye for that perfect landscape image.
The bird images in this post were taken with a Canon 1D Mk III and a 500mm f/4 L lens with attached 1.4x TC for an effective focal length of 700mm, using a Jobu monopod and Jobu Jr. gimbal head. The landscape images were taken with a Canon 5D Mk III and 16-35 f/2.8 lens on a Gitzo travellers tripod with Markins ball head.
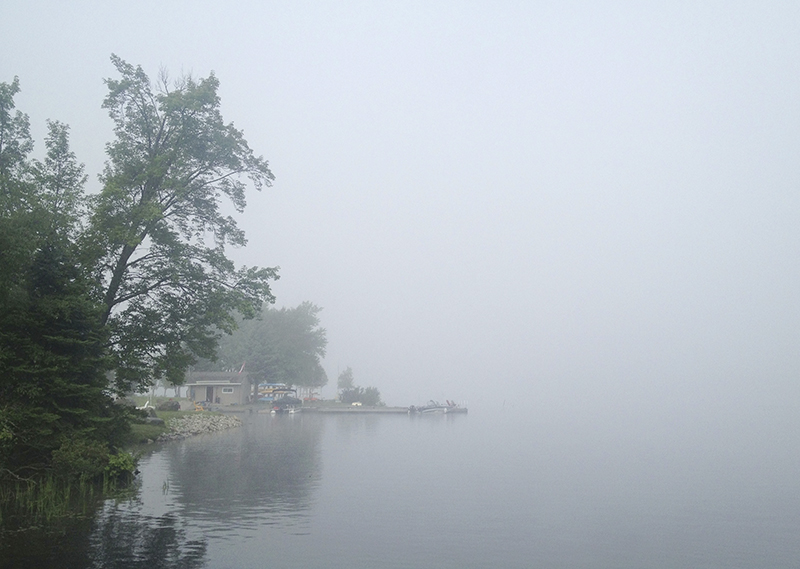
Labour Day, it seems, has once again arrived a little earlier than it did last year and in doing so signalling that another summer season has come and gone. It appears that each season blends seamlessly into the next, just like the water does with the skyline in this snapshot taken a couple of days ago from the dock at the cottage with my iPhone.
This blog post will be a short one as we prepare to pack up the van and join the throngs who will be heading south on Highway 11.
This summer has been a great one, the highlight for us was becoming grandparents on July 3, 2013 with the arrival of baby Kaj, to Jeff & Ellesse. He’s one of the most photogenic and photographed babies on the planet as you will no doubt see in upcoming posts. In order to properly document his rapid growth I’ve been experimenting with taking video as well as learning how to edit the clips. Also as mentioned in prior posts, I’ve also been attempting to video birds and other wildlife after photographing them in the traditional sense.
The video in this post today is a compilation of clips taken by placing the GoPro video camera on different positions on our Seadoo and then trying to edit them into a short video. Having only one GoPro it is challenging to edit multiple clips in a fashion that results in a coordinated video. There is still much to learn however I trust you enjoy this short (2:30 min) clip showing some of the fun enjoying the summer of 2013.


Follow Scott Martin Photography