The beautiful country of Italy is home to many unique and well known buildings with the Leaning Tower of Pisa being among the most iconic. As Deb & I left Cinque Terre and headed to the Amalfi coast for a few days in Positano we made it a point to stop and visit the Leaning Tower.
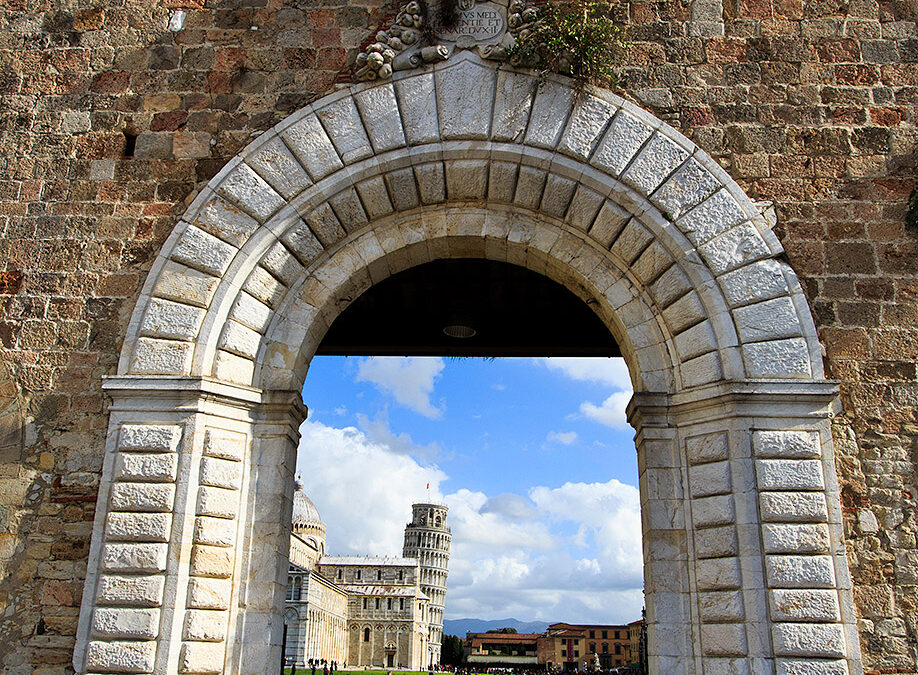
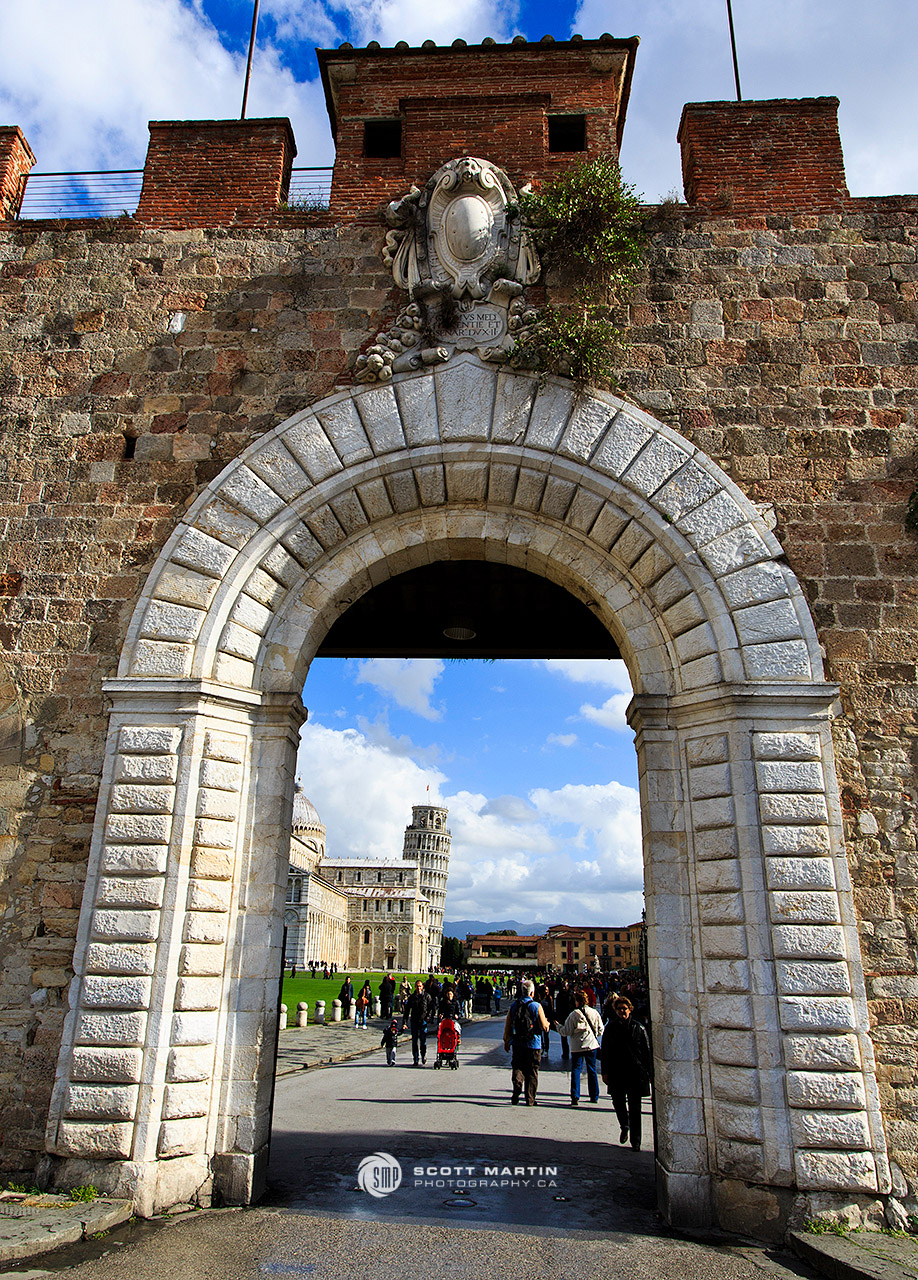
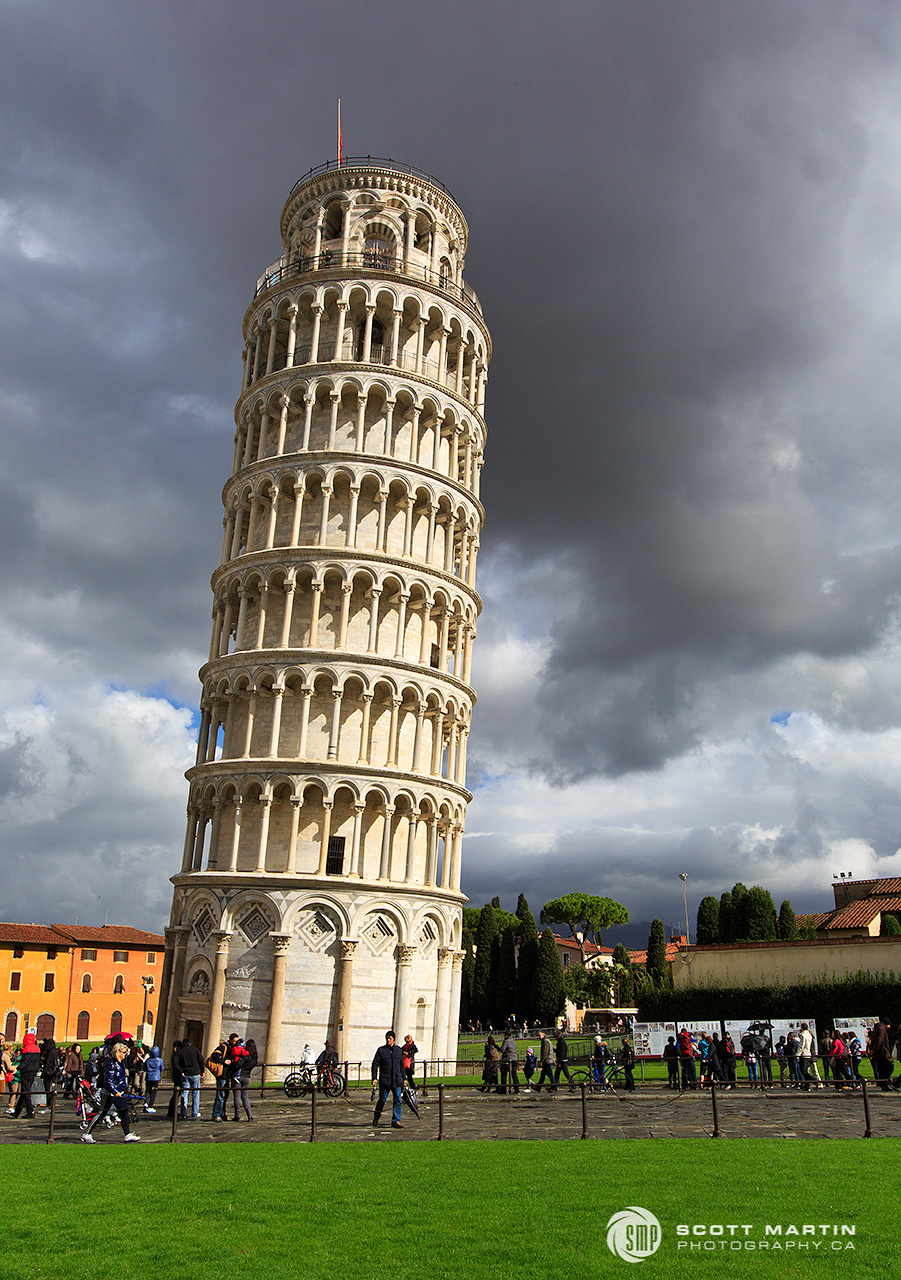
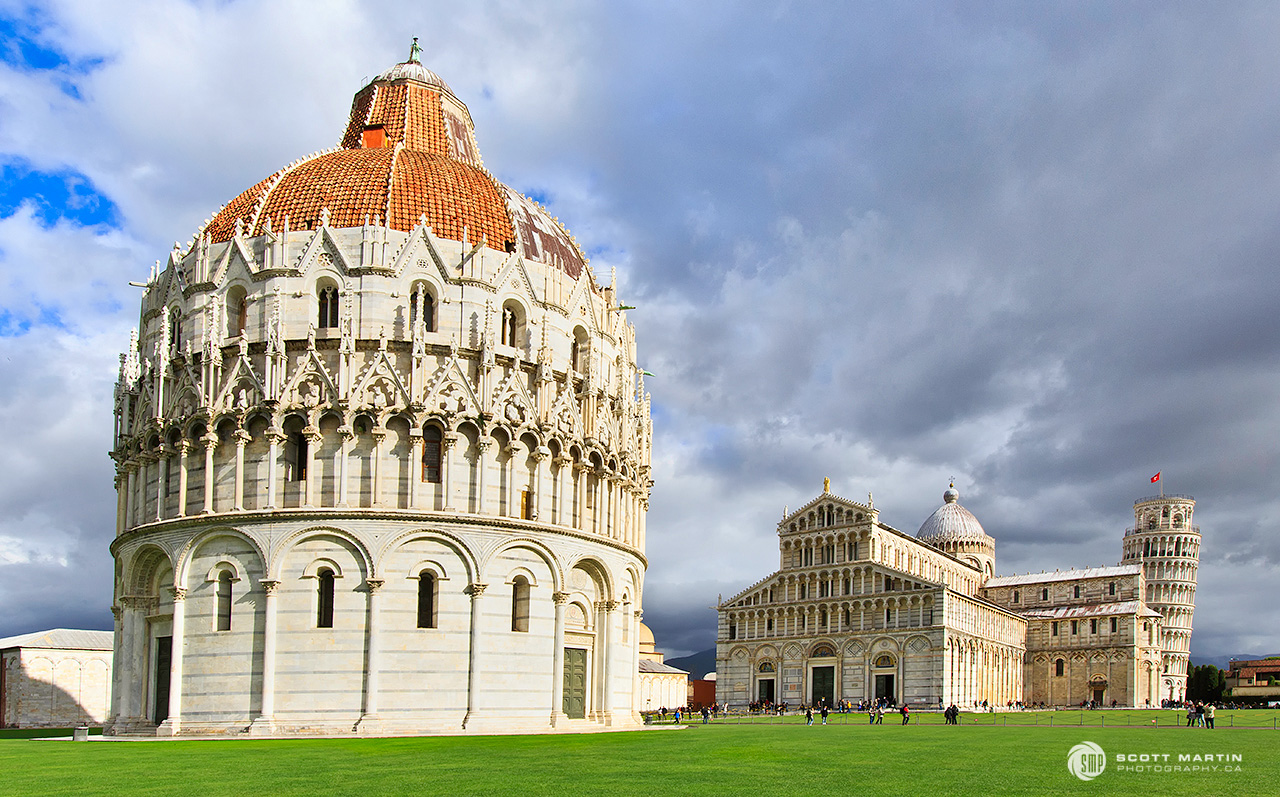
Pisa is a coastal city of over 90,000 people in the famous Italian region of Tuscany. The Leaning Tower of Pisa is a free standing bell tower, or campanile, of the Pisa Cathedral. The partially walled grounds of the cathedral have three primary buildings; the cathedral, the baptistery and the campanile. As we approached one of the gateways to the campus we experienced our first glimpse the Leaning Tower. One of the many joys of travel is the feeling engendered when seeing an iconic landscape or building in person for the first time and this image captures that moment with the famous bell tower.
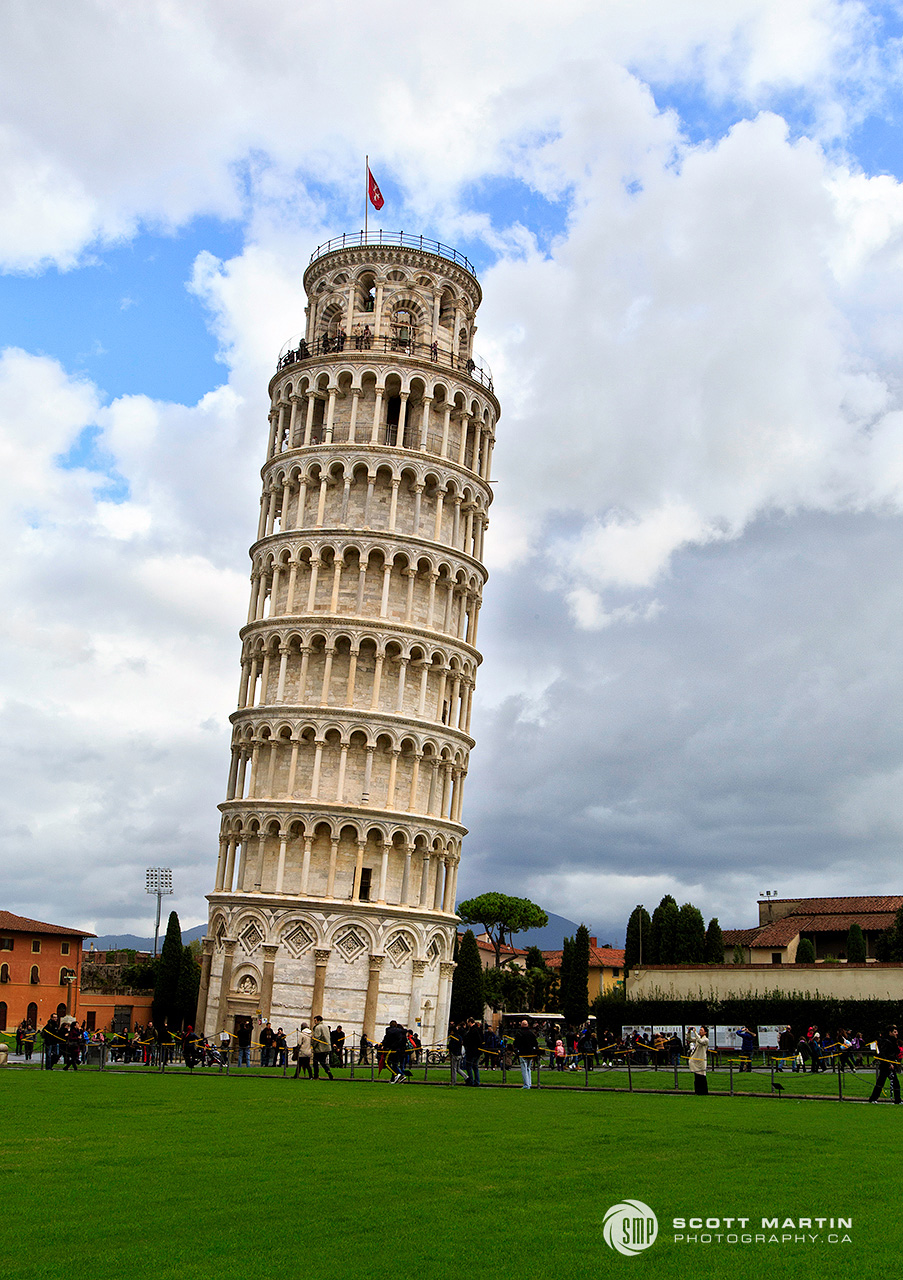
The tower is ~185 feet high and took many many years to complete. The tilting of the tower began to occur during its initial construction primarily due the sandy ground on one side of the tower being too soft to support the extreme weight of the structure (14,500 metric tons).
The walls at the base of the tower are made of solid white marble and are an incredible eight feet thick in order to create a sufficient support on which to build the seven stories above. Unfortunately, the ground below didn’t do as well! It’s hard to believe that the below grade foundation is only ten feet deep for a structure that is almost 200′ high. Certainly the design of the tower was flawed from the outset.
Construction of the tower began on August 14, 1173 and wasn’t completed until 1372 when the bell chamber was finished atop the tower 199 years after the ground breaking. Recent cleaning and surface restoration of the tower removed centuries of dirt & grime from the industrial revolution which had darkened the tower to a dirty grey colour. This next image shows the beautiful white sunlit marble against a stormy dark back ground. It really is a beautiful structure.
By 1990 the tower’s lean reached 5.5° and the campanile was closed to the public. Steel guy wires were attached to the third level, the seven bells were removed from the bell chamber and nearby apartment buildings were evacuated due to fear of spontaneous toppling of the tower. Between 1990-2001 the tower was straightened and stabilized. This was accomplished by removing 1350 cubic feet (77 tons) of earth from below the high side of the foundation. This restored the lean of the tower to about 3.9° which it was in the late nineteenth century. The decision was made not to place the tower in a vertical orientation largely due to tourism considerations. Its present lean means that the centre point at the top of the tower is 12’10” from the centre point at the base.
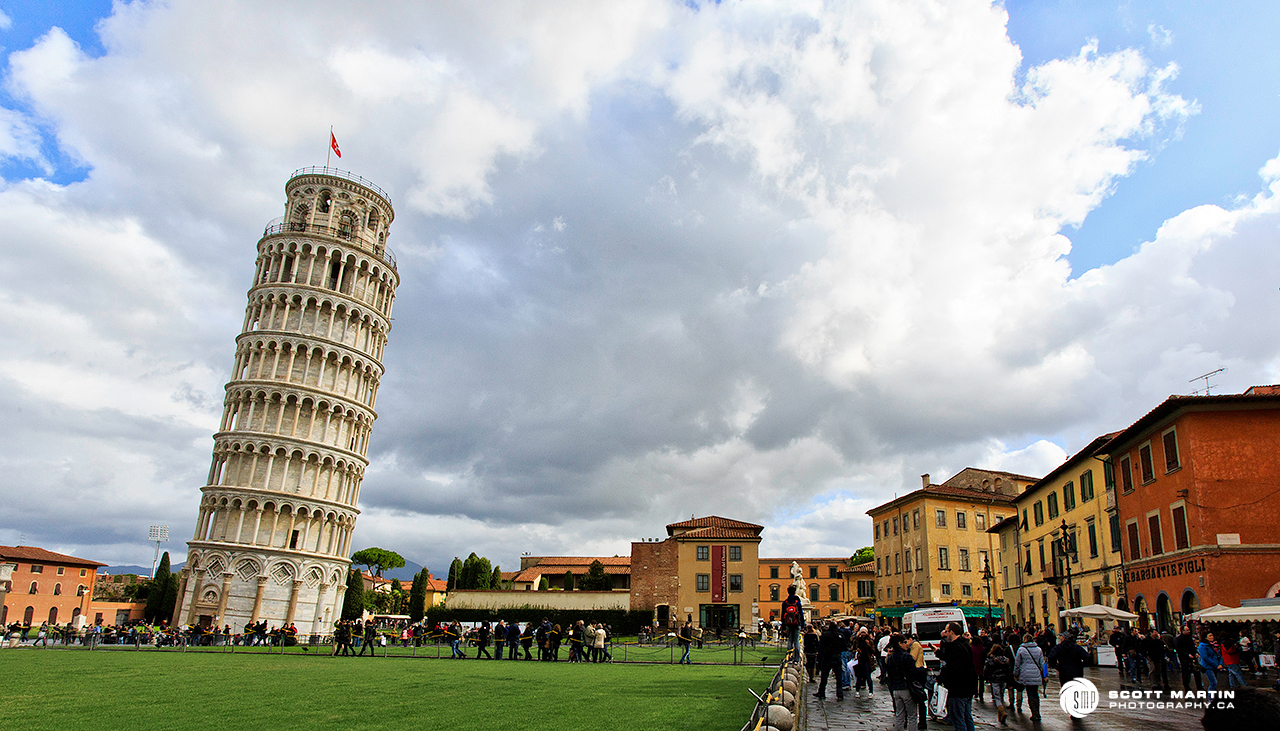
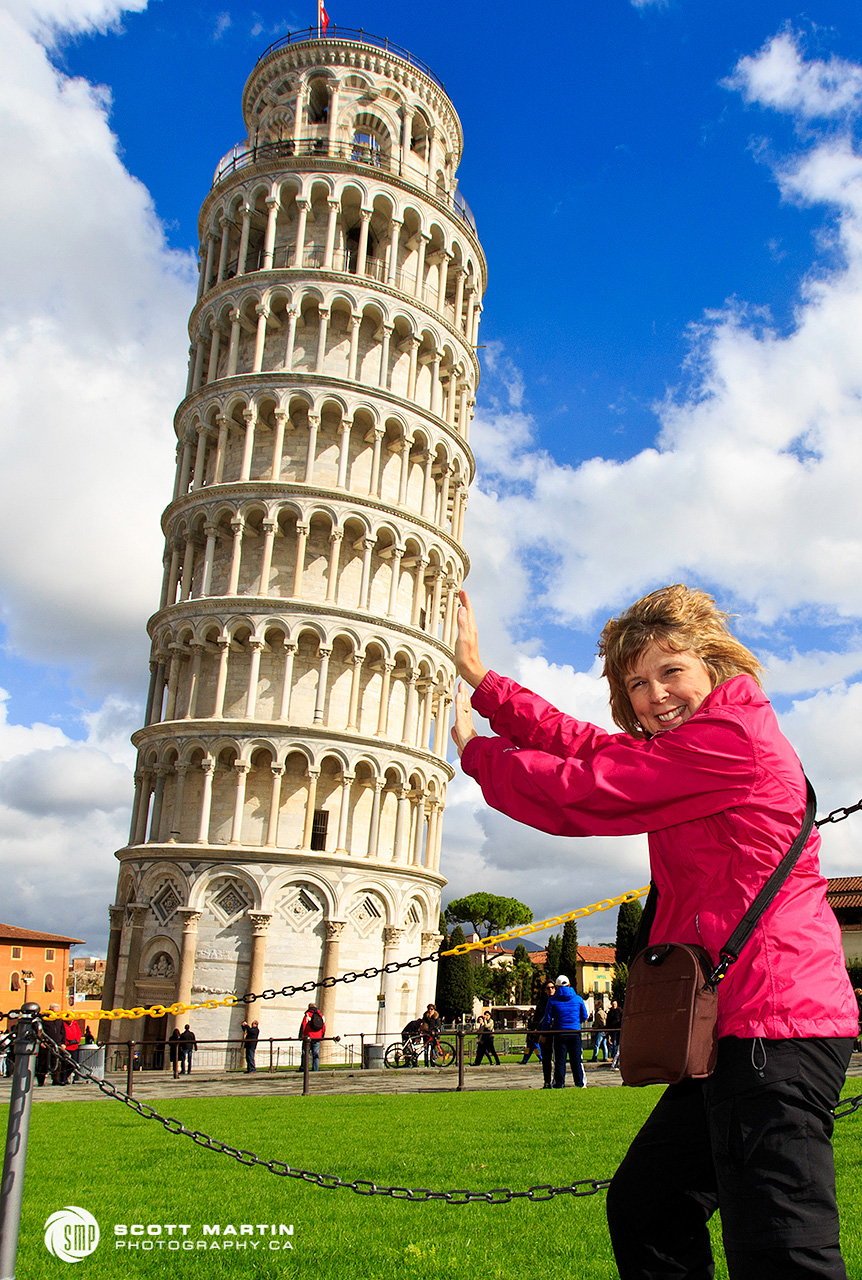
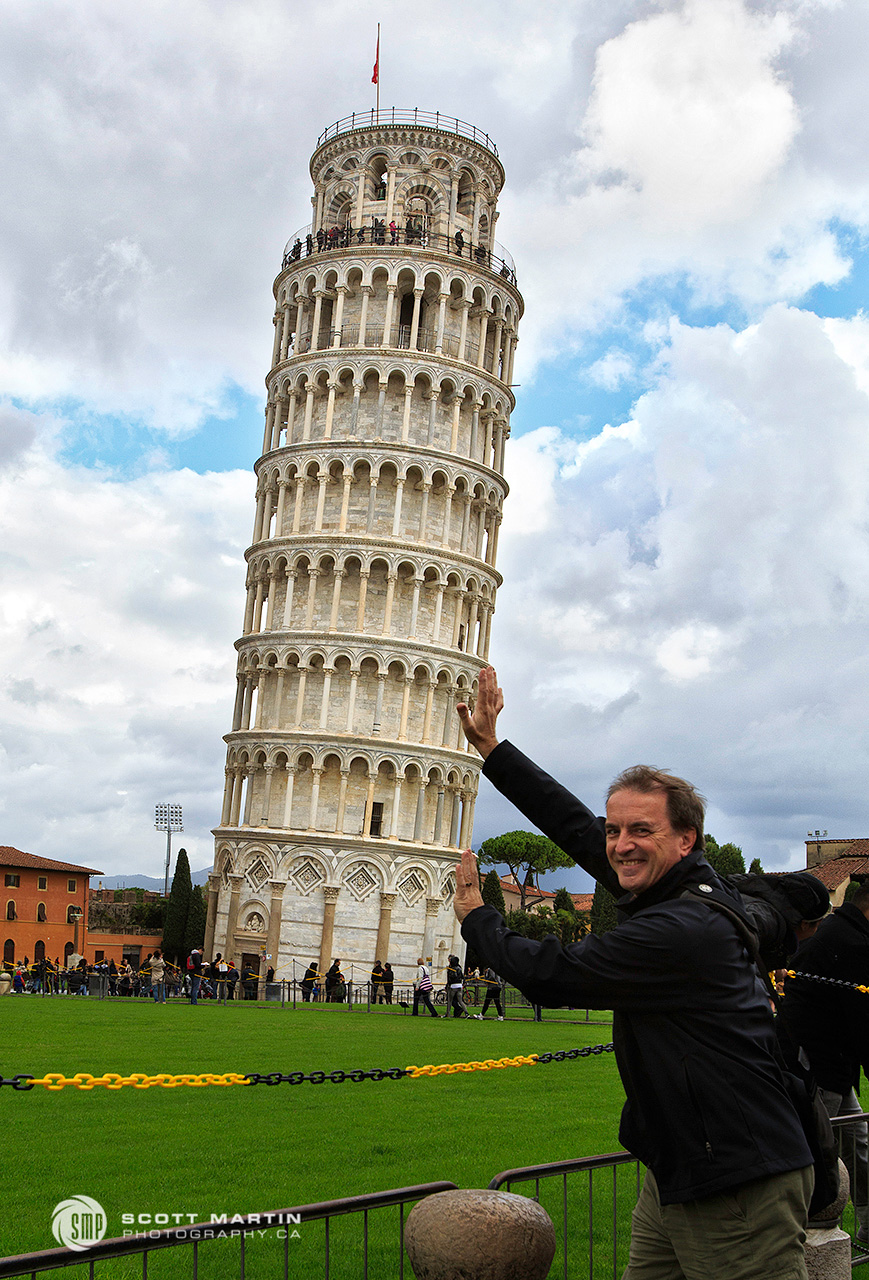
Although this next image has not been manipulated, it was taken at a focal length of 16mm on a full frame camera and the native optics of the lens creates an exaggerated perspective of the tower.
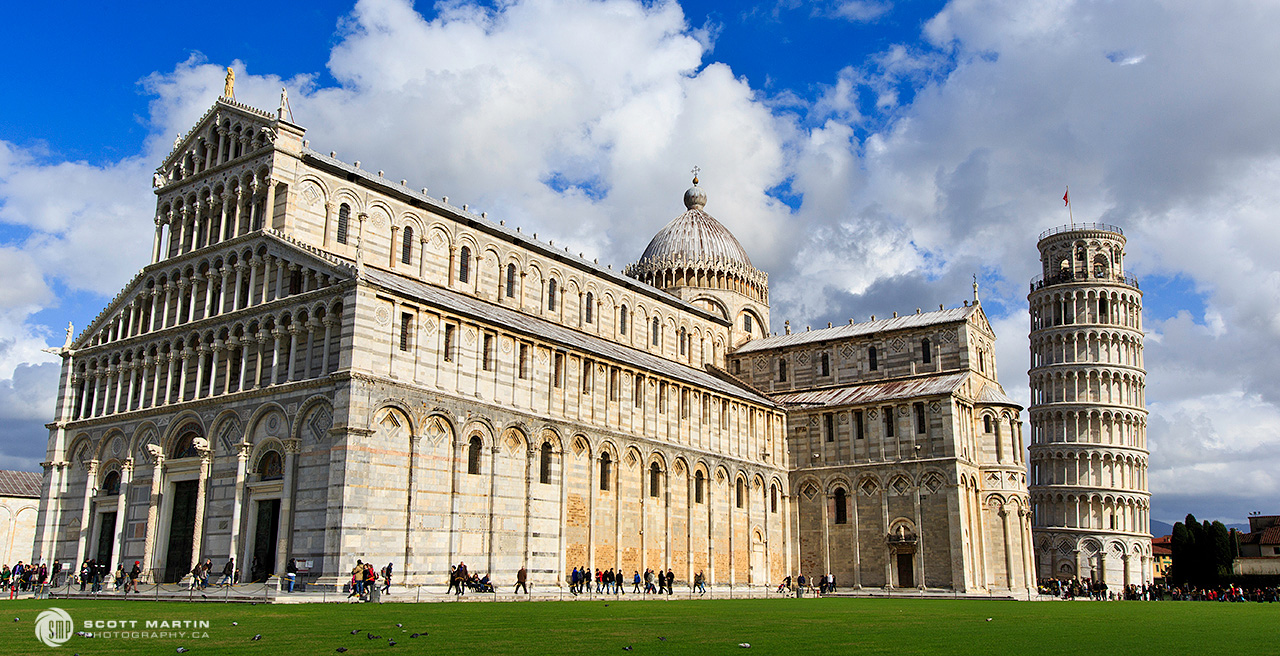
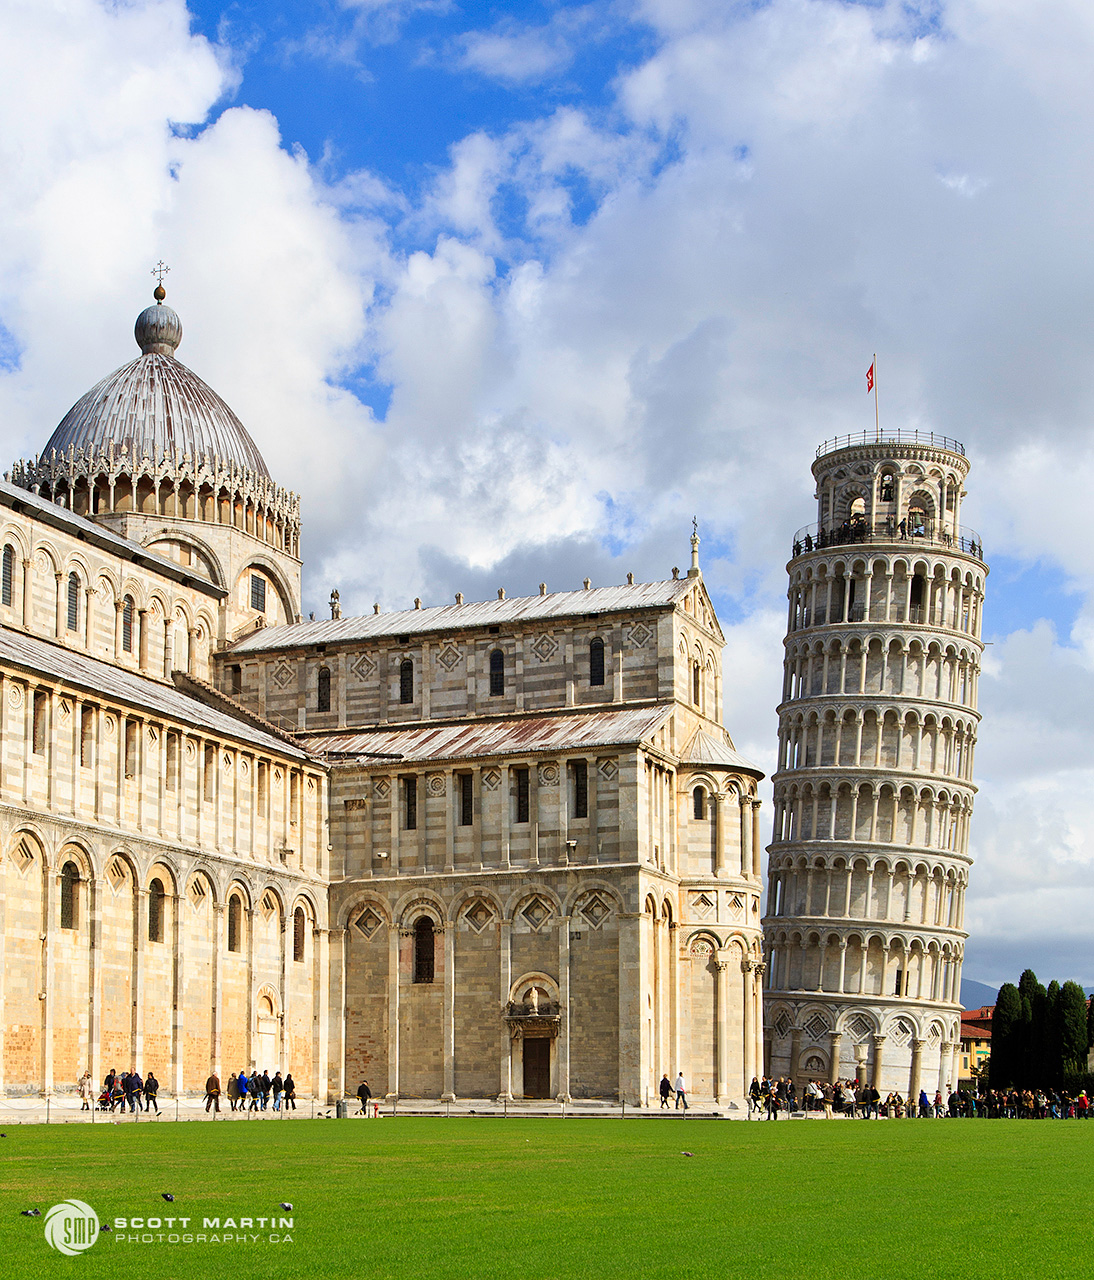
The Pisa Cathedral is an impressive structure in its own right, designed in the shape of a latin cross and constructed of white & grey marble. The cathedral began construction in 1063 and was completed in 1092.
It’s hard to believe when walking through the campus that these buildings are almost one thousand years old.
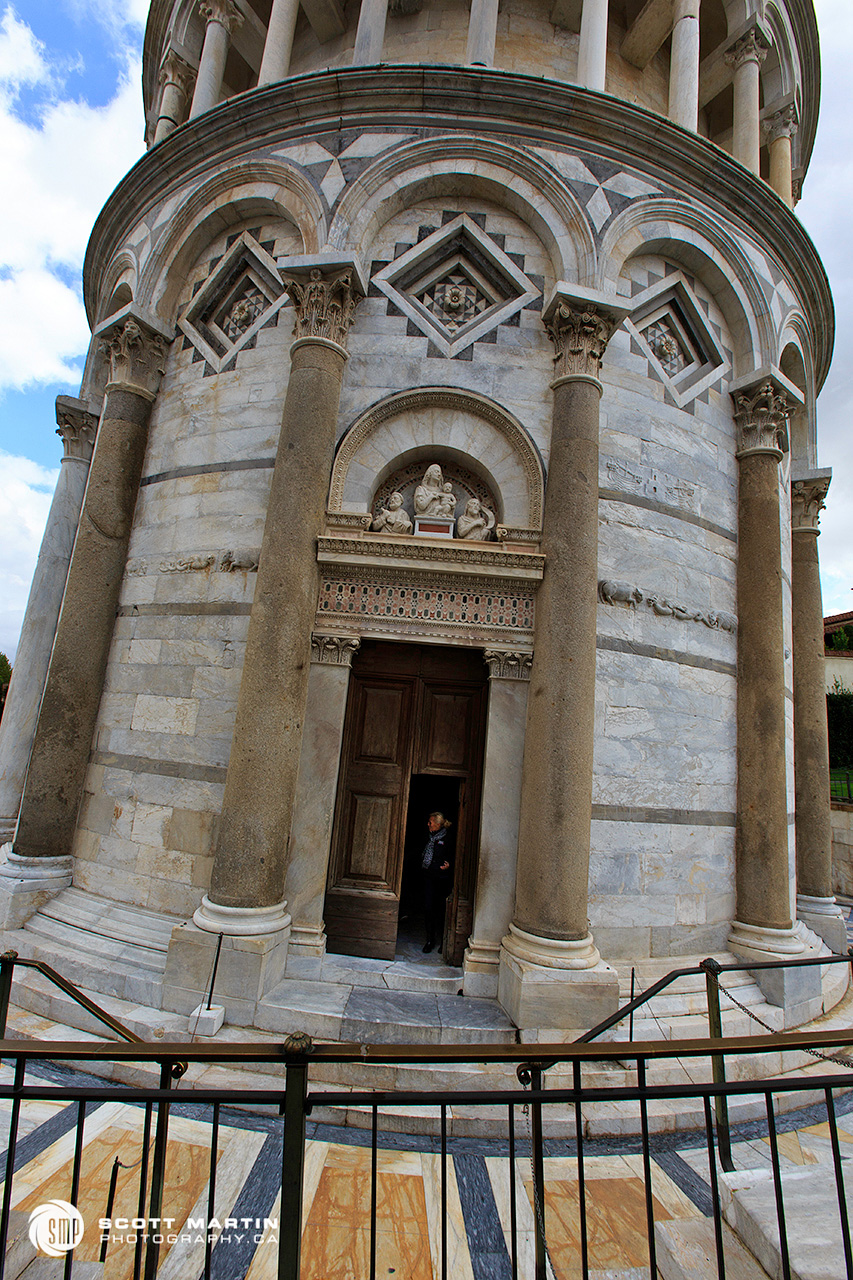
The third major building on the cathedral grounds is the baptistery. It was the second structure chronologically, with construction starting in 1152 and completed in 1363, two hundred and eleven years later. The Pisa Baptistery is the largest in Italy and like the adjacent structures is constructed of marble. The interesting thing to note when looking at the baptistery is the different architectural styles of the building, presumably a result of the 200+ years it took to build. The base of the building is in Roman styling with rounded arches above the columns while the upper sections of the building are of gothic styling with pointed arches atop the columns.
The baptistery also has a relatively small foundation and shares the sandy earth of the cathedral & bell tower so it also leans, however an almost imperceptible 0.6° towards the cathedral.
Although we only spent a few hours visiting Pisa, it was a great time and a pleasure to see and learn a little about its iconic landmark.
Deb & I couldn’t help taking some classic tourist shots of the tower while we were there. As a photographer, one always looks for that ‘original shot’, especially of the well known landmarks…..I’m quite certain these next two images don’t qualify 🙂
.
Other images from Pisa can be seen by clicking on this link plus there are a number of other galleries from various locations in Europe that are also posted on the website.
All of the images in this post were taken using a Canon 5D Mk III and EF 16-35 f2.8 wide angle zoom lens.
Thanks for taking the time to read through this post and I trust you’ve enjoyed the Leaning Tower of Pisa. As always you comments and questions are much appreciated.
Its been a long time since our last blog post documenting our 30th anniversary trip through Europe. Please excuse the delay and hopefully we will get back on track with this installment.
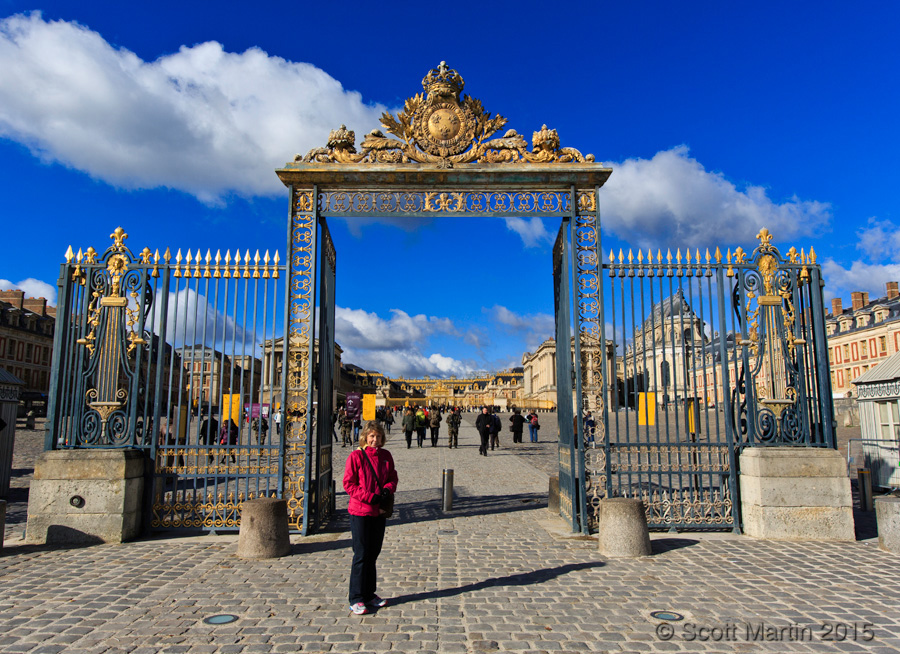
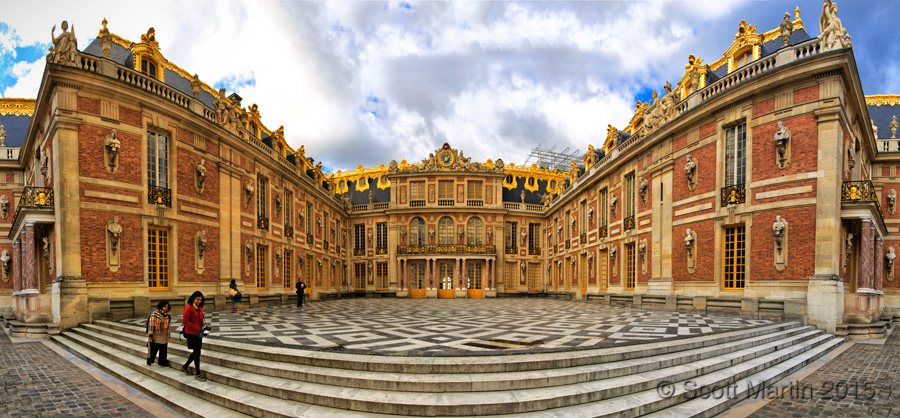
Leaving Paris we headed 20 km south west from our hotel near the base of the Eiffel Tower to visit a hunting lodge built in 1624 by Louis XIII, which was later ‘spruced up’ by Louis XIV to become the Palace of Versailles. Louis XIV moved from his house in Paris (The Louvre) to Versailles in 1682. The French Royal family and thus the seat of political power in France remained in Versailles until 1789 when the French Revolution forced the Royals back into Paris. The Palace of Versailles is one of the largest and most opulent palaces in the world constructed at a cost of two billion dollars. The few images posted in this blog can not adequately convey the immensity nor extravagancy of the palace and the 19,262 acre gardens that surround it.
Here’s Deb at the gate leading into the central court yard.
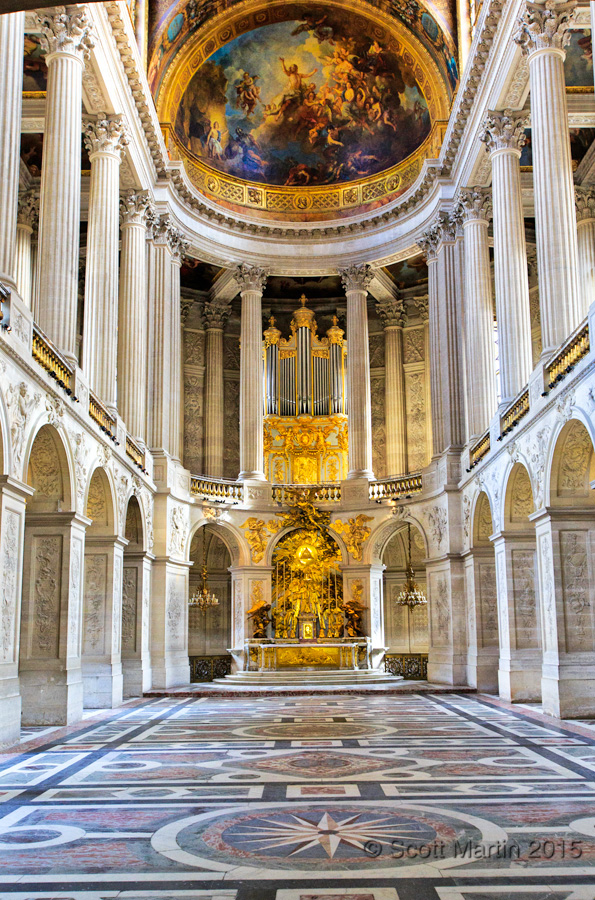
The Royal Chapel required twenty eight years to construct and was completed in 1710. It was only used by Louis XIV for five years before his death in 1715.
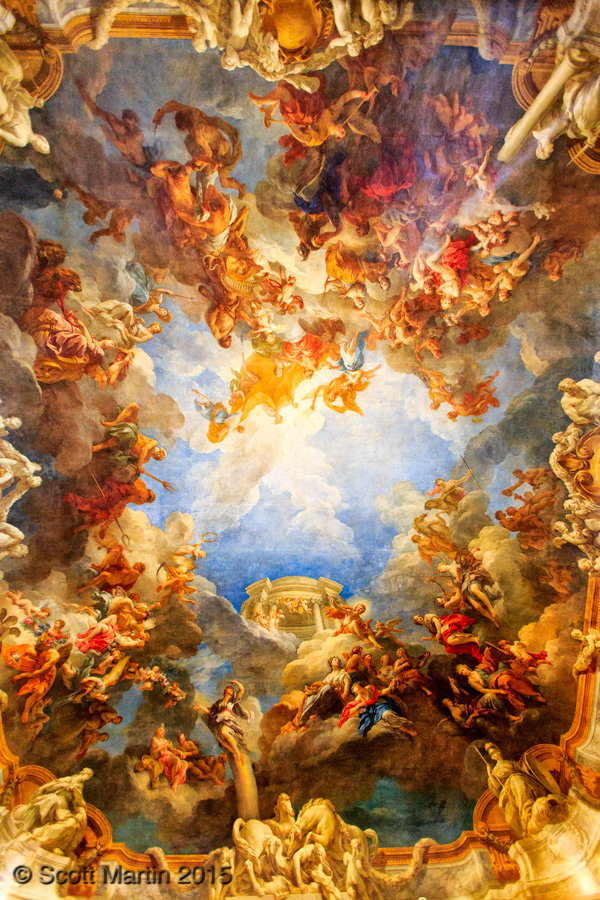
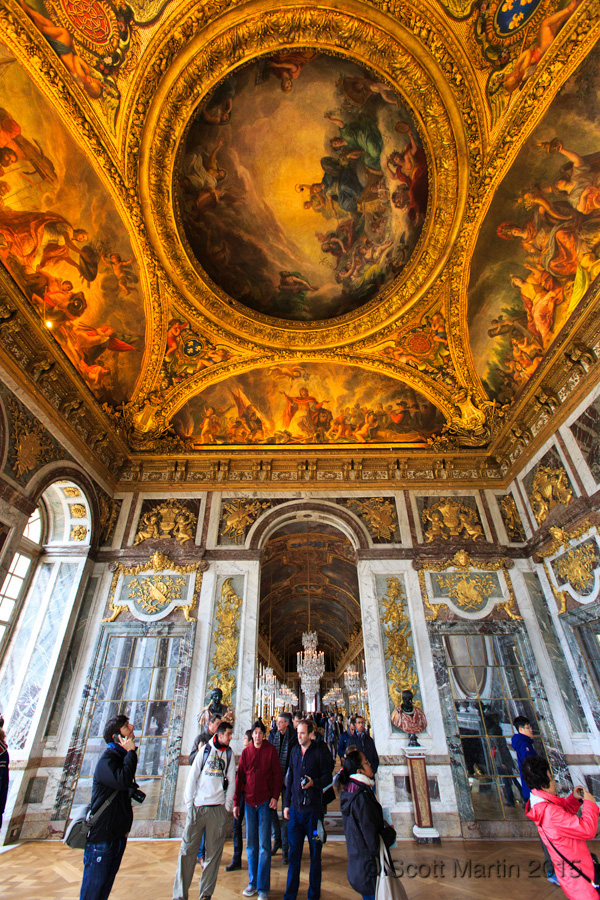
After the ‘new’ chapel was completed the original chapel was repurposed and part of it became the Hercules Salon, the vaulted ceiling of which contains the Apotheosis of Hercules, an enormous painting by Francois Le Moyne. The painting is on canvas which was glued to the ceiling.
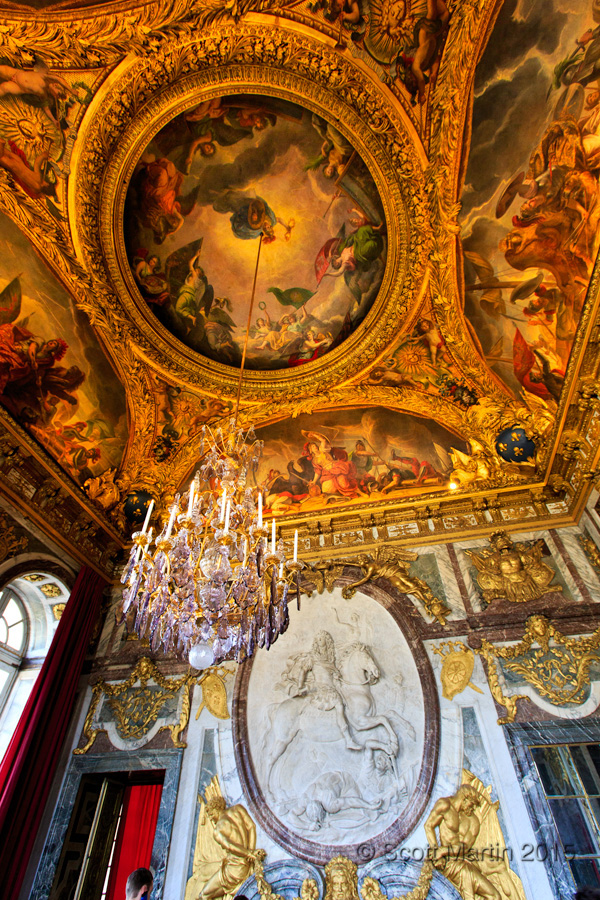
It is difficult to effectively capture the opulence of the palace as virtually every square inch of the building is a visual masterpiece as seen in the image below.
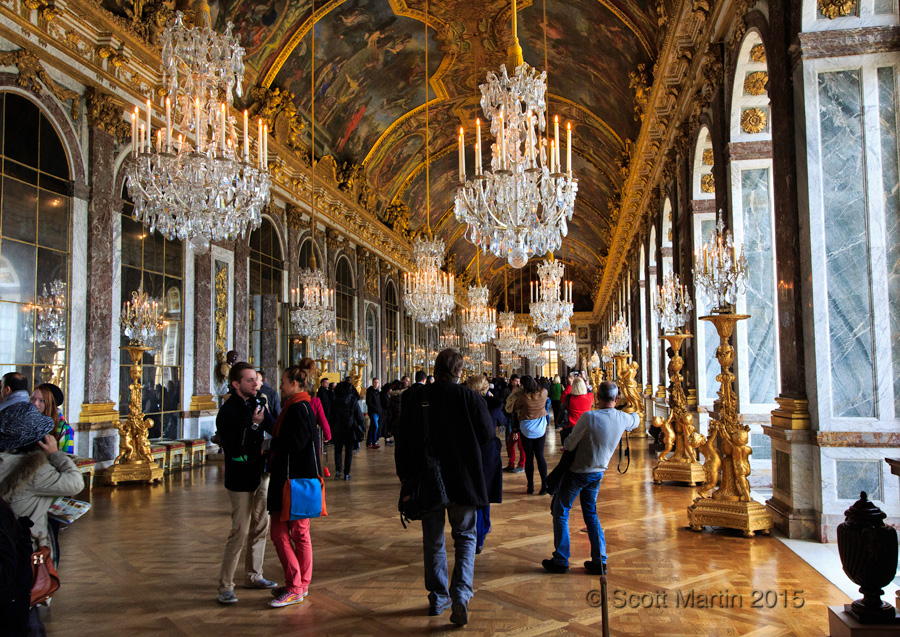
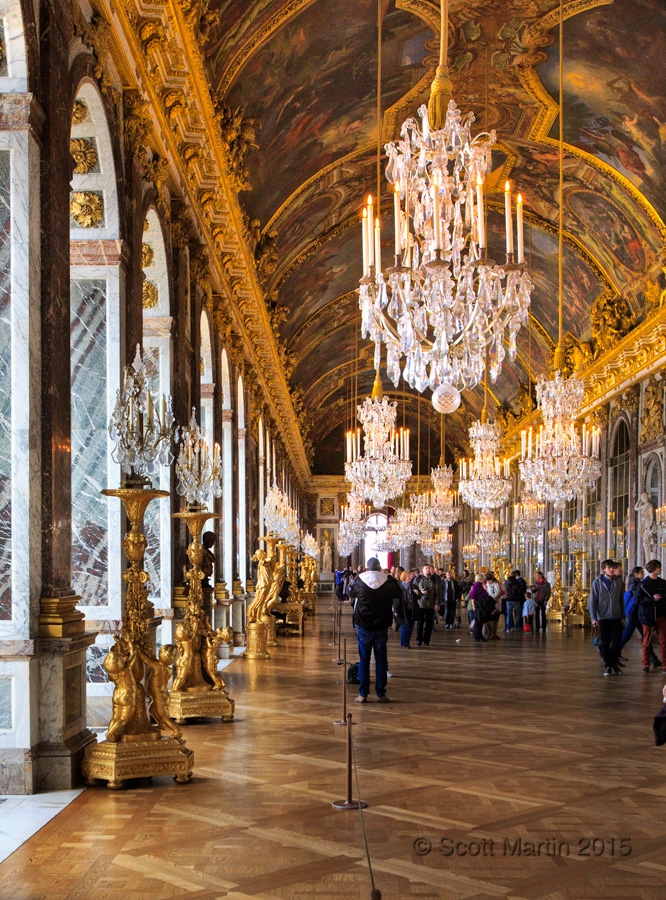
The Hall Of Mirrors is perhaps the most well known room in the palace, and rightly so, as it was designed to show off the political, economic and artistic power of seventeenth century France to all who visited the palace, including heads of state of neighbouring countries and those abroad. The hall is 73 metres long and has 357 mirrors between its 17 marble arches and windows with gilded gold and bronze accents. Seventeen large and twenty six smaller sterling silver chandeliers that cradle 1,000 candles light the hall. The ceiling serves as the canvas for thirty Charles Le Brun masterpieces. The throne was on a podium at the end of the hall, where Louis XIV would receive his visitors after they walked the full length of the hall.
The Treaty of Versailles which marked the end of World War One was signed in the Hall of Mirrors on June 28, 1919.
The Salon de la Paix, or Room of Peace is at the end of the Hall of Mirrors at the end where the King’s throne was located.
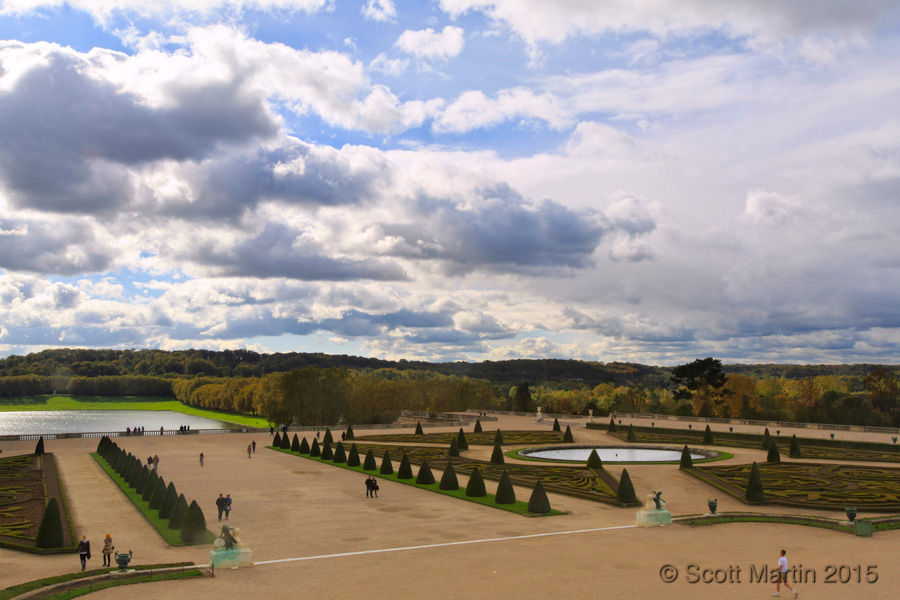
We didn’t spend the extra 10 euros to visit the palace gardens as the flowers were not in bloom while we were there however this image, taken through a window in the palace, gives a small glimpse as to what the gardens and countryside look like. I’m sure in the spring and early summer they would be absolutely spectacular.
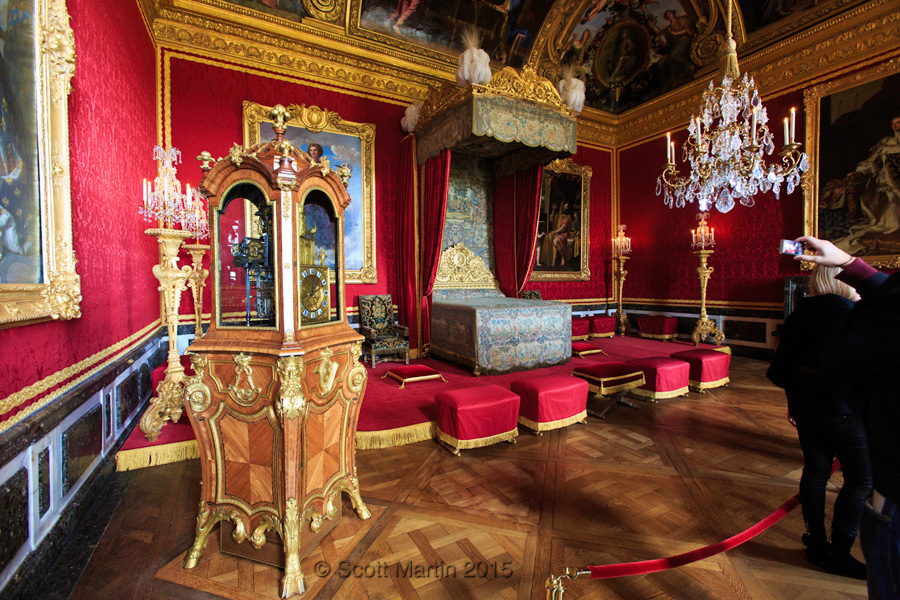
The entrance way to the King’s apartments which include the King’s and Queen’s bedchambers and ultimately leading to the Hall of Mirrors.
The Mercury Salon, also known as the bedchamber, was rarely used as bed room but rather a gaming room. It is also the room in which Louis XIV lay in state for eight days in September, 1715.
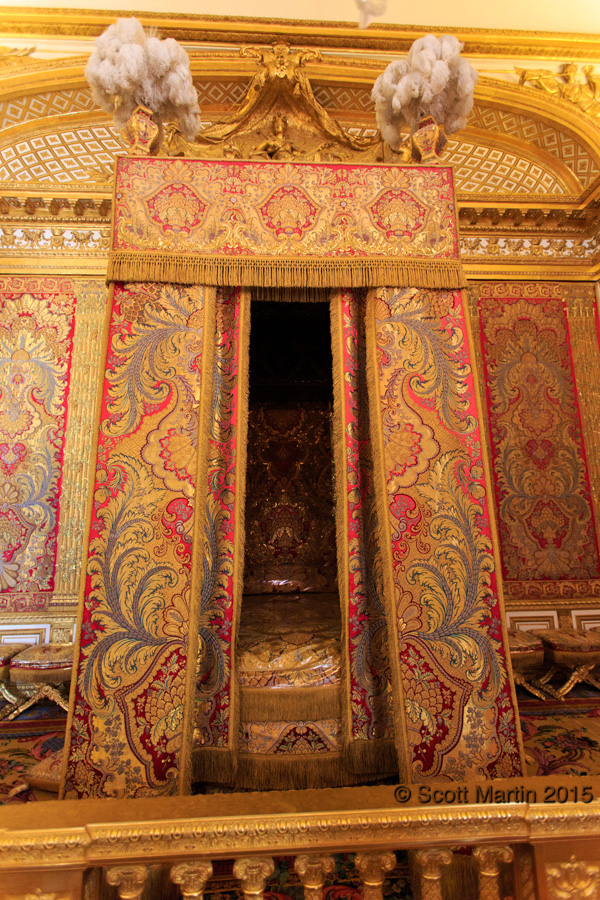
The King’s bedchamber is adjacent to the Hall of Mirrors and designed to face out over the gardens with a wonderful view of the sunrise. Apparently Louis XIV liked to sleep in however as his bed is surrounded by heavy curtains to block out the very sun light the bedroom was designed around! Louis XIV died in this bed on September 1, 1715 after reigning over France for almost 73 years. He was the longest reigning monarch in European history.
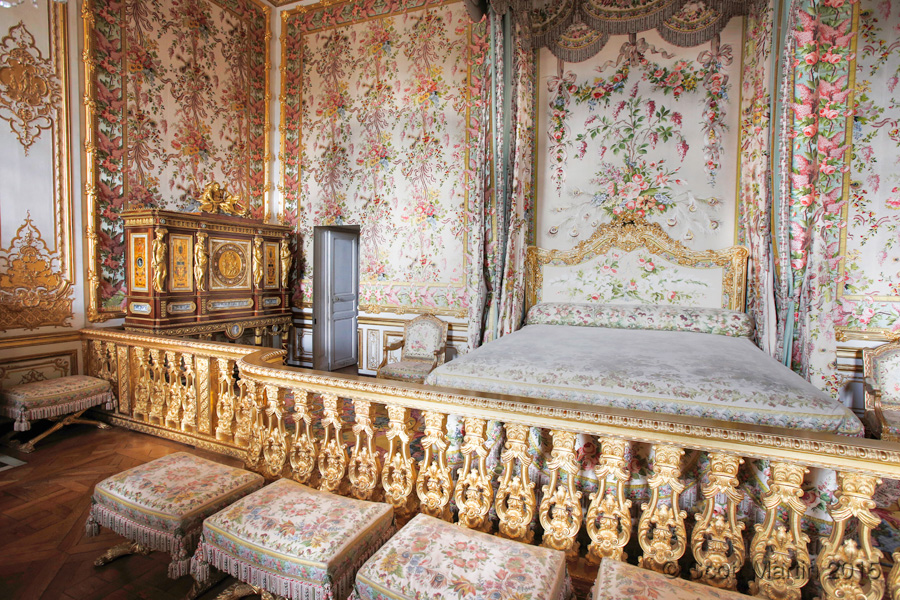
This next pic is of the Queen’s bedchamber. The small open door on the left, next to the jewelry cabinet, is the secret door through which Marie Antoinette escaped when a mob from Paris attacked the palace is 1789. The Queen’s bedchamber is the largest in the palace, including the King’s, as during that era childbirth of the royal family was a public event and believe it or not, more than 200 people attended the birth of Louis XVI.
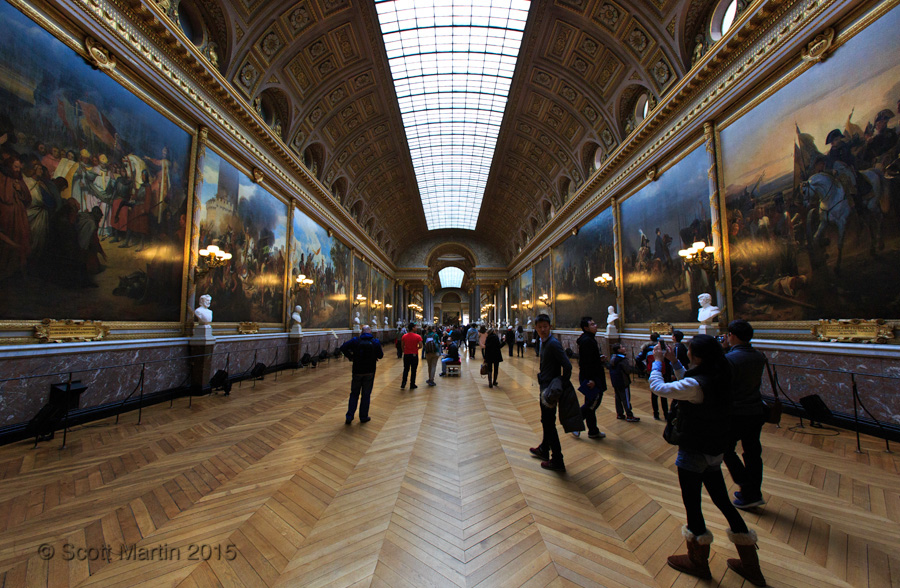
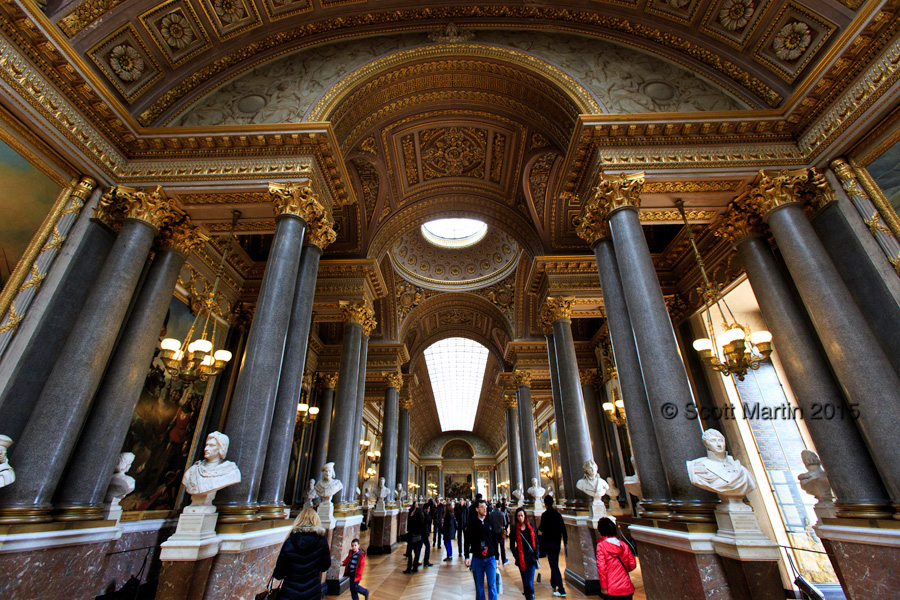
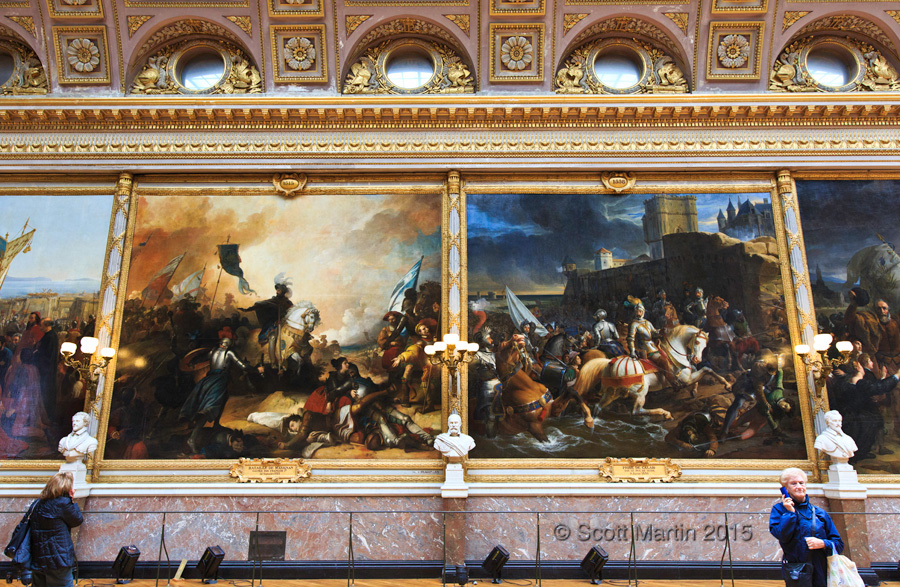
The Battles Gallery is the largest of the galleries in the palace occupying the top two floors of the entire south wing of the palace. Its walls are lined with thirty three huge canvases depicting the major battles fought by France between 496AD and 1809. As the Hall of Mirrors showcased France’s political, economic and artistic superiority, the Battles Gallery showed the military strength and conquest that France was built on.
Along the Battles Gallery are extravagant and impressive marble columns with gilded archways. The people in the frame below provide a great perspective as to the size of the gallery.
I had to wait a few minutes to get the next image but I really enjoy the two women in the frame. Within the walls of one of the grandest museums in the world proudly depicting the military heritage of France, one women takes it all in pondering each canvas, while the other turns her back to make a cell phone call!
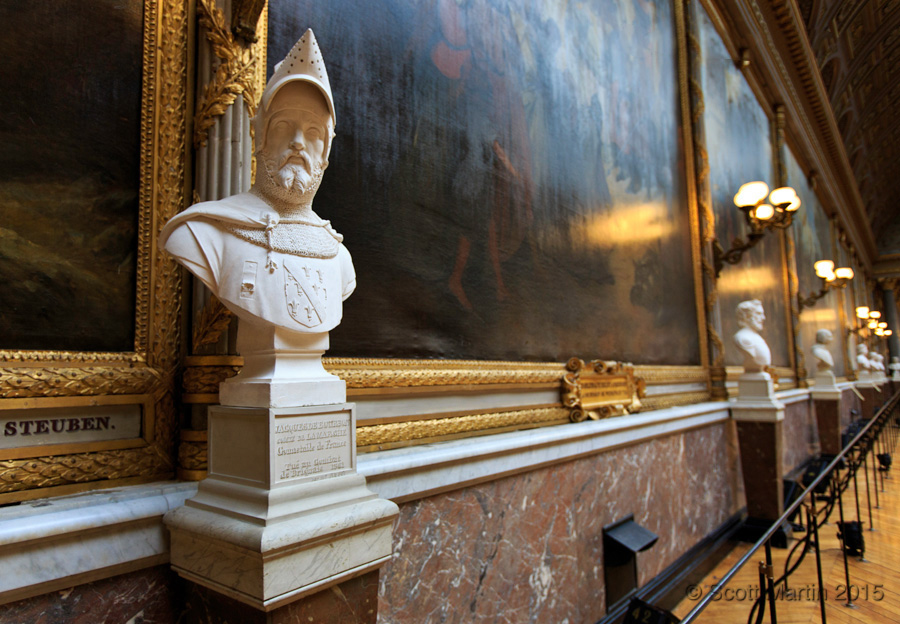
Along the hallway of the Battles Gallery are eighty busts of famous French people.
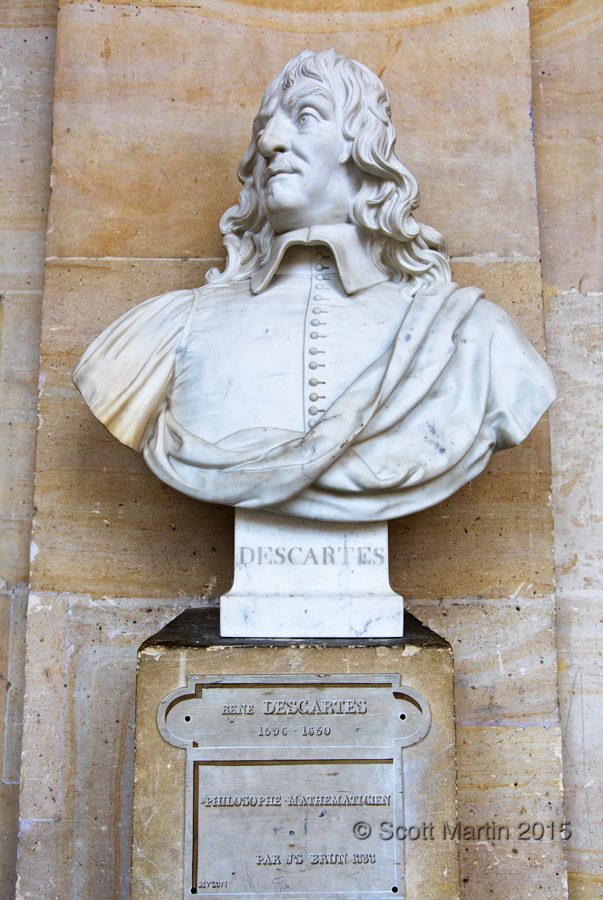
Perhaps my favourite bust was of Rene Descartes (1596-1650) the famous French mathematician and philosopher, known for his famous declaration “I think therefore I am”.
This last photograph is a multi image 180° panorama taken in the inner court yard of the palace. The absolute attention to detail demanded by Louis XIV in the construction of the palace is evidenced by the symmetry of the inner court with each side being a mirror image representation of the other.
Following our half day long meander through the vast palace we left Versailles and headed south east to Lyon where we spent the night before continuing on the next morning to Antibes, in the French Rivera where we spent a couple of days.
I trust you enjoyed this visual tour through the halls of the Palace of Versailles and as always your comments are much appreciated.
In October Deb & I were able to free up five days and get away to visit one of our favourite places – California – and more specifically Deb’s favourite spot in California, Huntington Beach, which is located on the Pacific Coast about 40 miles south of Los Angeles along the Pacific Coast Highway.
From a photographer’s perspective The Golden State offers a plethora of opportunities amongst some of the most varied subject material anywhere in the world. We will see but a few of them in this post. The interesting thing about this trip was that for the first time since I was a teen, I didn’t have an SLR or DSLR with me, instead using a mirrorless Fujifilm X-E2 body with an array of six lenses ranging from 8mm to 200mm in focal length. This new Fuji system is arguably one of the best travel camera gear set ups available today as the image quality rivals that of any professional DSLR system and is significantly smaller and lighter, two valuable premiums while travelling. In fact, the X-E2, six lenses and all the associated trinkets (SD cards, Intervalometer, spare batteries and charger) easily fits into my Crumpler Six Million Dollar Home shoulder bag and weighs in at about one third of what the comparable Canon gear weighs. Needless to say, all of the images in today’s post were taken with the X-E2 and I will try to select some images taken with each lens. Although this post is not designed to critically evaluate the Fuji X-mount system, I trust it does give you a flavour of what the camera is capable of, which is impressive, and although it will never replace the Canon gear, it does provide a very capable adjunct to it.
Heading north from LAX along the Pacific Coast Highway you first encounter Marina Del Ray, Los Angeles’ largest marina. On the north side of the marina is the start of Venice Beach which seamlessly runs into the Santa Monica beach and its very famous pier.
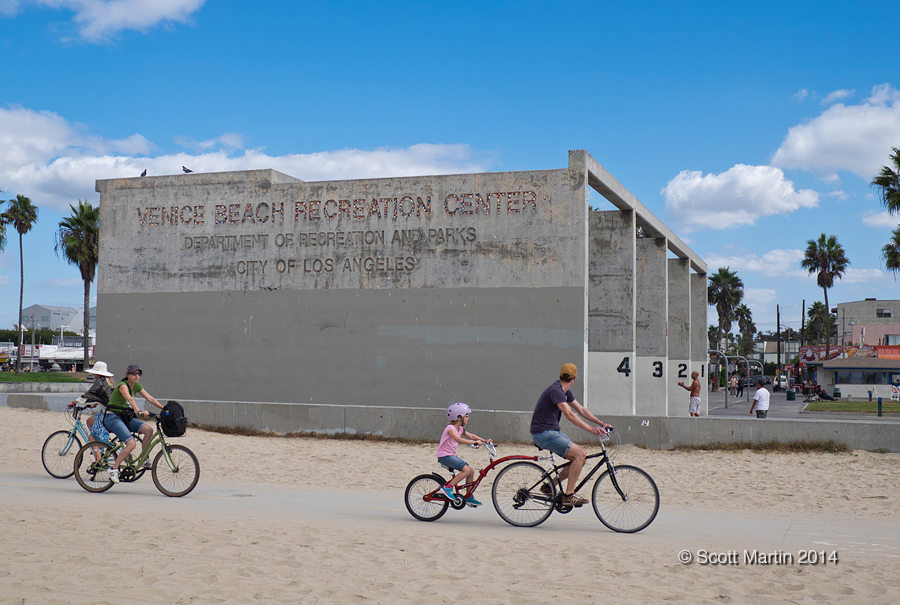
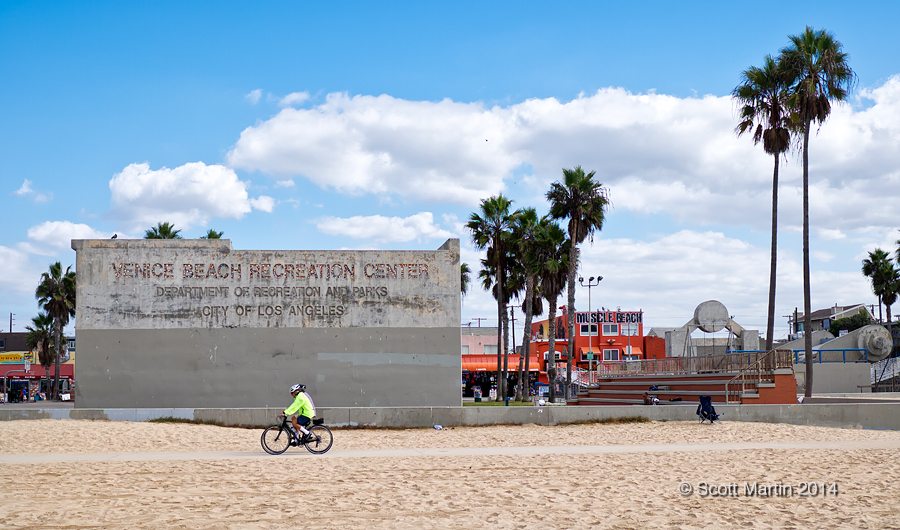
The well known Venice Beach Logo staking its claim to the beach.
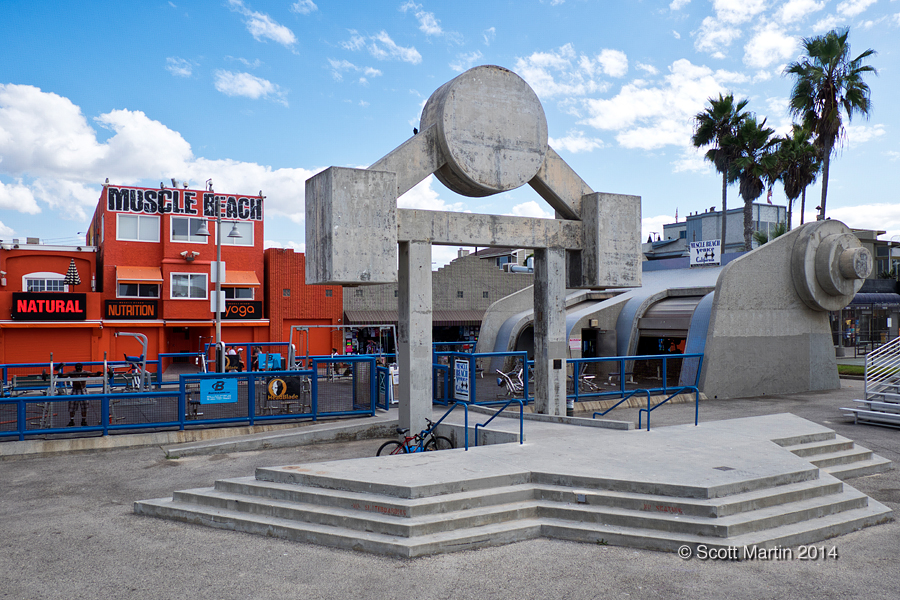
Venice Beach is one of the most eclectic beaches in the world and attracts people of every conceivable stripe which creates a most unusual beach side community. It is also famous for Muscle Beach which is an outdoor, on the beach, weight training facility started in the 1930’s (just south of the Santa Monica Pier) and relocated to Venice Beach in 1950.
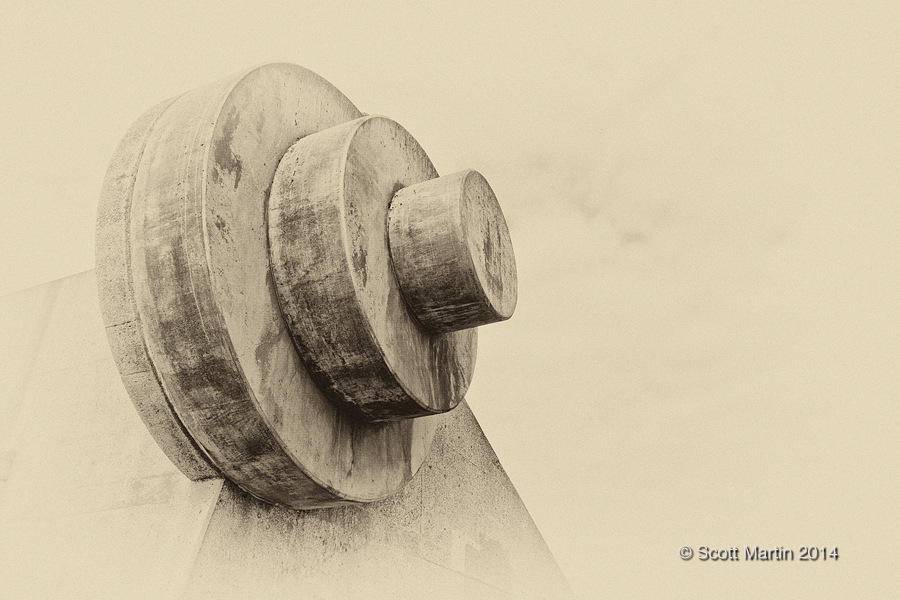
An artistic impression of the stylized concrete bar-bells at Muscle Beach.
Hundreds of small shopping stalls line the walkways of Venice Beach and there are no shortages of places to purchase anything that has to do with life on the beach. Sunglasses anyone?
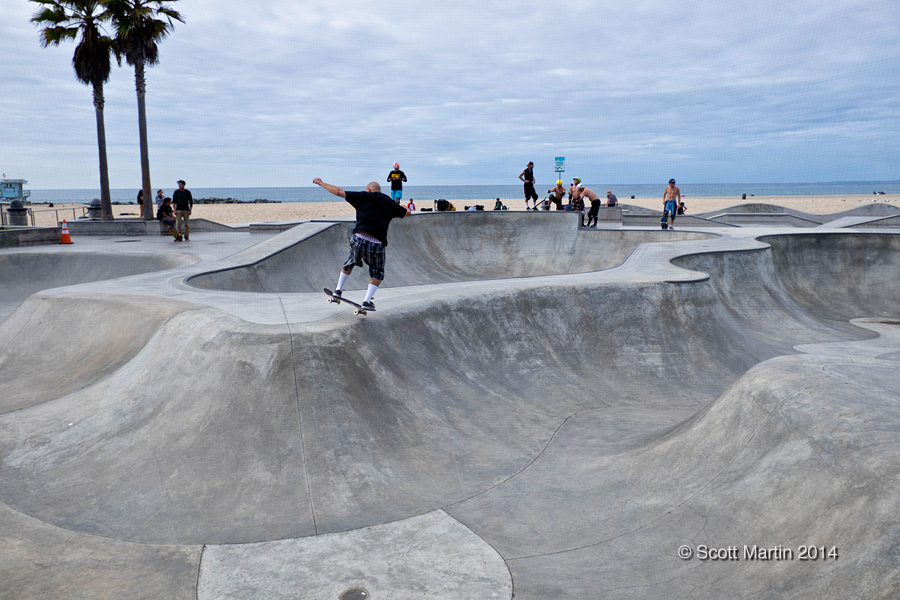
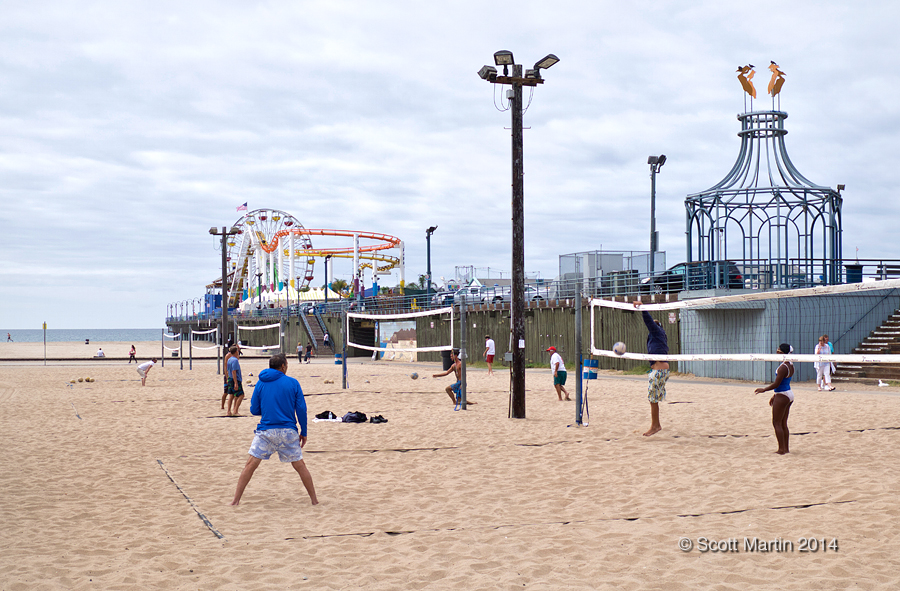
The California Coastal Beaches are exceedingly wide with perfect soft sand, so beach volleyball courts abound. At Venice Beach there are also expansive skate parks and paddle ball courts, but long before these were popular, Venice Beach had hand ball courts pictured below.
Just a quick photographic aside re these two pics of the hand ball courts. Always think about the foreground (and back ground) elements of every image you take. Doing so will improve your skills immeasurably. Although these two images will never be more than snapshots in our travel album, I waited for a number of minutes in both cases for cyclists to pass through the frame and exposed the image when they were positioned where I wanted them compositionally. The cyclists are not the object of the image but add a touch to the final result that makes the whole image a little more interesting.
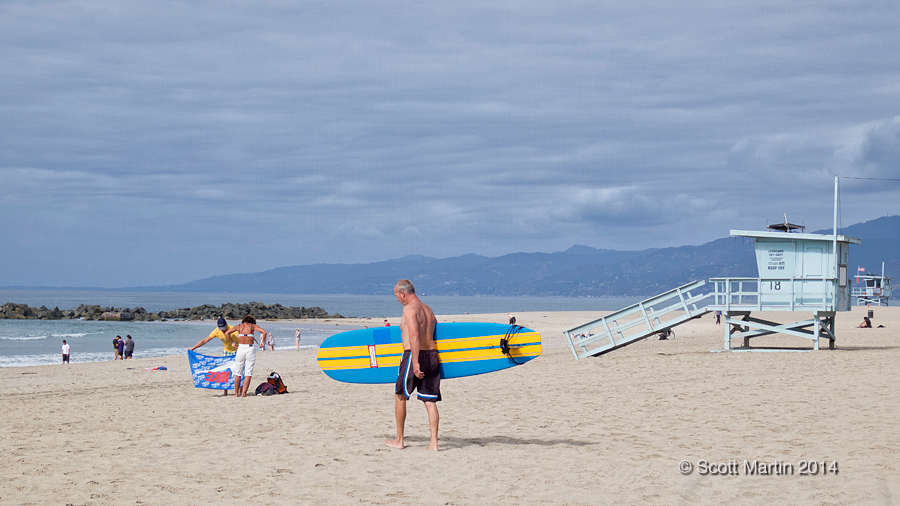
The ever present California surfer.
I think I’d rather be swimming.
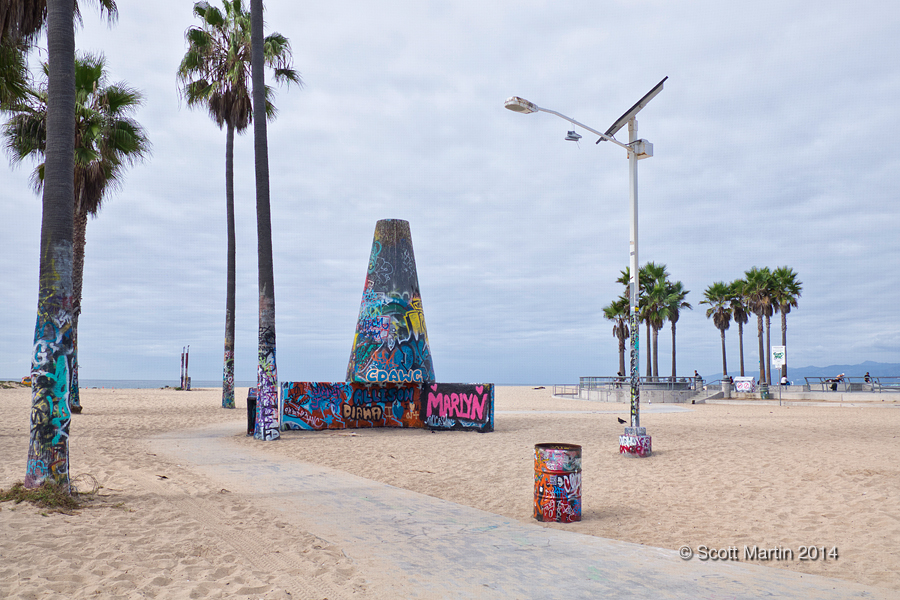
The Venice Beach area is rather devoid of graffiti, except in the designated graffiti area in which every inch of available real estate is tagged.
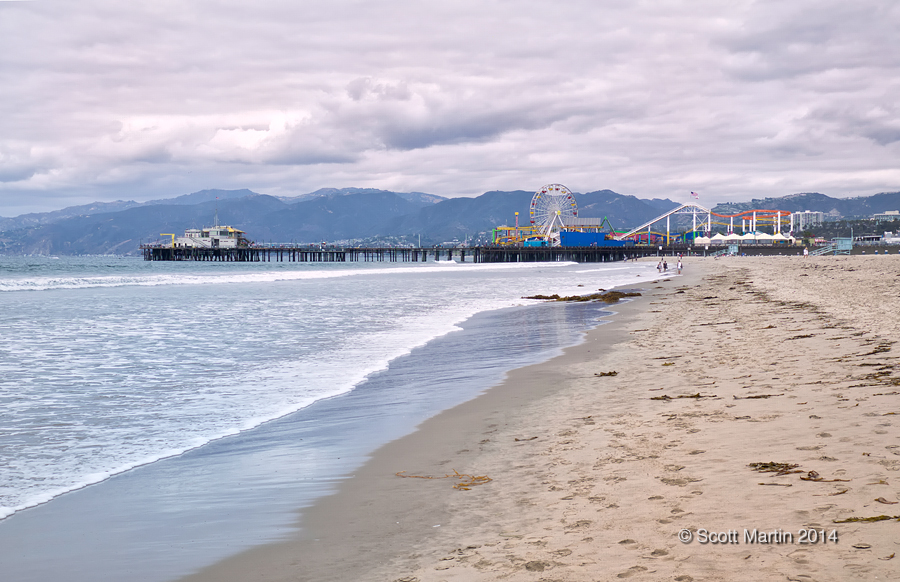
The Santa Monica Pier immediately north of Venice Beach.
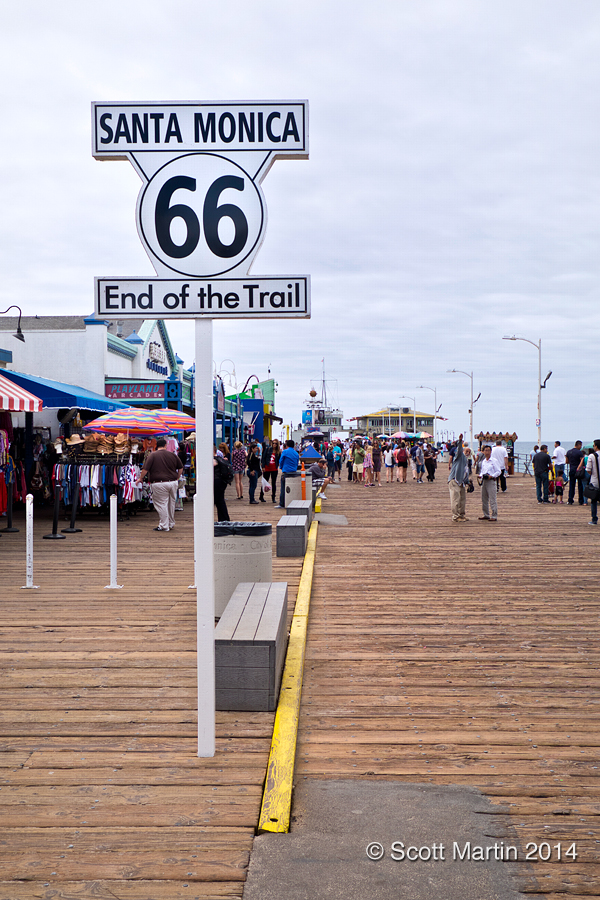
The famous Route 66 or Will Rogers Highway covers almost 4,000 km beginning in Chicago and ending on the Santa Monica Pier.
Looking out along the pier standing on the original site of Muscle Beach.
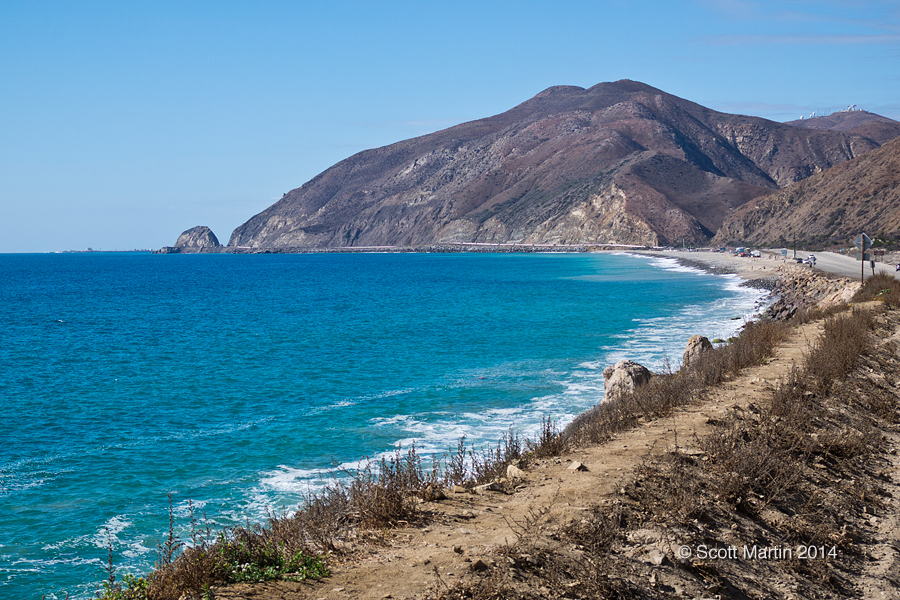
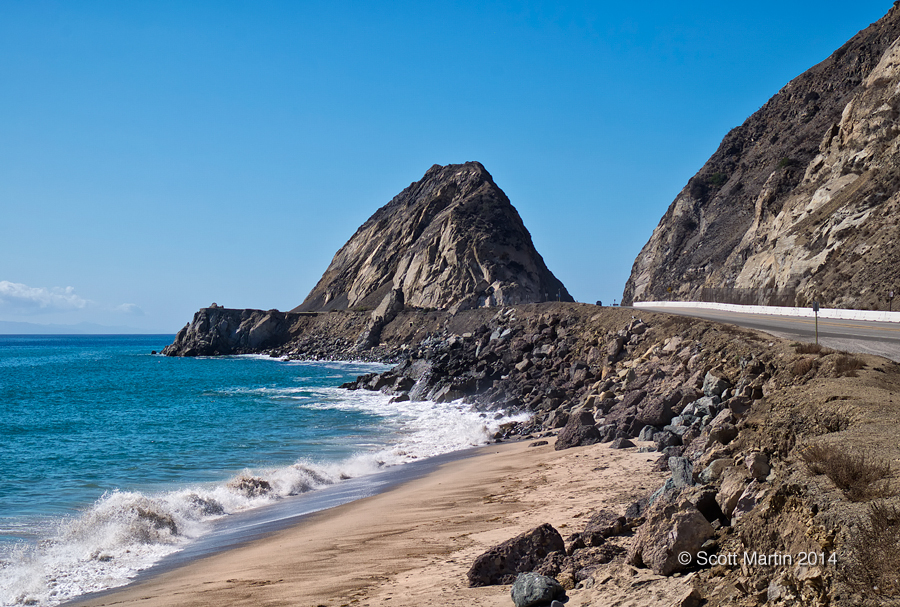
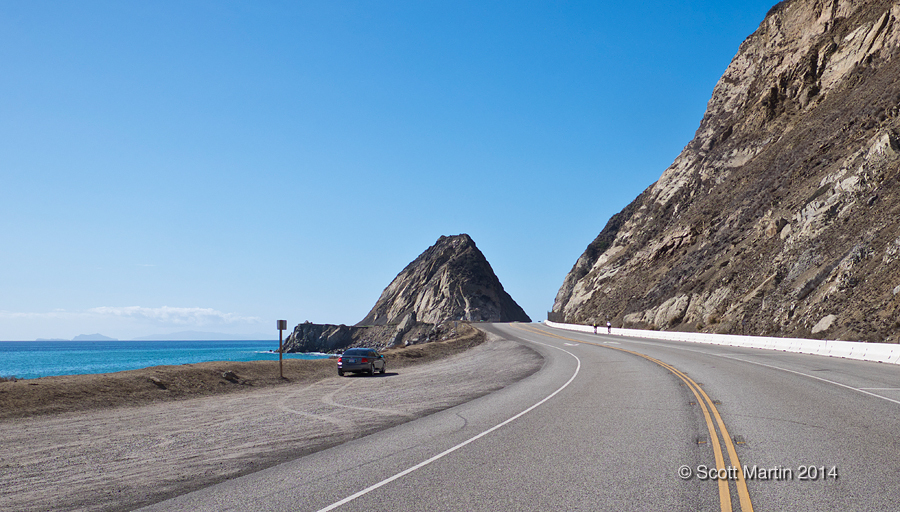
Heading north from Santa Monica you pass through Malibu with its amazing beach front properties which are home to the rich and famous. As you progress north along the Pacific Coast Highway from Malibu the urban areas transition into more natural terrain and you find one of California’s most recognized vistas, seen regularly on movies, TV shows and automobile commercials.
.
As this view is often associated with car scenes in movies and commercials, it was necessary to get an image from the road’s perspective. With Deb watching for cars I was able to catch a shot from the road.
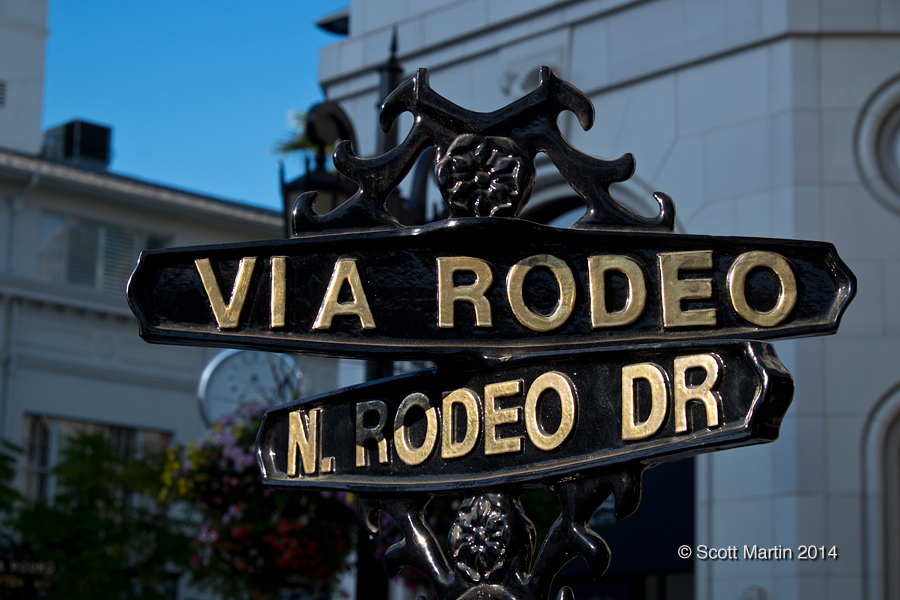
After spending most of the day on the beaches we headed up Sunset Boulevard from Malibu and walked around Rodeo Drive, the shopping area for the uber-rich which also makes it a great place for car watching 🙂
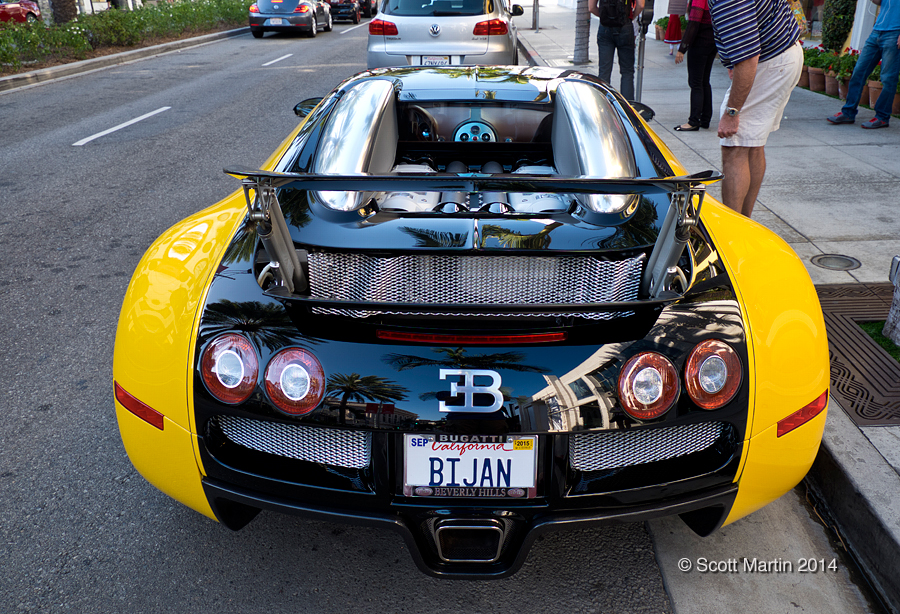
Here is a $2,000,000 Bugatti Veyron, the world’s fastest production car with over 1,000 horsepower and a top speed of 257 mph from its 8L V-16 engine with four turbo chargers.
Here is what it looks like from behind and also an image that is included solely for my great friend Arni, who I know will get a chuckle from this picture.
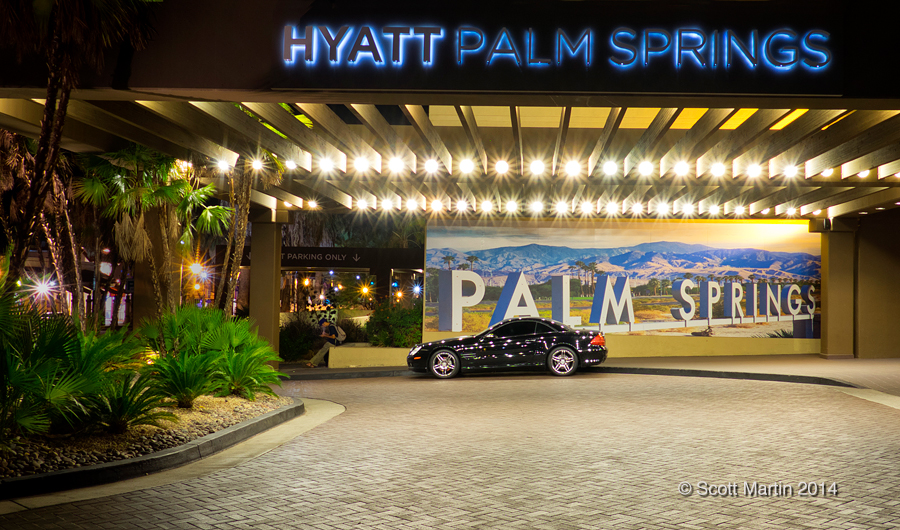
After looking but not buying anything on Rodeo Drive we headed for Palm Springs, a beautiful spot in the Sonoran Desert about 175 km east of Los Angeles in the Coachella Valley bounded on all sides by rugged mountain ranges. We arrived in Palm Springs well after dark, so the photography options were few, however here is a view of the entrance to our hotel, which was the perfect spot to stay. We had a cabana suite which was fabulous.
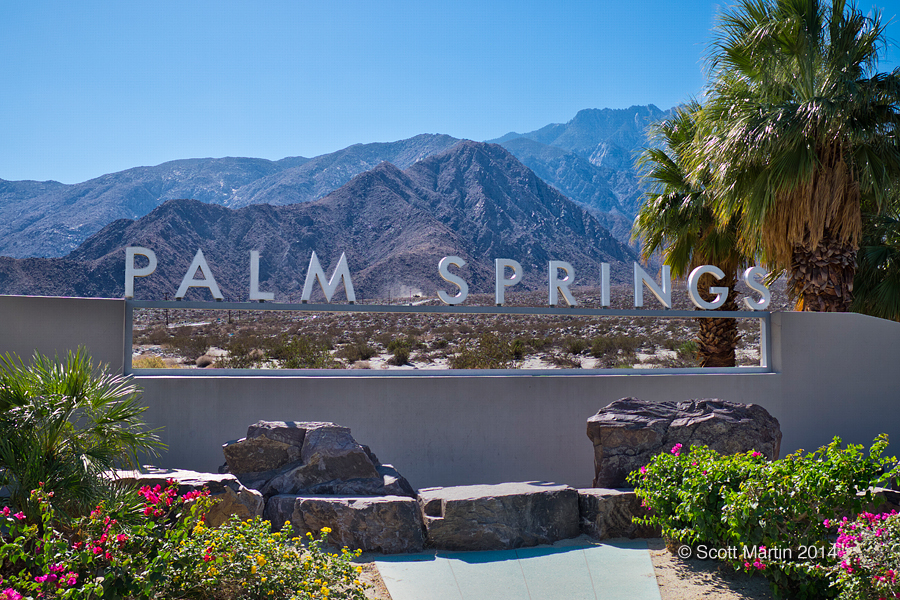
I was intrigued by the Palm Springs mural in the above shot so we set out to find it and fortunately it was very close to the entrance road to the Palm Springs Aerial Tramway which was on the agenda for our fist day’s activity.
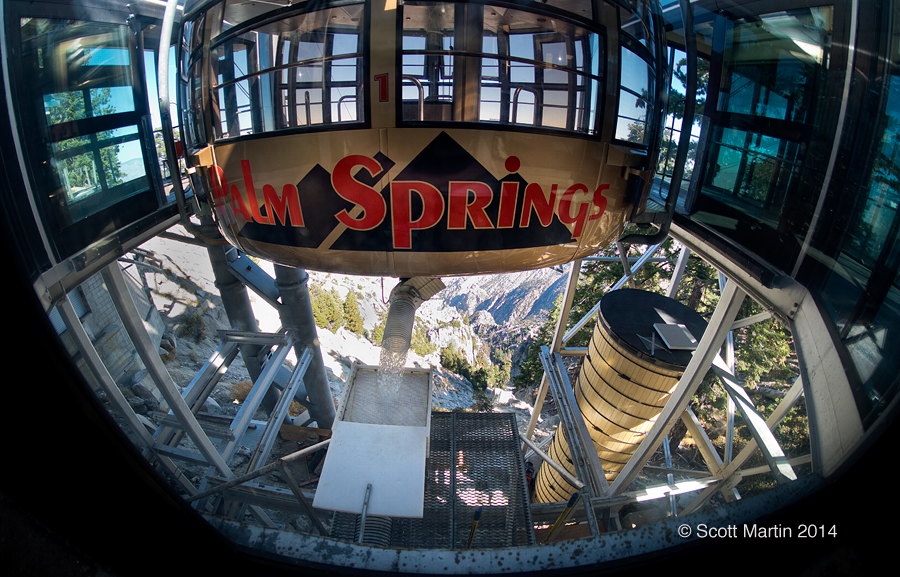
The Palm Springs Aerial Tramway is on the north side of Palm Springs and provides a wonderful eleven minute ride to a mountain peak which offers a 360° view of the region. The Tramway took over 26 months to construct beginning in 1961 and opening in June 1963. Since then over 20 million people have taken the trip to the peak. The gondolas used today are among the largest in the world with room for 80 passengers and the floor of the gondola rotates through two complete revolutions as you traverse the mountain.
The gondola docked at the summit, notice the water pouring out of the base of the tram. Hundreds of gallons of fresh water are taken to the top with every trip and stored in a large reservoir. The only source of water at the peak.
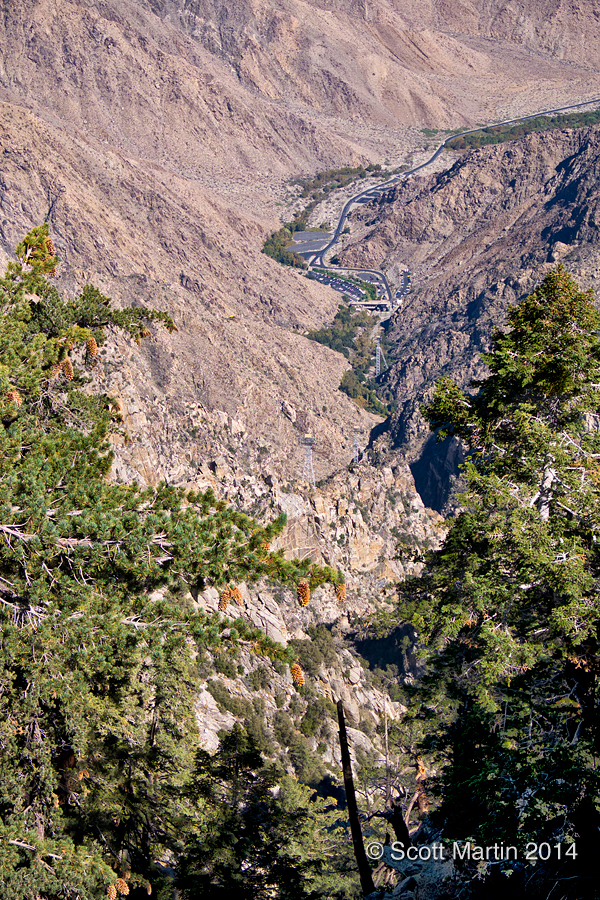
Looking down to the valley from the tram.
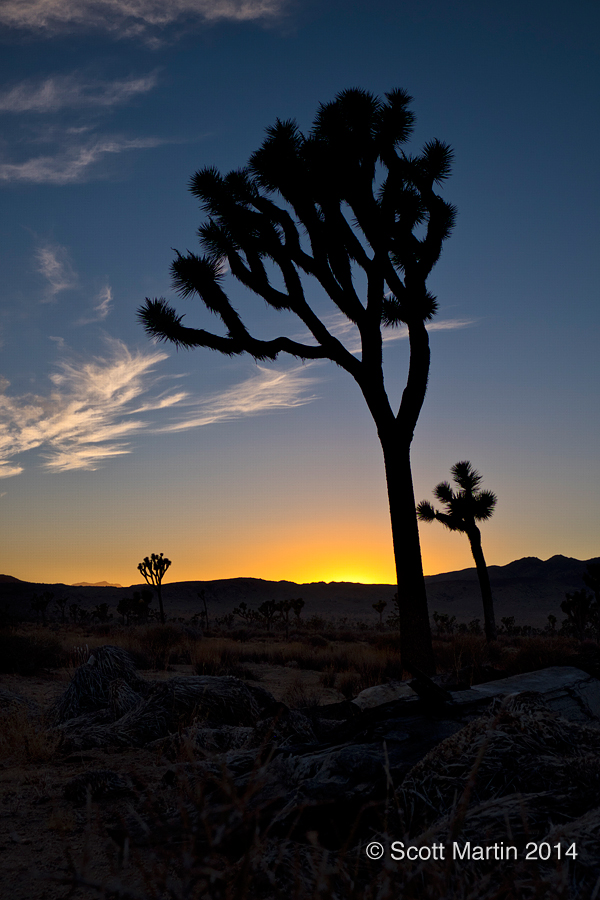
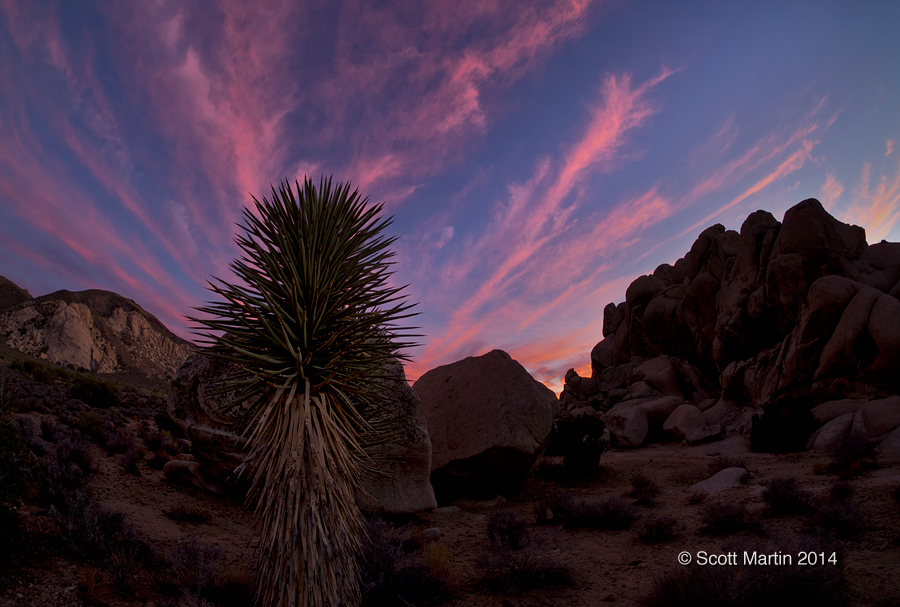
One of our favourite places to hike is in Joshua Tree National Park which is about an hours drive east of Palm Springs. This year we were able to watch a beautiful sunset inside the park in an area where the Mojave & Colorado Deserts converge. The first image is just after sundown with the silhouette of a Joshua Tree, which is not really a tree nor a cactus, but its own unique plant.
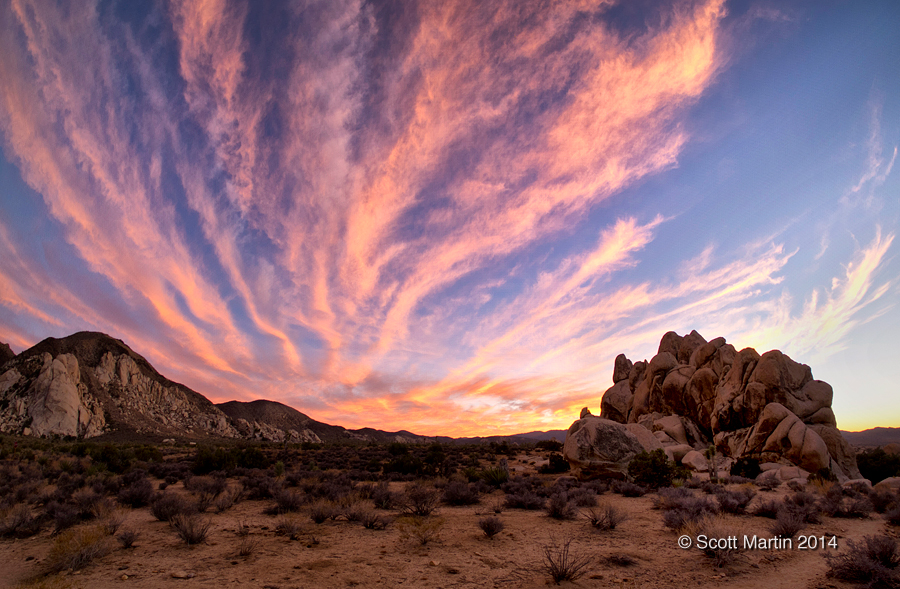
The use of a fisheye lens with its unique distortion pattern and 180° FOV (field of view) makes for some interesting cloud formations.
.
Leaving Joshua Tree National Park we headed west for the 150 km drive to Huntington Beach on the Pacific coast where we spent a couple of days enjoying walking the beaches and keeping our FitBits happy.
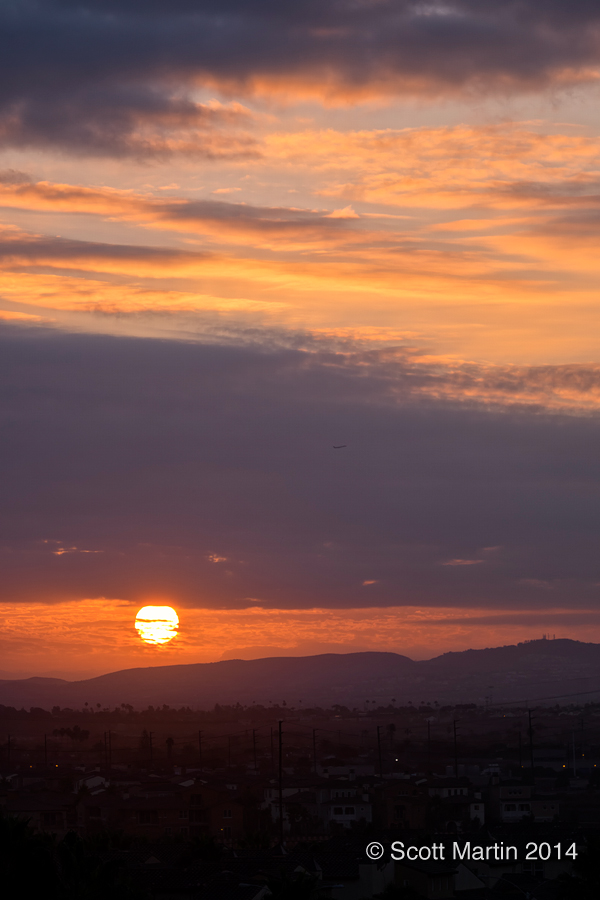
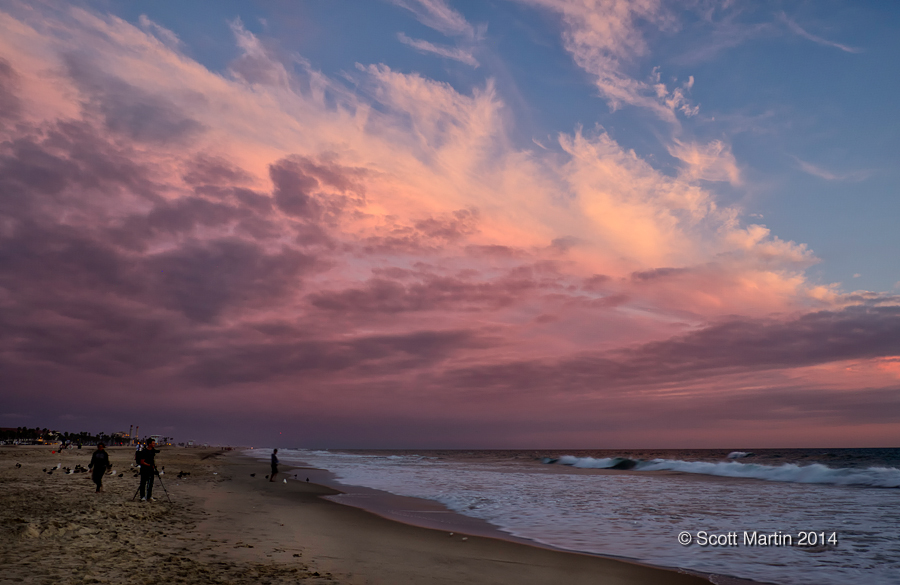
Sunrise is a very special part of each day, yet sadly an event that I miss other than while on vacation. You just know its going to be a good day when you take the time to watch the sunrise….its kind of like watching God turn the lights on for another day He has planned for you. Here is the view from our hotel room at the Hilton on Huntington Beach.
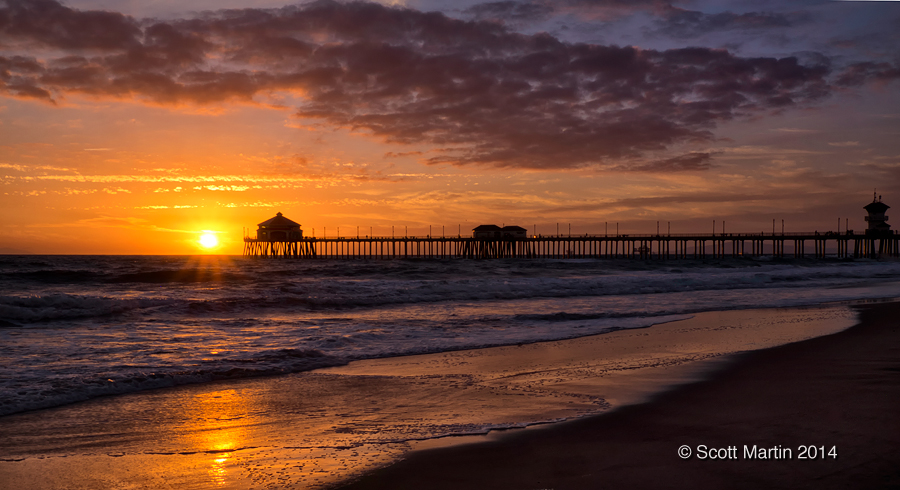
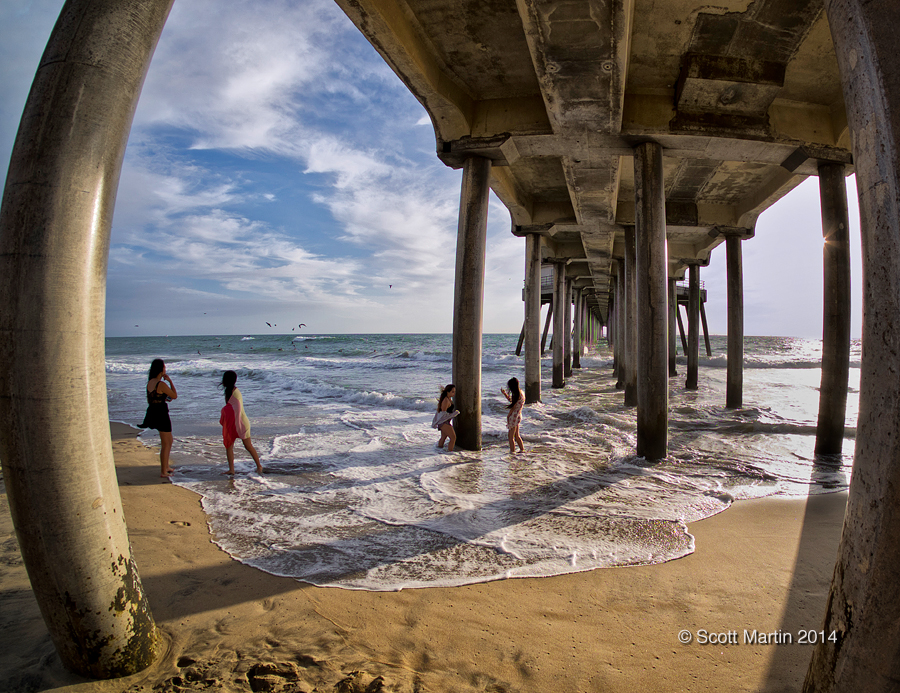
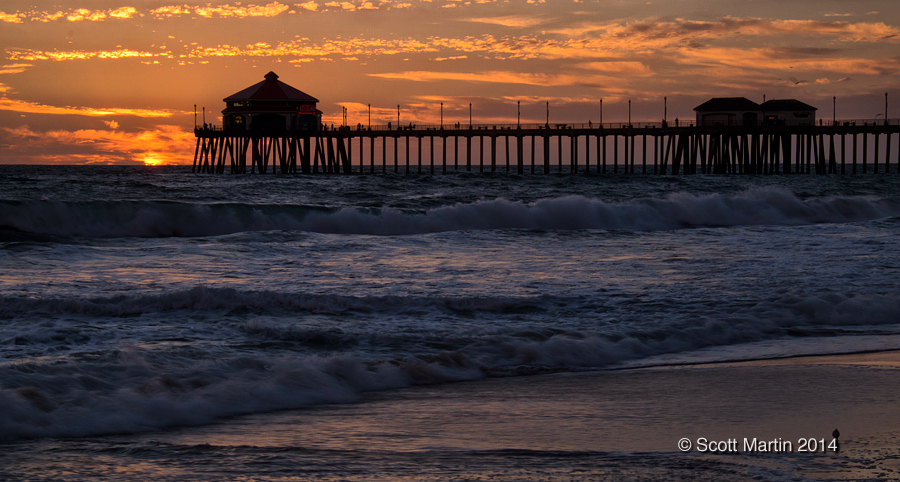
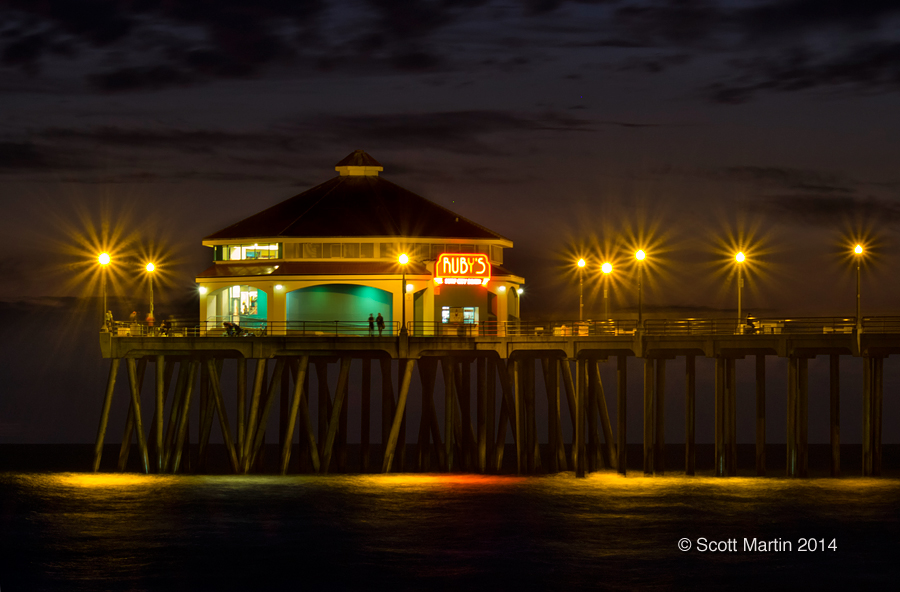
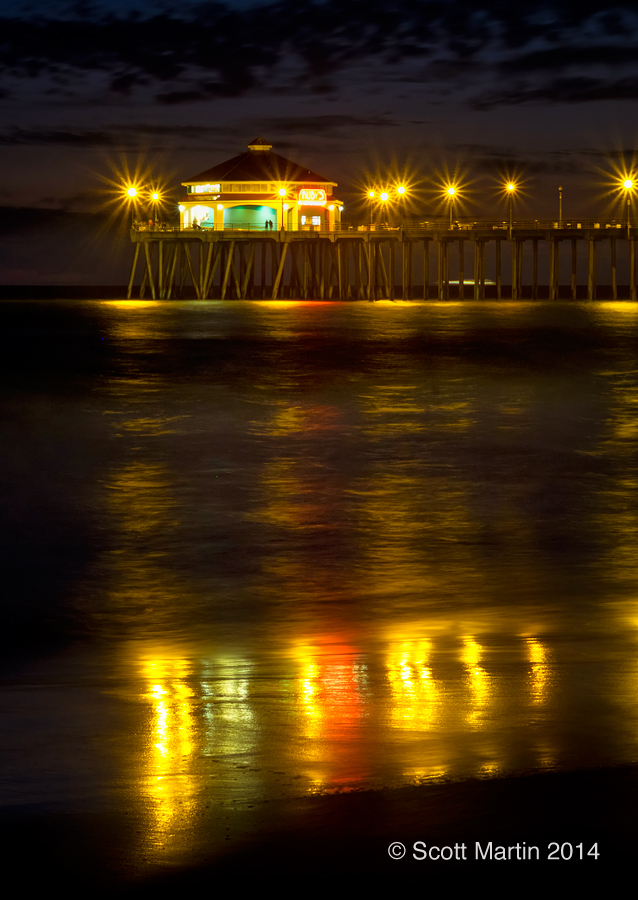
The landmark that dominates Huntington Beach is its large pier that extends well it into the Pacific Ocean and provides the perfect location for Ruby’s restaurant at the very western most reach of the pier.
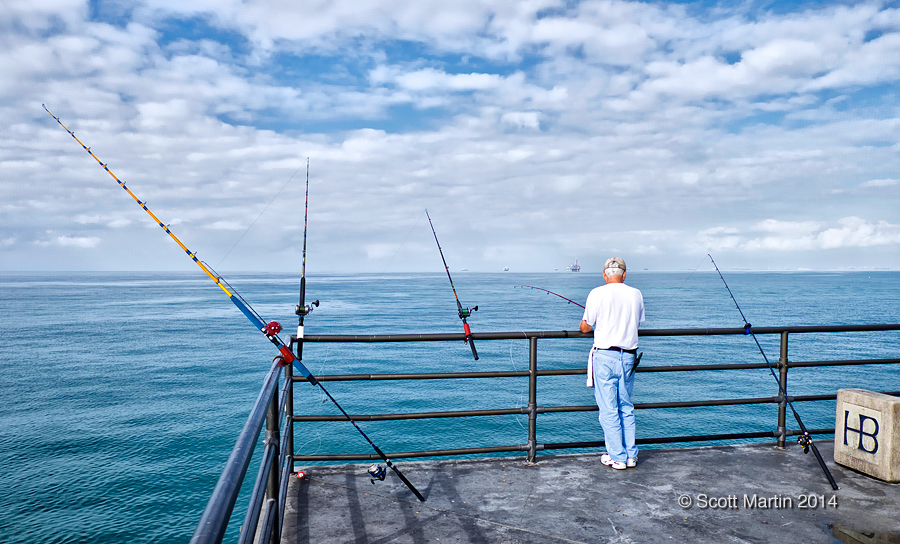
Fishermen and women line the end of the pier and although they are perched some thirty feet above the water they quite adeptly retrieve their catch although the ever-present gulls will try to take the fish from the lines while they are being reeled in. If you are an expert you can handle five lines simultaneously!
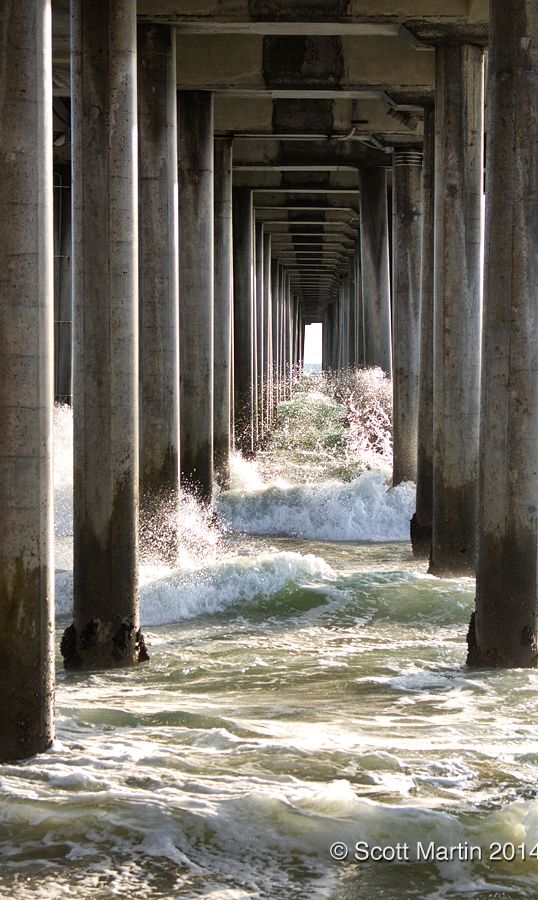
Walking along the beach beneath the pier also provided for some interesting photographic opportunities. The next two images were taken from pretty much the exact same spot, the only variable being the focal length of the lens. The first was taken with an 8mm fisheye lens and the second with a 55mm lens. They serve as a good example to always carry a number of lenses with you and when you find an interesting subject take some time to experiment with different focal lengths. The results can be surprising and tell very different stories. (A cautionary note; always be careful and minimize the likelihood of letting salt spray and sand get at your sensor when changing lenses. Face your back to the water and the wind and use a towel to create a tent around the camera. Face the camera body downwards and minimize the time the camera and lenses will be exposed to the air. Over the years Deb and I have developed a very efficient ‘four handed’ system for quickly changing lenses).
.
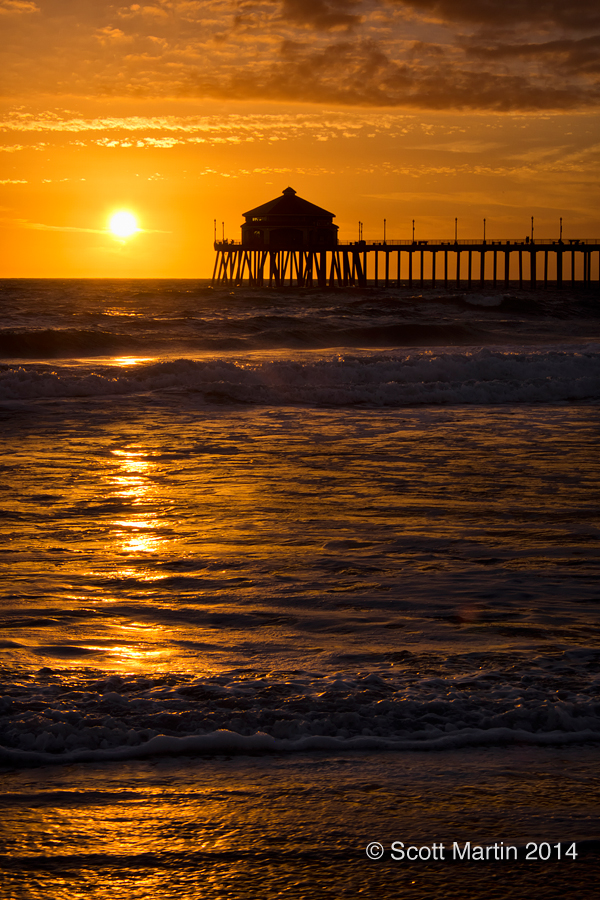
Just after sunset.
….and a few more of the pier.
.
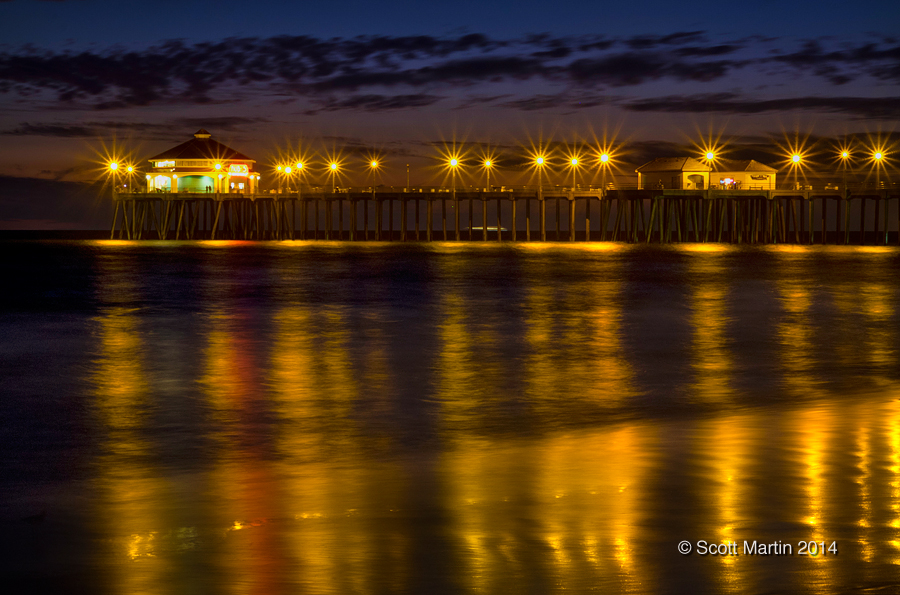
Long after the sun has set. Use very small apertures (f18-22) to create the starburst effect on the floodlights. This requires long time exposures which also has the added benefit of blurring the water which helps soften the fore ground and creates reflections on the water. The number of rays emanating from the light sources is determined by the number of blades in the diaphragm of the lens (which are used to set the aperture of the lens). With lenses having an even number of blades, there is one ray produced per blade, while an odd number of blades produces two rays per blade. If you take time to count the rays in the following images you will see there are 14 rays around each light source created by the seven diaphragmatic blades in the Fuji XF55-200mm lens I was using. Have a look in the Naturescapes Gallery for a similar image taken a few years ago of the same pier with the Canon 24-105mm lens which has eight diaphragm blades producing eight rays from each light source. You will notice the effect is quite different, so based on your preference you may want to inquire as to the number of blades in the diaphragm of the next lens you buy….or better yet buy two similar focal length lenses, one with an even number of blades and one with an odd number!!
.
.
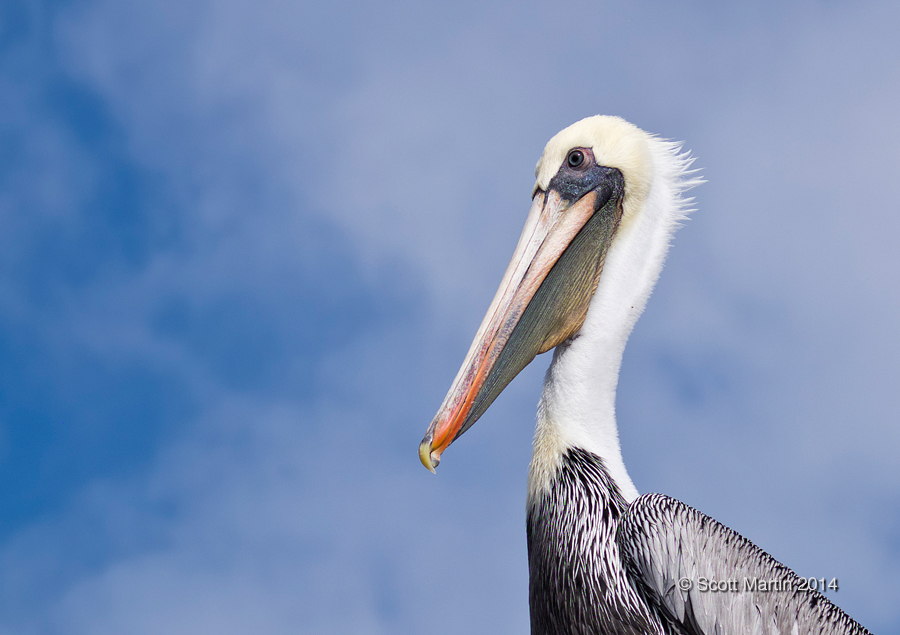
As mentioned earlier this trip was the first time I’d ever travelled without any Canon gear, which also means no specialized equipment for bird photography. For this Californian excursion all bird photography would be with the Fuji X-E2 and the 55-200mm zoom lens. We headed north to the Bolsa Chica Conservancy looking for some birds to practice with and although it was a quiet birding day there were a number of Brown Pelicans fishing in the wetlands.
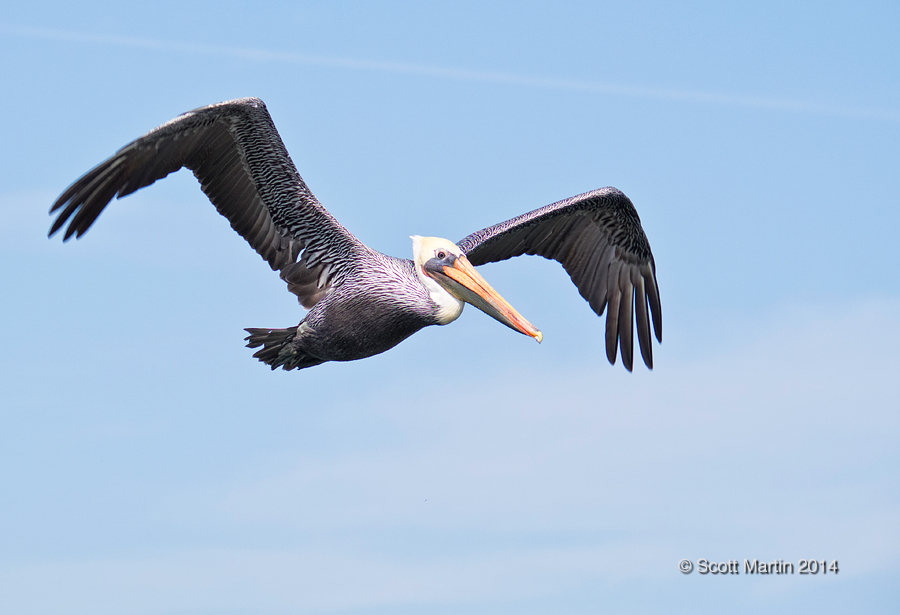
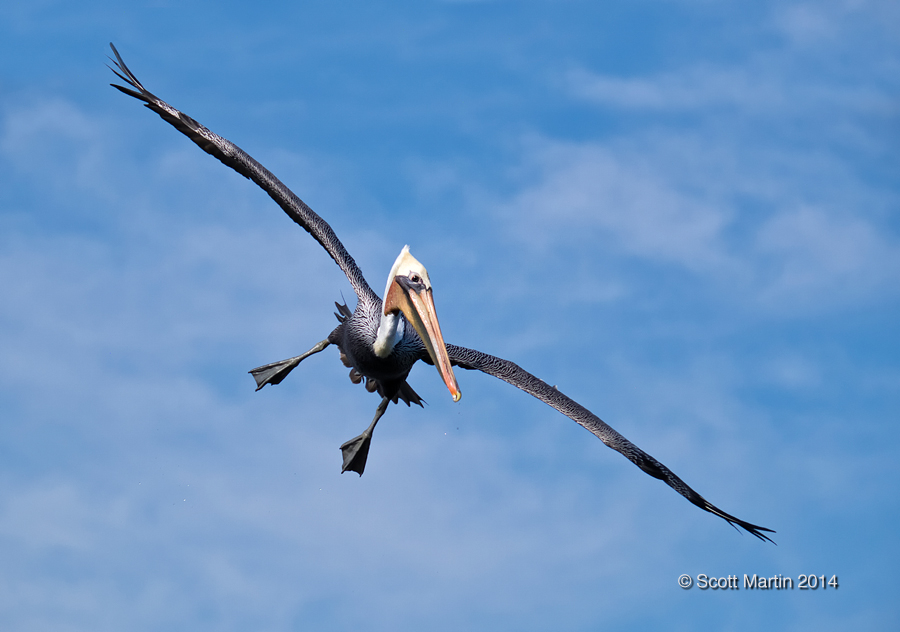
Although the keeper rate was low compared to the Canon, the slow flying Pelicans did afford a few decent in flight photo ops.
.
We had a wonderful few days in California and look forward to our next trip west. Travelling with the new Fuji mirrorless camera system exceeded my expectations and I trust this blog post has given you an idea of capabilities of this type of gear. Images in this post ranged from 8-200mm focal lengths and covered a wide range of photographic challenges. I’m not of the opinion that this new breed of camera will replace the DSLR, however it does provide a superb travel gear system that is fully able to meet virtually every photographic challenge and do so with gear that is less conspicuous, much lighter and yet retains superb image quality.
I’m still a Canon guy but do like the Fuji….a lot!
Although this last shot was taken through some dirty glass windows at LAX, Deb & I enjoyed our last sunrise in California while waiting to board our plane for the rather long flight home.
Time lapse photography is something that has always been of interest and recently both my son and I have been experimenting with this fascinating niche in the photographic world. The basic premise of time lapse is quite simple; you record several images at regular intervals over an extended period of time and then after processing them, add the images into a video file. When you play the resulting video file, you have a video that shows everything captured in the still images over the period of time they were taken compressed into a few seconds. For example, if you take one image every fifteen seconds for an hour you will take a total of 240 images. Placing these 240 images into a video file of 24 frames per second will produce a video of ten seconds duration. Thus the resulting video will display in ten seconds what occurred over a period of an hour.
This first sample time lapse is exactly as described above; 240 images taken over an hour ending with sun down and displayed in a 24 fps video file. The images were taken from our hotel room in Niagara Falls.
Besides your DSLR you require two other pieces of equipment to get into the time lapse game, a tripod and an intervalometer.
The tripod is required to ensure that the camera is stable and records the exact same frame with every exposure over the time lapse period. Next to the camera and lens, the tripod is arguably the most important piece of equipment and I would certainly buy a tripod before a flash. As tripod technology hasn’t changed much since the advent of carbon fibre, I would recommend investing in the best possible as they will, for all intents and purposes, last a lifetime. I use Gitzo tripods which have proven very reliable over the years. They are well constructed, very stable and lightweight. As time lapse photography generally involves wide angle or short telephoto lenses, I use a smaller Gitzo 1542T traveller tripod with a Markins Q3 ball head.
The intervalometer is simply a timer remote switch for the camera that allows you to program a remote timer (delay from activation to shutter release), interval timer (the amount of time between successive exposures), long exposure timer (defines exposure time with camera on bulb setting) and exposure count setting (how many exposures will be taken). I use the Canon TC-80N3. Some of the new cameras have an intervalometer built into the camera itself so make sure you check for this feature on your camera before buying an intervalometer.
The easiest time lapses to take are those with a constant exposure over the duration of the time lapse. Changing exposures within the time lapse often causes flickering in the final product which is very distracting and must be avoided. Even slight exposure variations when shooting in any of the automatic exposure modes will result in flickering which is why it is essential to shoot time lapses manually. Similarly you want to disable the autofocus on the camera for time lapse photography to ensure that that the camera focus does not change during the shoot.
This next time lapse is of the American Falls and consists of about 380 images taken over a ninety minute period.
Moving from a CF card with hundreds of images on it to the finished time lapse is surprisingly easy as long as you have a video editing software program. I use Adobe Premier Pro CS6, but any editor will work fine. You are not too concerned with post processing the images and any post processing done must be applied equally to every image to avoid flickering in the video. My workflow is to open all the RAW files in ACR (Adobe Camera Raw), select all, level and crop if needed (but care should always be taken to do this in camera so it is not needed in post processing), adjust for lens correction, contrast, clarity and vibrance and save the images as jpegs in their own folder. Open a new file your video editor (I prefer 24 frames per second), import your time lapse images, render the file and export it as you like it and you are ready to go. I’ve been playing around with both YouTube and Vimeo formats (you can find me at both sites under Scott Martin Photography). When watching the time lapse videos on full screen on the desk top, the Vimeo format appears better than YouTube, however for embedding videos in WordPress blogs like this the YouTube plugins are infinitely better than any of the Vimeo plugins I looked at.
Here is a 240 image, ten second time lapse of the Horseshoe Falls, again taken from our hotel room window on the 44th floor of the Hilton Fallsview Hotel in Niagara Falls.
I would encourage you to experiment with time lapse photography. It provides a lot of enjoyment and is one of those things you can truly multi-task with. My intent is to set up a camera for time lapse when I’m out doing landscape photography and that way as I’m moving about shooting sunrises and sunsets or exploring an area for landscape images I can simultaneously be recording images for a time lapse of the same scene.
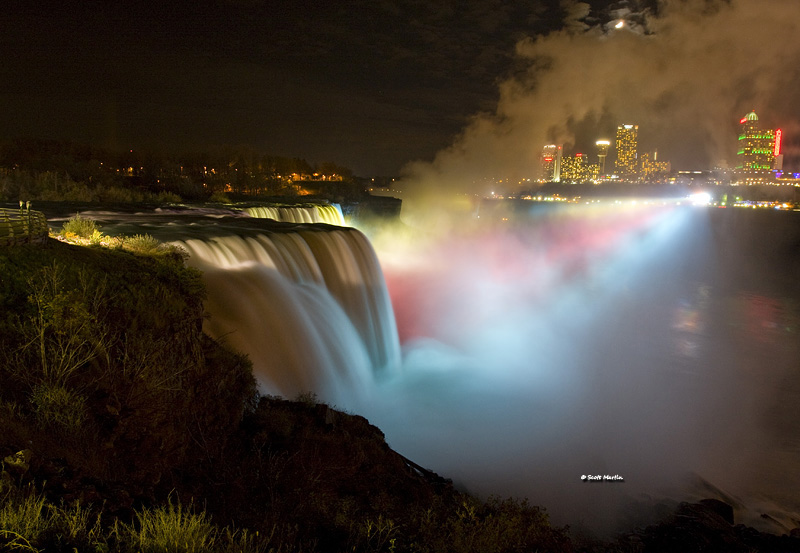
Although this last image is not a time lapse, it is a time exposure taken from the American side of the falls, looking across the American Falls towards the Horseshoe Falls in the back ground.
Without doubt the Eiffel Tower is the most recognized and photographed icon in Paris, having towered 1063′ above the Parisienne skyline since 1889 when it was erected to serve as the entrance way to the 1889 World’s Fair. The tower is the tallest structure in the city of Paris and was in fact the tallest man-made structure in the world from its completion (surpassing the Washington Monument) for forty one years until it was dwarfed by the Chrysler Building in New York City in 1930.
The Eiffel Tower was the winning submission in a contest to design the grand entrance way to the 1889 World’s Fair and the contest rules included that the structure would be easily constructed and easily dismantled. For this reason the tower metalwork was designed to be fastened only with rivets and bolts. The temporary nature of the tower is shown in that Gustave Eiffel was only awarded a twenty year permit for the tower (until 1909) at which time the ownership of the tower was slated to be returned to the city of Paris for demolition. The tower however proved invaluable not only for tourism, but also for radio and television broadcasting, so fortunately the tower remains today, and has become the world’s most visited paid tourist attraction with about seven million paying visitors every year. Deb & I were glad to pay about 18€ each to visit the top of the tower.
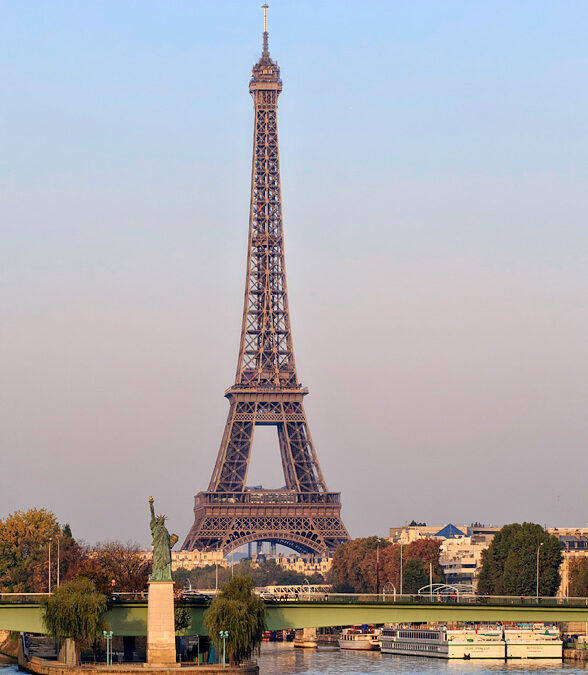
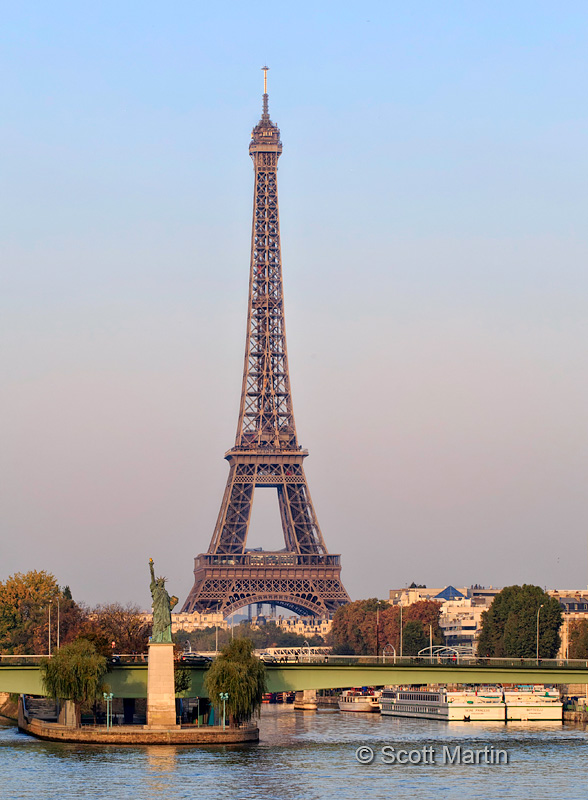
While preparing for our trip to Paris, we found that there are many, if not hundreds, of replicas of the Statue of Liberty around the world. The most famous Lady Liberty who overlooks New York City from Liberty Island was a gift to the United States from France. The original statue is in Luxembourg Gardens in Paris and a second replica was erected at the tip of a small man made island in the River Seine in 1889 for the World’s Fair. Knowing it was there we set out to take a picture of the Statue of Liberty with the Eiffel Tower as a back drop. It turned out to be a seven kilometre excursion but was worth the effort to get this rather unique image.
.
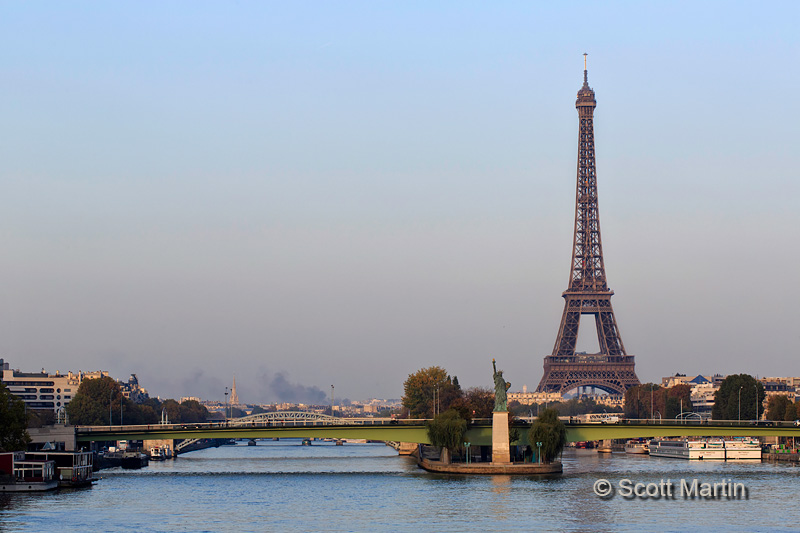
Being one of the most recognizable and photographed land marks in the world means that it is virtually impossible to take a novel picture of the tower, however Deb and I tried to find some unique perspectives and we hope you enjoy them.
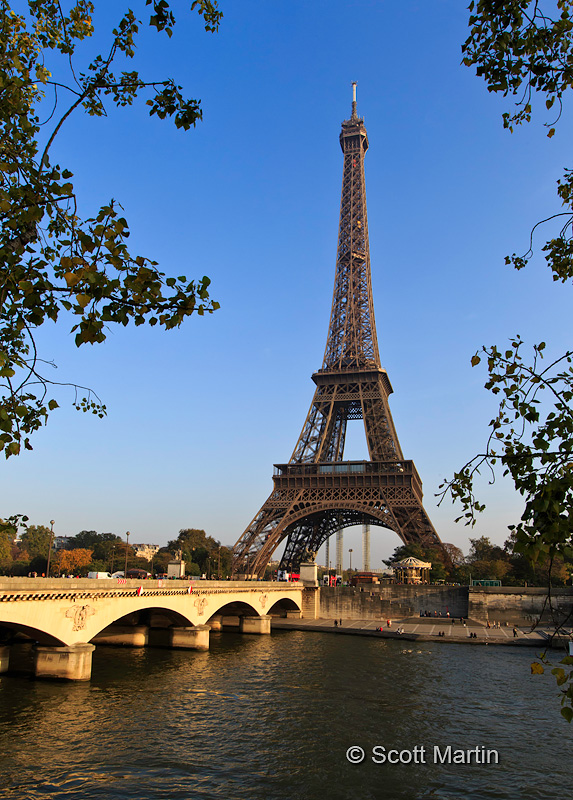
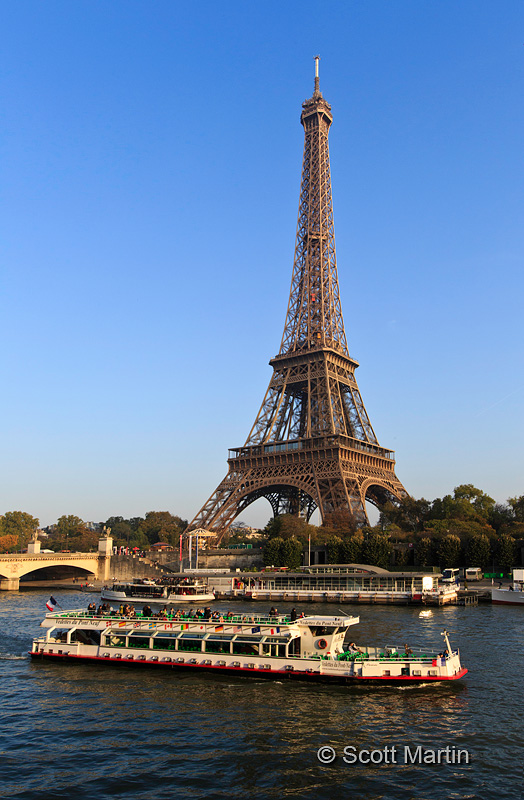
It is good practice to change the secondary compositional elements in an image if possible as a very different result can be achieved even if the perspective of the primary subject is virtually the same. The image above uses trees in the foreground to provide some visual interest and frame the tower while the image below provides an uncluttered view of the tower from the same perspective, however includes a river ferry as a secondary object of interest. Two very different images of the same primary subject from the same perspective. Some may prefer one over the other, which is merely subjective, however good practice is to take both and give people the choice!
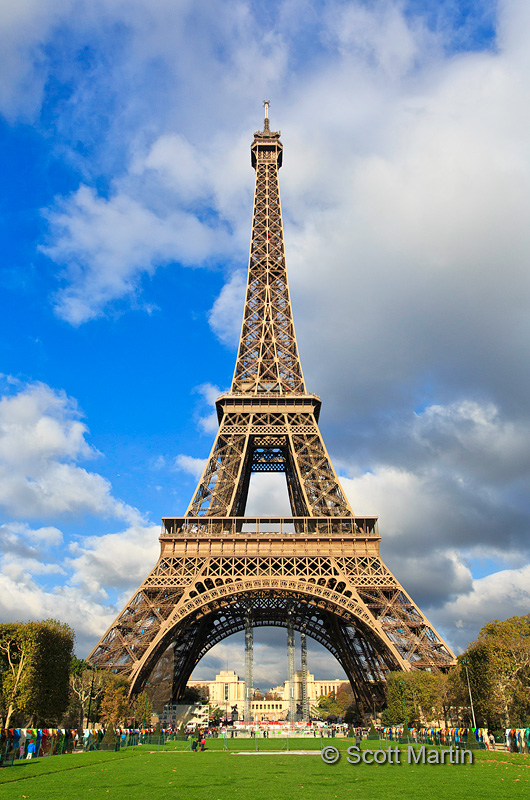
Although the tower is most often photographed to include the Seine River, it also looks good from the Champ de Mars which is the extensive parkland to the east of the tower. Thankfully there were great clouds which add to the pictures. Brian Peterson, in his classic book “Understanding Exposure” says that the best time to take a vertically orientated image is after you’ve already taken one in a horizontal orientation! While generally good advice, the Eiffel Tower lends itself to portrait orientation. It is interesting how the two camera orientations (portrait & landscape) create very different results as shown below.
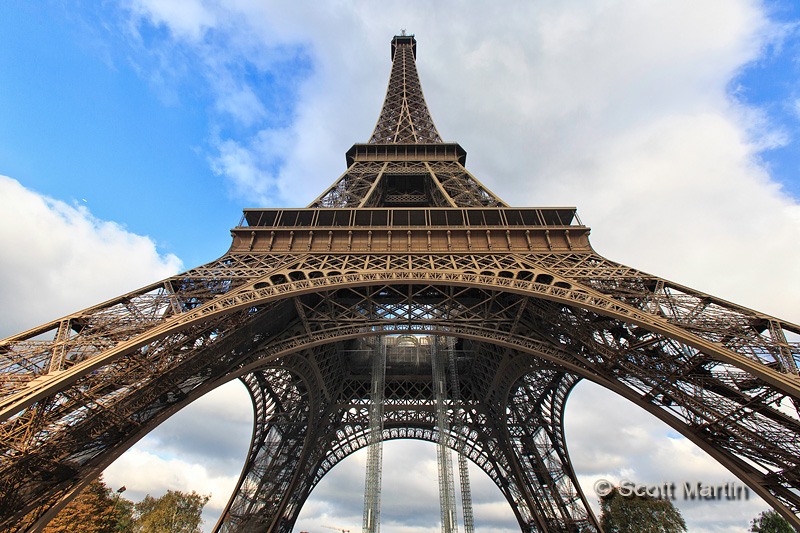
When photographing the tower with a wide angle lens (16-35/2.8 in this case) in landscape orientation you are pretty much forced to put the tower in the centre of the frame to avoid the distortion that is created when the tower is located near the edges of the frame. Distortion can be minimized by making sure the camera is level, however the height of the tower requires some upwards tilting of the camera which exacerbates the distortion.
The above two images show us that its always a good idea to take images using both camera orientations as a general practice. One may be decidedly better than the other but you amy never know which one is the best if you don’t practice taking both!
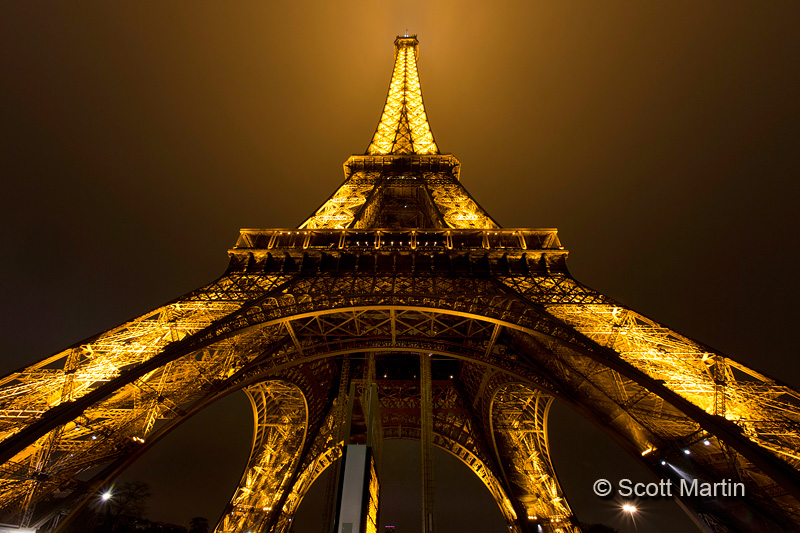
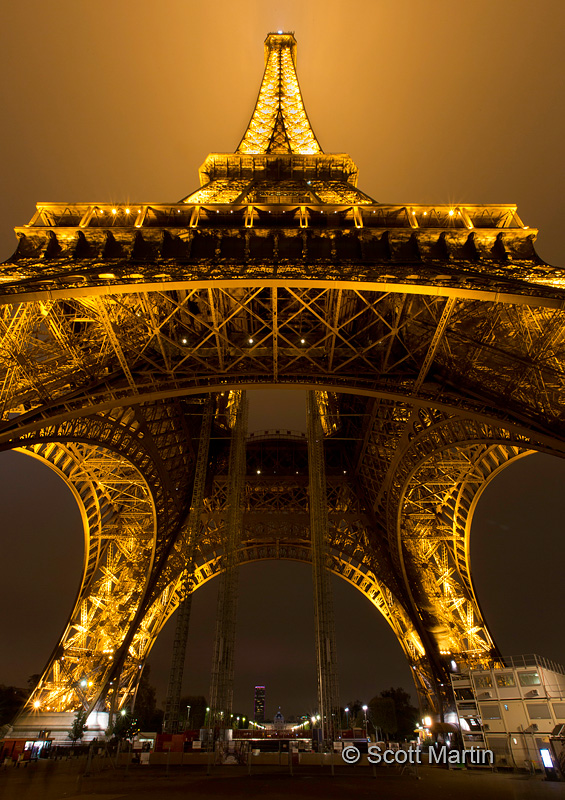
Breaking the rules of composition is easy to do when photographing the tower and even images missing the ground (a cardinal no no) sometimes turns out no too badly as shown below.
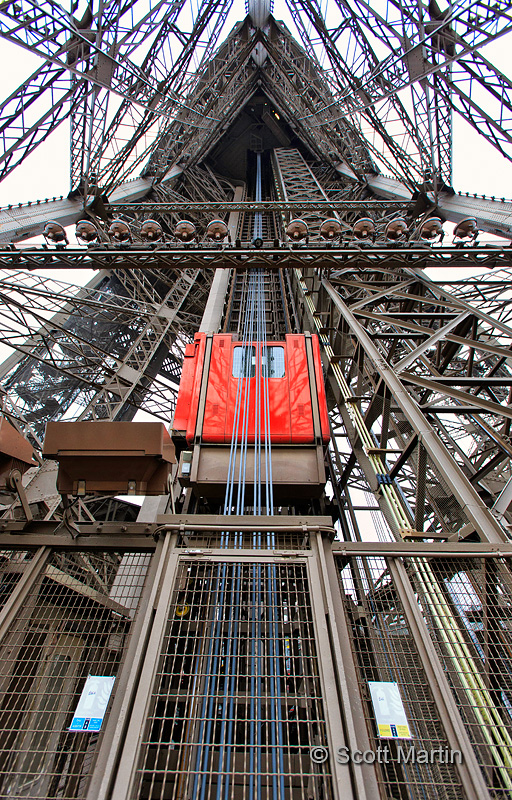
Getting to the top of the Eiffel Tower requires two elevator rides, a very unique two story elevator that angles up two of the four tower bases to the first level of the tower and then a second, much smaller traditional elevator that rises straight up to the second level. Even when arriving to the top of the second elevator you are required to climb a couple of flights of stairs to arrive at the outside upper observatory, but the view that awaits is spectacular. Below is the second elevator.
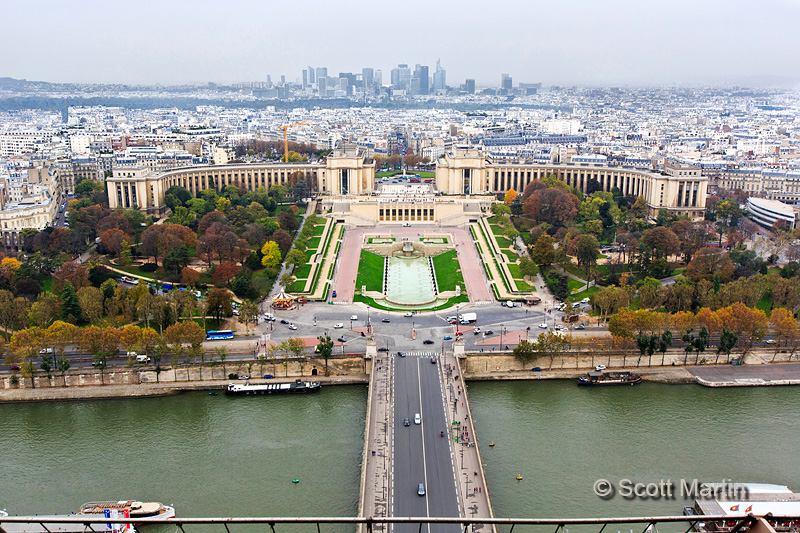
The views of Paris from the Eiffel Tower are grand as you can easily see the historic landmarks of the city. Looking west from the lower observation deck across the River Seine is the Place du Trocadéro and the expansive Palais de Chaillot which houses a number of museums. In the back ground is the skyline of ‘modern’ Paris.
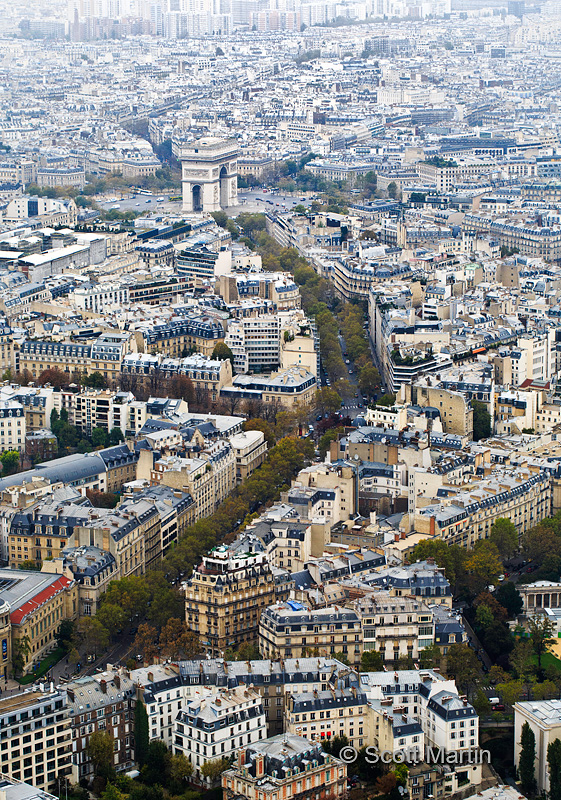
From the upper observation deck the perspective is completely different and allowed me the opportunity to use the 100 mm f/2.8 macro lens as a short telephoto lens (If you’ve been following this blog you will require that my beloved 24-105 broke in Venice). Below is the Arc du Triomphe as seen from the top of the Eiffel Tower.
Photographing the Eiffel Tower at night is something that every photographer wants to do at some point in time, capturing that iconic shot. We spent two evenings shooting the tower at night and a light rain made one of those evenings a bit challenging.
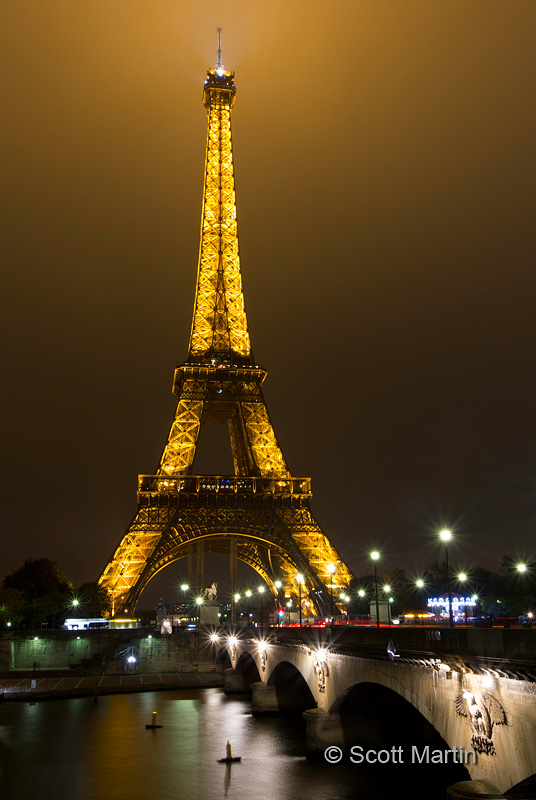
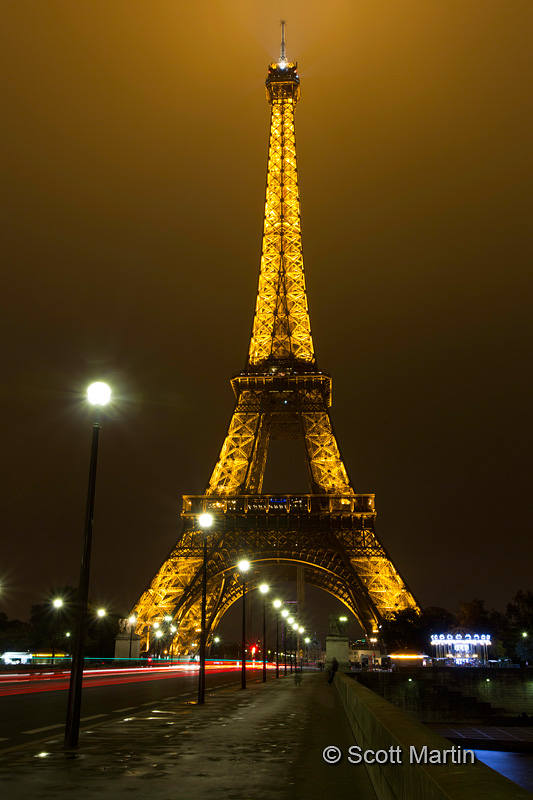
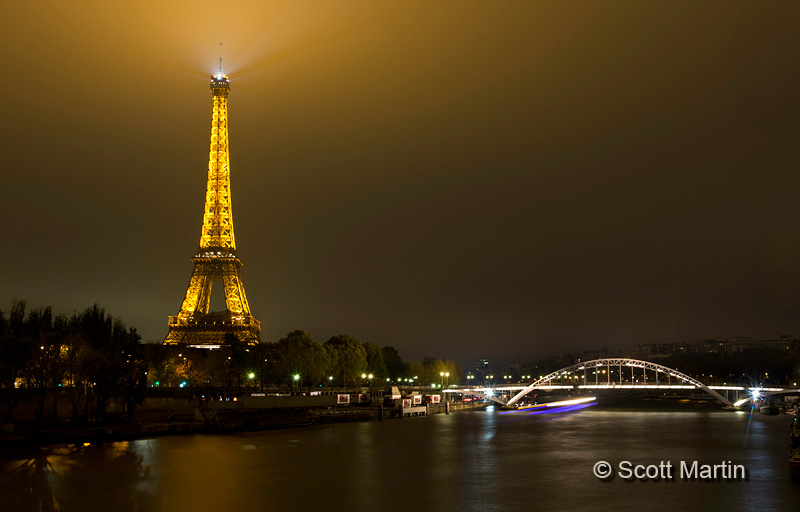
For me the classic Eiffel Tower at night shot is taken from across the Seine River, one view highlighting the arches of the bridge and the other the string of streetlights leading towards the tower. So we took those two shots first!
.
A view from about half a kilometre away.
Images taken from near the tower pose a problem as wide angle lenses are required and tilting them upwards to include the tower also creates optical distortions that can be problematic. That said, you should always play around with different angles and compositions until you find something that works. Using a tripod, which is essential for night photography, forces you to constantly think about composition simply because of the discipline involved with setting up the tripod and choosing where to place it. Simply by using a tripod all the time, day or night, will quickly improve your skills. Its been said the biggest difference between a professional and amateur photographer is the tripod!
.
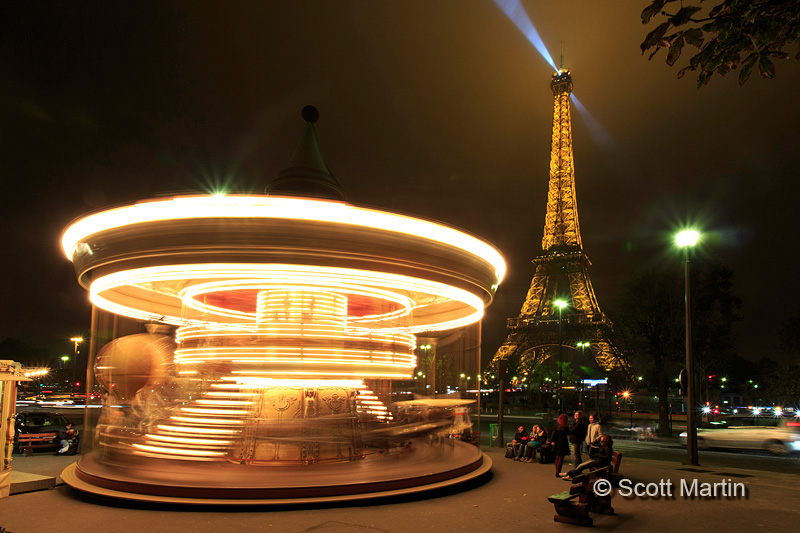
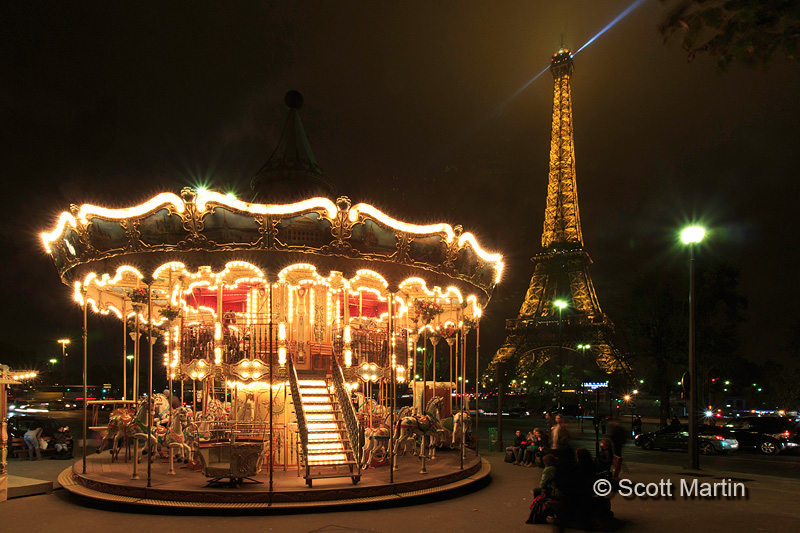
Another commonly seen image of the tower is with the Eiffel Tower Carousel in the foreground. Once the tripod was set up, there were only two shots to be taken, one with a slow shutter speed to blur the moving carousel and one with the carousel stationary.
.
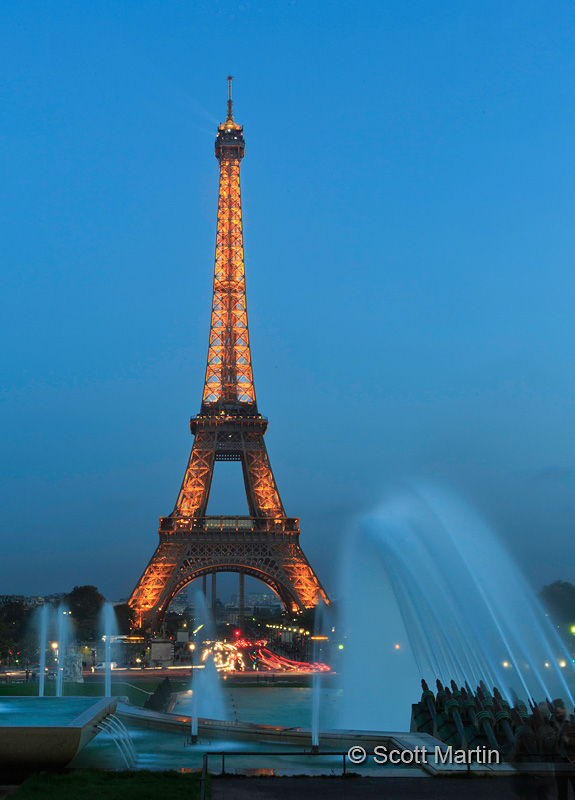
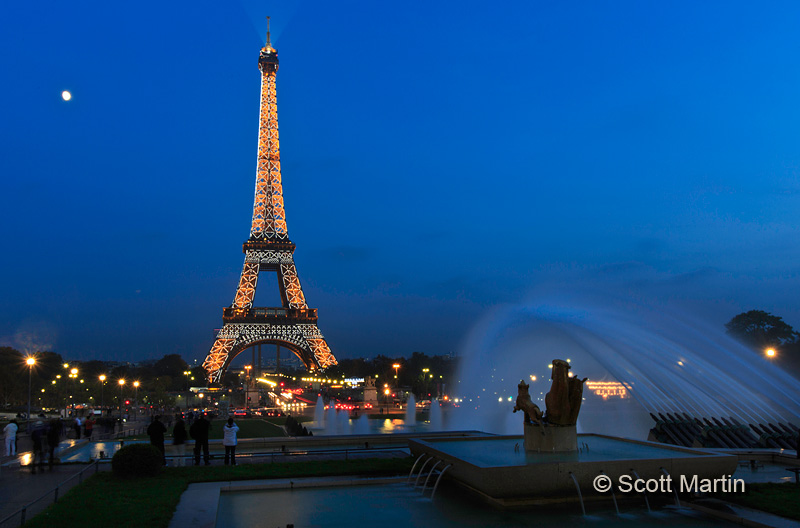
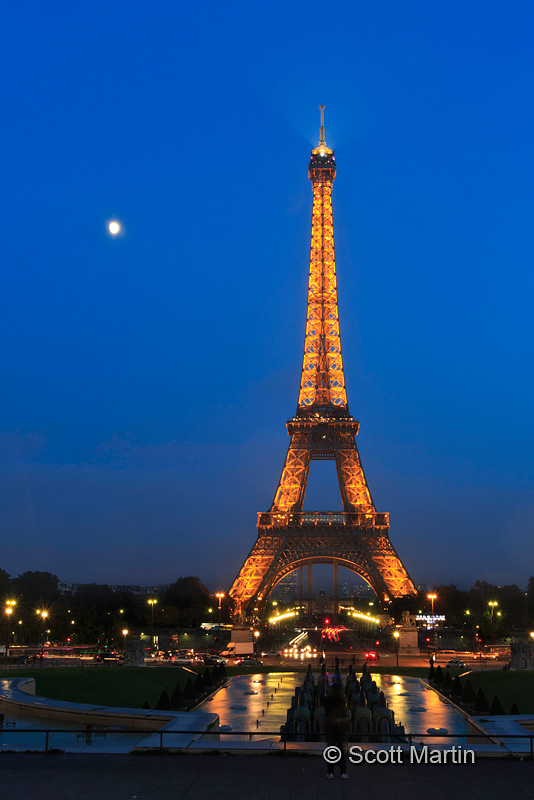
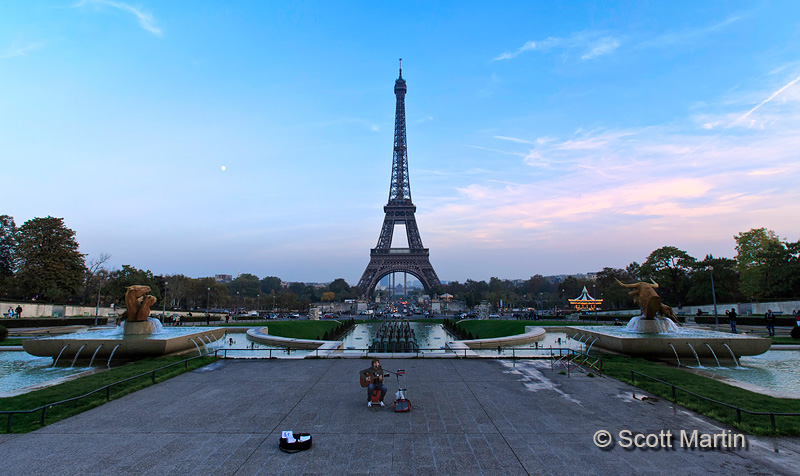
The remaining images in this post were taken the second night which is evident by the very different sky. The next two images use the impressive fountains of the Place du Trocadéro to provide some fore ground interest for the tower.
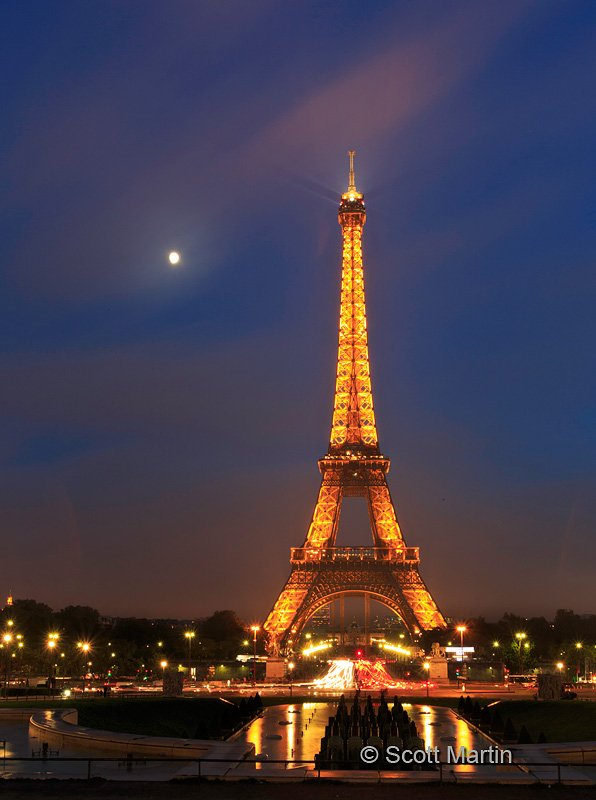
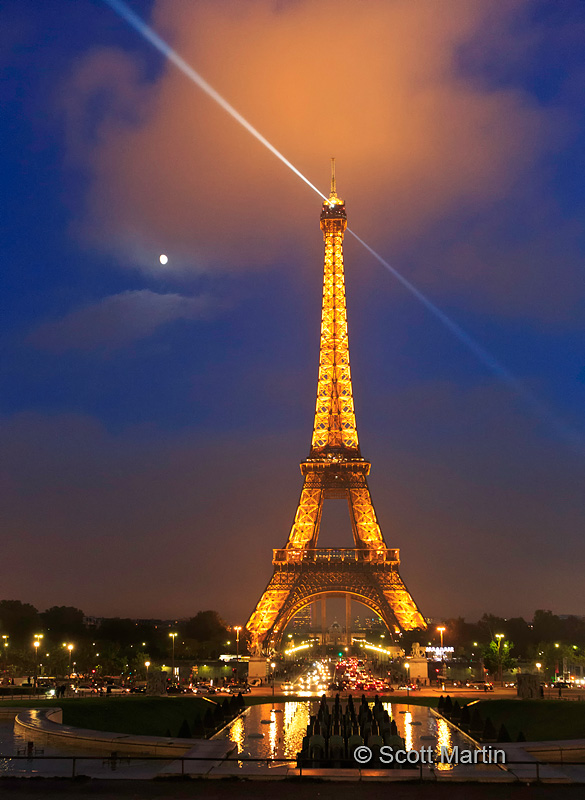
Every night, on the hour, the Eiffel Tower twinkles for about five minutes with a spectacular light show created by 20,000 individual lights. They blink randomly and make the tower appear to be shimmering, however when photographed with a long exposure all the lights are recorded which demonstrates the lattice pattern of the lights on the iron tower structure.
The moon was a bonus for us on this evening.
.
The next two images are identical except for the exposure, however different exposures make for very different results. The first is a low ISO, long exposure, small aperture shot that blurs the tower beacon.
The next image was taken with a high ISO and larger aperture to allow for a fast shutter speed which ‘freezes’ the beacon atop the tower creating a rather dramatic effect. I took a number of these shots with the beam in many different orientations but this one seemed the most aesthetically pleasing.
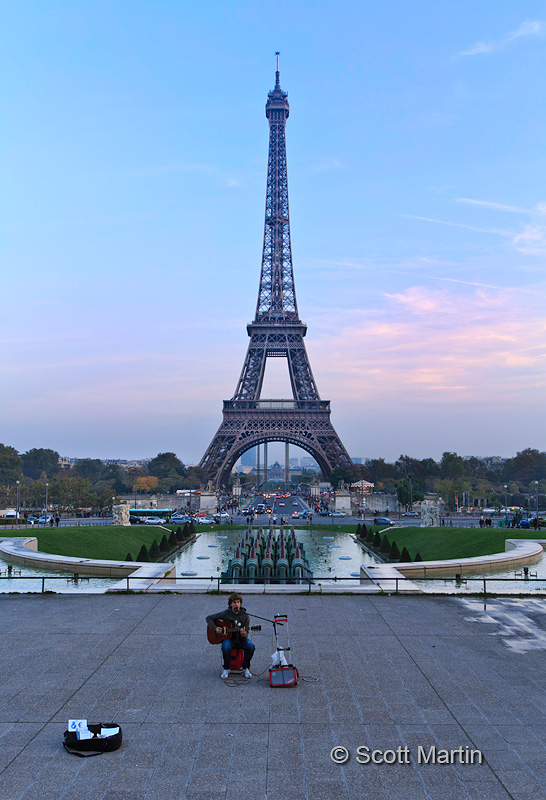
The last two images in this post were taken just after sunset when it was starting to get dark. They are not really Eiffel Tower pictures but rather of the lone busker, who presumably after many hours of singing and after it was starting to get dark, stayed and kept whole-heartedly singing, even though there was no one left on the large patio to hear his voice or toss some coins into his guitar case. It was a huge testament to his character and perseverance.
.
After leaving Paris we headed south towards the French Riviera, with a one night stop over in Lyon. On the way to Lyon we took a small detour and spent half a day at one of the most impressive houses in all of the world, the Palace of Versailles, home to Louis XIV. The Palace of Versailles will the subject of our next European post.
I trust you enjoyed the Eiffel Tower and thanks for taking the time to work through this post. It is much appreciated.
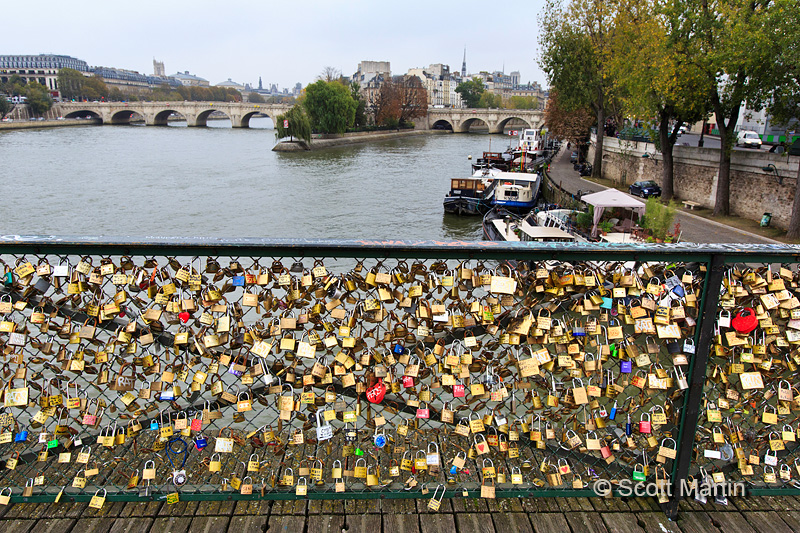
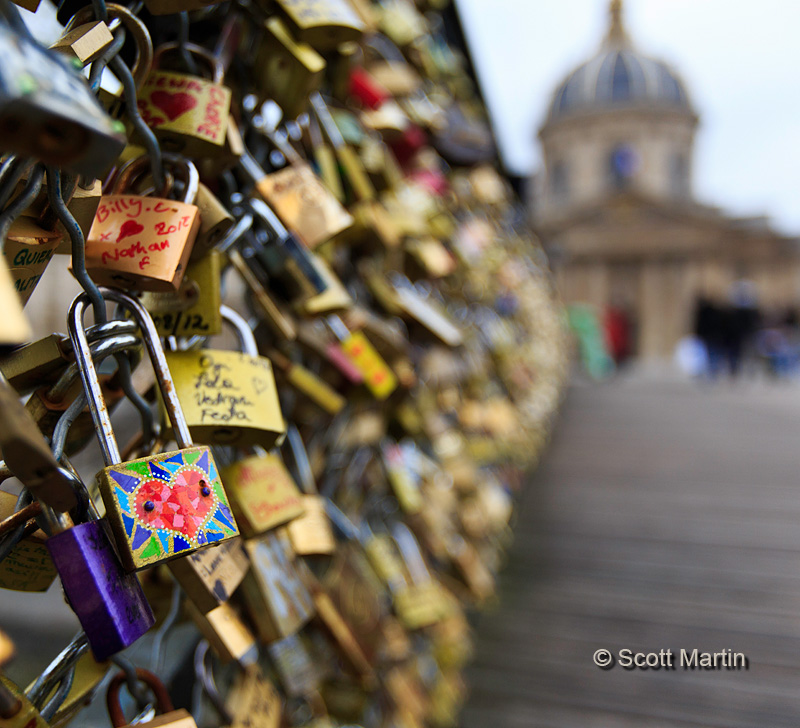
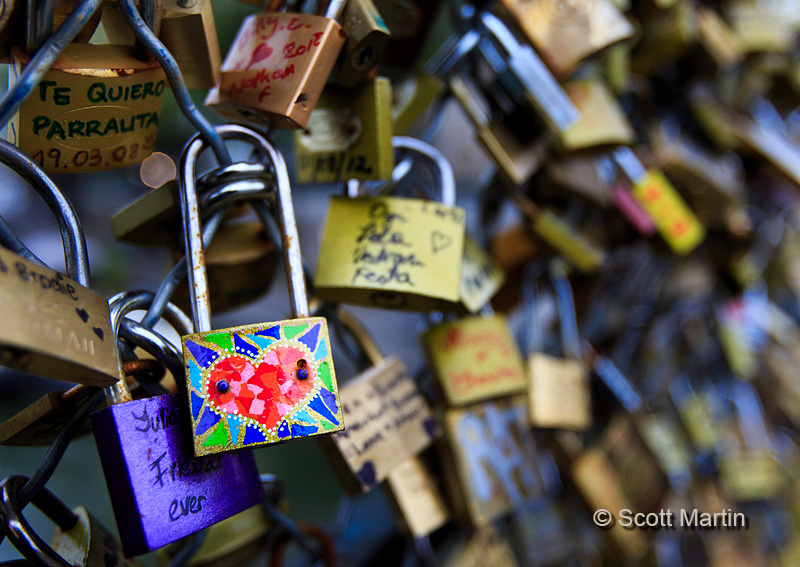
After leaving The Louvre we moseyed along the north bank of the Seine until we arrived at a bridge that took us part way across the river to one of only two natural islands in the Seine River within Paris known as Île de la Cité. As we crossed the bridge in was impossible not to notice the thousands of locks, of every size, shape and style imaginable that were locked to the railings alongside the bridge.
Upon closer inspection each lock was emblazoned with the initial’s or names of the couples who attached the lock to the railing and no doubt pledged their love to each other while they tossed the keys into the river below. I couldn’t help but take a few pics of these locks.
.
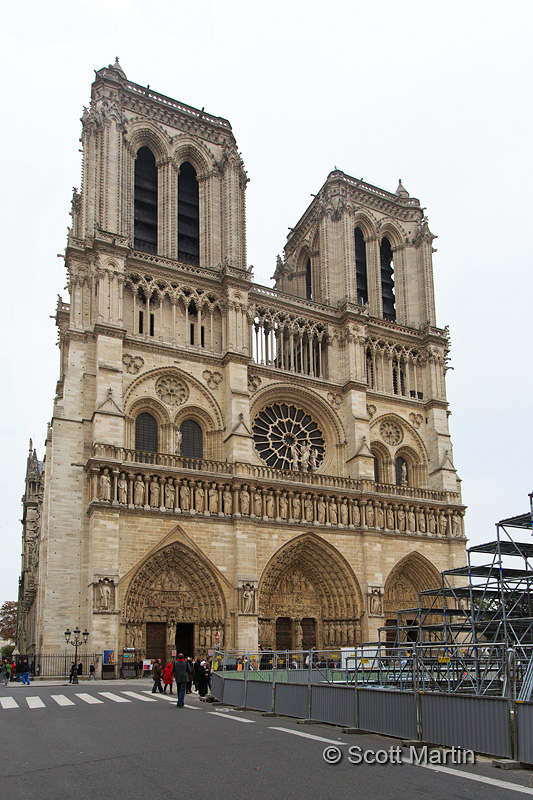
Île de la Cité is a small island that marks the geographic centre of the city and is where Paris was founded. The most famous building on the island is without doubt the cathedral Notre Dame de Paris (Our Lady of Paris) or simply Notre Dame. The cathedral is located in the geographic centre of Paris and there is a brass plaque in front of Note Dame that marks the spot from which all distances around the city are measured.
The western facade of Notre Dame provides the typical view of the building, however the day we were there large portable grandstands were set up in front of the cathedral which precluded a good vantage point for a picture.
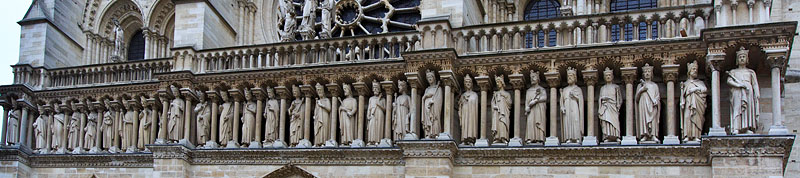
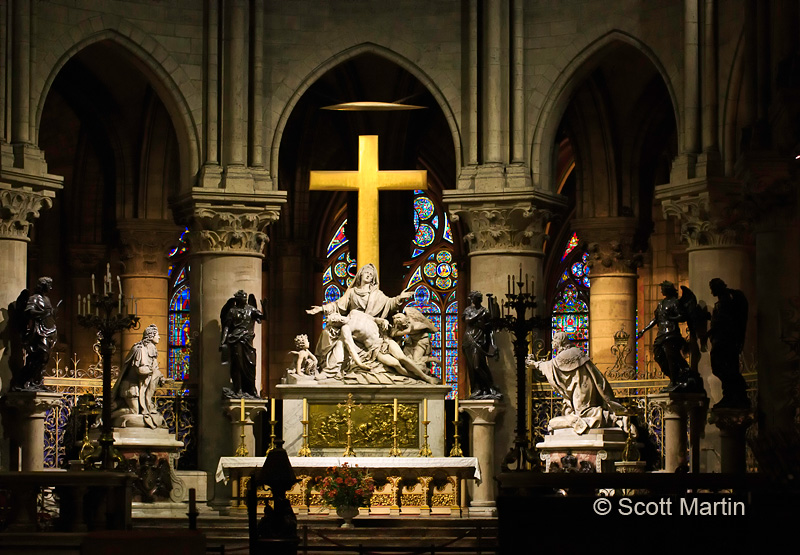
The cornerstone of the building was laid in 1163 and the western facade pictured above was finished in 1225 although the total structure was not completed until 1345. Although famous for the flying buttresses that support the library of the cathedral the western facade is what you visualize when you think about Notre Dame. The facade is large and impressive with its towers, rose window, balustrade, statues and three portals of entry. It measures 135′ wide and is 207′ high. The rose window in the centre of the facade is 31.5′ in diameter and forms a halo around the heads of a statue of Mary and Jesus which sits on the railing of the balustrade when viewed from the ground in front of the cathedral. Below the balustrade is a frieze that extends across the entire width of the facade, known as the Gallery of Kings containing twenty eight statues depicting the generations of Kings of Judah.
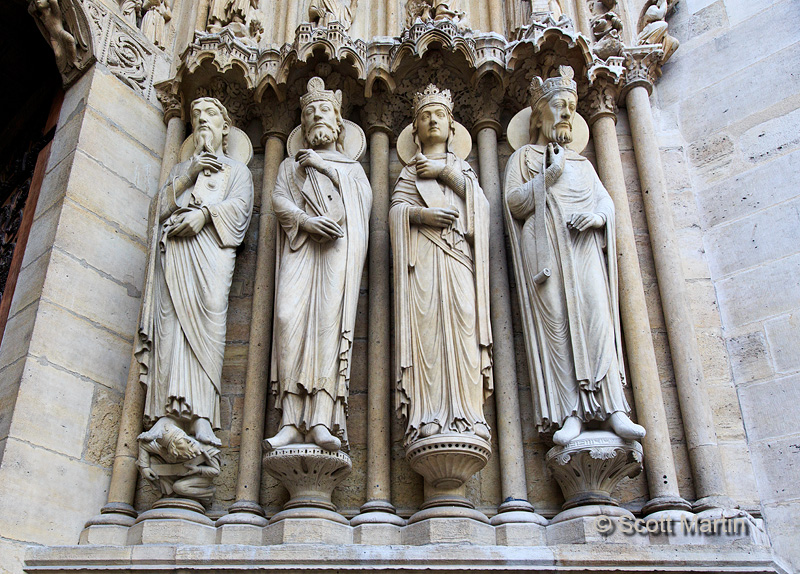
Below the Gallery of Kings are three large double sets of doors that form the main entrances, or portals, into the cathedral. The left (north) is the Portal of the Virgin (1210), the central Portal of the Last Judgement (1220) and the right Portal of Saint Anne (Mary’s mother) (1200). Each portal is framed by an ornate archway supported by columns or jambs that contain statues of Kings & Monarchs from Biblical times. Below are four at the Portal of Saint Anne.
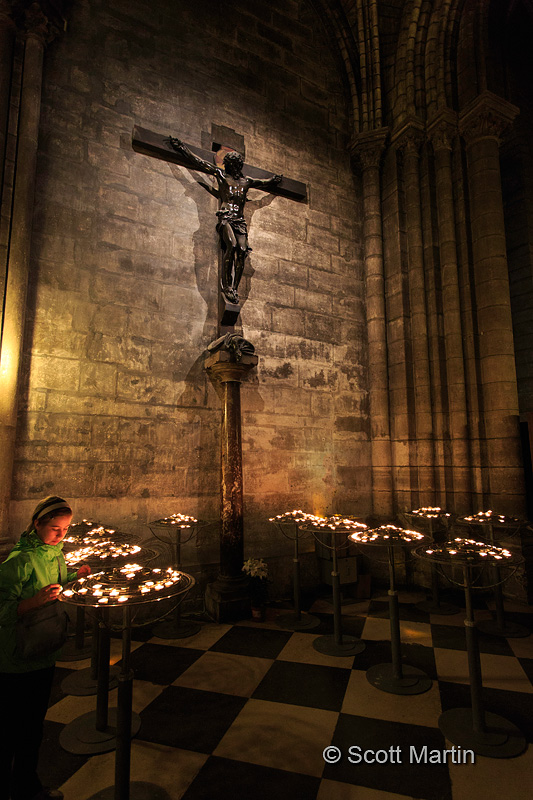
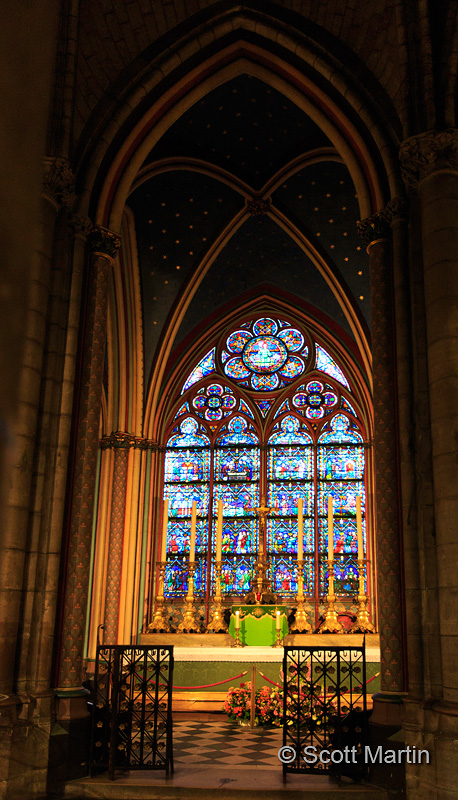
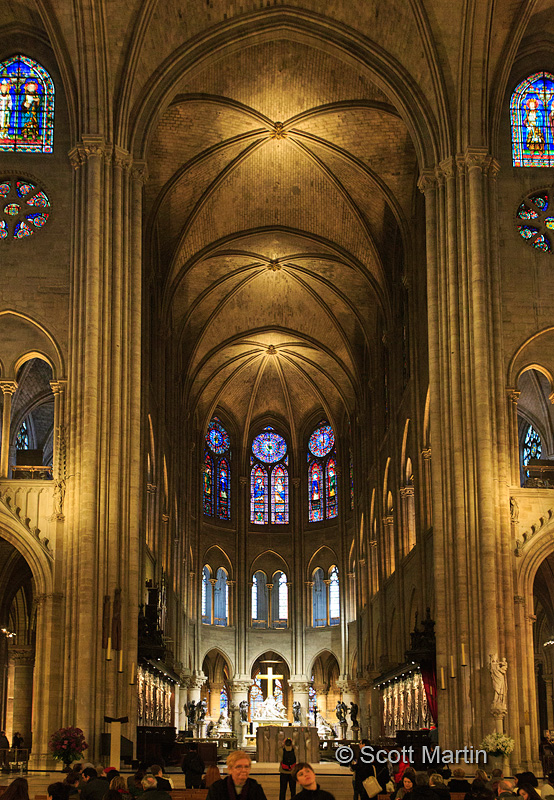
Flashes and tripods are not allowed in Notre Dame so very high ISO’s are required to generate exposure times fast enough to hand hold the camera in the deliberately dark interior (to prevent light degradation of the artefacts within). All of the interior images that follow were taken at ISO 4000 or more and I trust you enjoy these views from within Notre Dame.
.
.
.
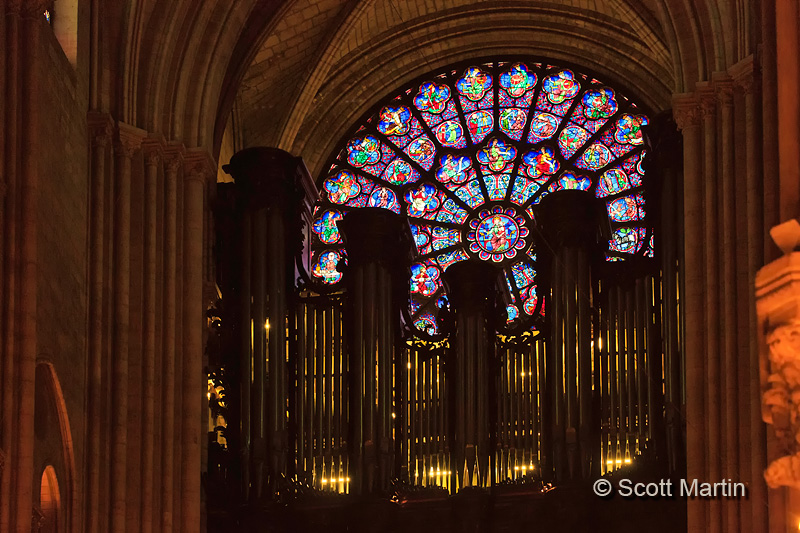
Notre Dame has two permanent and one portable organs. The great organ is said to be the most famous pipe organ in the world, having five keyboards, 190 stops and 8,000 pipes. The ‘smaller’ choir organ has two keyboards, thirty stops and 2,000 pipes.
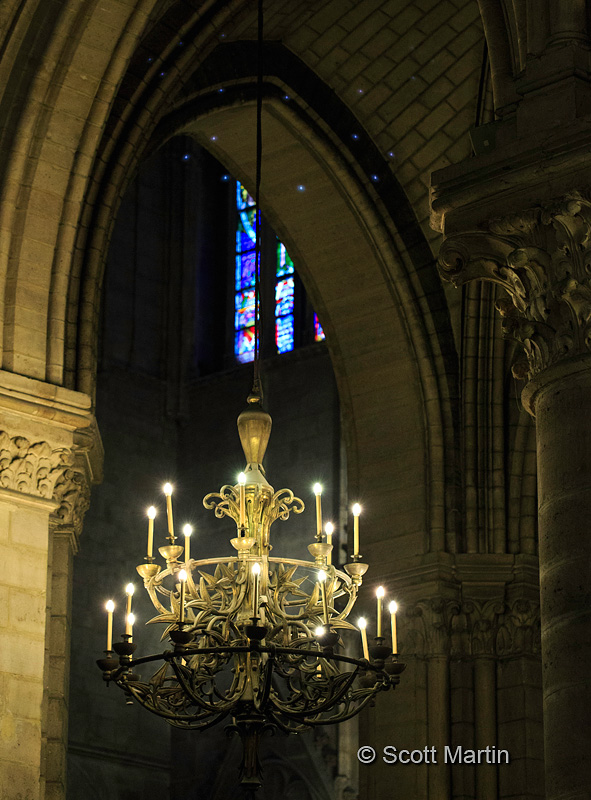
One can not walk through the cathedral and avoid thinking about Victor Hugo’s classic “The Hunchback of Notre Dame” and wondering where Quasimodo was. We could find no mention of him anywhere, however this next picture reminded me of him, probably because of the chandelier and the connection with the swinging chandelier in “Phantom of the Opera”….I know, same city, different building and completely different story 🙂
When shooting the interior of a large building like Notre Dame it is important to consider focal lengths as the photographic results are vastly different, and equally as impressive, at 16mm and 100mm. Its become our practice to make two passes through buildings like Notre Dame for a couple of reasons, first of all it takes a couple of trips through just to take in the magnificence of the structure and commit as much as possible to memory so it can be enjoyed over and over again. Looking at the building differently with each pass helps heighten your appreciation of the building as a whole as well. I take the first trip through ‘thinking wide’ and taking in the big picture and recording it with a 16-35 f2.8 zoom lens. The results of which are shown in the first three interior images above. The second trip through the building I think ‘detail’ and record it with a 100mm f2.8 macro lens which allows the recording of small details up close and big details from farther away. The last three images above were taken with the 100mm lens. The beauty of the 100mm macro is that it is a very small and therefore discreet lens that does not attract attention. It is also very light so carrying it around all day is not a hardship and thus it has found a permanent home in my travel camera bag. The only down side is that as a prime lens you must zoom and compose with your feet 🙂 If you don’t have this little stealth telephoto/macro in your bag I would highly recommend it to you.


Follow Scott Martin Photography