We recently returned from an almost 4,000 km drive around the Gaspe Peninsula of Quebec. It was a wonderful trip for many reasons, including that my parents joined us and we were able to visit my Dad’s parents homestead in the little town of New Richmond on the south side of the peninsula. Prior to my grandparents moving to Oshawa in the 1920’s, there were five generations of Martin’s in the Black Cape/New Richmond area of the Gaspe Peninsula.
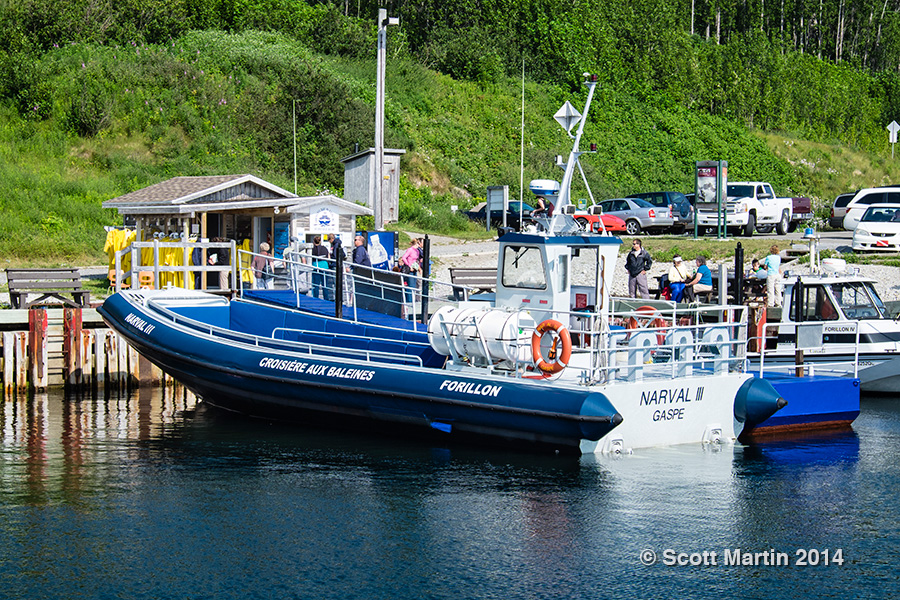
Undoubtably, one of the high points of the vacation was seeing Minke and Humpback Whales while whale watching out in the rough waters of Gaspe Bay and the Gulf of St. Lawrence. Our boat, the Narval III was operated by Croisieres Baie de Gaspe leaving from Grande-Grave harbour within Forillon National Park, Quebec’s first National park, located at the Eastern tip of the Gaspe Peninsula.
As you can see the Narval III is a beautiful boat for whale watching.
Narval III
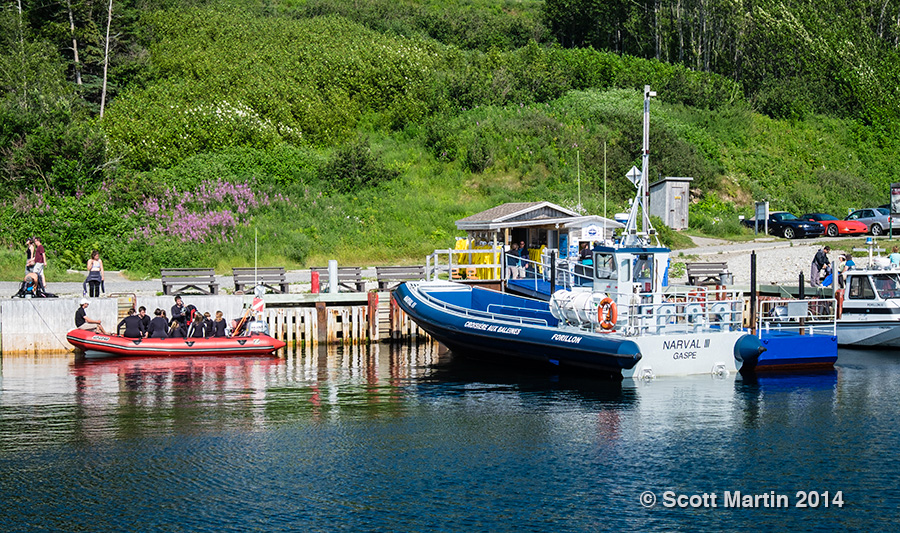
This next shot with the smaller red zodiac on the left gives some perspective as to the size of the Narval III.
Narval III
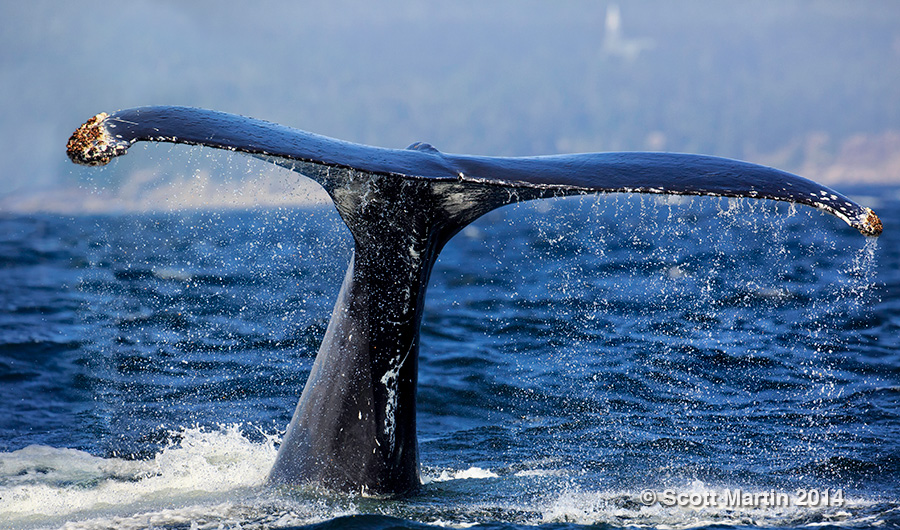
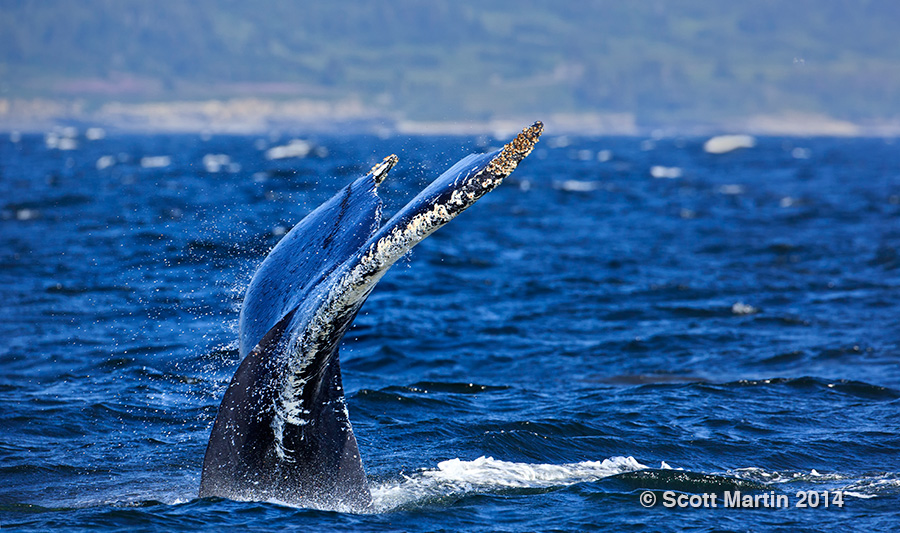
We had reserved our spots on the boat a number of weeks before arriving, however because of the rough seas and high winds, we were forewarned that it would be a rough almost three hours on the boat and that we would get completely soaked. Deb & my mom were wise in their decision to stay on shore, but my Dad and I donned the complementary rain gear and climbed aboard. Not knowing anything about whale observation and given the rough seas, I was pretty much convinced we wouldn’t see any whales, however only a few minutes into the voyage we saw some Minke whales, which are the second smallest of the baleen whales (more on baleen whales in a minute). The average length of a Minke whale is 23 feet. It was such a thrill to see even a ‘small’ whale that the trip was already a success, but only a short while later we found a pair of Humpback Whales and I was amazed at how close they would come to the boat as we watched and followed them for the next hour or so.
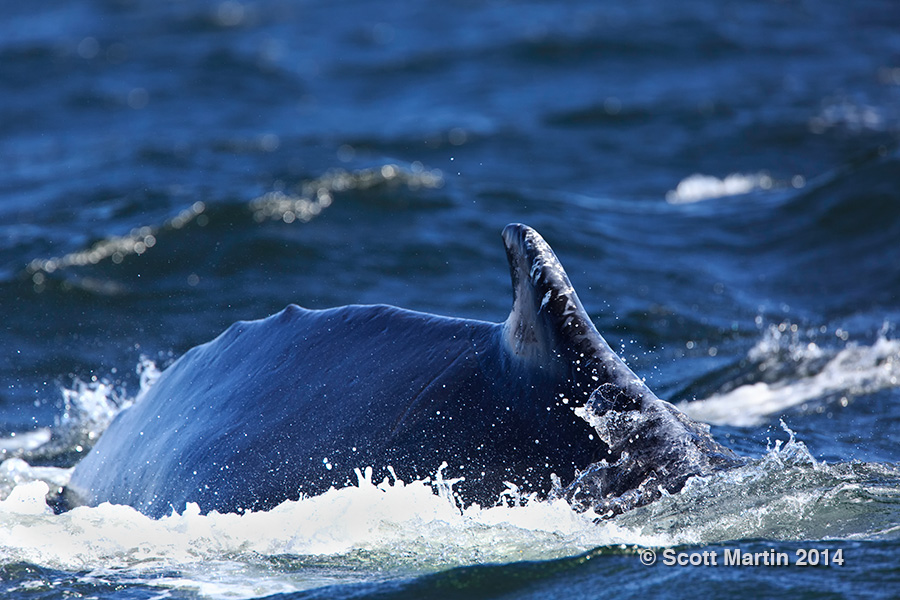
Here is one of the first pictures I was able to capture of the Humpback Whale.
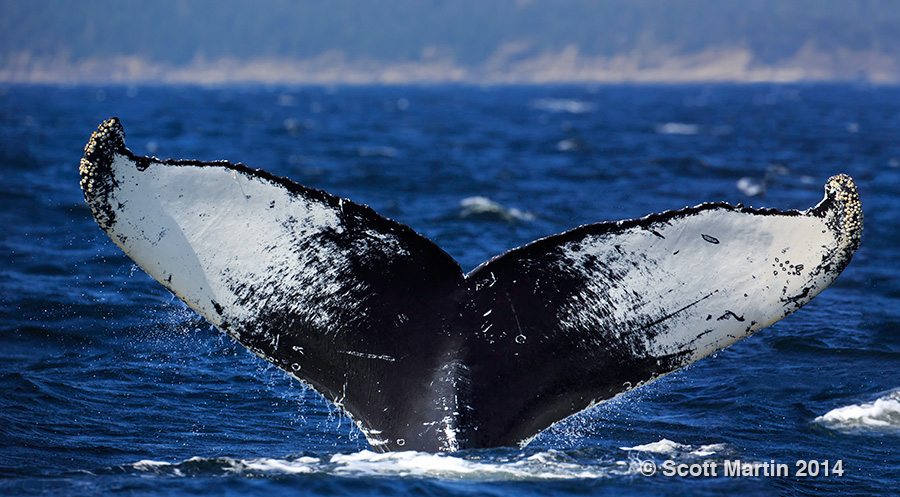
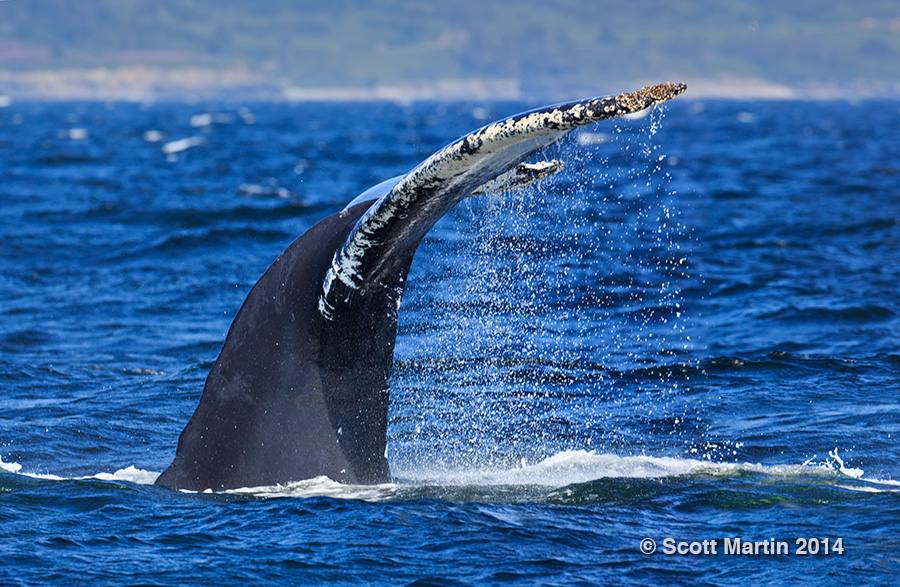
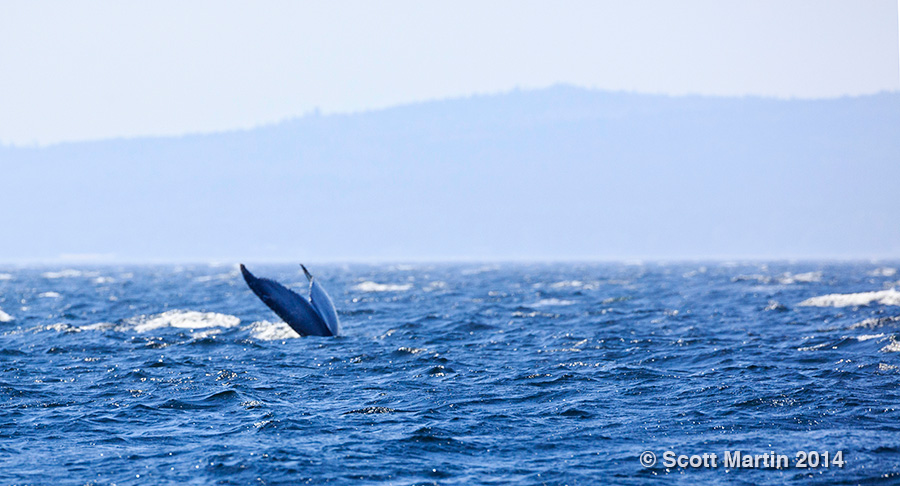
It is difficult, if not impossible, to describe effectively enough to provide someone else an appreciation for the sheer size of these whales. Humpbacks weigh in at about 40 tons (80,000 pounds) and can reach lengths of 62′, or larger than a transport truck, yet they are very graceful to observe in the water. The normal method of spotting whales is to look for the 10-15′ high water spout created when the whale surfaces to breath and forcibly exhales air through the blowhole before inhaling. This is an easy thing to spot under calm seas, but the high winds and ten foot swells made it much more difficult for us to observe the water spouts. After seeing a spout, the small dorsal fin would appear about twenty feet behind often followed by the fluke or tail, allowing for great photo opportunities. The following are a few of the results.
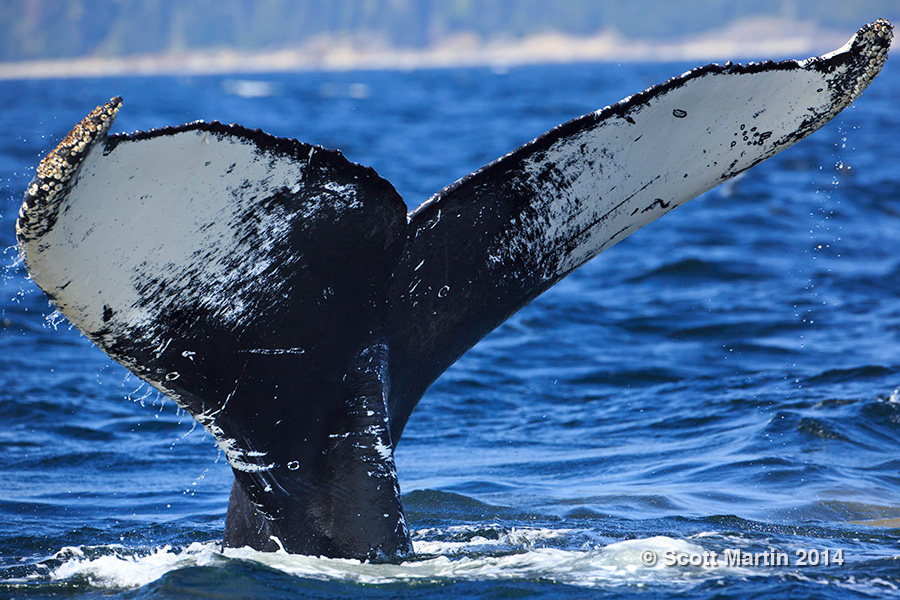
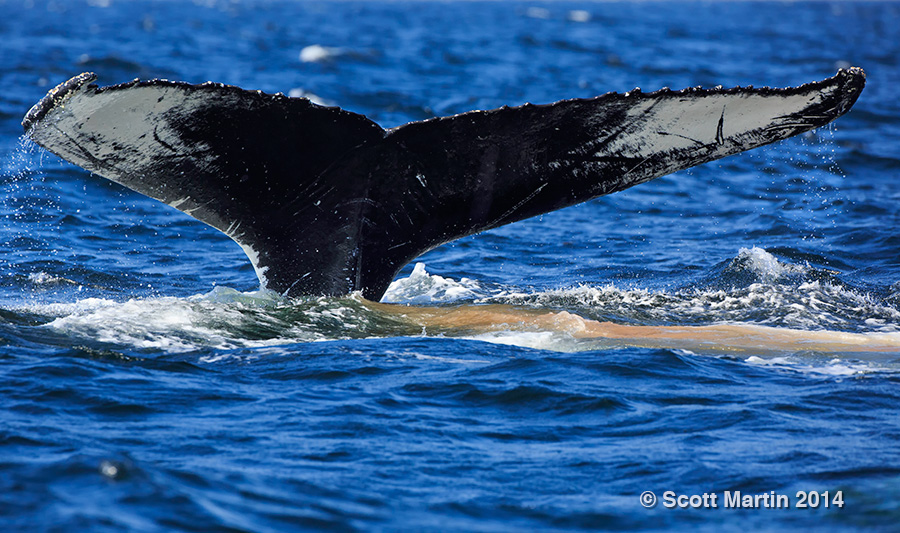
The underside of a Humpback tail has large white areas which are an identification distinction visible from quite far away.
Humpback Whales are part of the baleen whale grouping. Baleen whales are edentulous, meaning they have no teeth, but instead have up to 400 baleen plates on both sides of their mouths. These plates are side by side, perpendicular to the roof of the mouth and can be up to 4′ in length. When the whale closes its mouth while feeding on a school of krill, the small fish are trapped between the baleen plates while the water is expelled. The food is then swallowed. Blue whales, the largest animals on the planet, are also baleen whales, thus the biggest whales in the world have no teeth, which is perhaps one of those little pieces of trivia you will never forget after reading this blog post!
The Humpback Whale, like many whale species, was brought to the brink of extinction around the turn of the last century by over fishing and a hunting ban was implemented in 1966. Since then the population of the Humpback globally has slowly increased, however the National Geographic Association still lists the Humpback as endangered. It is estimated that there are 80,000 Humpbacks alive today.
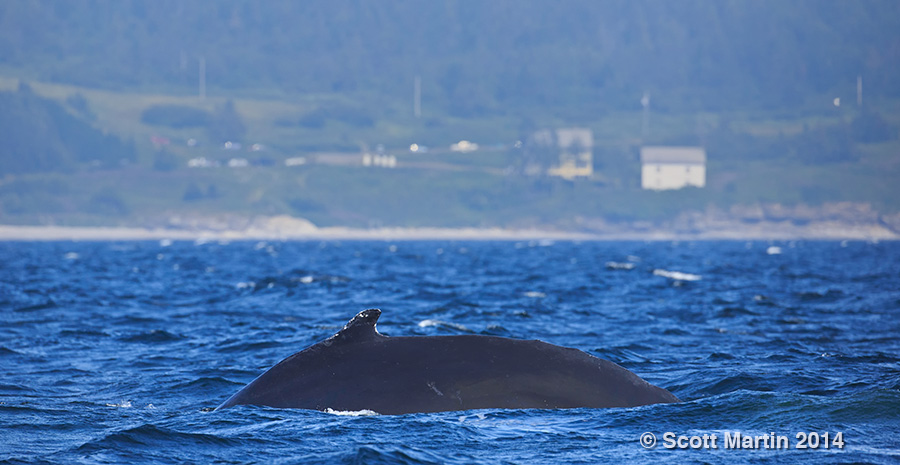
The Humpback Whale gets its name from the distinctive hump seen in its dorsal spine as it arches above the water when it surfaces to breath.
Humpback’s Hump
I was fortunate to capture a unique perspective of the dorsal spine of the Humpback Whale as it surfaced while swimming directly towards the boat. Only a small part of the whale is visible, but you can see how the humpback got its name.
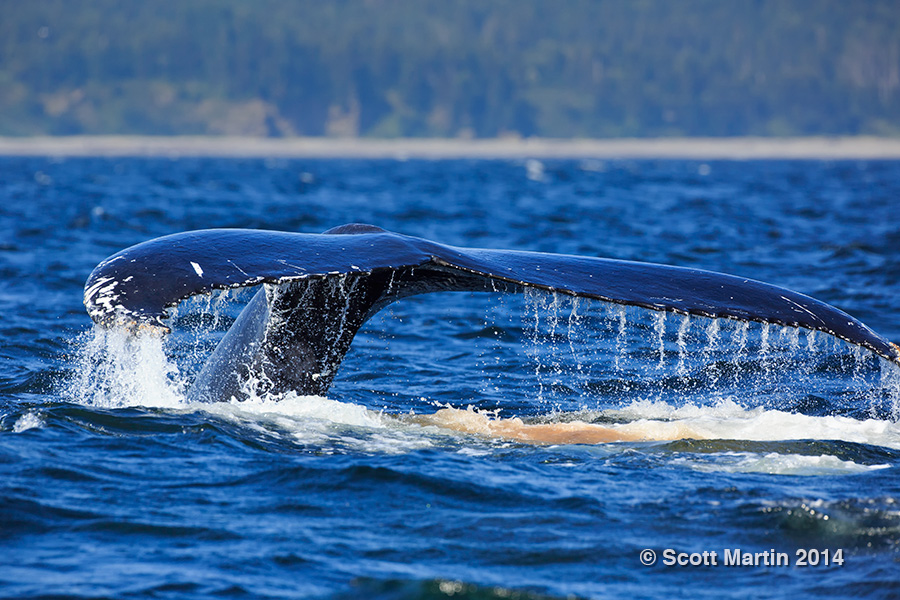
Humpback Whales are migratory animals that cover a lot of miles every year, in fact 16,000 miles on average. They summer in the cooler northern polar waters and head south in the winter to the tropical waters where they breed and give birth to their young. Interestingly they don’t eat while in the cooler waters in the summer and live of the fat reserves created by all the krill and small fish they consume in the winter months. Although they don’t eat in the summer, they continue to produce waste as this next image shows 🙂
You won’t find this next pic in the gallery, but it is included here in an attempt to convey the relative size of an adult Humpback whale, using the rough waters of Gaspe Bay and the shoreline in the back ground to provide some scale. The width of the Humpback fluke can be up to one third of its length meaning the tail width can reach 15-20 feet or the length of most recreational motor boats.
Humpback Fluke
I trust that you have enjoyed these Humpback Whale images and if you’ve never been whale watching, I would urge you to plan a trip to Forillon National Park and sign up for an excursion with Croisieres Baie de Gaspe. You will be amazed when you see up close one of the largest animals that God designed to roam our oceans.
To see the above images in more detail, you can view them in the Wildlife Gallery.
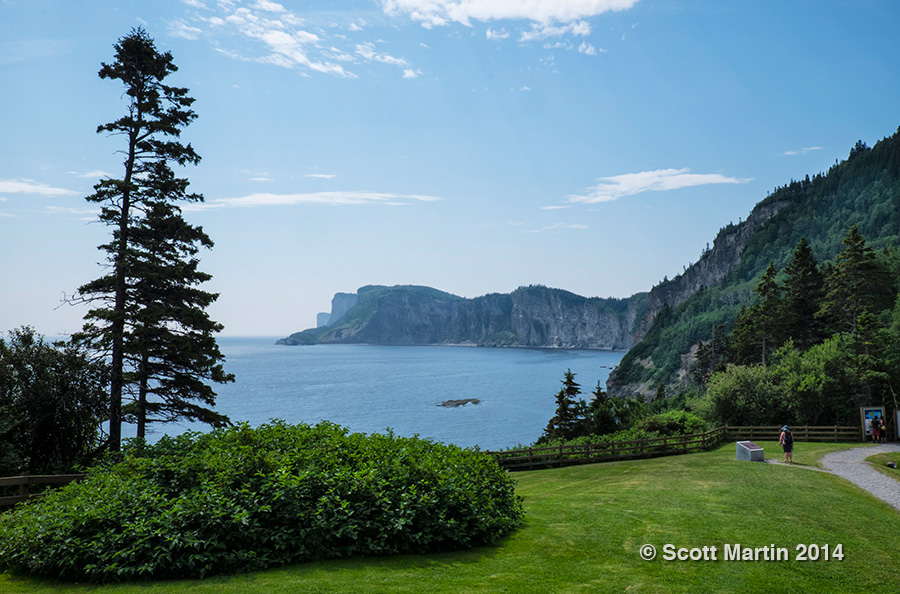
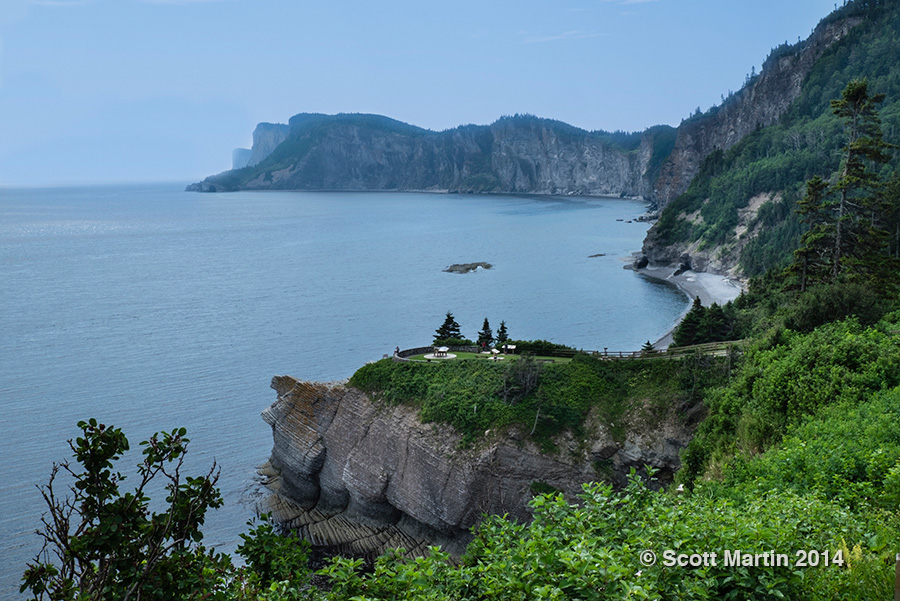
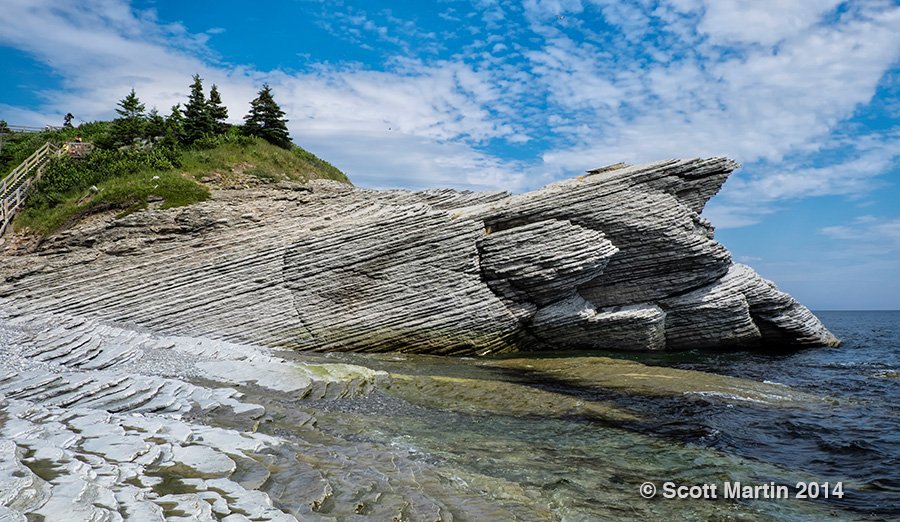
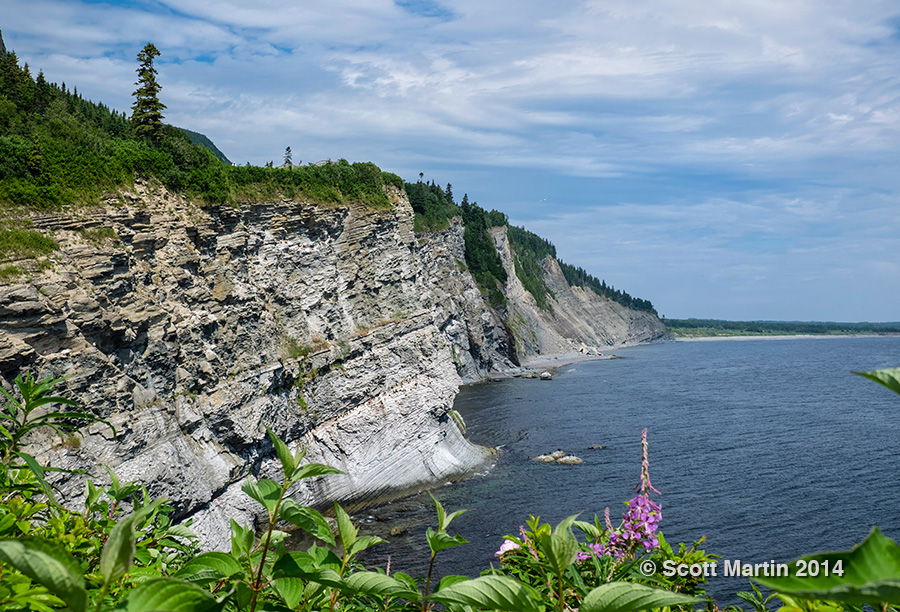
As mentioned in the opening of this blog post, our whale watching excursion left from Grande-Grave Harbour in Forillon National Park. You could easily spend a few days exploring the park itself and admiring its many beautiful vistas overlooking the Gulf of St. Lawrence and Gaspe Bay. One of the most picturesque is Cape Bon Ami in the northern section of the park. The cliffs around the Cape provide nesting grounds for Black-legged Kittiwakes, Razor-billed Auks, Common Murre and Black Guillemots, which will be described in a future post. In the mean time here are some pictures of Cape Bon Ami and the surrounding area.
The whale images in this post were all taken with a Canon 5D Mk III and 500 f/4 L lens while all other images were taken with a Fujifilm X-E2 and 18-55 zoom lens. Long time readers of this blog will recognize that this is a significant departure from a gear perspective, however I will talk about the new Fuji equipment in more detail in a future post.
One final note; if you would like to receive future blog posts via email, please enter your email address in the “Subscribe to Blog Via Email” box at the top of the right sidebar. By doing so, you will receive future blog posts via email as soon as they are published. Your email addresses will never be shared and your email subscription is easily managed.
Time lapse photography is something that has always been of interest and recently both my son and I have been experimenting with this fascinating niche in the photographic world. The basic premise of time lapse is quite simple; you record several images at regular intervals over an extended period of time and then after processing them, add the images into a video file. When you play the resulting video file, you have a video that shows everything captured in the still images over the period of time they were taken compressed into a few seconds. For example, if you take one image every fifteen seconds for an hour you will take a total of 240 images. Placing these 240 images into a video file of 24 frames per second will produce a video of ten seconds duration. Thus the resulting video will display in ten seconds what occurred over a period of an hour.
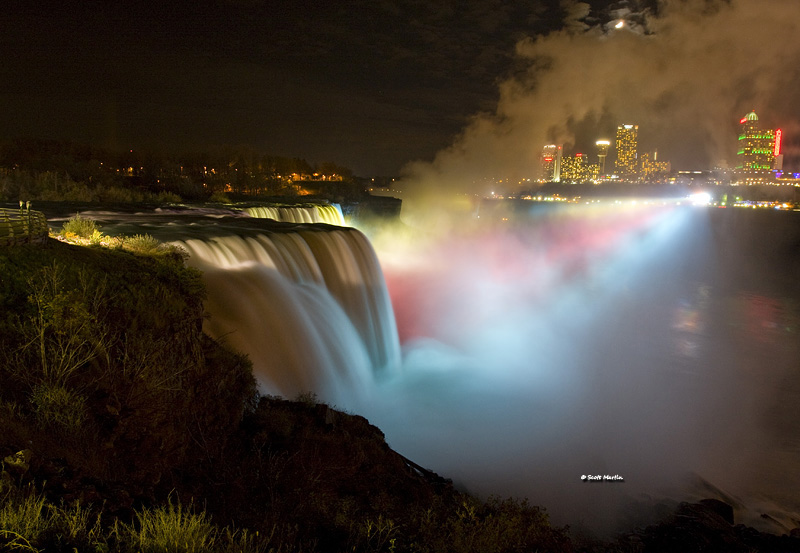
This first sample time lapse is exactly as described above; 240 images taken over an hour ending with sun down and displayed in a 24 fps video file. The images were taken from our hotel room in Niagara Falls.
Besides your DSLR you require two other pieces of equipment to get into the time lapse game, a tripod and an intervalometer.
The tripod is required to ensure that the camera is stable and records the exact same frame with every exposure over the time lapse period. Next to the camera and lens, the tripod is arguably the most important piece of equipment and I would certainly buy a tripod before a flash. As tripod technology hasn’t changed much since the advent of carbon fibre, I would recommend investing in the best possible as they will, for all intents and purposes, last a lifetime. I use Gitzo tripods which have proven very reliable over the years. They are well constructed, very stable and lightweight. As time lapse photography generally involves wide angle or short telephoto lenses, I use a smaller Gitzo 1542T traveller tripod with a Markins Q3 ball head.
The intervalometer is simply a timer remote switch for the camera that allows you to program a remote timer (delay from activation to shutter release), interval timer (the amount of time between successive exposures), long exposure timer (defines exposure time with camera on bulb setting) and exposure count setting (how many exposures will be taken). I use the Canon TC-80N3. Some of the new cameras have an intervalometer built into the camera itself so make sure you check for this feature on your camera before buying an intervalometer.
The easiest time lapses to take are those with a constant exposure over the duration of the time lapse. Changing exposures within the time lapse often causes flickering in the final product which is very distracting and must be avoided. Even slight exposure variations when shooting in any of the automatic exposure modes will result in flickering which is why it is essential to shoot time lapses manually. Similarly you want to disable the autofocus on the camera for time lapse photography to ensure that that the camera focus does not change during the shoot.
This next time lapse is of the American Falls and consists of about 380 images taken over a ninety minute period.
Moving from a CF card with hundreds of images on it to the finished time lapse is surprisingly easy as long as you have a video editing software program. I use Adobe Premier Pro CS6, but any editor will work fine. You are not too concerned with post processing the images and any post processing done must be applied equally to every image to avoid flickering in the video. My workflow is to open all the RAW files in ACR (Adobe Camera Raw), select all, level and crop if needed (but care should always be taken to do this in camera so it is not needed in post processing), adjust for lens correction, contrast, clarity and vibrance and save the images as jpegs in their own folder. Open a new file your video editor (I prefer 24 frames per second), import your time lapse images, render the file and export it as you like it and you are ready to go. I’ve been playing around with both YouTube and Vimeo formats (you can find me at both sites under Scott Martin Photography). When watching the time lapse videos on full screen on the desk top, the Vimeo format appears better than YouTube, however for embedding videos in WordPress blogs like this the YouTube plugins are infinitely better than any of the Vimeo plugins I looked at.
Here is a 240 image, ten second time lapse of the Horseshoe Falls, again taken from our hotel room window on the 44th floor of the Hilton Fallsview Hotel in Niagara Falls.
I would encourage you to experiment with time lapse photography. It provides a lot of enjoyment and is one of those things you can truly multi-task with. My intent is to set up a camera for time lapse when I’m out doing landscape photography and that way as I’m moving about shooting sunrises and sunsets or exploring an area for landscape images I can simultaneously be recording images for a time lapse of the same scene.
Although this last image is not a time lapse, it is a time exposure taken from the American side of the falls, looking across the American Falls towards the Horseshoe Falls in the back ground.
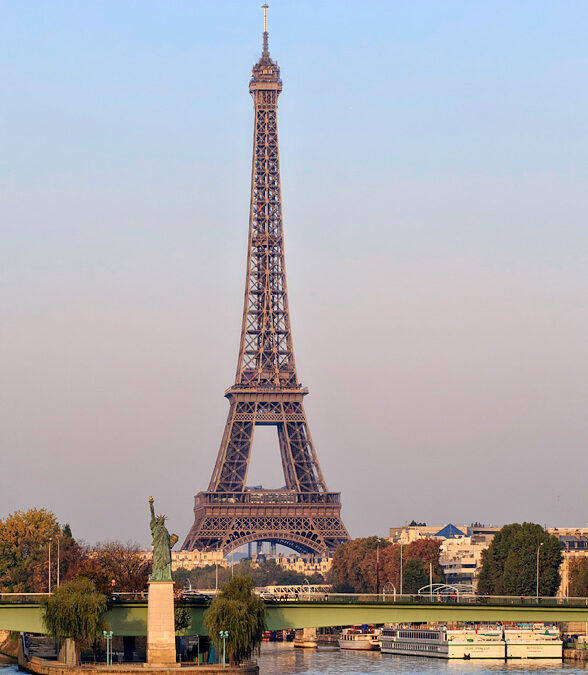
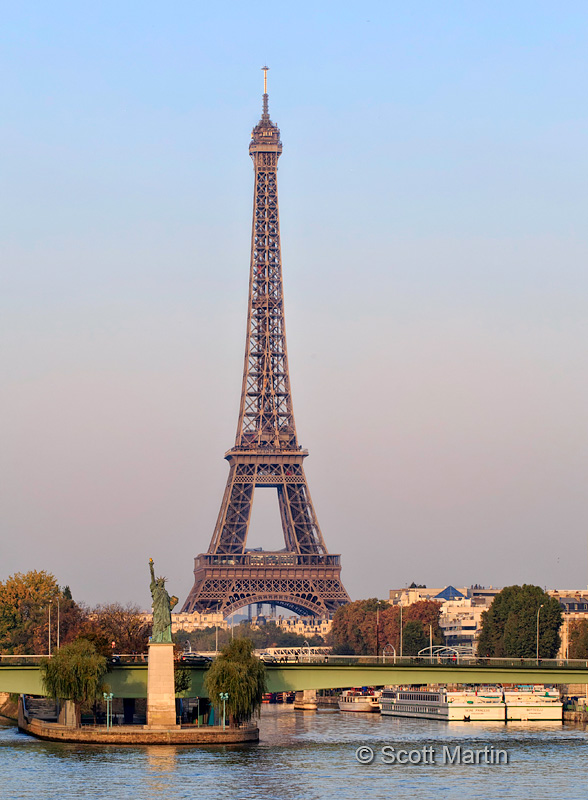
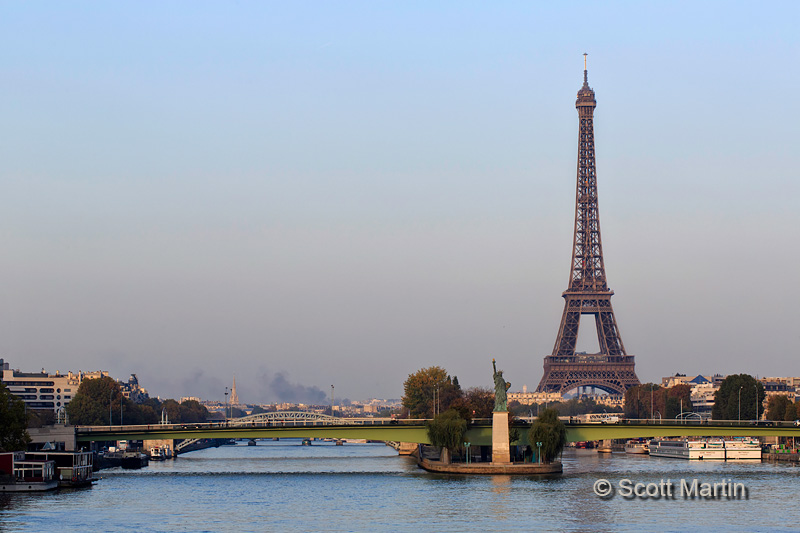
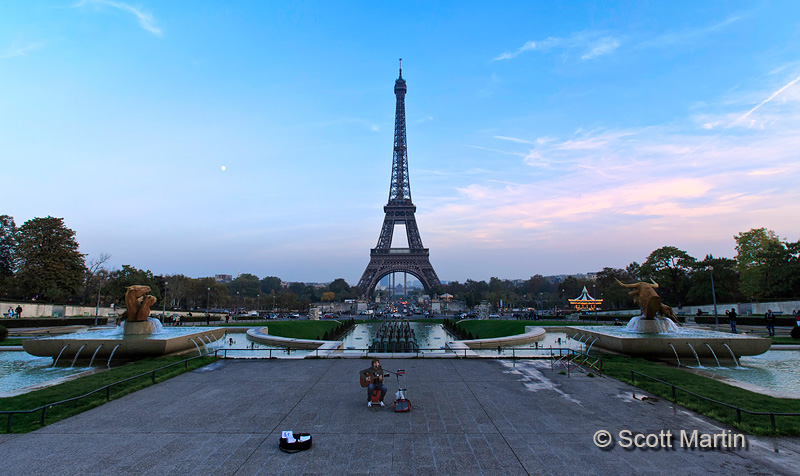
Without doubt the Eiffel Tower is the most recognized and photographed icon in Paris, having towered 1063′ above the Parisienne skyline since 1889 when it was erected to serve as the entrance way to the 1889 World’s Fair. The tower is the tallest structure in the city of Paris and was in fact the tallest man-made structure in the world from its completion (surpassing the Washington Monument) for forty one years until it was dwarfed by the Chrysler Building in New York City in 1930.
The Eiffel Tower was the winning submission in a contest to design the grand entrance way to the 1889 World’s Fair and the contest rules included that the structure would be easily constructed and easily dismantled. For this reason the tower metalwork was designed to be fastened only with rivets and bolts. The temporary nature of the tower is shown in that Gustave Eiffel was only awarded a twenty year permit for the tower (until 1909) at which time the ownership of the tower was slated to be returned to the city of Paris for demolition. The tower however proved invaluable not only for tourism, but also for radio and television broadcasting, so fortunately the tower remains today, and has become the world’s most visited paid tourist attraction with about seven million paying visitors every year. Deb & I were glad to pay about 18€ each to visit the top of the tower.
While preparing for our trip to Paris, we found that there are many, if not hundreds, of replicas of the Statue of Liberty around the world. The most famous Lady Liberty who overlooks New York City from Liberty Island was a gift to the United States from France. The original statue is in Luxembourg Gardens in Paris and a second replica was erected at the tip of a small man made island in the River Seine in 1889 for the World’s Fair. Knowing it was there we set out to take a picture of the Statue of Liberty with the Eiffel Tower as a back drop. It turned out to be a seven kilometre excursion but was worth the effort to get this rather unique image.
.
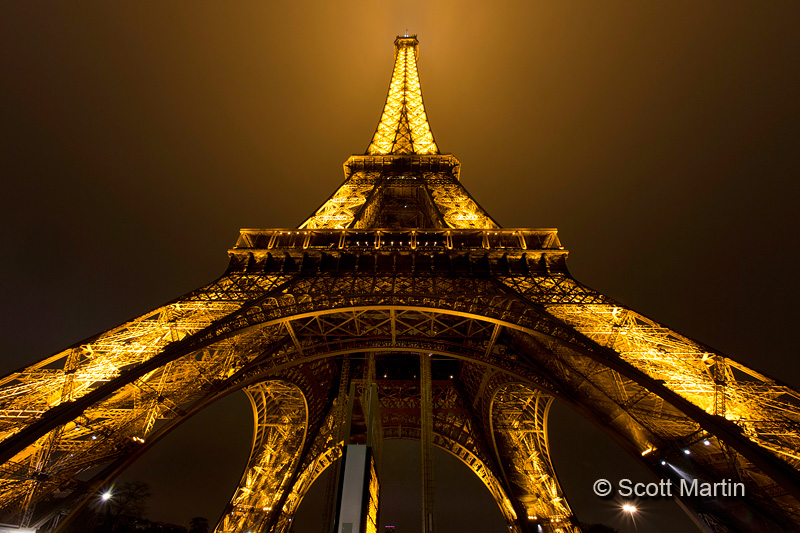
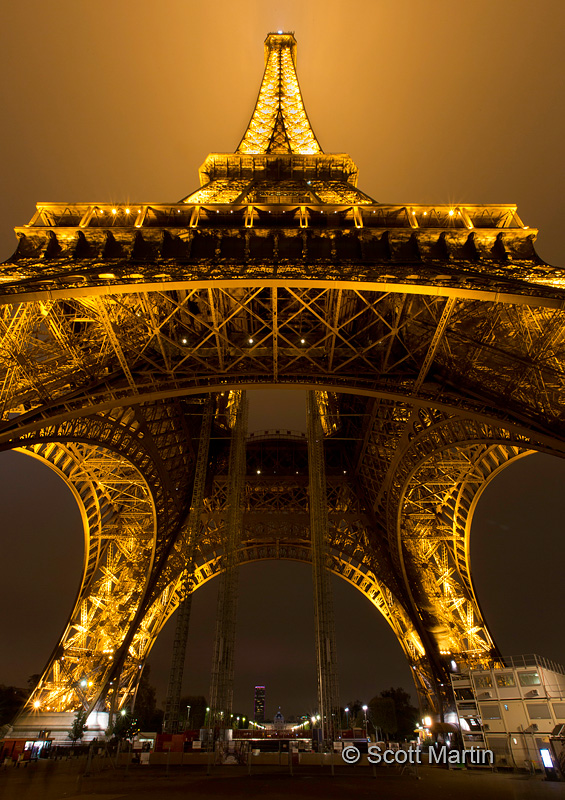
Being one of the most recognizable and photographed land marks in the world means that it is virtually impossible to take a novel picture of the tower, however Deb and I tried to find some unique perspectives and we hope you enjoy them.
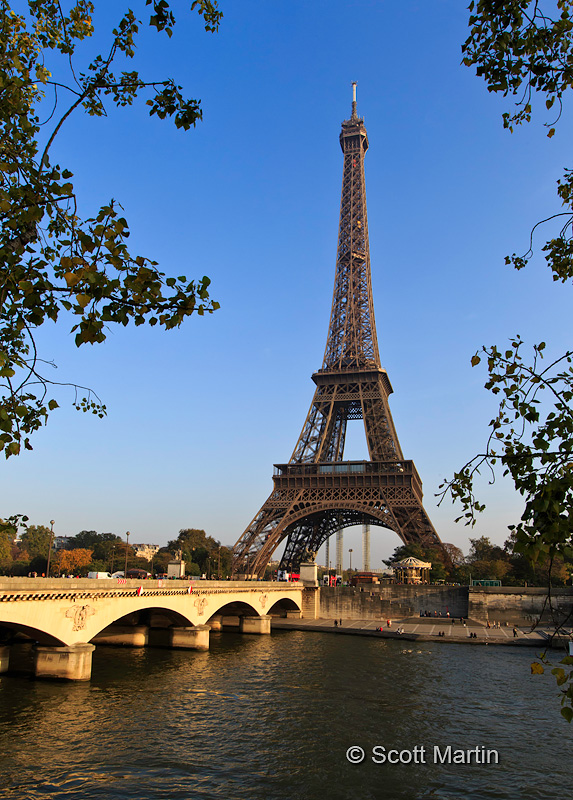
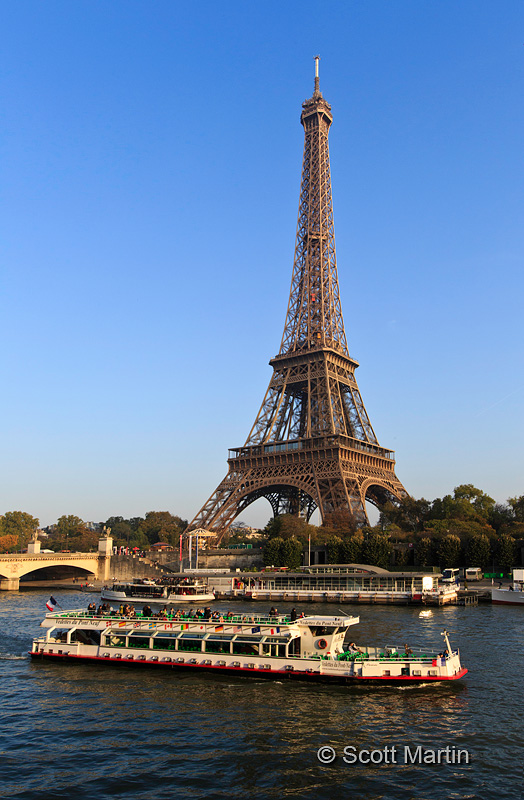
It is good practice to change the secondary compositional elements in an image if possible as a very different result can be achieved even if the perspective of the primary subject is virtually the same. The image above uses trees in the foreground to provide some visual interest and frame the tower while the image below provides an uncluttered view of the tower from the same perspective, however includes a river ferry as a secondary object of interest. Two very different images of the same primary subject from the same perspective. Some may prefer one over the other, which is merely subjective, however good practice is to take both and give people the choice!
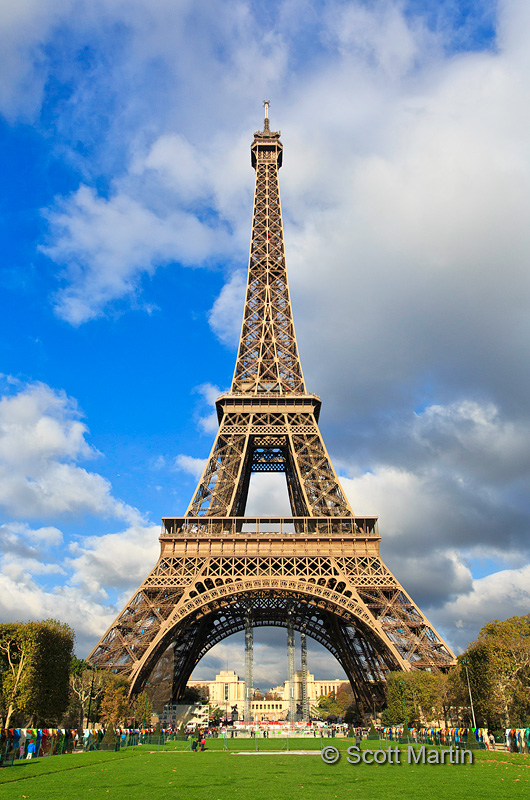
Although the tower is most often photographed to include the Seine River, it also looks good from the Champ de Mars which is the extensive parkland to the east of the tower. Thankfully there were great clouds which add to the pictures. Brian Peterson, in his classic book “Understanding Exposure” says that the best time to take a vertically orientated image is after you’ve already taken one in a horizontal orientation! While generally good advice, the Eiffel Tower lends itself to portrait orientation. It is interesting how the two camera orientations (portrait & landscape) create very different results as shown below.
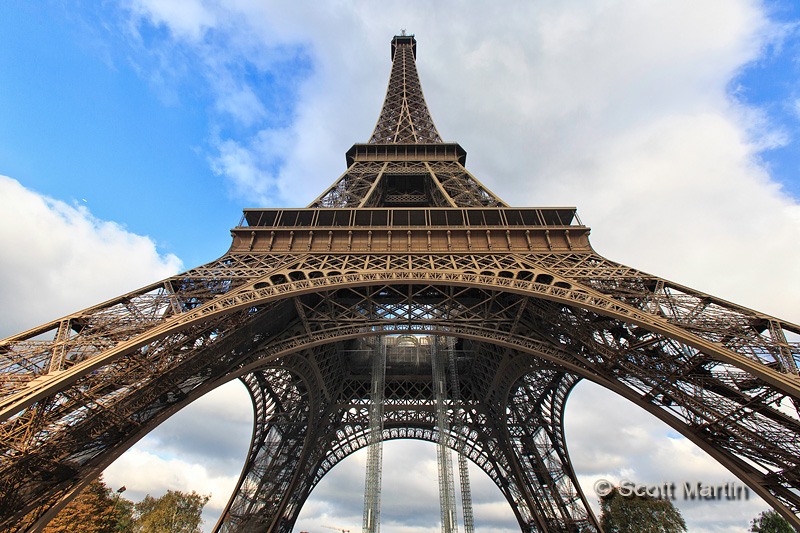
When photographing the tower with a wide angle lens (16-35/2.8 in this case) in landscape orientation you are pretty much forced to put the tower in the centre of the frame to avoid the distortion that is created when the tower is located near the edges of the frame. Distortion can be minimized by making sure the camera is level, however the height of the tower requires some upwards tilting of the camera which exacerbates the distortion.
The above two images show us that its always a good idea to take images using both camera orientations as a general practice. One may be decidedly better than the other but you amy never know which one is the best if you don’t practice taking both!
Breaking the rules of composition is easy to do when photographing the tower and even images missing the ground (a cardinal no no) sometimes turns out no too badly as shown below.
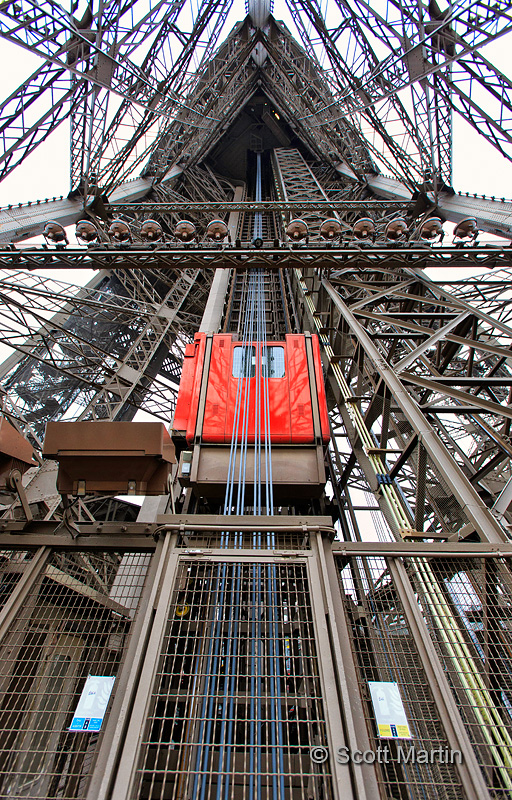
Getting to the top of the Eiffel Tower requires two elevator rides, a very unique two story elevator that angles up two of the four tower bases to the first level of the tower and then a second, much smaller traditional elevator that rises straight up to the second level. Even when arriving to the top of the second elevator you are required to climb a couple of flights of stairs to arrive at the outside upper observatory, but the view that awaits is spectacular. Below is the second elevator.
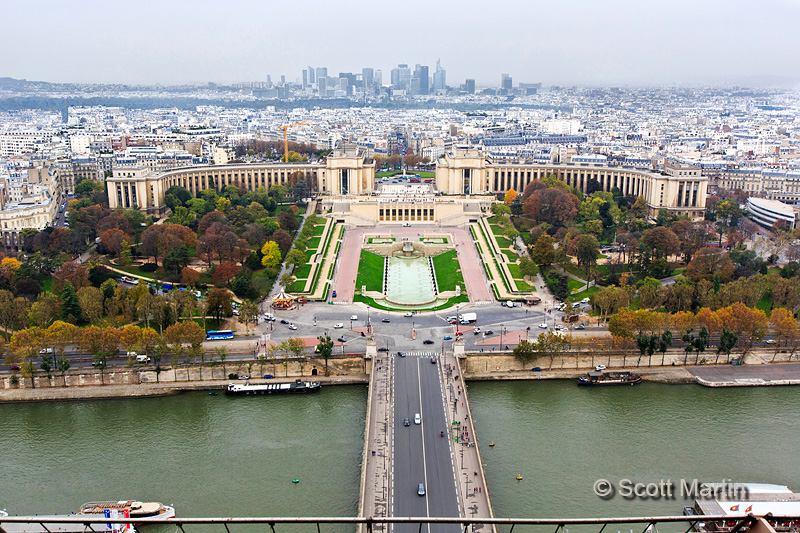
The views of Paris from the Eiffel Tower are grand as you can easily see the historic landmarks of the city. Looking west from the lower observation deck across the River Seine is the Place du Trocadéro and the expansive Palais de Chaillot which houses a number of museums. In the back ground is the skyline of ‘modern’ Paris.
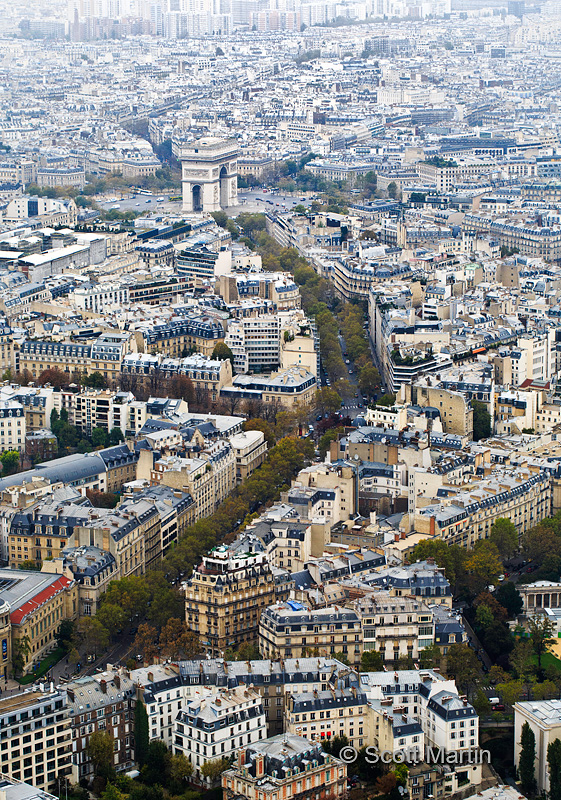
From the upper observation deck the perspective is completely different and allowed me the opportunity to use the 100 mm f/2.8 macro lens as a short telephoto lens (If you’ve been following this blog you will require that my beloved 24-105 broke in Venice). Below is the Arc du Triomphe as seen from the top of the Eiffel Tower.
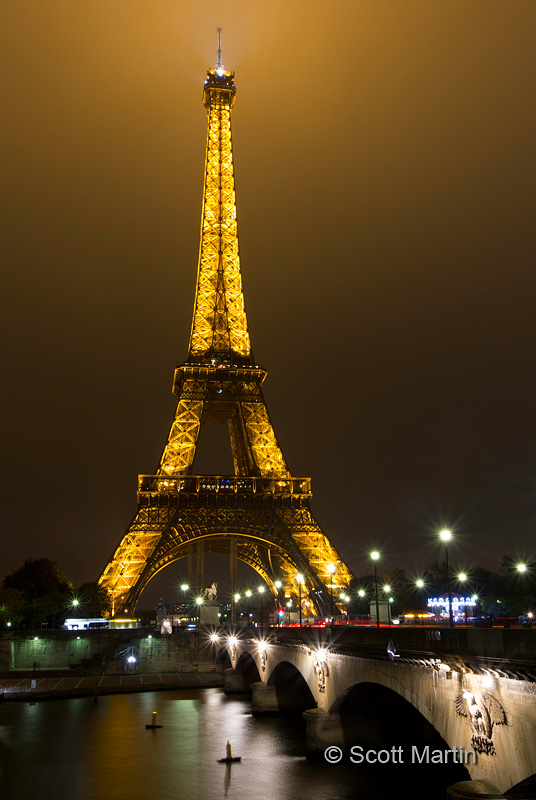
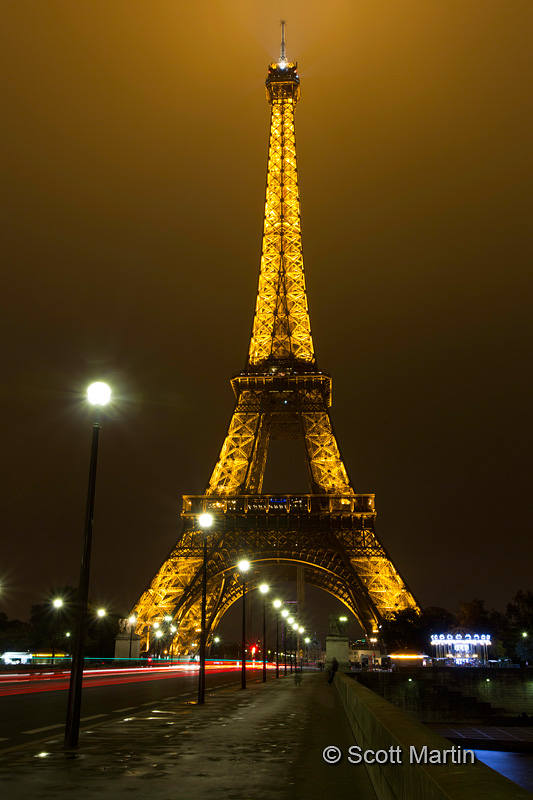
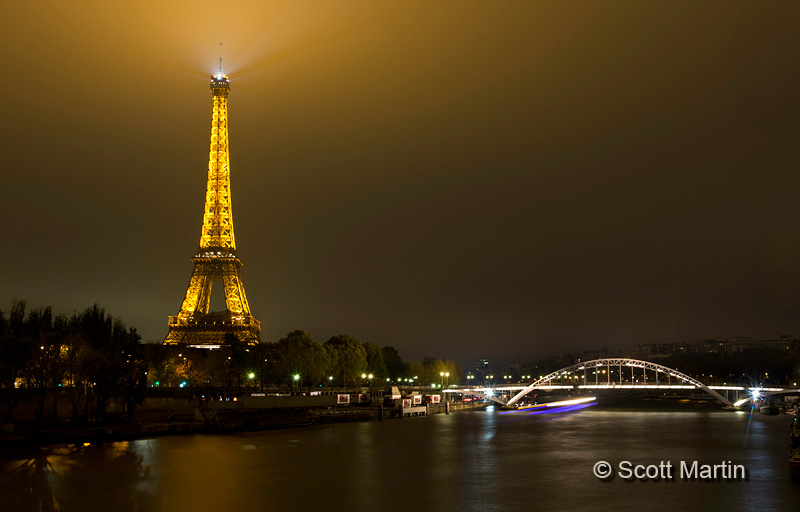
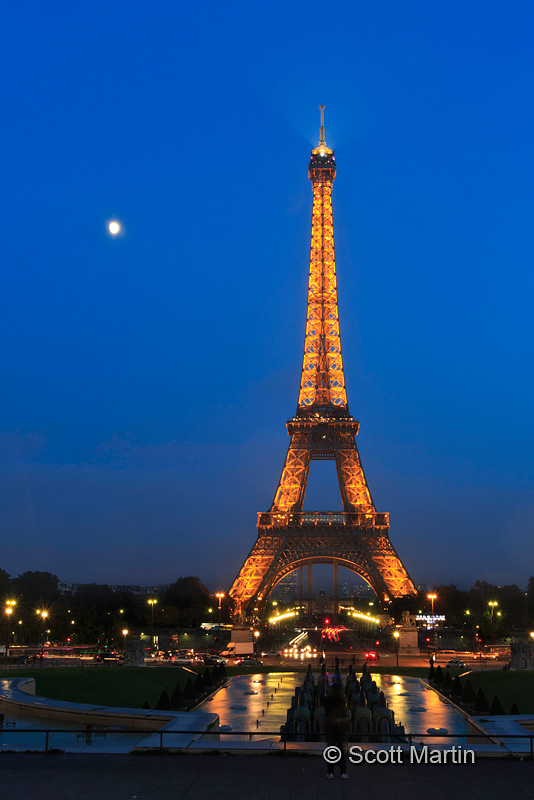
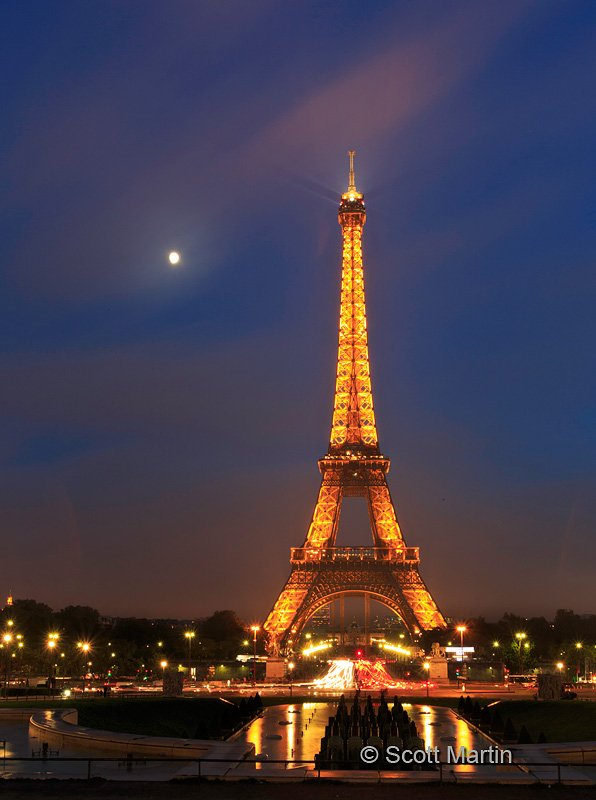
Photographing the Eiffel Tower at night is something that every photographer wants to do at some point in time, capturing that iconic shot. We spent two evenings shooting the tower at night and a light rain made one of those evenings a bit challenging.
For me the classic Eiffel Tower at night shot is taken from across the Seine River, one view highlighting the arches of the bridge and the other the string of streetlights leading towards the tower. So we took those two shots first!
.
A view from about half a kilometre away.
Images taken from near the tower pose a problem as wide angle lenses are required and tilting them upwards to include the tower also creates optical distortions that can be problematic. That said, you should always play around with different angles and compositions until you find something that works. Using a tripod, which is essential for night photography, forces you to constantly think about composition simply because of the discipline involved with setting up the tripod and choosing where to place it. Simply by using a tripod all the time, day or night, will quickly improve your skills. Its been said the biggest difference between a professional and amateur photographer is the tripod!
.
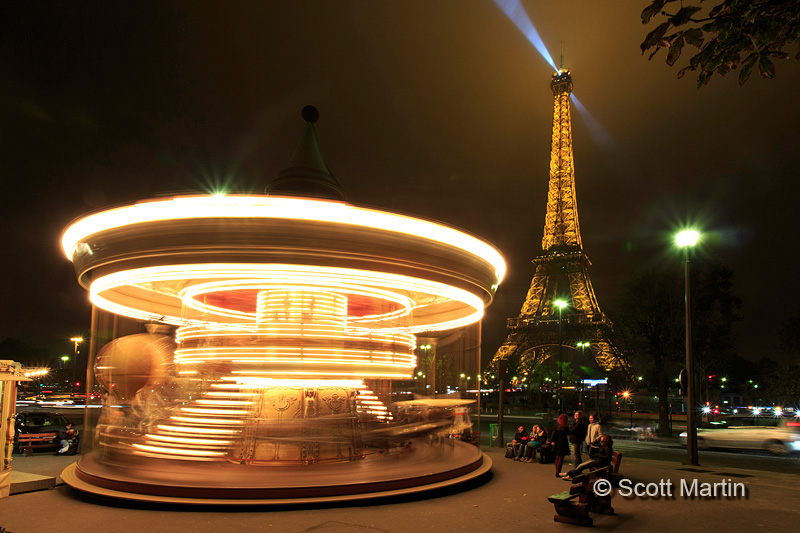
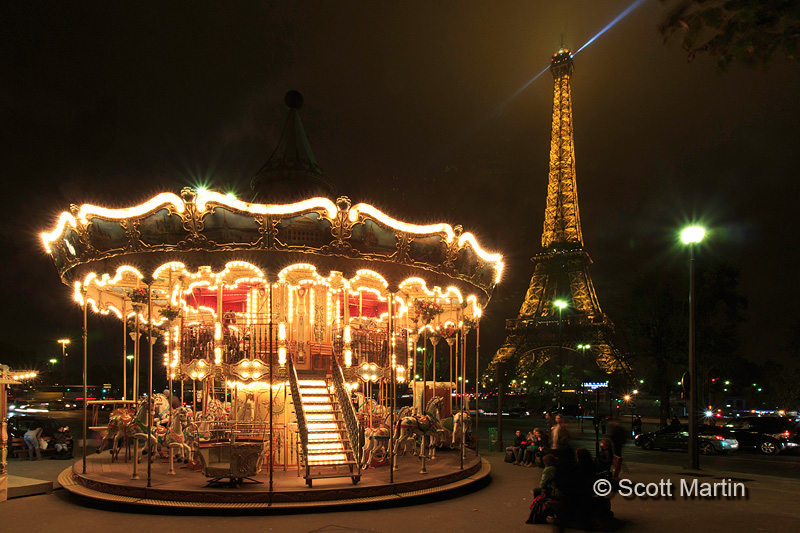
Another commonly seen image of the tower is with the Eiffel Tower Carousel in the foreground. Once the tripod was set up, there were only two shots to be taken, one with a slow shutter speed to blur the moving carousel and one with the carousel stationary.
.
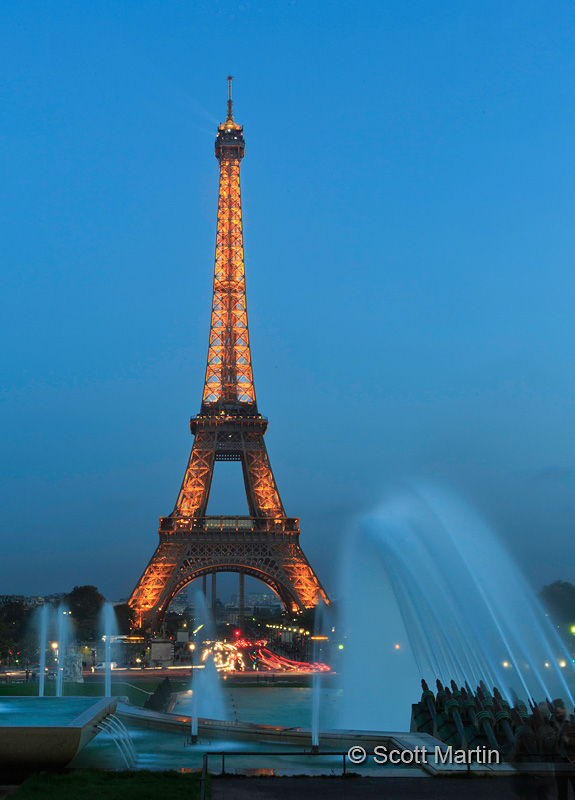
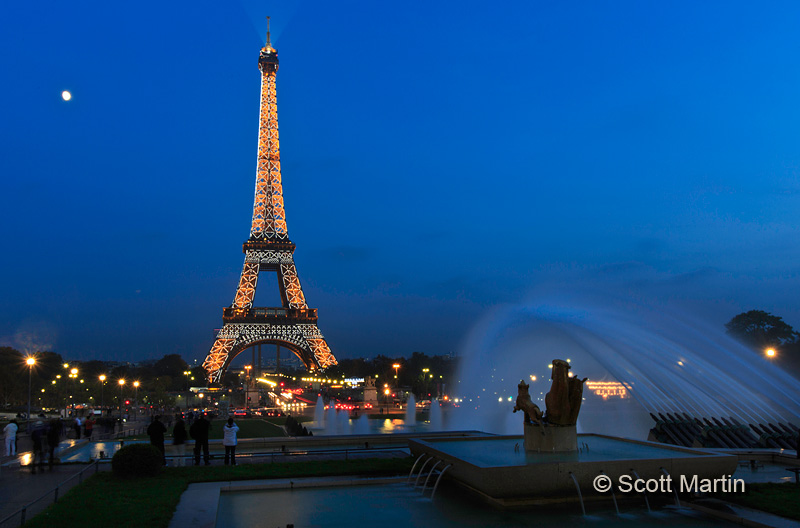
The remaining images in this post were taken the second night which is evident by the very different sky. The next two images use the impressive fountains of the Place du Trocadéro to provide some fore ground interest for the tower.
Every night, on the hour, the Eiffel Tower twinkles for about five minutes with a spectacular light show created by 20,000 individual lights. They blink randomly and make the tower appear to be shimmering, however when photographed with a long exposure all the lights are recorded which demonstrates the lattice pattern of the lights on the iron tower structure.
The moon was a bonus for us on this evening.
.
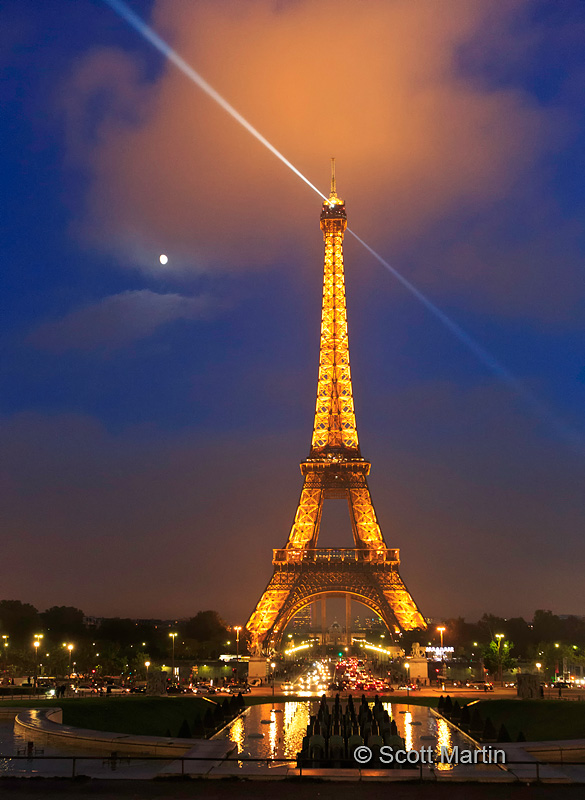
The next two images are identical except for the exposure, however different exposures make for very different results. The first is a low ISO, long exposure, small aperture shot that blurs the tower beacon.
The next image was taken with a high ISO and larger aperture to allow for a fast shutter speed which ‘freezes’ the beacon atop the tower creating a rather dramatic effect. I took a number of these shots with the beam in many different orientations but this one seemed the most aesthetically pleasing.
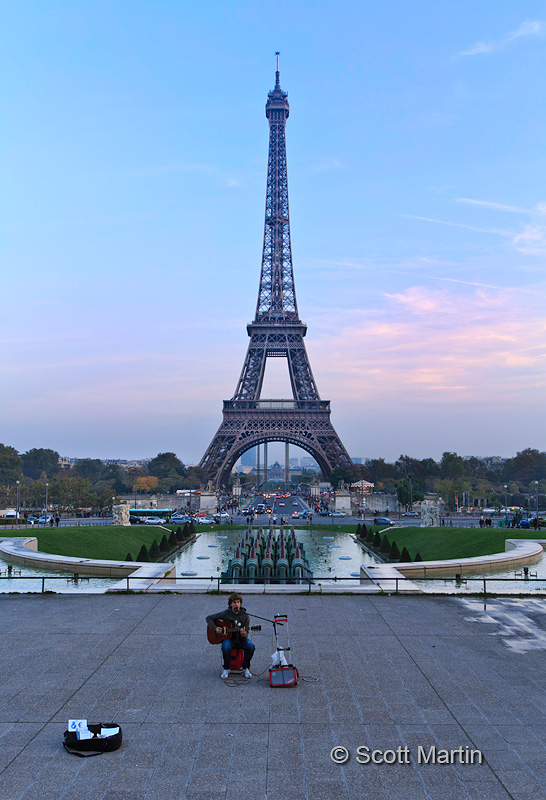
The last two images in this post were taken just after sunset when it was starting to get dark. They are not really Eiffel Tower pictures but rather of the lone busker, who presumably after many hours of singing and after it was starting to get dark, stayed and kept whole-heartedly singing, even though there was no one left on the large patio to hear his voice or toss some coins into his guitar case. It was a huge testament to his character and perseverance.
.
After leaving Paris we headed south towards the French Riviera, with a one night stop over in Lyon. On the way to Lyon we took a small detour and spent half a day at one of the most impressive houses in all of the world, the Palace of Versailles, home to Louis XIV. The Palace of Versailles will the subject of our next European post.
I trust you enjoyed the Eiffel Tower and thanks for taking the time to work through this post. It is much appreciated.
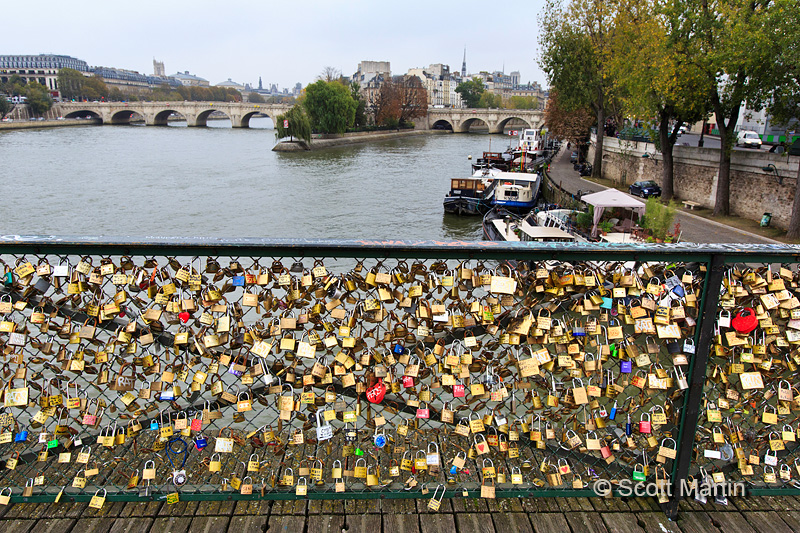
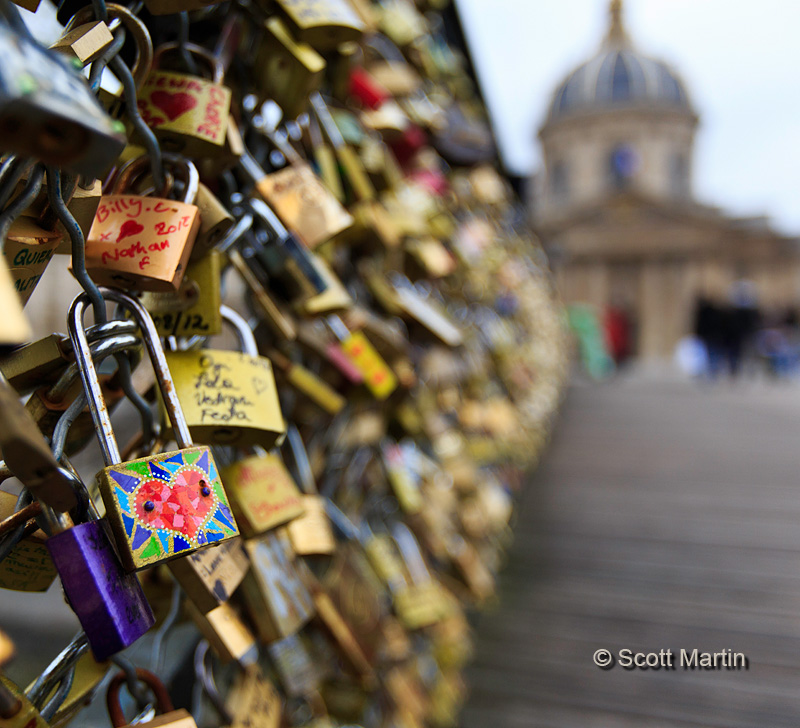
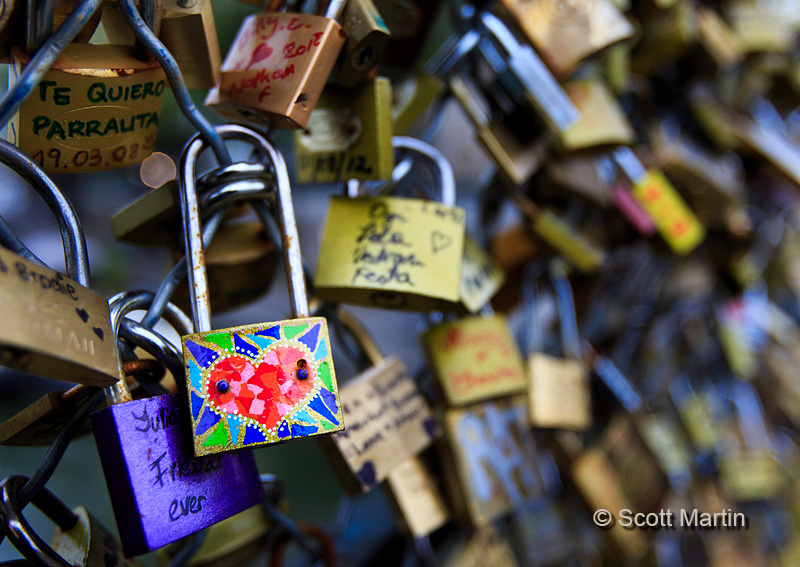
After leaving The Louvre we moseyed along the north bank of the Seine until we arrived at a bridge that took us part way across the river to one of only two natural islands in the Seine River within Paris known as Île de la Cité. As we crossed the bridge in was impossible not to notice the thousands of locks, of every size, shape and style imaginable that were locked to the railings alongside the bridge.
Upon closer inspection each lock was emblazoned with the initial’s or names of the couples who attached the lock to the railing and no doubt pledged their love to each other while they tossed the keys into the river below. I couldn’t help but take a few pics of these locks.
.
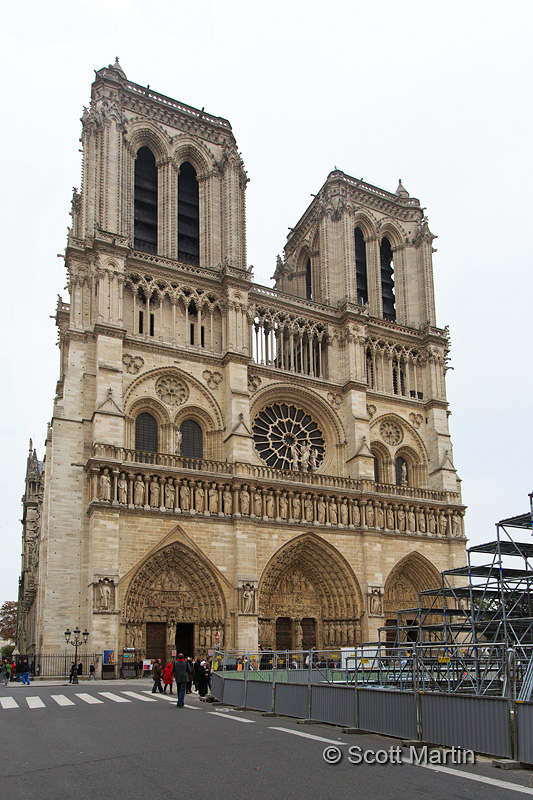
Île de la Cité is a small island that marks the geographic centre of the city and is where Paris was founded. The most famous building on the island is without doubt the cathedral Notre Dame de Paris (Our Lady of Paris) or simply Notre Dame. The cathedral is located in the geographic centre of Paris and there is a brass plaque in front of Note Dame that marks the spot from which all distances around the city are measured.
The western facade of Notre Dame provides the typical view of the building, however the day we were there large portable grandstands were set up in front of the cathedral which precluded a good vantage point for a picture.
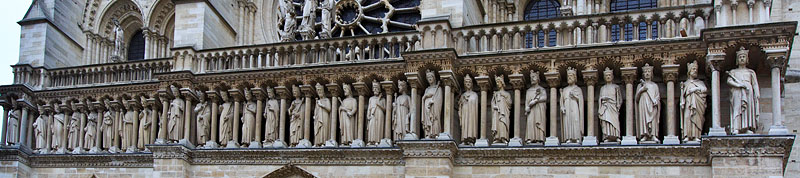
The cornerstone of the building was laid in 1163 and the western facade pictured above was finished in 1225 although the total structure was not completed until 1345. Although famous for the flying buttresses that support the library of the cathedral the western facade is what you visualize when you think about Notre Dame. The facade is large and impressive with its towers, rose window, balustrade, statues and three portals of entry. It measures 135′ wide and is 207′ high. The rose window in the centre of the facade is 31.5′ in diameter and forms a halo around the heads of a statue of Mary and Jesus which sits on the railing of the balustrade when viewed from the ground in front of the cathedral. Below the balustrade is a frieze that extends across the entire width of the facade, known as the Gallery of Kings containing twenty eight statues depicting the generations of Kings of Judah.
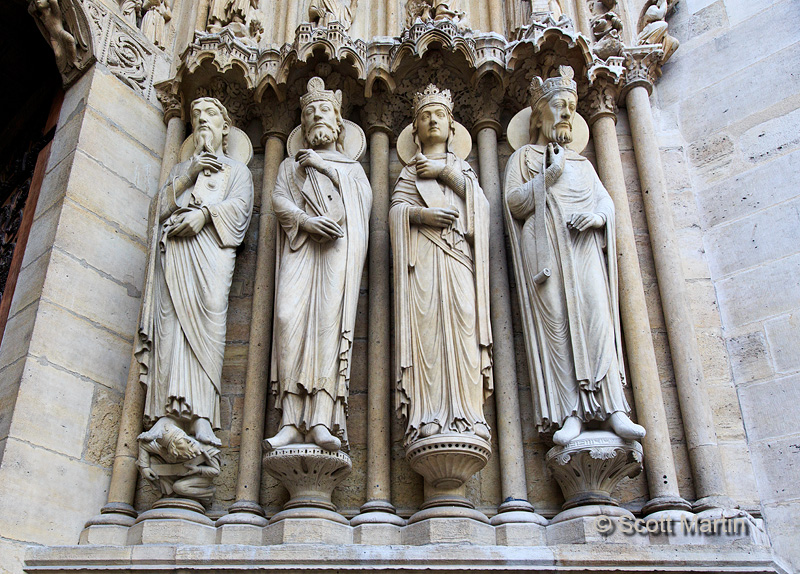
Below the Gallery of Kings are three large double sets of doors that form the main entrances, or portals, into the cathedral. The left (north) is the Portal of the Virgin (1210), the central Portal of the Last Judgement (1220) and the right Portal of Saint Anne (Mary’s mother) (1200). Each portal is framed by an ornate archway supported by columns or jambs that contain statues of Kings & Monarchs from Biblical times. Below are four at the Portal of Saint Anne.
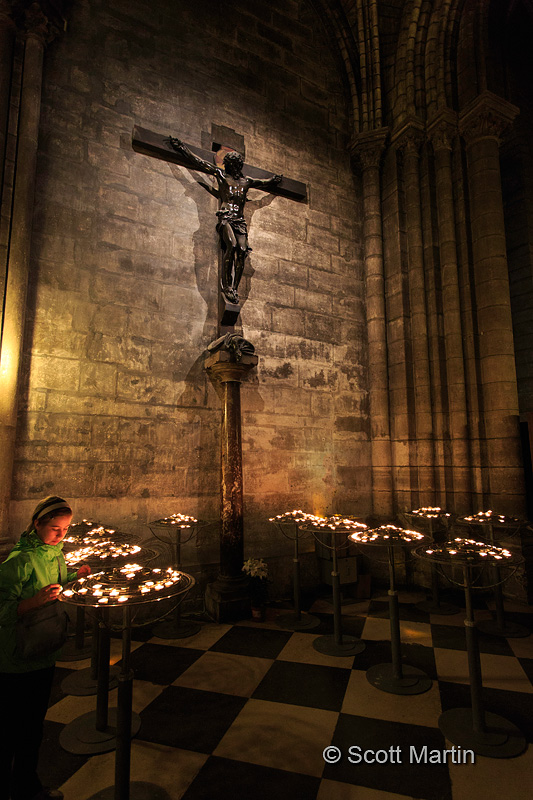
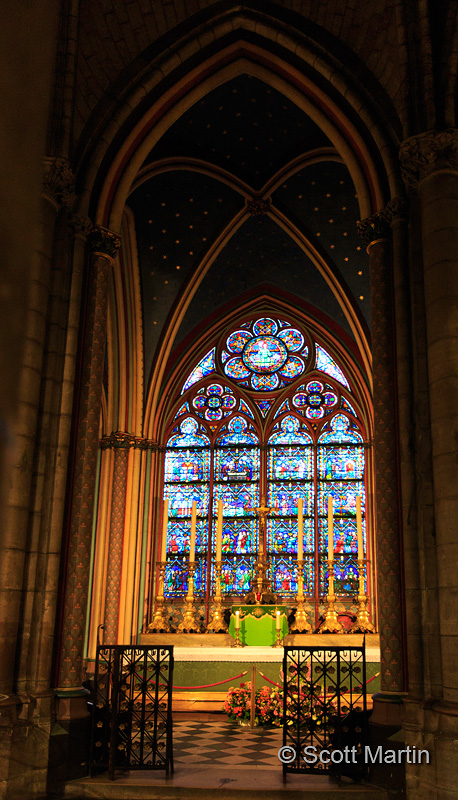
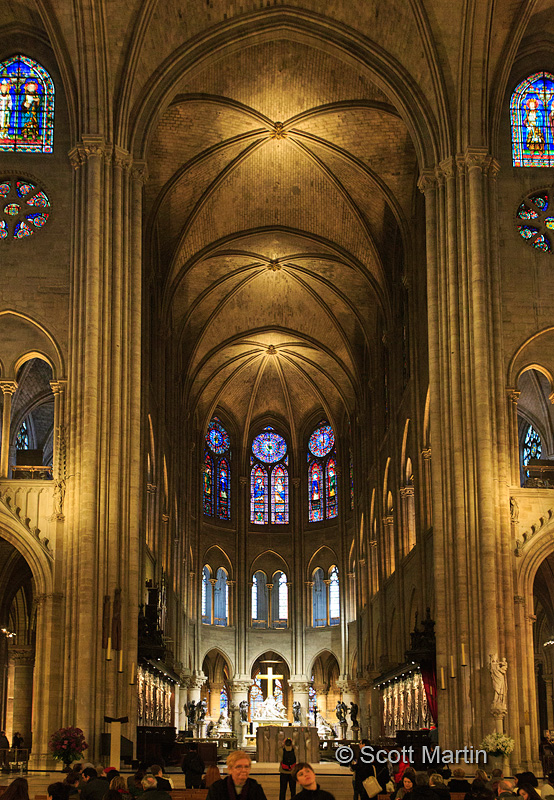
Flashes and tripods are not allowed in Notre Dame so very high ISO’s are required to generate exposure times fast enough to hand hold the camera in the deliberately dark interior (to prevent light degradation of the artefacts within). All of the interior images that follow were taken at ISO 4000 or more and I trust you enjoy these views from within Notre Dame.
.
.
.
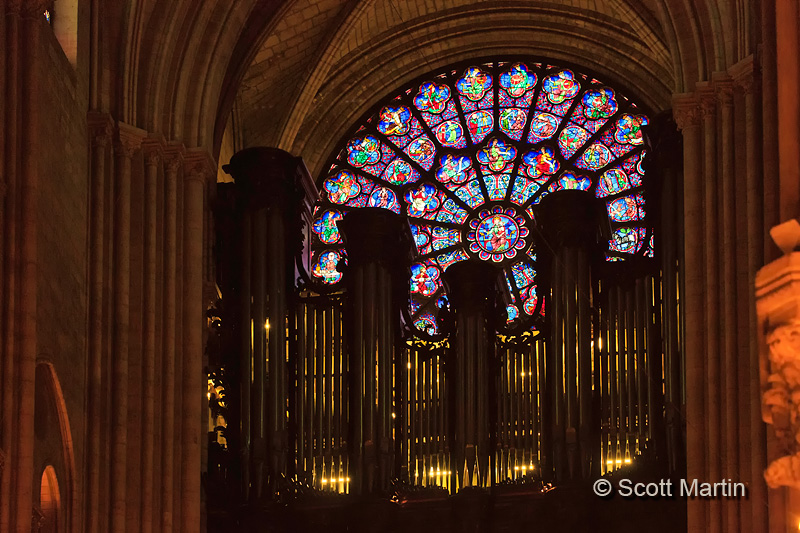
Notre Dame has two permanent and one portable organs. The great organ is said to be the most famous pipe organ in the world, having five keyboards, 190 stops and 8,000 pipes. The ‘smaller’ choir organ has two keyboards, thirty stops and 2,000 pipes.
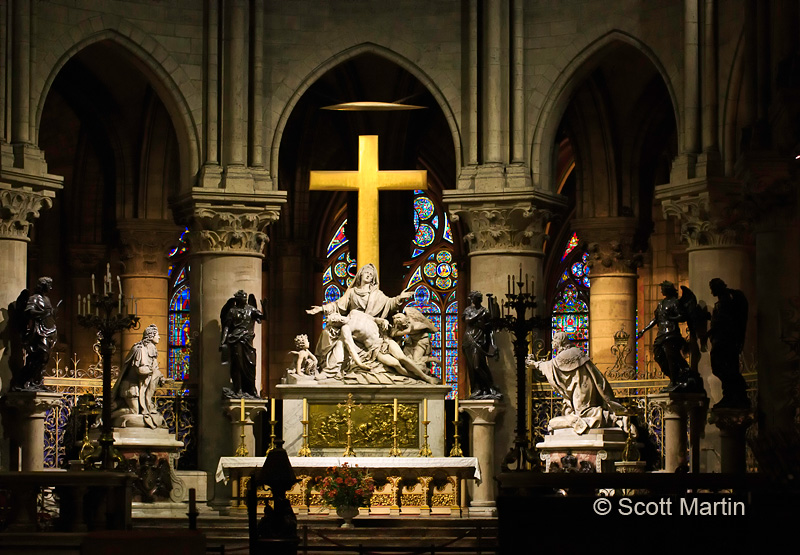
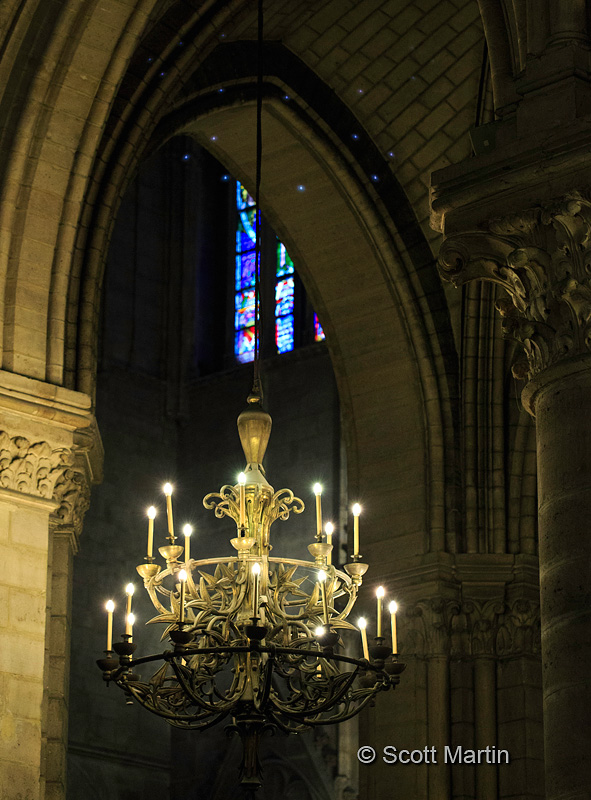
One can not walk through the cathedral and avoid thinking about Victor Hugo’s classic “The Hunchback of Notre Dame” and wondering where Quasimodo was. We could find no mention of him anywhere, however this next picture reminded me of him, probably because of the chandelier and the connection with the swinging chandelier in “Phantom of the Opera”….I know, same city, different building and completely different story 🙂
When shooting the interior of a large building like Notre Dame it is important to consider focal lengths as the photographic results are vastly different, and equally as impressive, at 16mm and 100mm. Its become our practice to make two passes through buildings like Notre Dame for a couple of reasons, first of all it takes a couple of trips through just to take in the magnificence of the structure and commit as much as possible to memory so it can be enjoyed over and over again. Looking at the building differently with each pass helps heighten your appreciation of the building as a whole as well. I take the first trip through ‘thinking wide’ and taking in the big picture and recording it with a 16-35 f2.8 zoom lens. The results of which are shown in the first three interior images above. The second trip through the building I think ‘detail’ and record it with a 100mm f2.8 macro lens which allows the recording of small details up close and big details from farther away. The last three images above were taken with the 100mm lens. The beauty of the 100mm macro is that it is a very small and therefore discreet lens that does not attract attention. It is also very light so carrying it around all day is not a hardship and thus it has found a permanent home in my travel camera bag. The only down side is that as a prime lens you must zoom and compose with your feet 🙂 If you don’t have this little stealth telephoto/macro in your bag I would highly recommend it to you.
After leaving Geneva we headed northwest for the 550km trek to the great city of Paris, where we stayed for three days at the Hotel Pullman Paris Tour Eiffel close to the base of the iconic tower which will be the focus of the next post.
Paris is the largest city in France with a population of more than two million and a metropolitan area of over twelve million people. It is located on the River Seine where it was first settled over two thousand years ago.
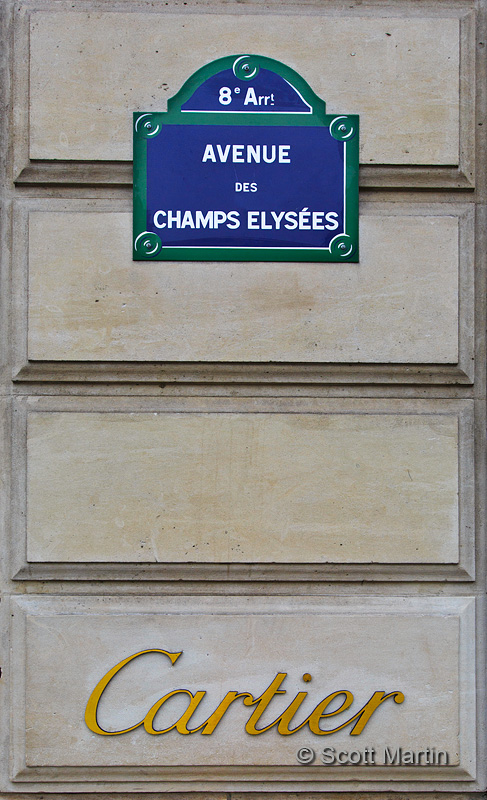
The Avenue des Champs Elysées is probably the most famous street in Paris, stretching almost two kilometres between the Arc de Triomphe to the west and Obelisk de Luxor to the east. It is home to some of the most expensive real estate, high end fashion boutiques and jewelry stores in the world.
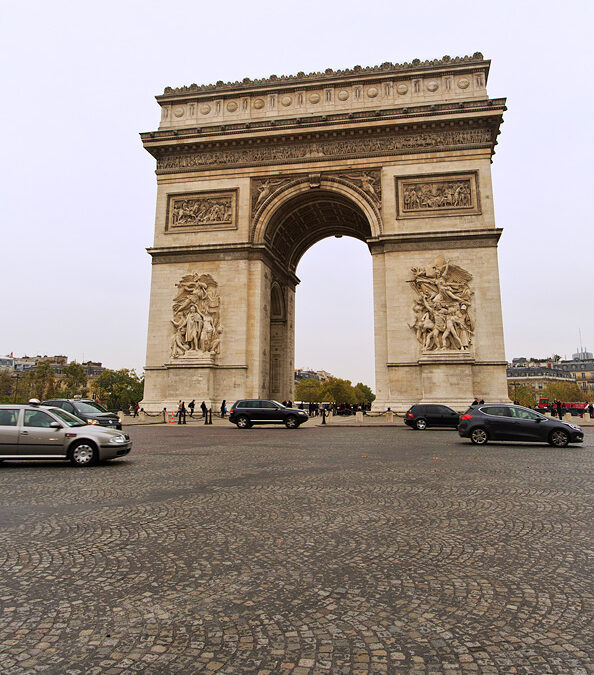
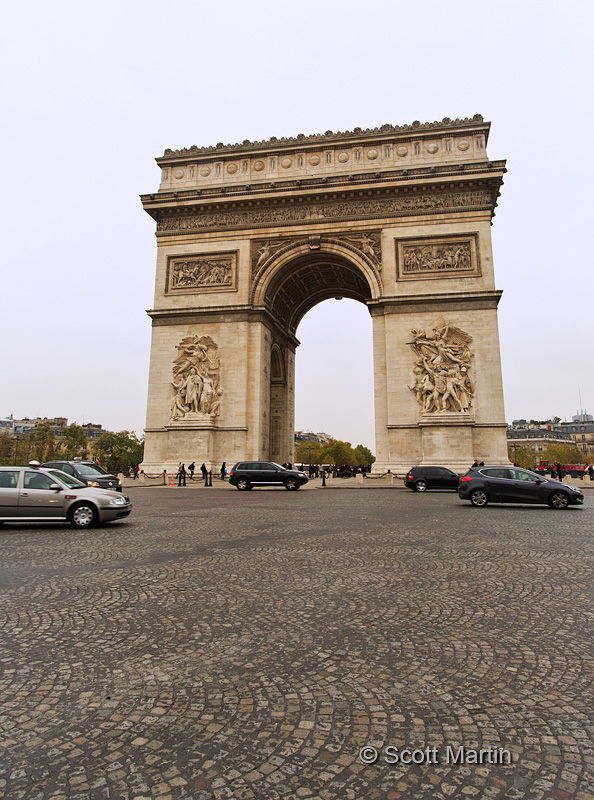
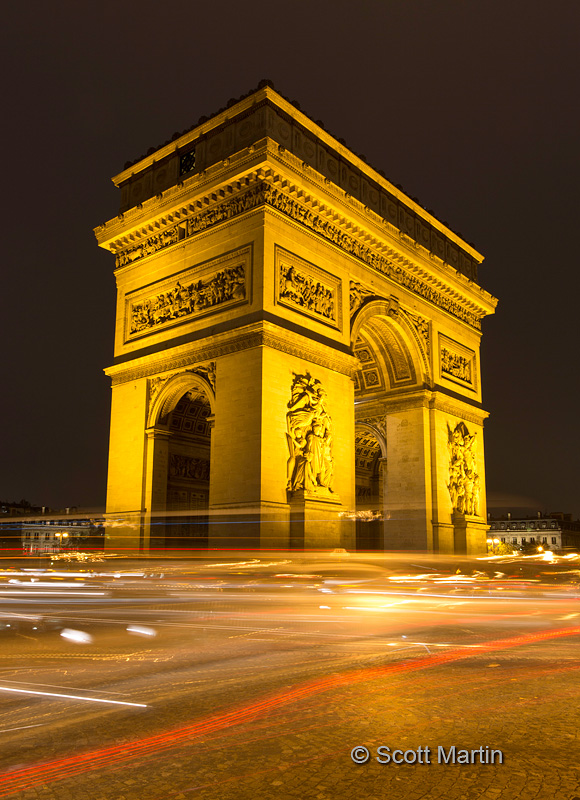
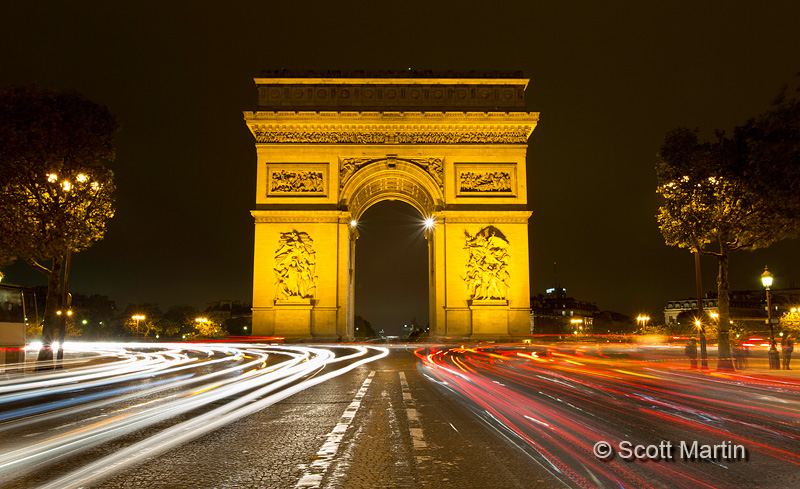
Place Charles de Gaulle is a large area that serves as the origin of twelve straight roads including the Champs Elysées that spread out like giant spokes in a wheel. In the centre of the place is the Arc de Triomphe. This makes the Arc de Triomphe the centre of one of the busiest and scariest roundabouts in the world. It is said that there are eleven lanes of traffic circling around the Arc with absolutely no lane markings on the cobblestones that make up the roadway. It was fascinating to observe and I’m very happy we left our rental car at the hotel and walked.
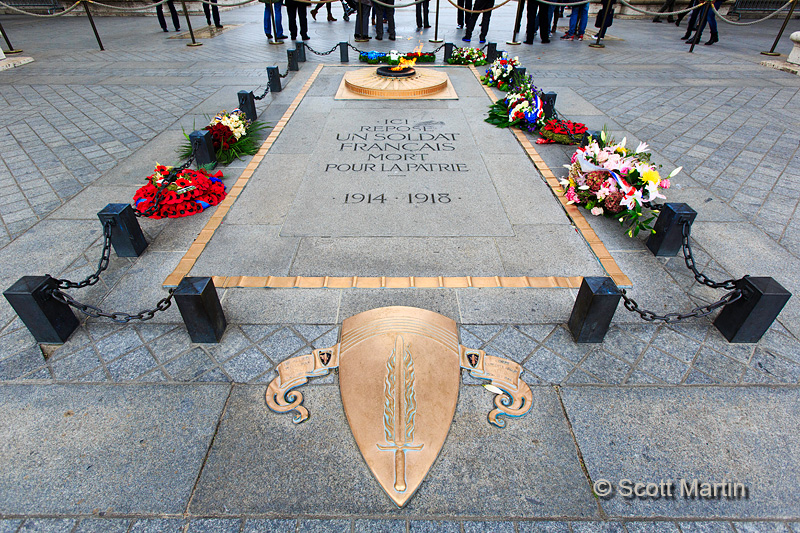
The Arc was commissioned in 1806 but not completed until about thirty years later. It was patterned after the Arch of Titus in Rome and was built to remember the French soldiers who fought & died in the French Revolutionary and Napoleonic wars. Below the arc is the Tomb of the Unknown Soldier remembering those who perished in the First Great War.
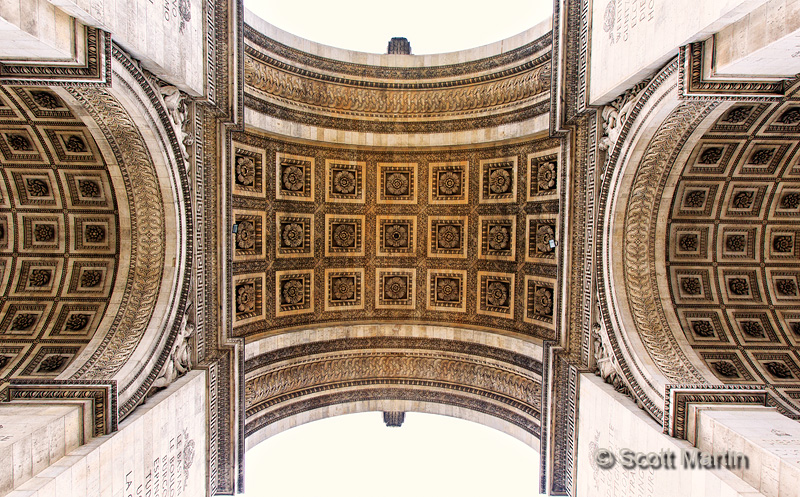
The names of those remembered are carved on the walls of the Arc, while the arches are intricate marble tiles which makes for an interesting wide angle shot looking up from the centre of the Arc.
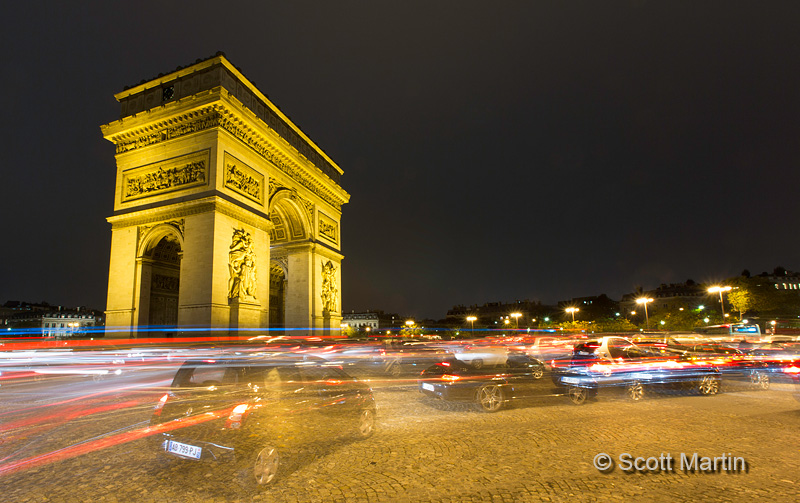
The Arc de Triomphe was fun to photograph at night as the hundreds of cars that are racing around its base provide some interesting lighting effects.
I didn’t notice the dog in the back of the car while taking this next shot, however it has become one of my favourite elements of the image.
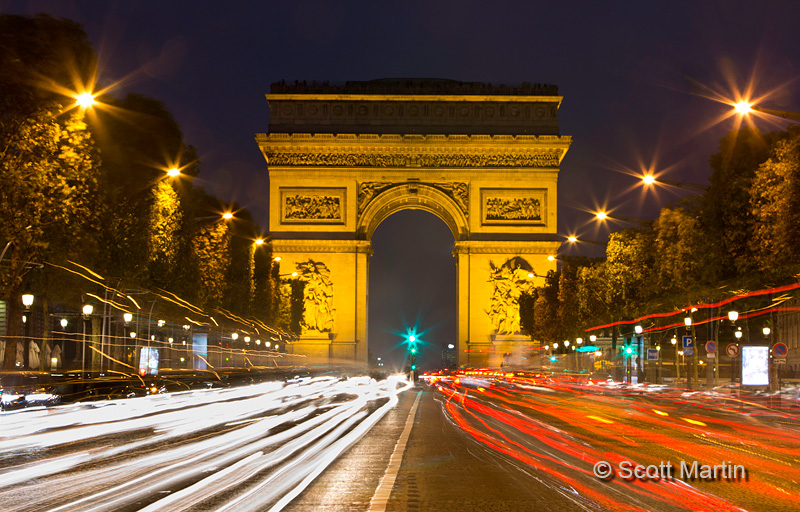
These last two images of the Arc are more classic views, however also required placing oneself into the middle of the traffic to get the desired composition. The first image was taken with a 70-200mm lens from the middle of the Champs Elysées about three blocks from the Arc in order to frame the Arc with the trees and streetlights. It was taken at f/22 to create the starburst effect on the streetlights.
The last shot is similar to the one above however taken on a different street from a vantage point much closer to the Arc using a 16-35mm lens to provide a feel for the curved motion of the vehicles entering and exiting the roundabout.
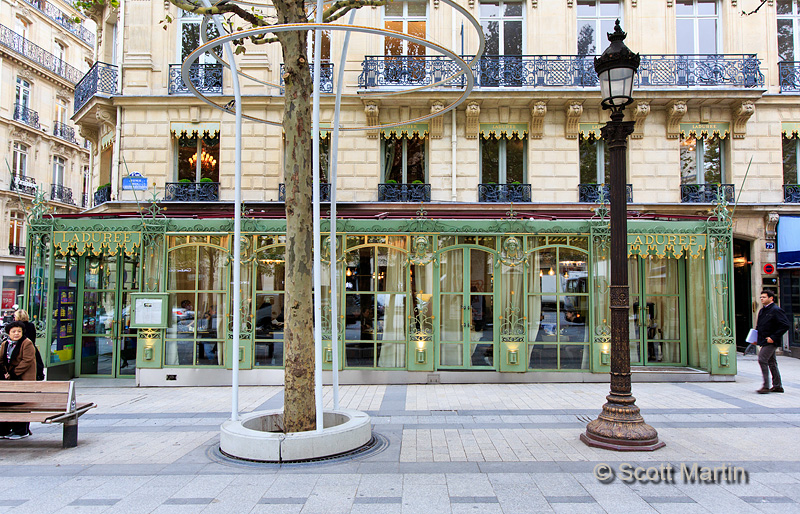
We walked the three miles between the Arc and the Louvre down the Champs Elysées and the following are a few snapshots along the way.
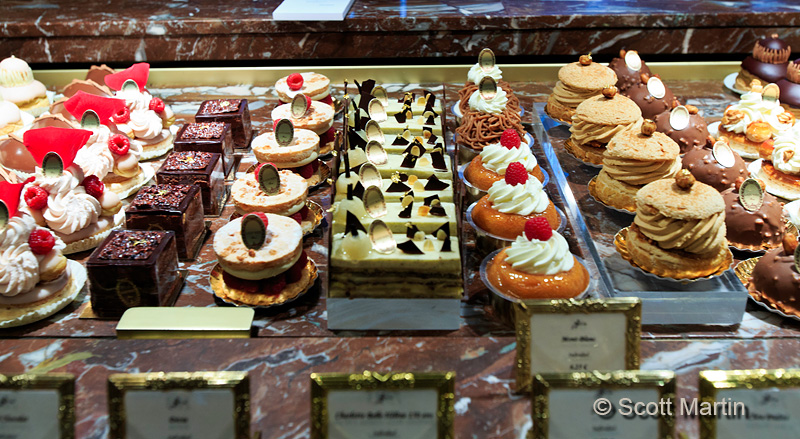
We didn’t buy any jewelry at Cartier, however we did stop at my new favourite shop, LaDuree, the worlds best (and probably most expensive) bakery.
Absolutely spectacular!
When you think of Louis Vuitton in Canada, you picture a small high end boutique…..in Paris its a department store!
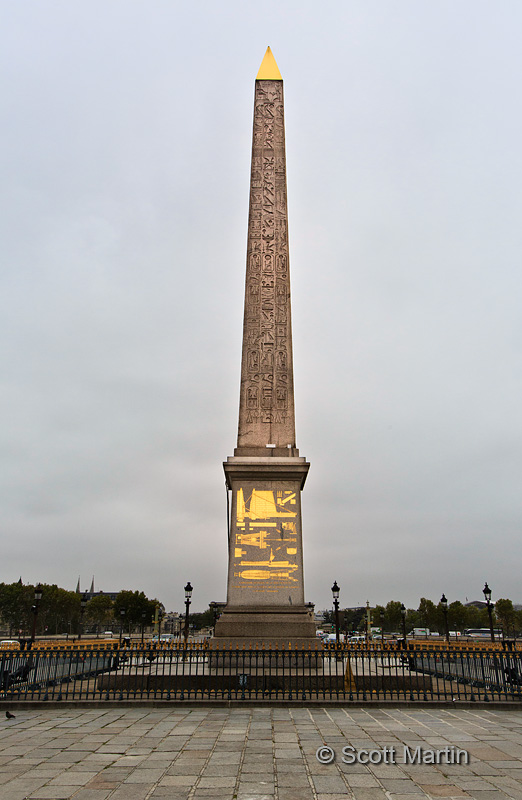
The Champs Elysées ends at the Obelisk of Luxor which stands in the middle of the Place de la Concorde. It first stood in front of the Luxor Temple in Egypt over 3,300 years ago. The 75′ high yellow granite obelisk arrived in Paris on December 21, 1833, exactly 180 years ago today!
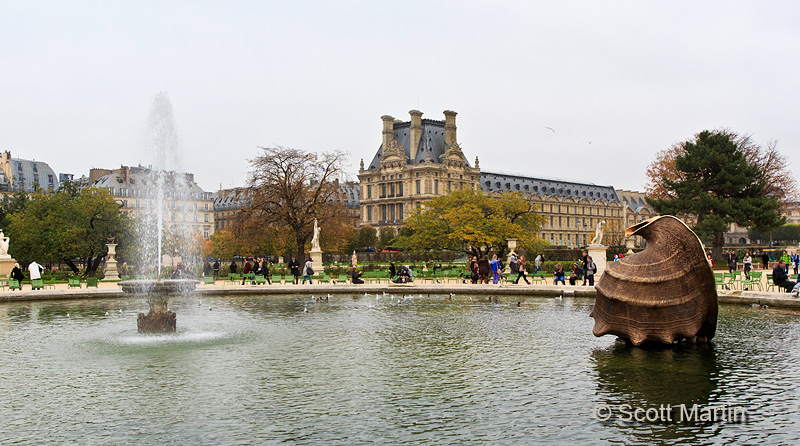
Beyond the obelisk to the east are a number of parks and museums stretching out about a kilometer before arriving at the Louvre.
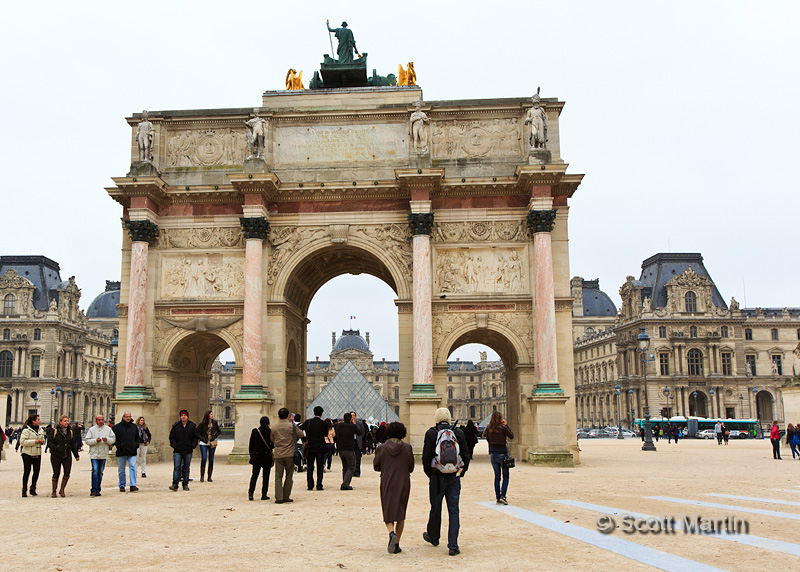
The last park you pass through on the way to the Louvre is Place du Carrousel in the centre of which is the Arc de Triomphe du Carrousel which stands in perfect alignment with the Obelisk Luxor, the Champs Elysées and the Arc de Triomphe in Place du Gaulle almost three miles away. The Carrousel Arc is older and about half the size of the Arc de Triomphe.
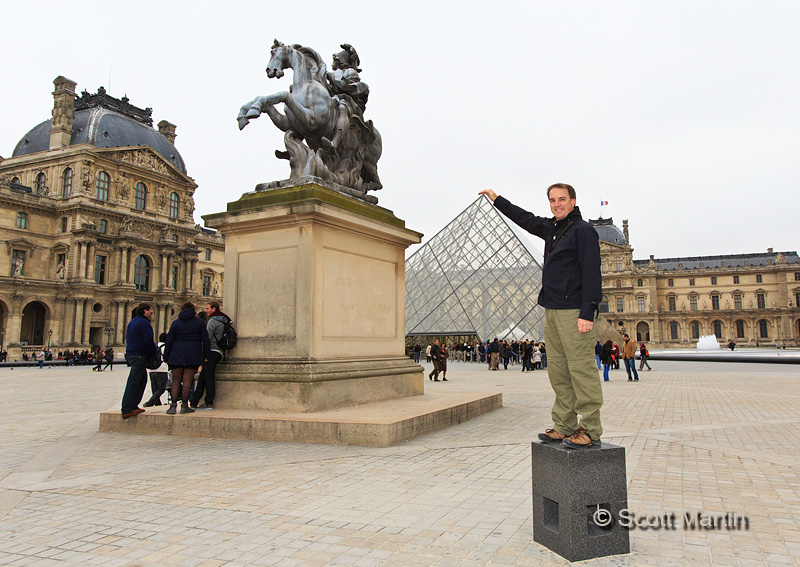
…..and the typical tourist shot 🙂
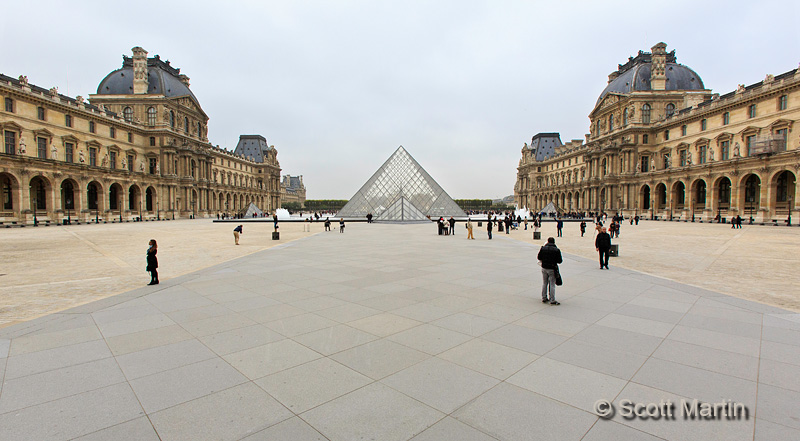
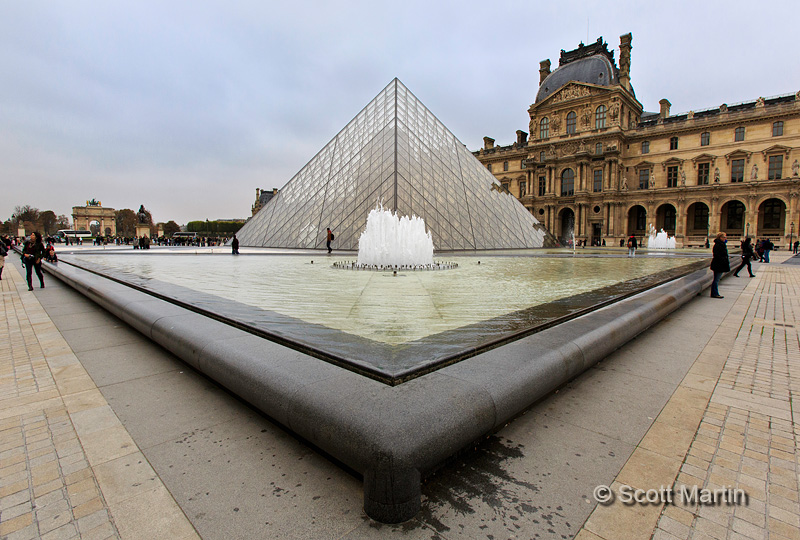
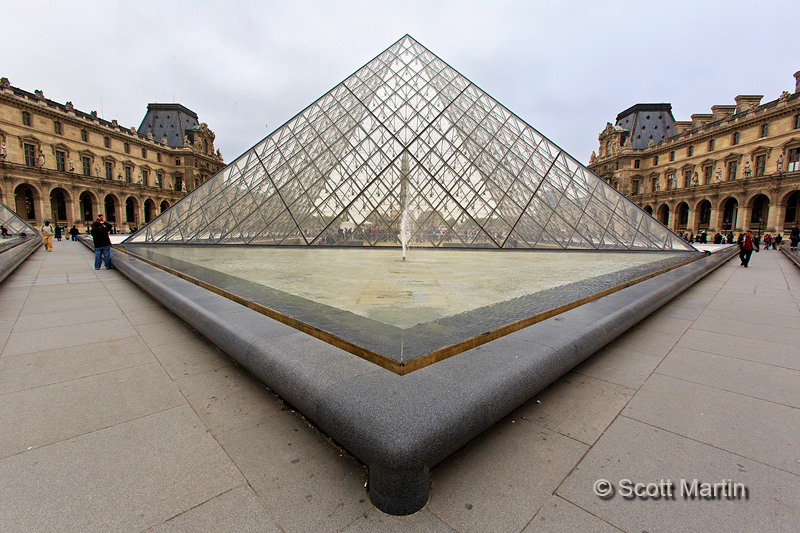
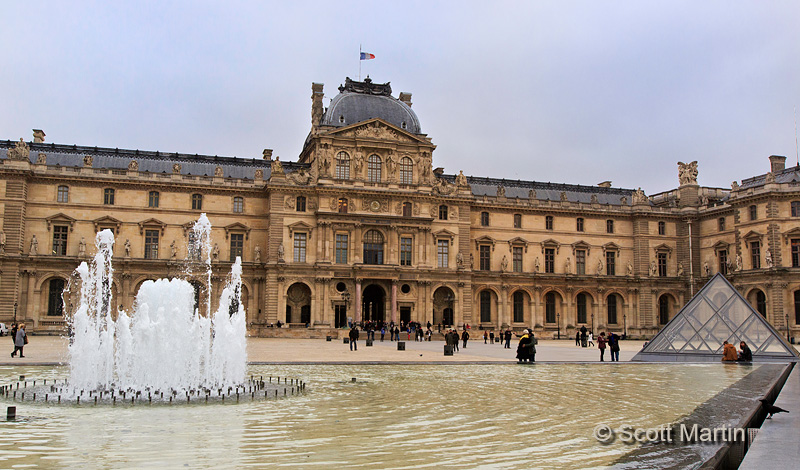
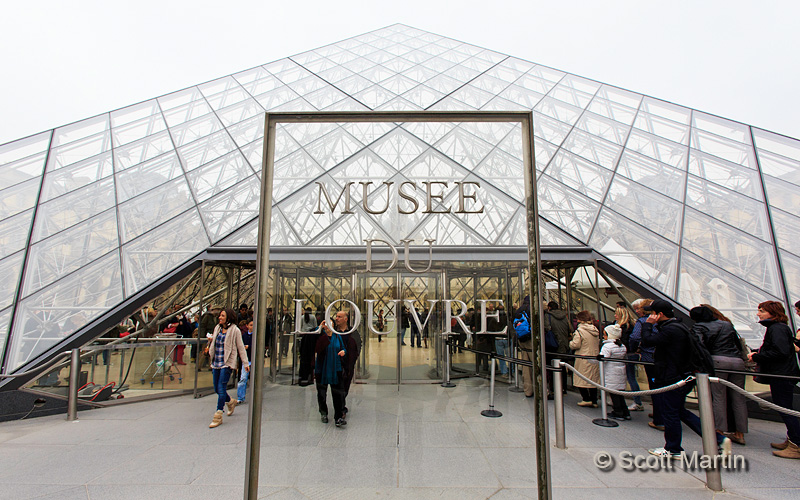
One of the things that surprised me about the Louvre was its sheer size as well as how the modern glass pyramids rise out of the central square yet don’t seem to detract from the old architecture of the museum buildings themselves.
.
.
.
.
Using my iPhone, I recorded a 360° panorama using an app called Photosynth. Click here to check it out. (Note: The pano works fine on Chrome and Firefox however I did have problems viewing it on Safari)
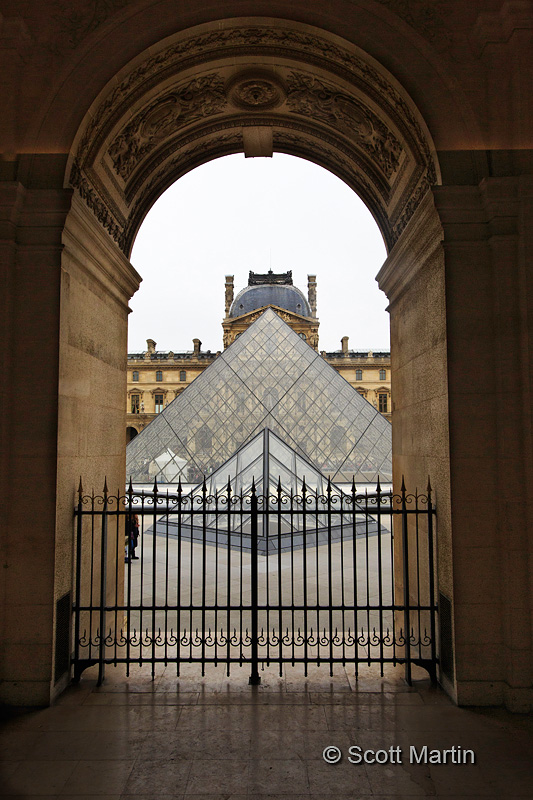
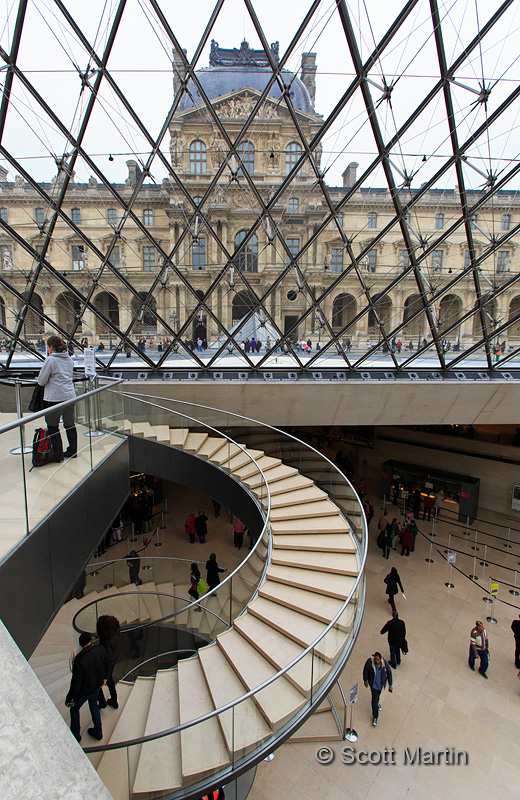
The main entrance to the Louvre is through the central pyramid and down into a cavernous subterranean lobby accessed by a large circular stairway.
.
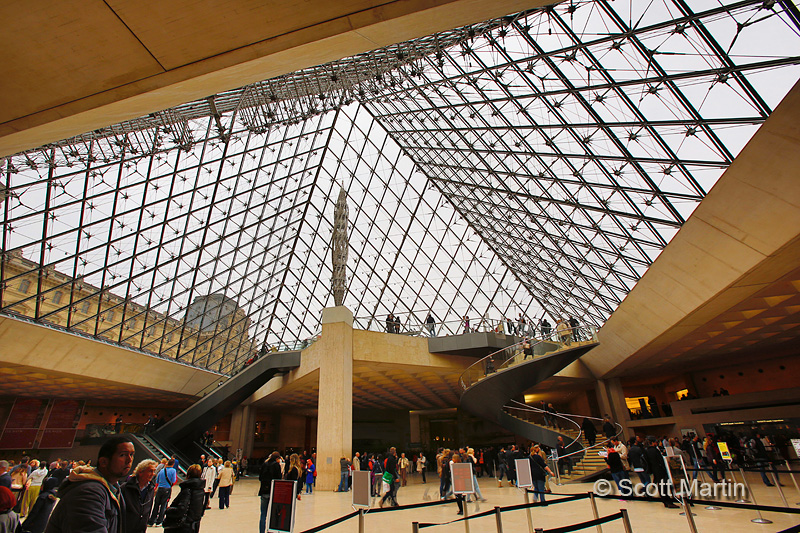
The next image is interesting for the photography enthusiast. It is an in-camera ±3 stop HDR that is processed in the 5D MkIII and saved as a single image. You can customize the exposure settings as well as how the images are processed. Once set up, the camera takes three different exposures of the same scene and then merges them into one image which it saves before deleting the three original images. HDR is an acronym for High Dynamic Range , which refers to scenes where the light intensity within the frame exceeds the ability of the camera to correctly expose the image with one shot. In the image below I metered on the central yellow pillar and set the camera to take one shot at that exposure plus one three stops over-exposed (to properly record the dark areas in the lobby) and one three stops under-exposed (to properly record the bright sky). Putting those three shots together resulted in the shot below. The amazing thing was that all of this happened with one trip of the shutter. Photographers have been doing HDR shots for years, however they always took lots of time ‘developing’ them on the computer afterwards.
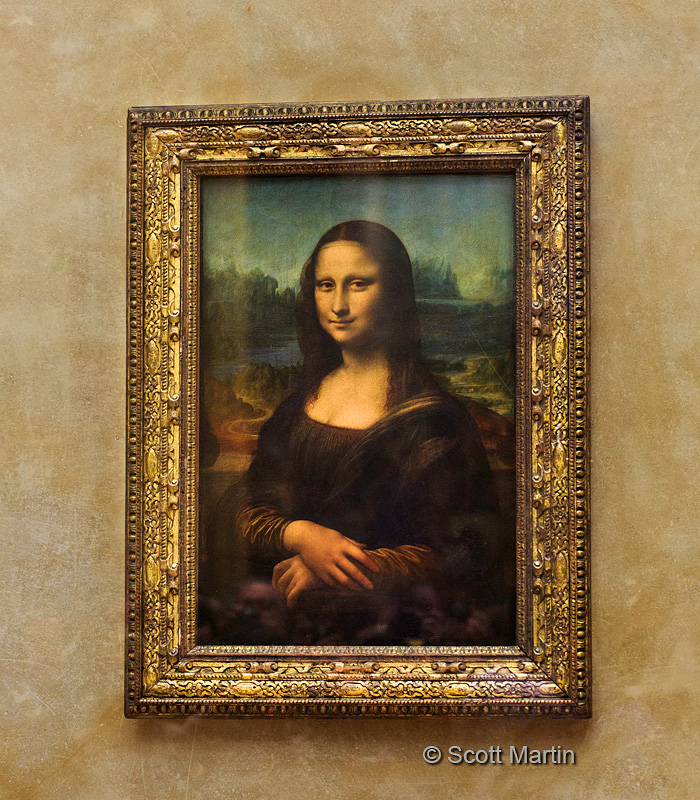
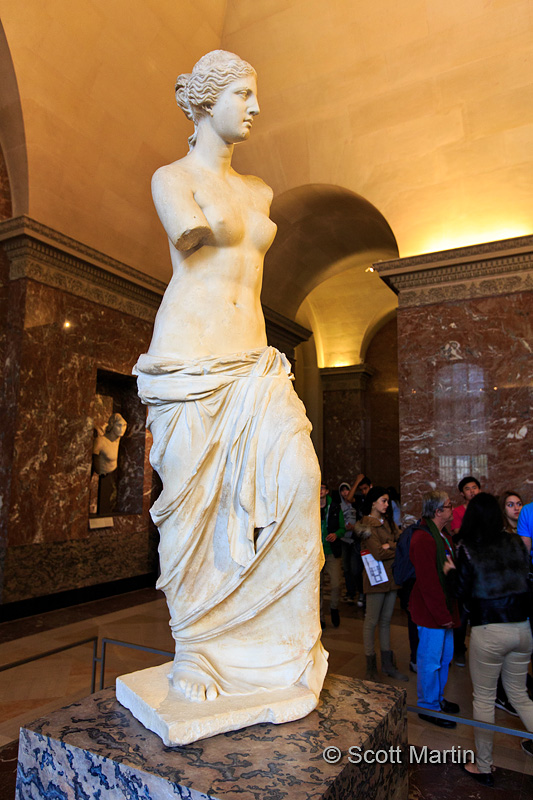
Wandering through the seemingly endless maze of hallways and galleries within the Louvre was fascinating for Deb & me, even though neither one of us grew up with an appreciation for the arts. I could include many images however will pare them down to arguably the two most famous pieces found within the walls of the Louvre. The Mona Lisa and Venus de Milo.
The Mona Lisa was painted on a white poplar panel around 1506 by the Italian painter Leonardo da Vinci. Although not small, the 30×21″ painting is not as large as one expects when viewing it for the first time.
Venus de Milo, or more correctly Aphrodite of Milos, is a 6’8″ white marble statue carved sometime between 130-100 BC by Alexandros of Antioch. Its larger than life size and folk-lore suggest that it depicts Aphrodite, the Greek goddess of love & beauty, known to the Romans as Venus.
After finishing our tour of the Louvre we crossed over to the left bank of the River Seine and headed towards Notre Dame and the Eiffel Tower which will be the subject of the next blog post.
A very Merry Christmas to all who stop by the blog and I look forward to keeping in touch with you in 2014.
After one last Vaporetto ride along the Grand Canal, we arrived back at the Venice Car Park where we loaded up our luggage and headed North for the 400 km drive to Innsbruck, Austria. The sun was descending below the mountains when we arrived at our hotel in the Old Town section of Innsbruck. We walked to the Town Square where we enjoyed some fine Austrian cuisine after which we wandered around recording some memories of this city that hosted the 1964 and 1976 Winter Olympics.
The remnants of the Olympic flame monument in the park where the Olympic medals were awarded almost fifty years ago.
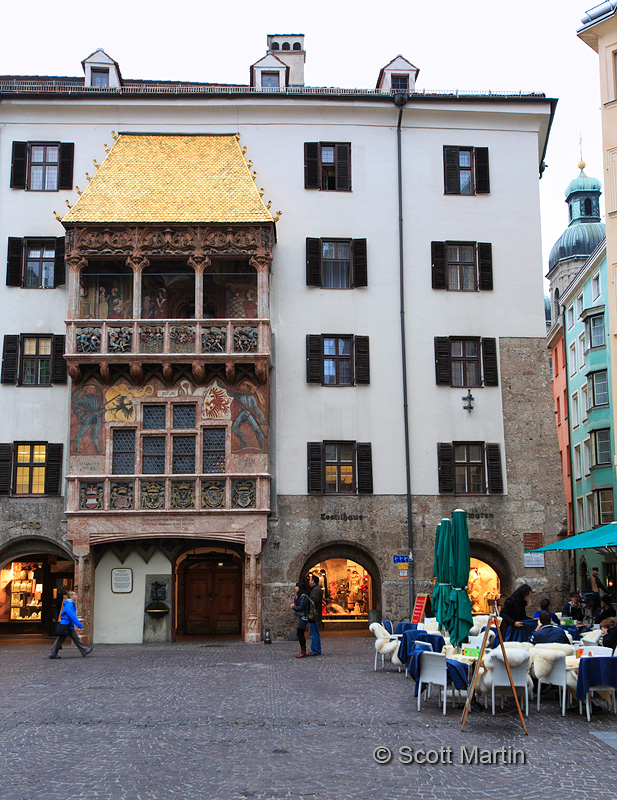
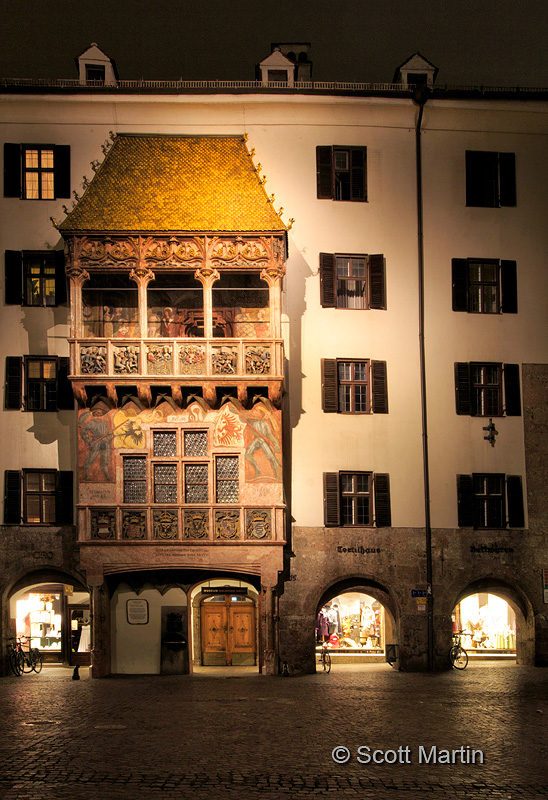
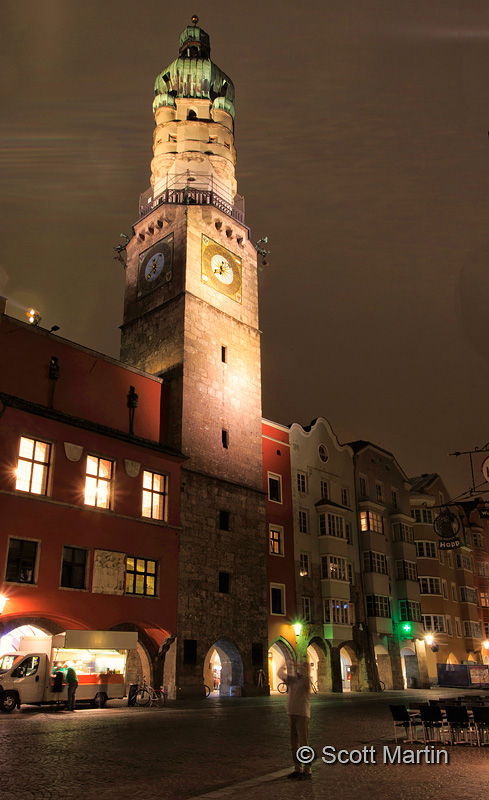
The Goldenes Dachl, or Golden Roof is Innsbruck’s most famous landmark and is a three-story balcony built in the fifteenth century as a palace for Emperor Maximilian I. The balcony was their private perch for watching the festivals that took place in the town square below. The golden roof is made from 2,738 gold-plated copper tiles and they really do serve as the focal point of the square.
The Goldenes Dachl at dusk.
…and after dark.
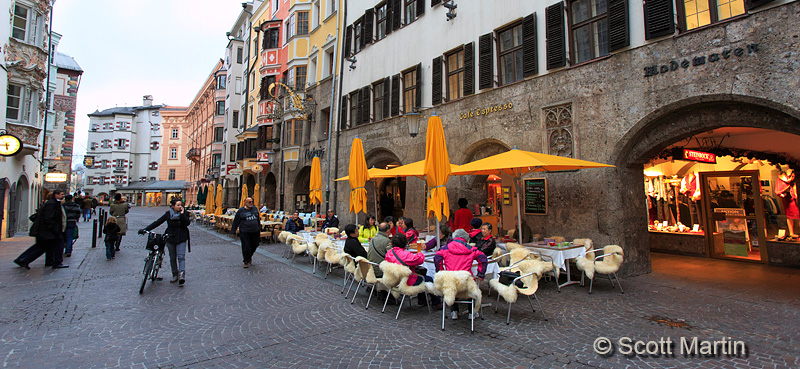
The town square in Old Town is a wonderful area that has remained relatively unchanged for the last 500 years. There are many cafe’s around the perimeter of the square that are designed for warmth in the colder weather, right down to the sheep skin throw blankets on every chair.
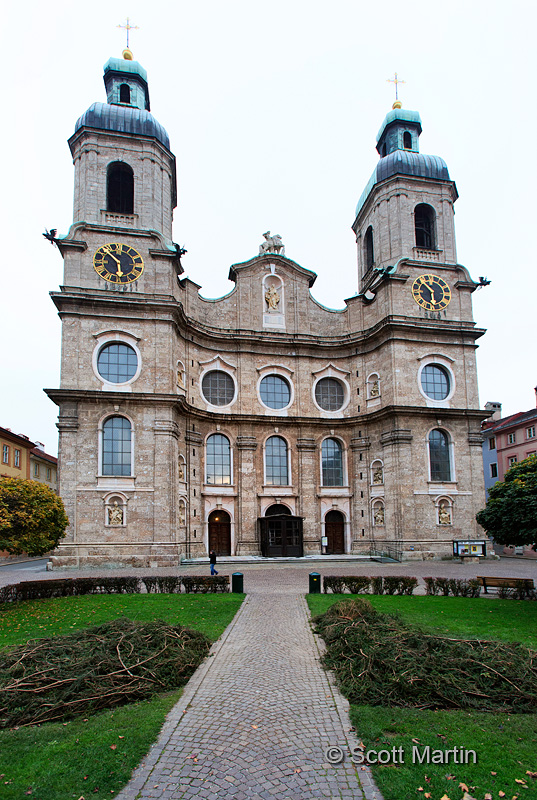
The Innsbruck Cathedral or Cathedral of St. James, a Baroque Cathedral built between 1717-1724.
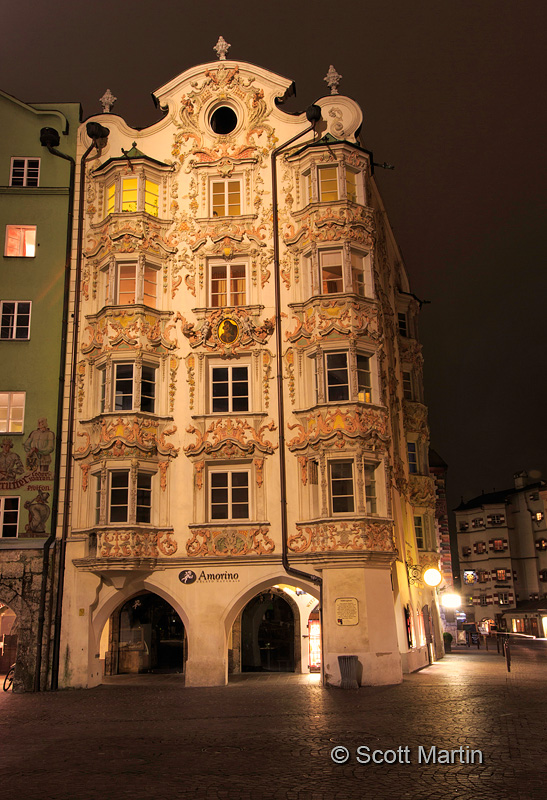
Helblinghaus dates back to the fifteenth century and was constructed as a town house. The ornate detail of the facade is in keeping with its neighbour with the golden roof!
This last image from Innsbruck is the City Tower, another focal point of the Old Town district of Innsbruck.
Following our very brief one night stay in Innsbruck we headed west, through Austria and Switzerland to our next stop which was Geneva, nestled on the edge of Lake Geneva on the Swiss/French border, some 580 km from Innsbruck. This day was designed for us to enjoy driving through the Alps and seeing one of the most picturesque mountain ranges in the world. We did enjoy the day however did not see a single mountain thanks to a very low cloud ceiling that day that extended the entire distance between Innsbruck and Geneva. Hopefully we will fare better the next time we make the trek!
Geneva is a fabulous city and it would have been nice to spend more time there, however we arrived late in the day and were on the road early the next morning heading towards Paris. The metropolitan Geneva area has a population of over one million people and has the third highest quality of life of any city in the world (after Vienna and Zürich). It boasts more international organization headquarters than any other city in the world and not surprisingly is rated as the third most expensive place in the world in which to live. We instinctively knew this because the burgers and fries at the restaurant where we had diner were thirty eight Euros!
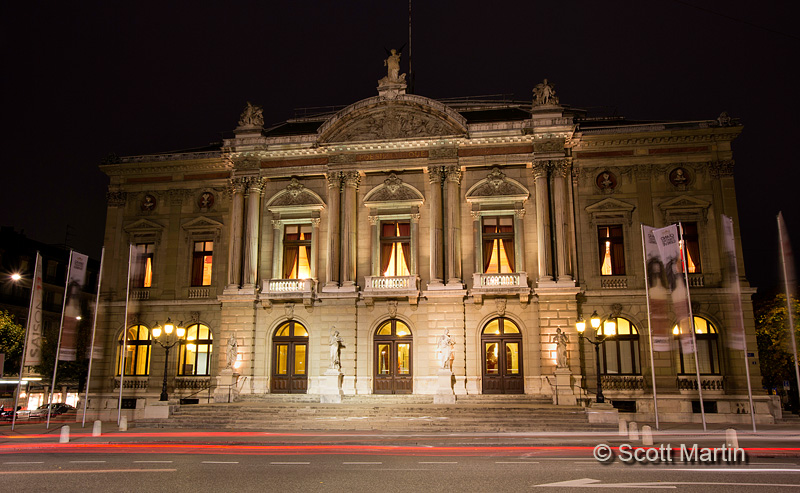
For our evening in Geneva we headed down town to the old centre of Geneva where the University of Geneva is located. Adjacent to the university are some of the city’s cultural landmarks. Below is the Geneva Theatre.
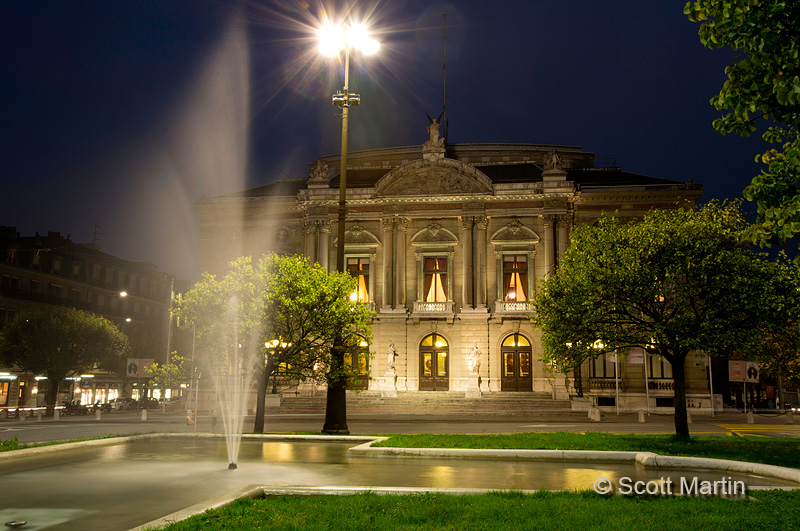
And a little different perspective. Unfortunately it was impossible to include the fountain and not the light standard.
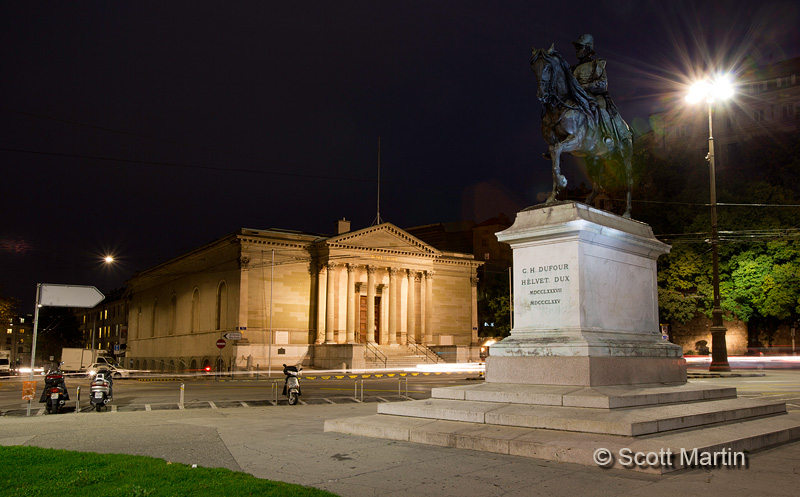
Next to the theatre was the museum , again with an annoying light standard. If you look closely you will note the streetlight is behind the statue of the horse & rider, which would typically result in the statue being underexposed as it was completely back lit. To solve this problem, during the thirty second exposure I grabbed the flash and ran up to the statue base and fired the flash at the horse & rider about six times while I made sure to never stop moving (so I didn’t show up in the picture). This technique is know as light painting and is a common practice in night photography. It takes a bit of practice but is not really that difficult….just don’t stop moving!
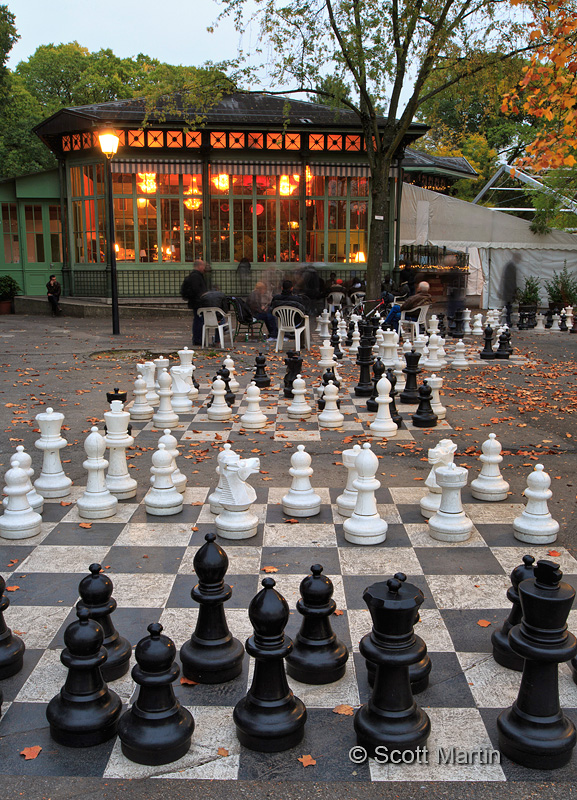
The University of Geneva is a sprawling campus in the heart of the old city. On its park like setting there are many academic buildings, lecture halls, dormitories and libraries however my favourite was this little cafe with bigger than life checker and chess boards out front for anyone to play.
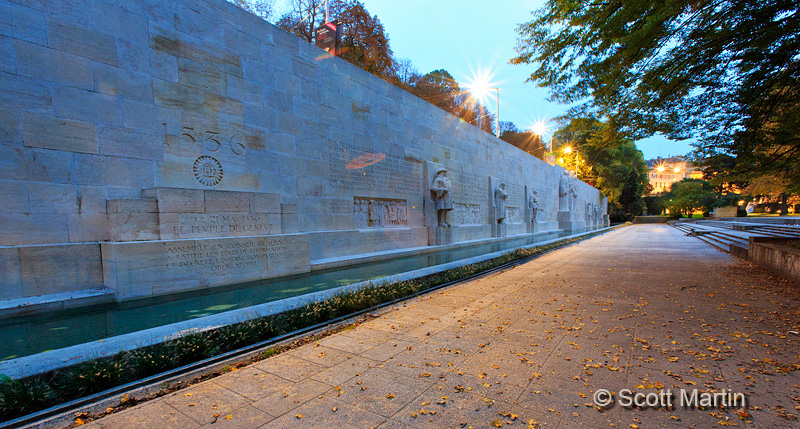
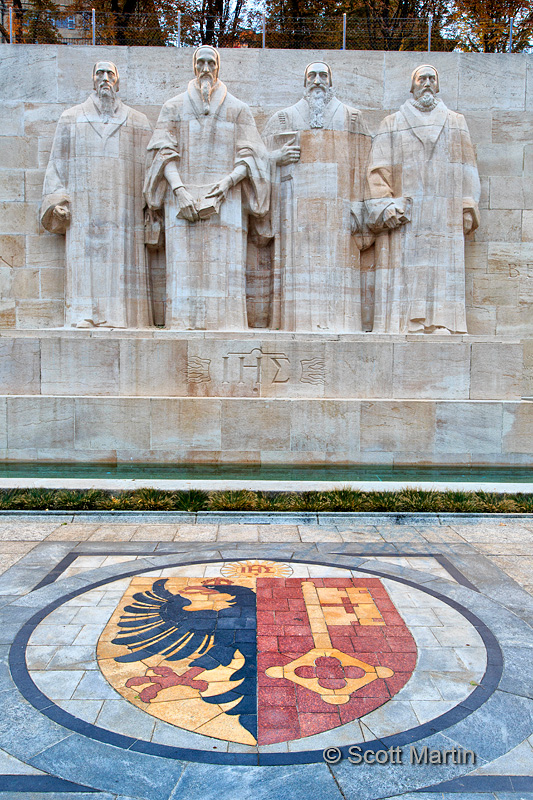
The reason we visited the university was to see Reformation Wall which is a 100 metre long monument built into the side of the old wall of the city of Geneva. Reformers Wall was constructed in 1909 to commemorate the 350th anniversary of the founding of the University of Geneva by John Calvin on June 5, 1559. The wall features ten prominent theologians of the Reformation period in the mid fourteenth century. Although John Calvin is noted as the founder of the university, he is best know for his role in the Protestant Reformation initiated by Martin Luther who nailed his Ninety Five Theses on the door of his church on October 31, 1517, a document that ‘protested’ (hense Protestant) the theology, doctrine and structure of the Roman Catholic Church. In 1536 John Calvin published his opus “Institutes of the Christian Religion”.
In the centre of Reformation Wall are statues of (from left to right) William Farel, John Calvin, Theodore Beza and John Knox that stand 16.5′ high.
Although the above image may look like it was taken on a dull day, it was really taken in the virtual dark and is a 25 second time exposure.
I trust you have enjoyed these few images from Innsbruck and Geneva. It was unfortunate that we couldn’t spend more time exploring these two cities but it is impossible to fit everything into one trip! After one night in Geneva we headed to Paris where we spent almost three days and took enough photographs to supply the material for more than one blog post.


Follow Scott Martin Photography