In October Deb & I were able to free up five days and get away to visit one of our favourite places – California – and more specifically Deb’s favourite spot in California, Huntington Beach, which is located on the Pacific Coast about 40 miles south of Los Angeles along the Pacific Coast Highway.
From a photographer’s perspective The Golden State offers a plethora of opportunities amongst some of the most varied subject material anywhere in the world. We will see but a few of them in this post. The interesting thing about this trip was that for the first time since I was a teen, I didn’t have an SLR or DSLR with me, instead using a mirrorless Fujifilm X-E2 body with an array of six lenses ranging from 8mm to 200mm in focal length. This new Fuji system is arguably one of the best travel camera gear set ups available today as the image quality rivals that of any professional DSLR system and is significantly smaller and lighter, two valuable premiums while travelling. In fact, the X-E2, six lenses and all the associated trinkets (SD cards, Intervalometer, spare batteries and charger) easily fits into my Crumpler Six Million Dollar Home shoulder bag and weighs in at about one third of what the comparable Canon gear weighs. Needless to say, all of the images in today’s post were taken with the X-E2 and I will try to select some images taken with each lens. Although this post is not designed to critically evaluate the Fuji X-mount system, I trust it does give you a flavour of what the camera is capable of, which is impressive, and although it will never replace the Canon gear, it does provide a very capable adjunct to it.
Heading north from LAX along the Pacific Coast Highway you first encounter Marina Del Ray, Los Angeles’ largest marina. On the north side of the marina is the start of Venice Beach which seamlessly runs into the Santa Monica beach and its very famous pier.
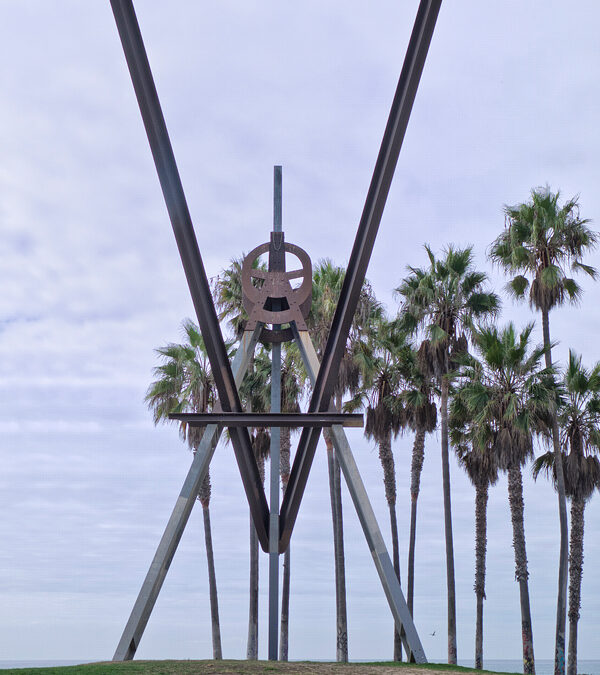
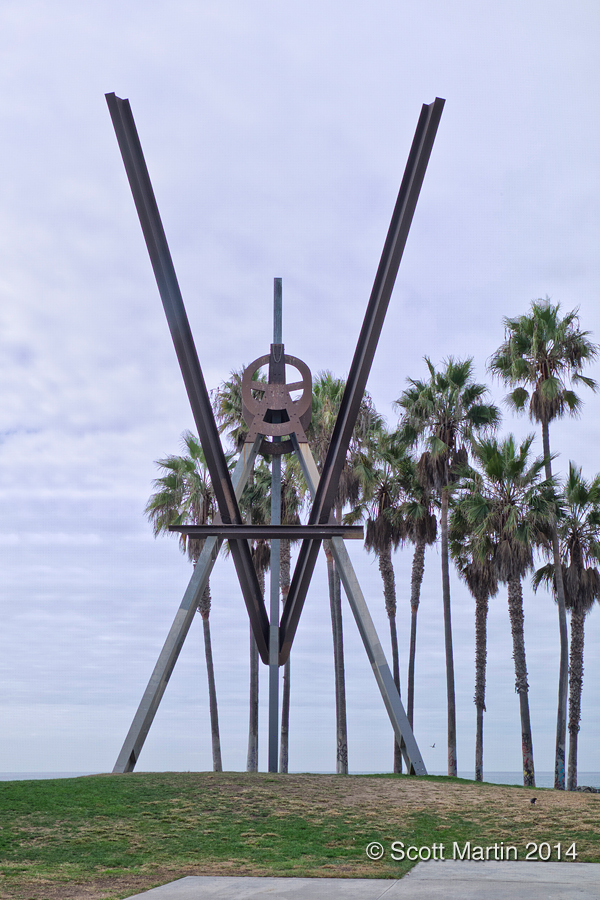
The well known Venice Beach Logo staking its claim to the beach.
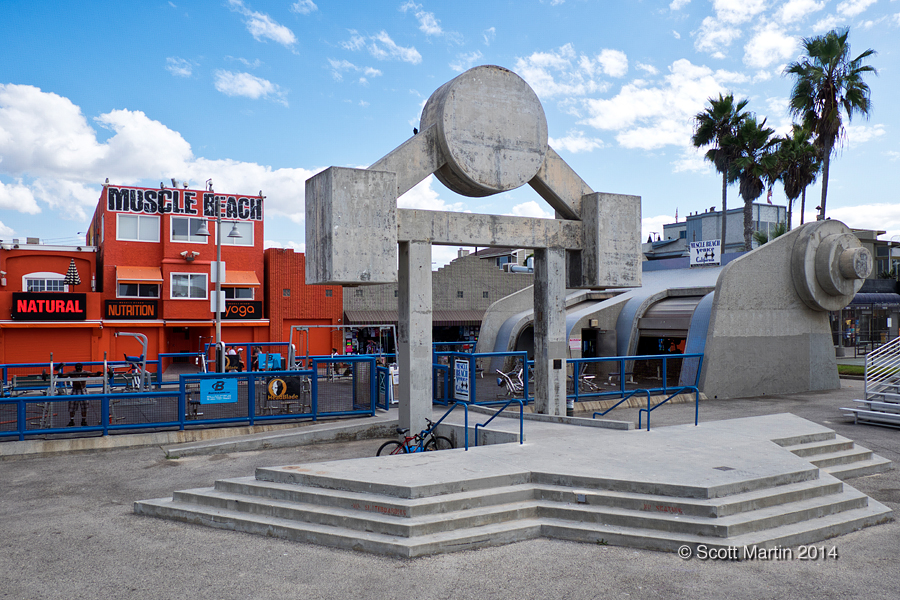
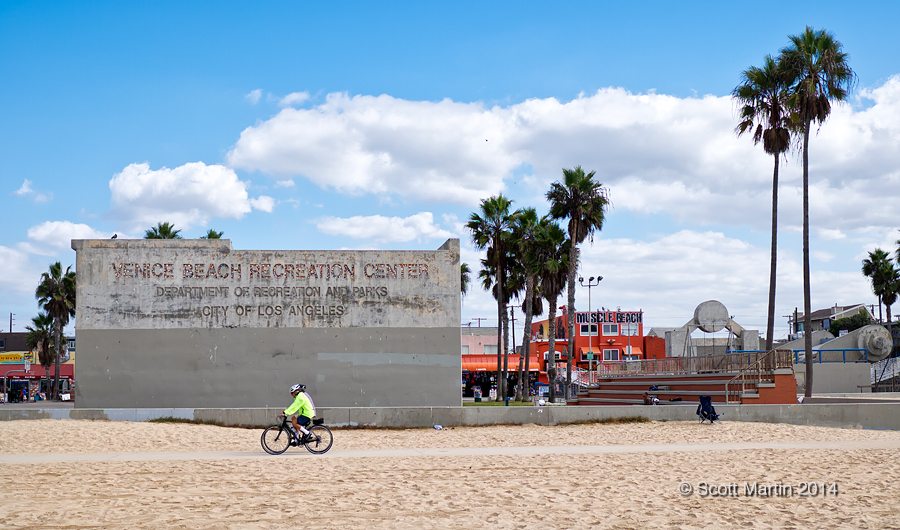
Venice Beach is one of the most eclectic beaches in the world and attracts people of every conceivable stripe which creates a most unusual beach side community. It is also famous for Muscle Beach which is an outdoor, on the beach, weight training facility started in the 1930’s (just south of the Santa Monica Pier) and relocated to Venice Beach in 1950.
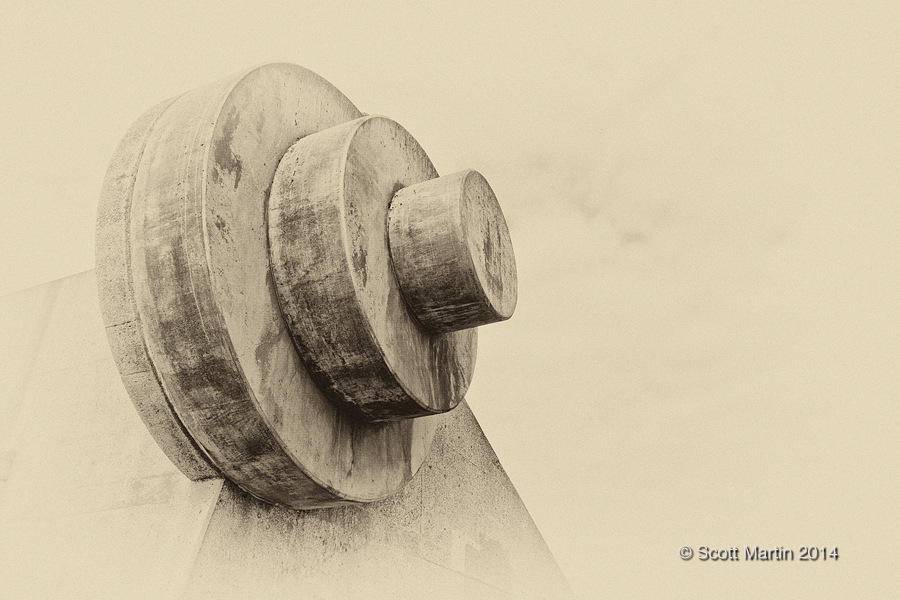
An artistic impression of the stylized concrete bar-bells at Muscle Beach.
Hundreds of small shopping stalls line the walkways of Venice Beach and there are no shortages of places to purchase anything that has to do with life on the beach. Sunglasses anyone?
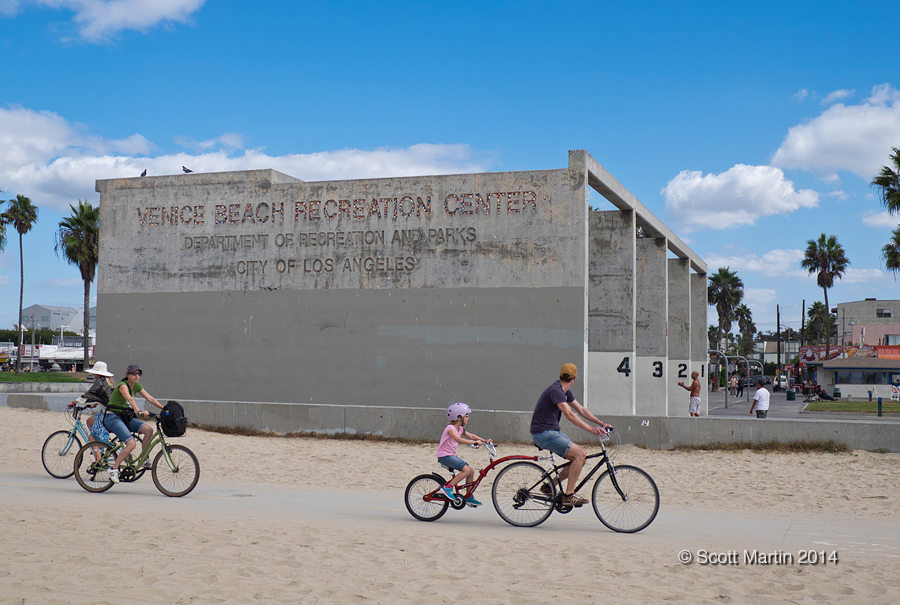
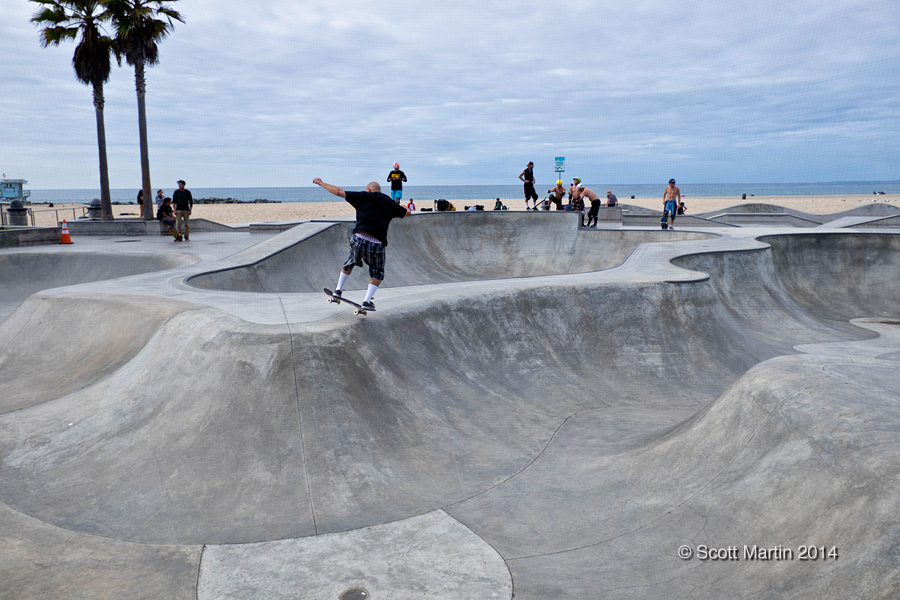
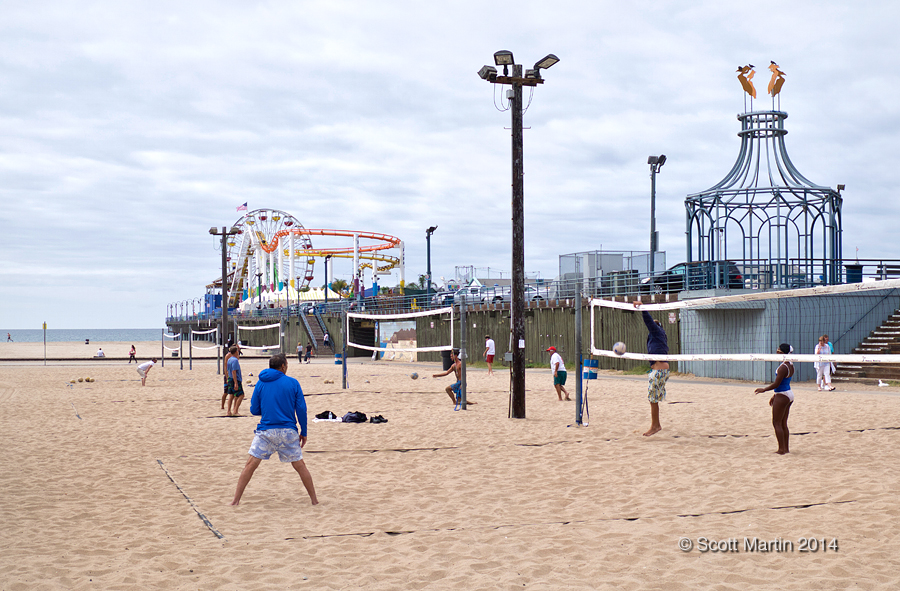
The California Coastal Beaches are exceedingly wide with perfect soft sand, so beach volleyball courts abound. At Venice Beach there are also expansive skate parks and paddle ball courts, but long before these were popular, Venice Beach had hand ball courts pictured below.
Just a quick photographic aside re these two pics of the hand ball courts. Always think about the foreground (and back ground) elements of every image you take. Doing so will improve your skills immeasurably. Although these two images will never be more than snapshots in our travel album, I waited for a number of minutes in both cases for cyclists to pass through the frame and exposed the image when they were positioned where I wanted them compositionally. The cyclists are not the object of the image but add a touch to the final result that makes the whole image a little more interesting.
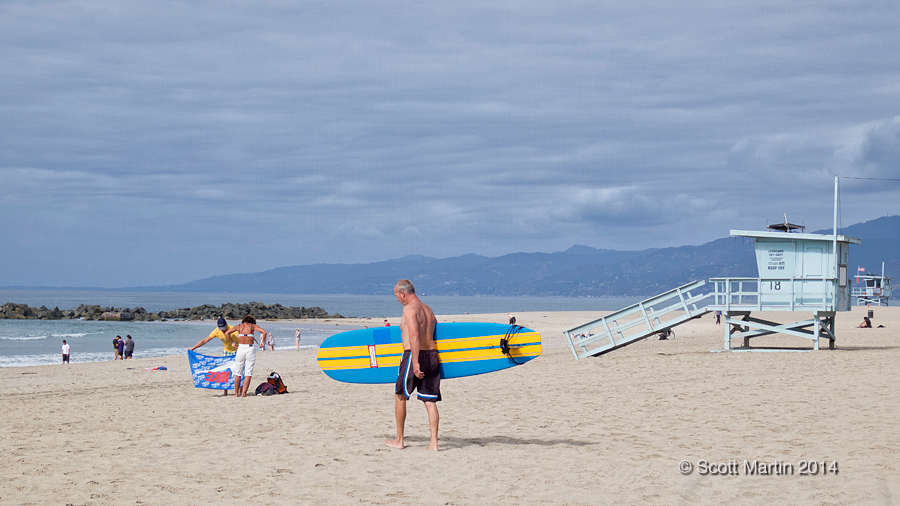
The ever present California surfer.
I think I’d rather be swimming.
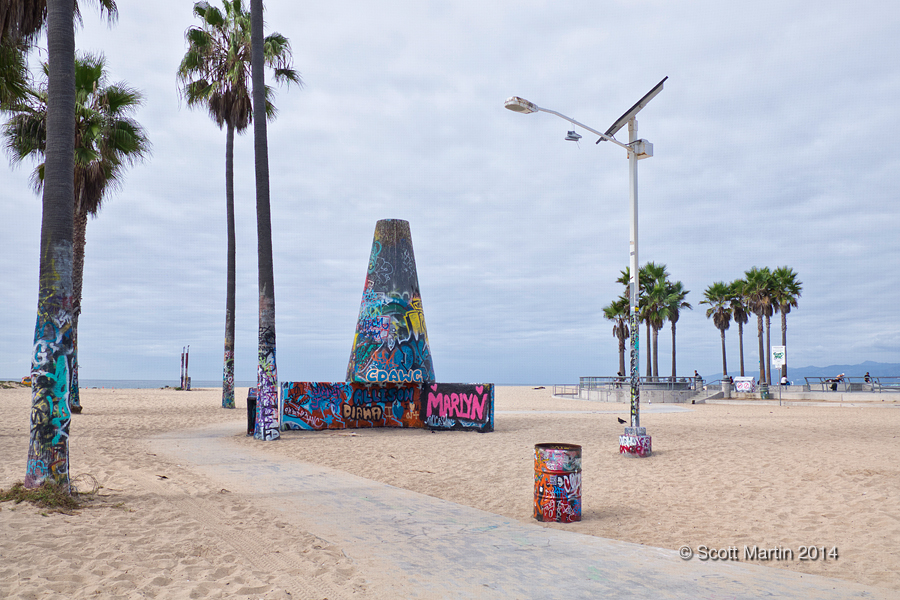
The Venice Beach area is rather devoid of graffiti, except in the designated graffiti area in which every inch of available real estate is tagged.
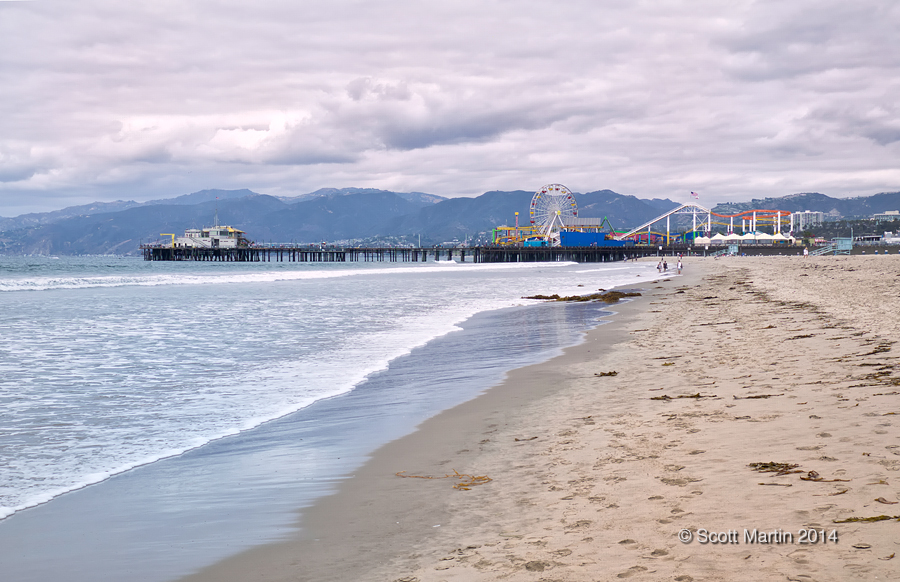
The Santa Monica Pier immediately north of Venice Beach.
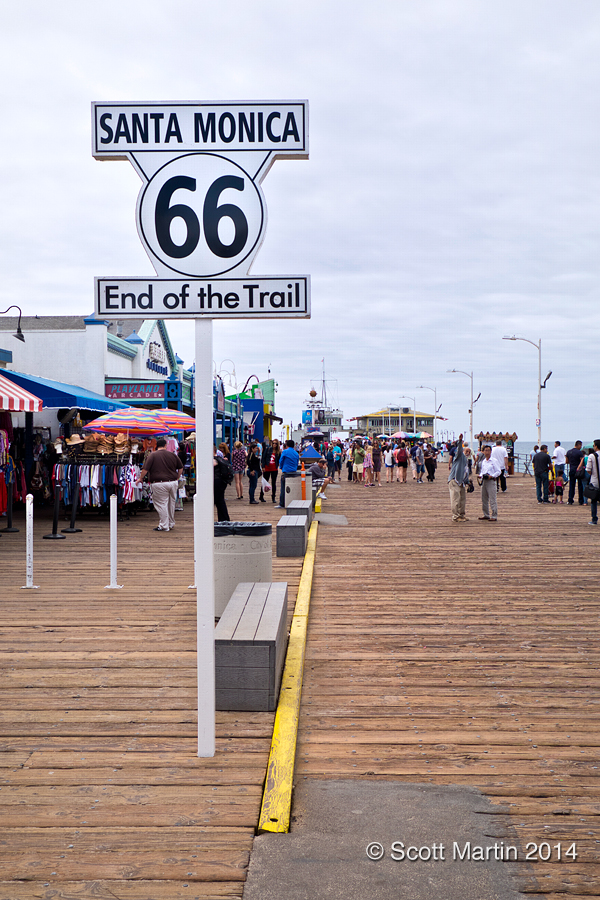
The famous Route 66 or Will Rogers Highway covers almost 4,000 km beginning in Chicago and ending on the Santa Monica Pier.
Looking out along the pier standing on the original site of Muscle Beach.
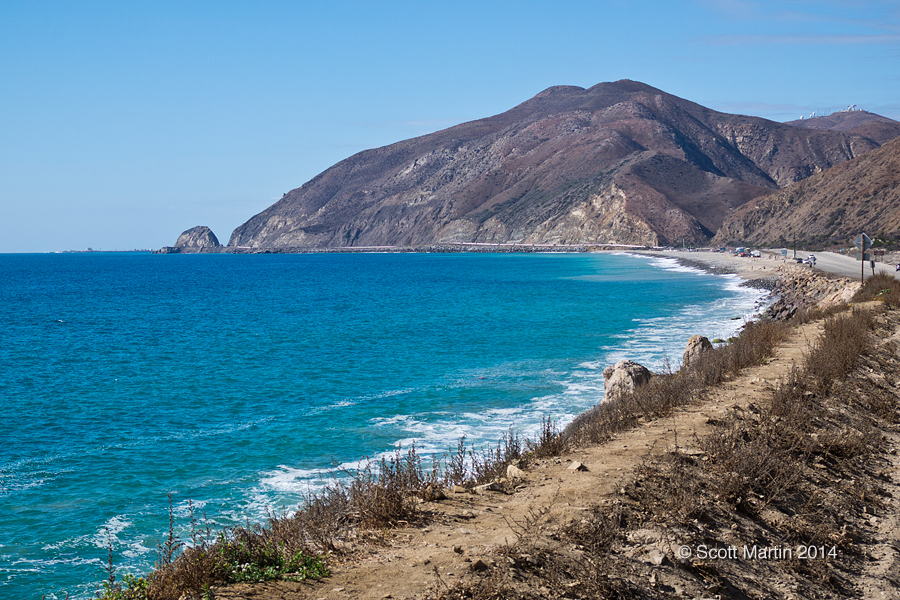
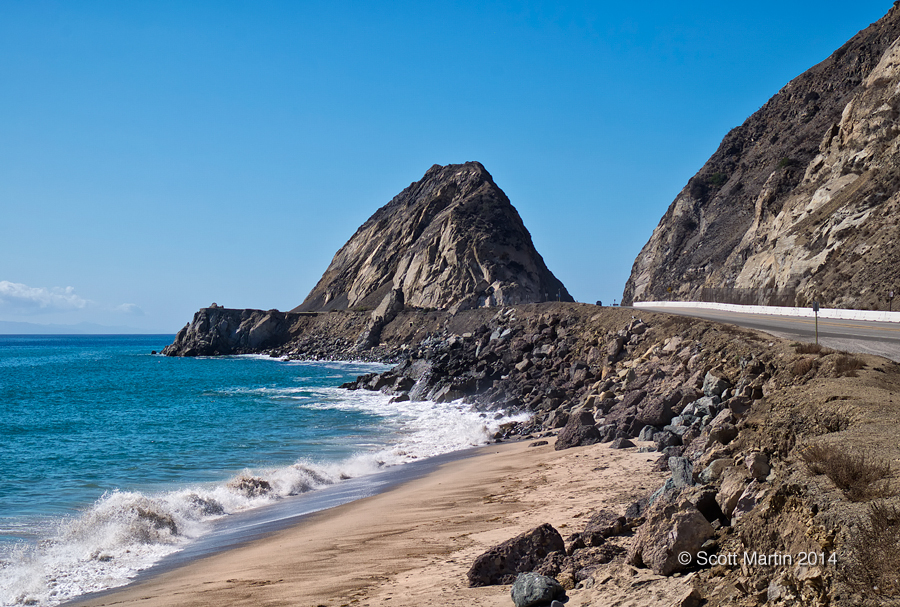
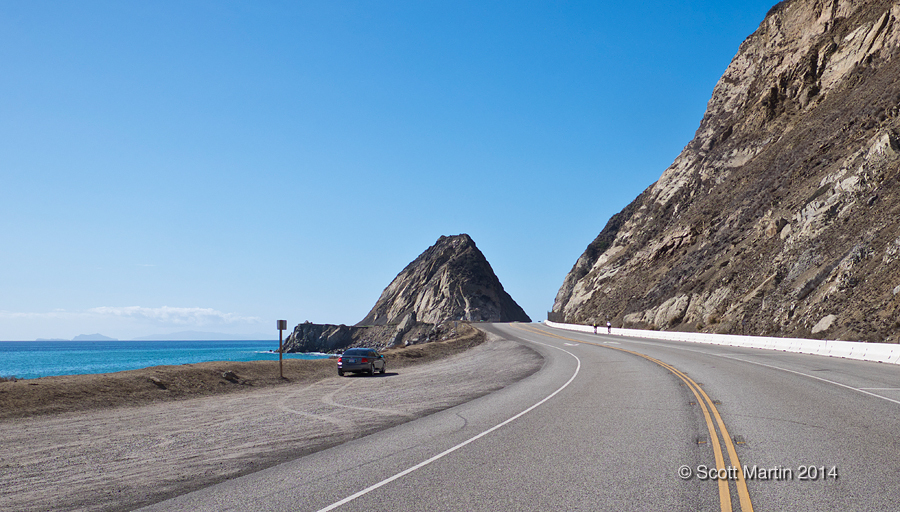
Heading north from Santa Monica you pass through Malibu with its amazing beach front properties which are home to the rich and famous. As you progress north along the Pacific Coast Highway from Malibu the urban areas transition into more natural terrain and you find one of California’s most recognized vistas, seen regularly on movies, TV shows and automobile commercials.
.
As this view is often associated with car scenes in movies and commercials, it was necessary to get an image from the road’s perspective. With Deb watching for cars I was able to catch a shot from the road.
After spending most of the day on the beaches we headed up Sunset Boulevard from Malibu and walked around Rodeo Drive, the shopping area for the uber-rich which also makes it a great place for car watching 🙂
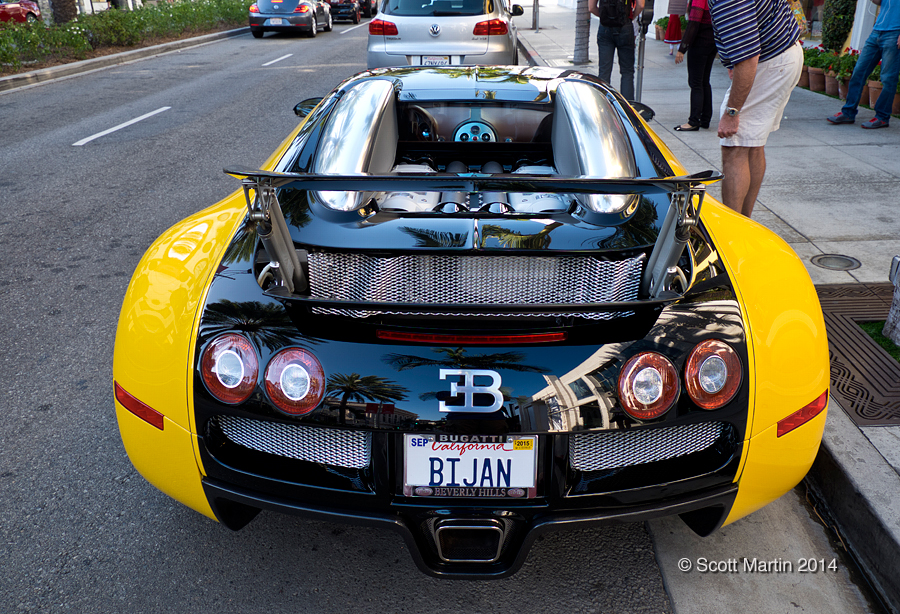
Here is a $2,000,000 Bugatti Veyron, the world’s fastest production car with over 1,000 horsepower and a top speed of 257 mph from its 8L V-16 engine with four turbo chargers.
Here is what it looks like from behind and also an image that is included solely for my great friend Arni, who I know will get a chuckle from this picture.
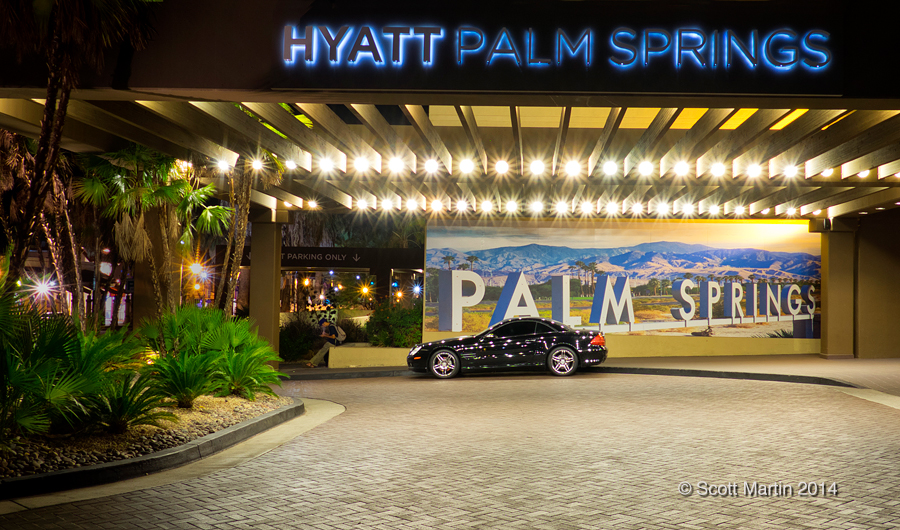
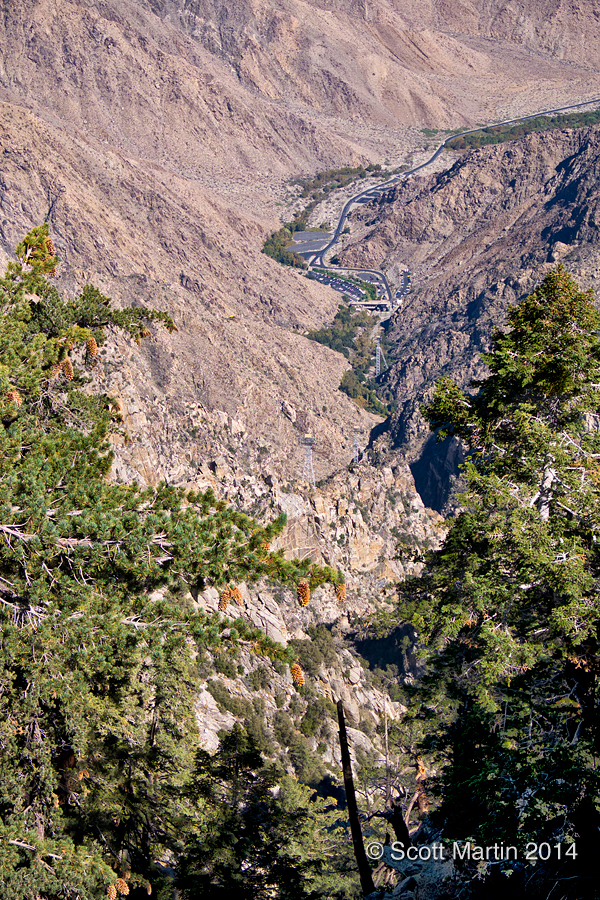
After looking but not buying anything on Rodeo Drive we headed for Palm Springs, a beautiful spot in the Sonoran Desert about 175 km east of Los Angeles in the Coachella Valley bounded on all sides by rugged mountain ranges. We arrived in Palm Springs well after dark, so the photography options were few, however here is a view of the entrance to our hotel, which was the perfect spot to stay. We had a cabana suite which was fabulous.
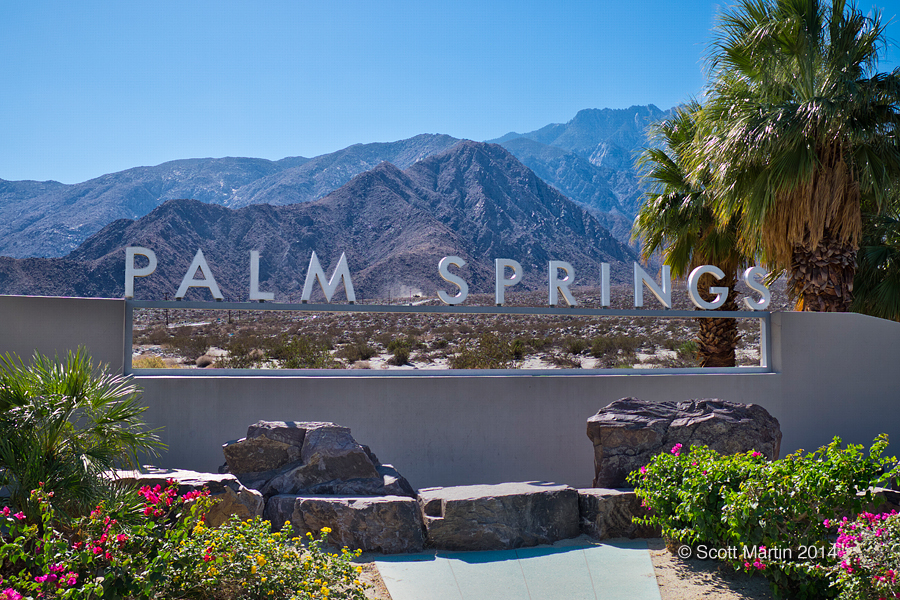
I was intrigued by the Palm Springs mural in the above shot so we set out to find it and fortunately it was very close to the entrance road to the Palm Springs Aerial Tramway which was on the agenda for our fist day’s activity.
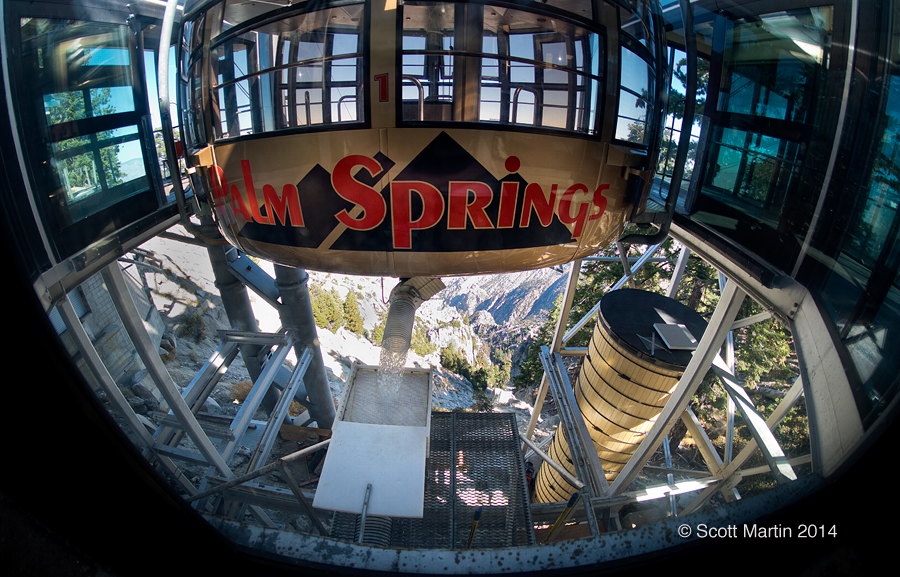
The Palm Springs Aerial Tramway is on the north side of Palm Springs and provides a wonderful eleven minute ride to a mountain peak which offers a 360° view of the region. The Tramway took over 26 months to construct beginning in 1961 and opening in June 1963. Since then over 20 million people have taken the trip to the peak. The gondolas used today are among the largest in the world with room for 80 passengers and the floor of the gondola rotates through two complete revolutions as you traverse the mountain.
The gondola docked at the summit, notice the water pouring out of the base of the tram. Hundreds of gallons of fresh water are taken to the top with every trip and stored in a large reservoir. The only source of water at the peak.
Looking down to the valley from the tram.
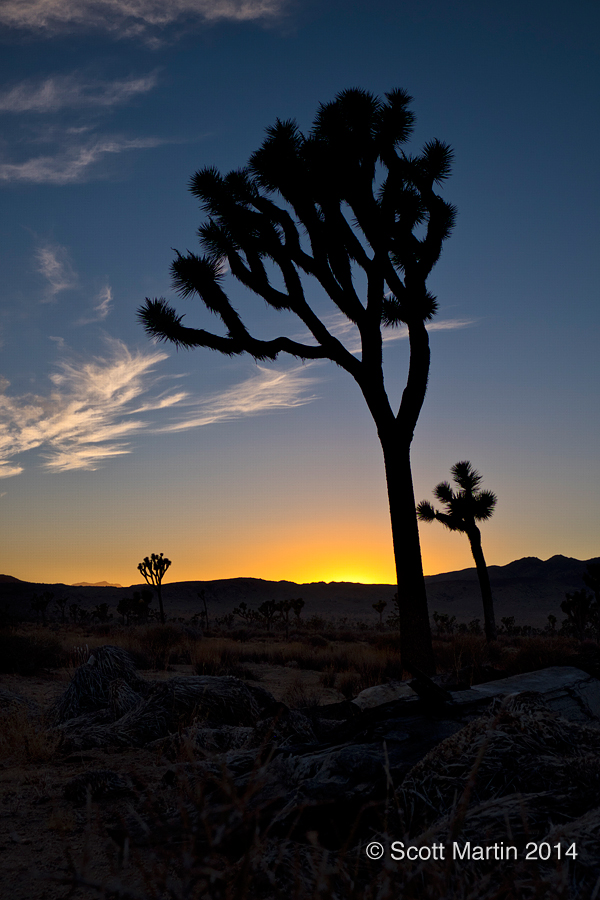
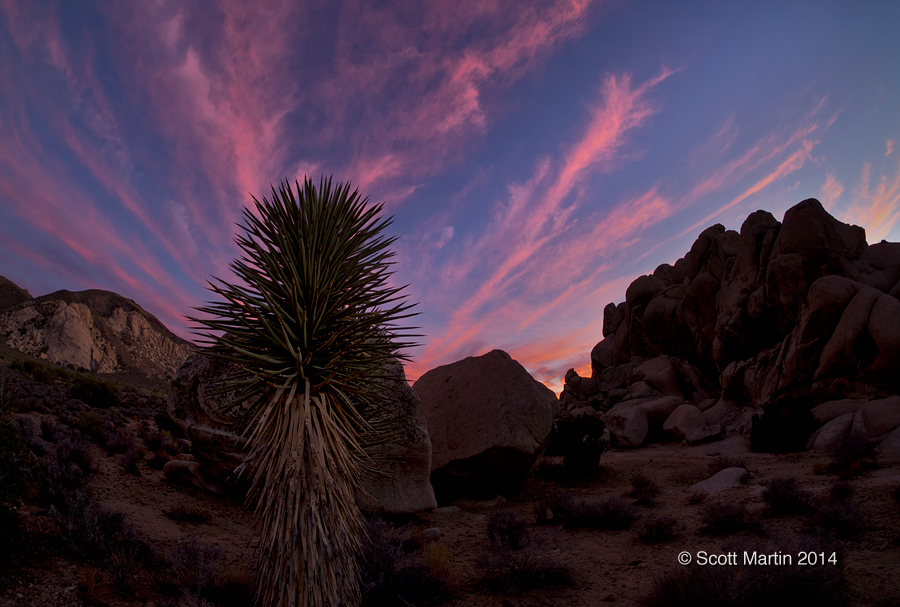
One of our favourite places to hike is in Joshua Tree National Park which is about an hours drive east of Palm Springs. This year we were able to watch a beautiful sunset inside the park in an area where the Mojave & Colorado Deserts converge. The first image is just after sundown with the silhouette of a Joshua Tree, which is not really a tree nor a cactus, but its own unique plant.
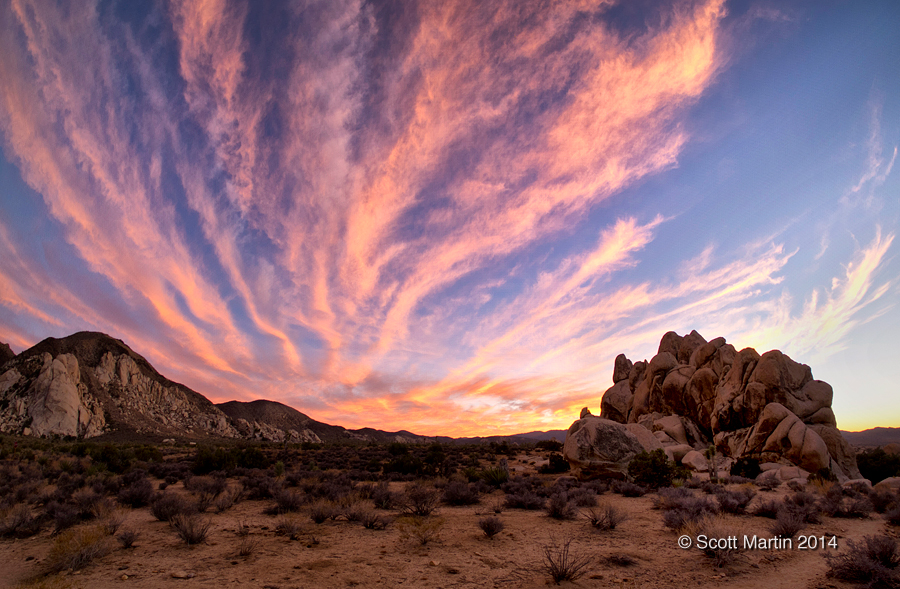
The use of a fisheye lens with its unique distortion pattern and 180° FOV (field of view) makes for some interesting cloud formations.
.
Leaving Joshua Tree National Park we headed west for the 150 km drive to Huntington Beach on the Pacific coast where we spent a couple of days enjoying walking the beaches and keeping our FitBits happy.
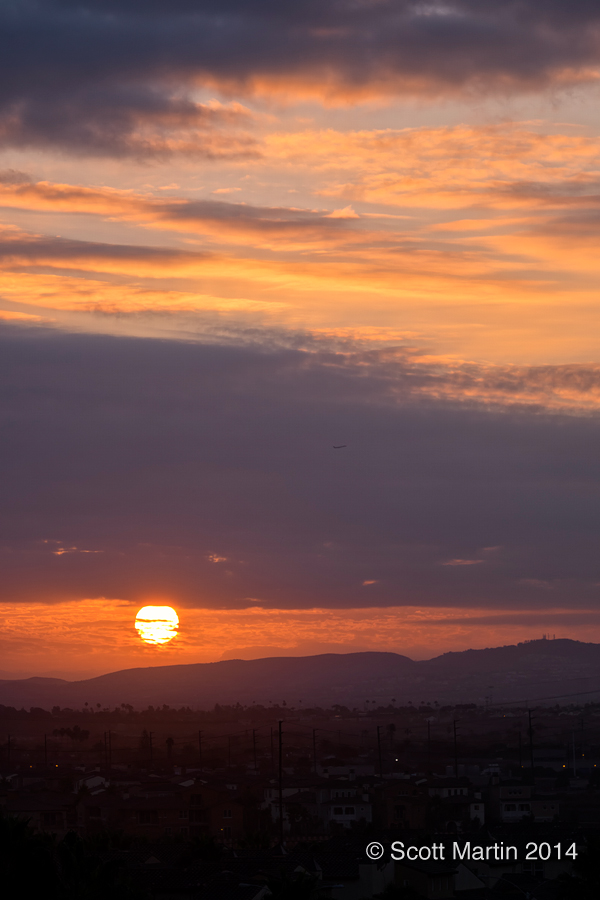
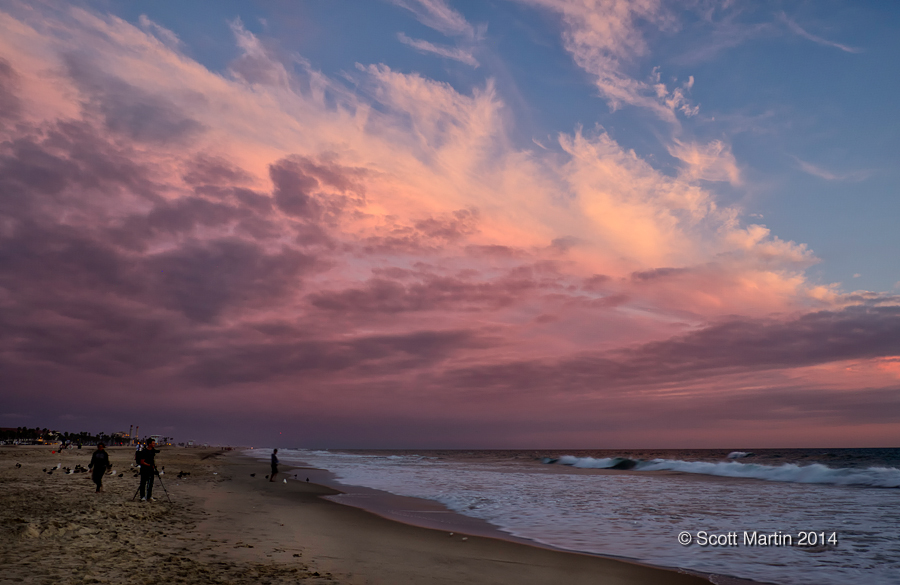
Sunrise is a very special part of each day, yet sadly an event that I miss other than while on vacation. You just know its going to be a good day when you take the time to watch the sunrise….its kind of like watching God turn the lights on for another day He has planned for you. Here is the view from our hotel room at the Hilton on Huntington Beach.
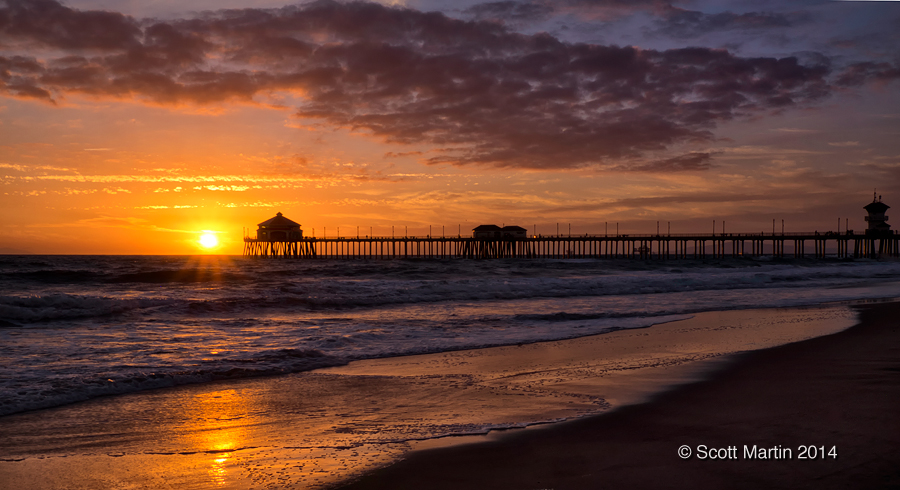
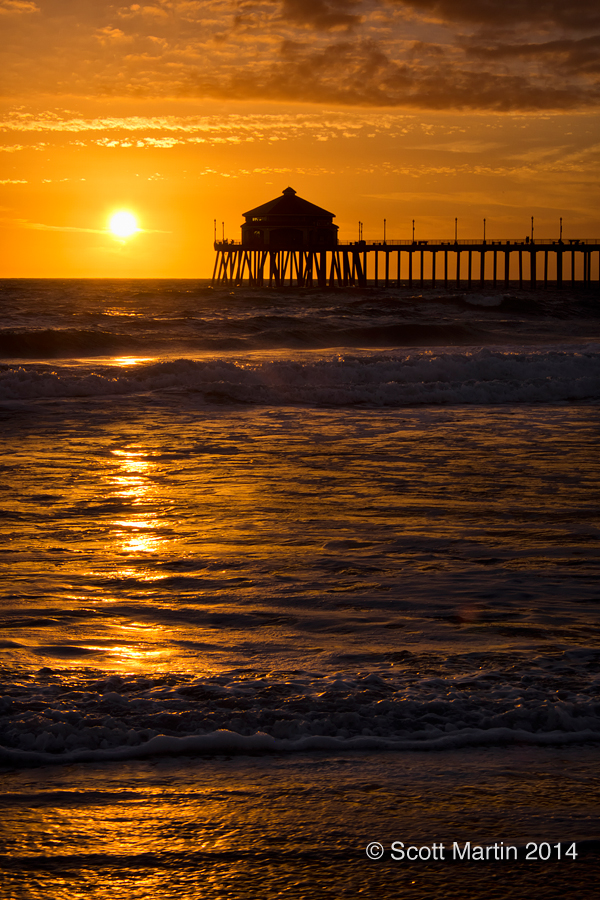
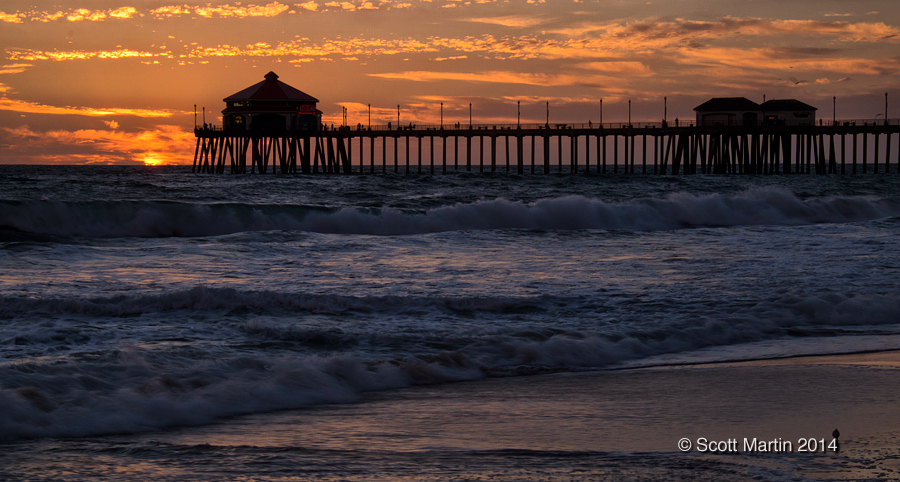
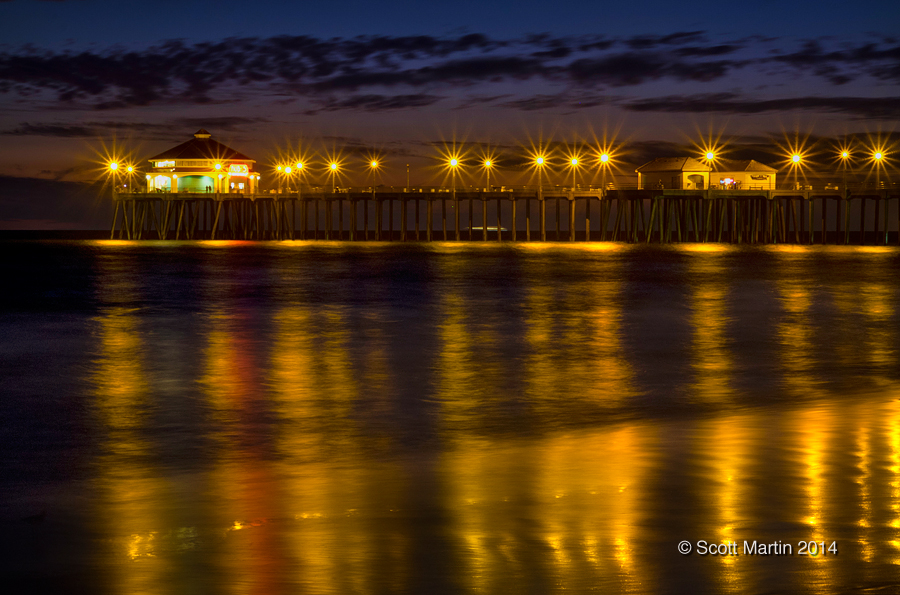
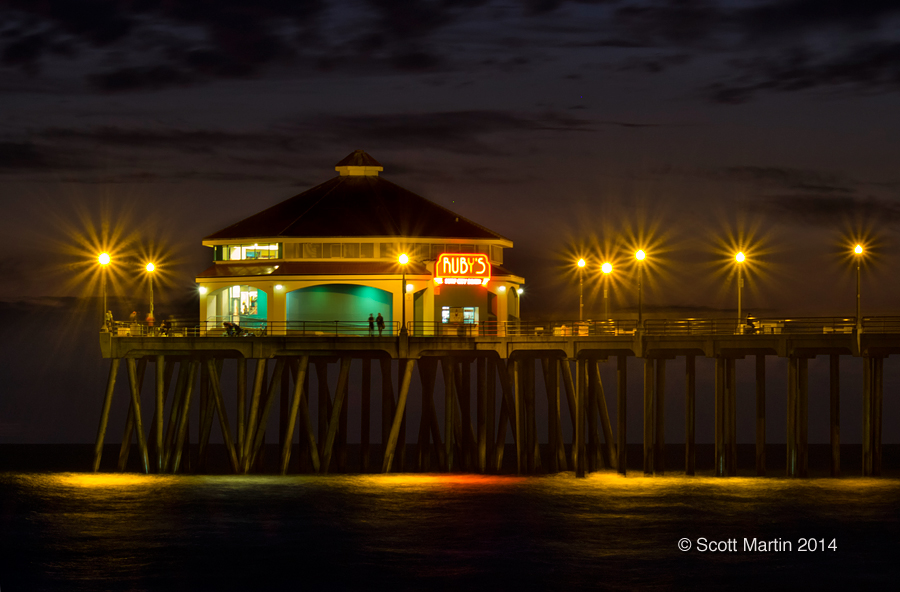
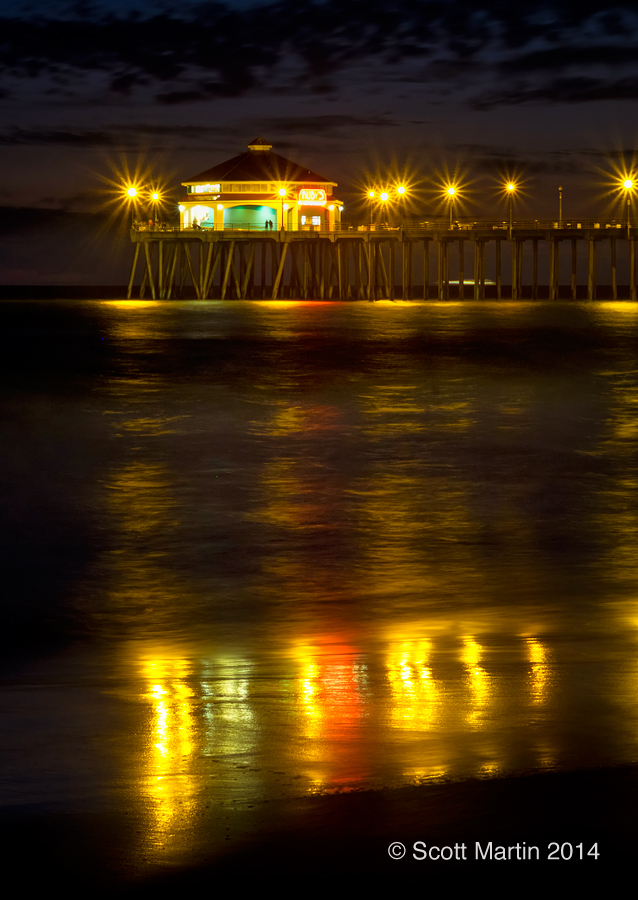
The landmark that dominates Huntington Beach is its large pier that extends well it into the Pacific Ocean and provides the perfect location for Ruby’s restaurant at the very western most reach of the pier.
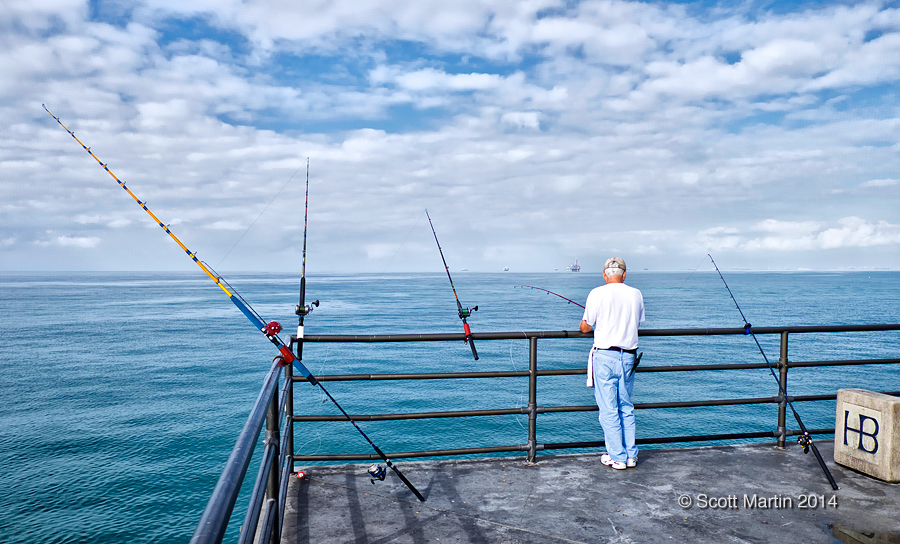
Fishermen and women line the end of the pier and although they are perched some thirty feet above the water they quite adeptly retrieve their catch although the ever-present gulls will try to take the fish from the lines while they are being reeled in. If you are an expert you can handle five lines simultaneously!
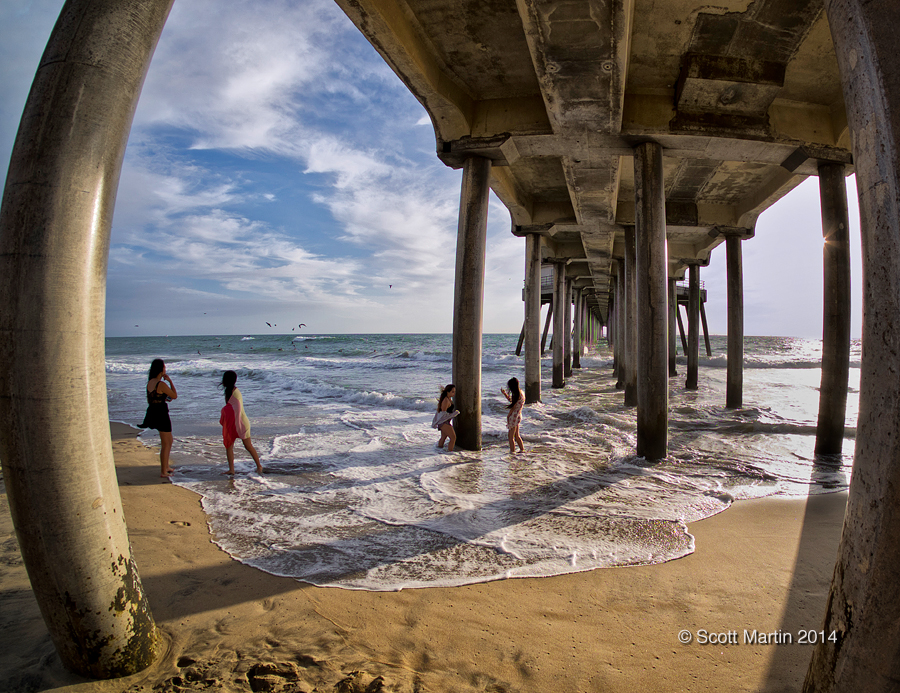
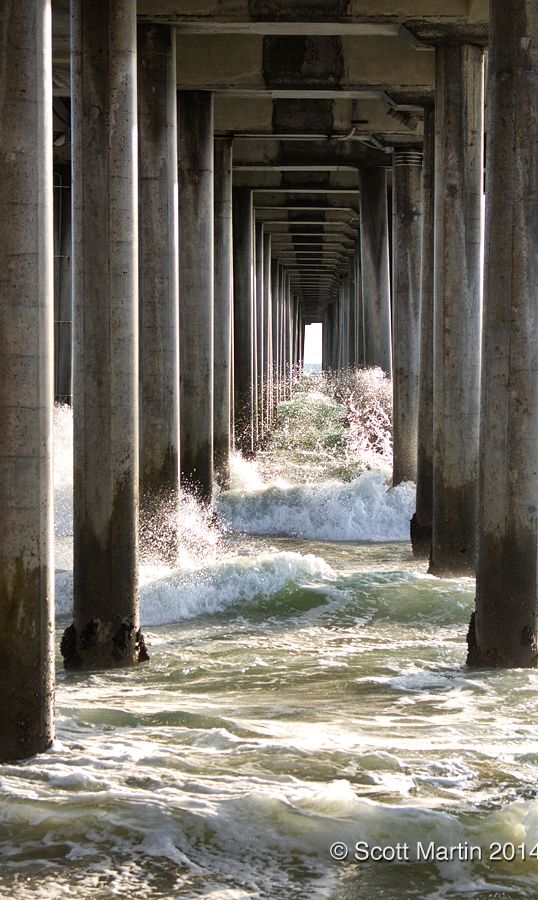
Walking along the beach beneath the pier also provided for some interesting photographic opportunities. The next two images were taken from pretty much the exact same spot, the only variable being the focal length of the lens. The first was taken with an 8mm fisheye lens and the second with a 55mm lens. They serve as a good example to always carry a number of lenses with you and when you find an interesting subject take some time to experiment with different focal lengths. The results can be surprising and tell very different stories. (A cautionary note; always be careful and minimize the likelihood of letting salt spray and sand get at your sensor when changing lenses. Face your back to the water and the wind and use a towel to create a tent around the camera. Face the camera body downwards and minimize the time the camera and lenses will be exposed to the air. Over the years Deb and I have developed a very efficient ‘four handed’ system for quickly changing lenses).
.
Just after sunset.
….and a few more of the pier.
.
Long after the sun has set. Use very small apertures (f18-22) to create the starburst effect on the floodlights. This requires long time exposures which also has the added benefit of blurring the water which helps soften the fore ground and creates reflections on the water. The number of rays emanating from the light sources is determined by the number of blades in the diaphragm of the lens (which are used to set the aperture of the lens). With lenses having an even number of blades, there is one ray produced per blade, while an odd number of blades produces two rays per blade. If you take time to count the rays in the following images you will see there are 14 rays around each light source created by the seven diaphragmatic blades in the Fuji XF55-200mm lens I was using. Have a look in the Naturescapes Gallery for a similar image taken a few years ago of the same pier with the Canon 24-105mm lens which has eight diaphragm blades producing eight rays from each light source. You will notice the effect is quite different, so based on your preference you may want to inquire as to the number of blades in the diaphragm of the next lens you buy….or better yet buy two similar focal length lenses, one with an even number of blades and one with an odd number!!
.
.
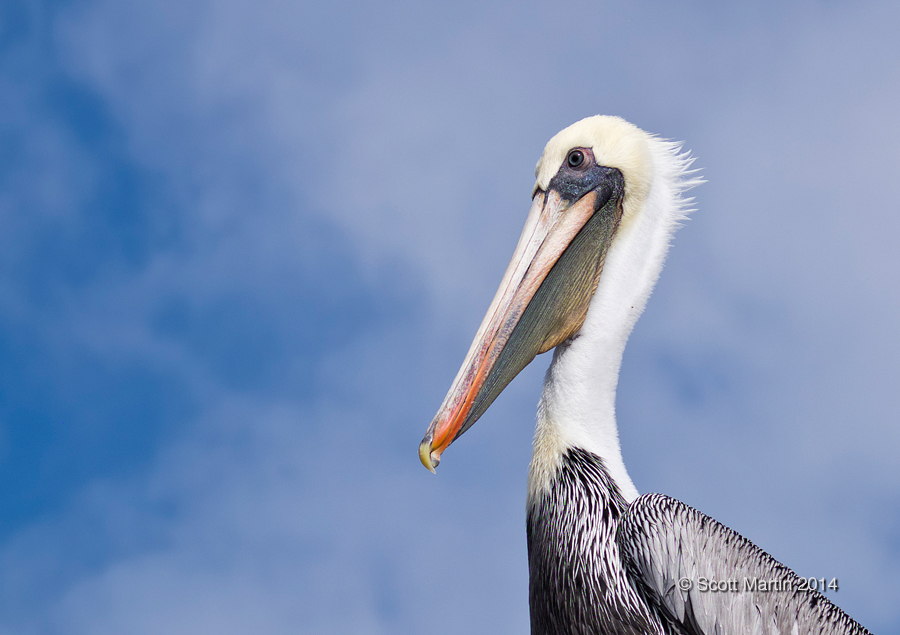
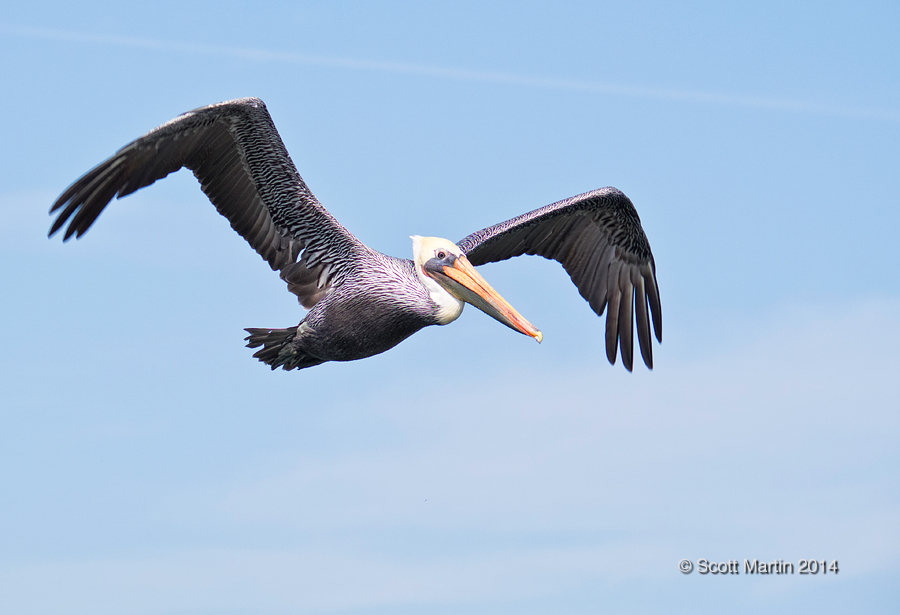
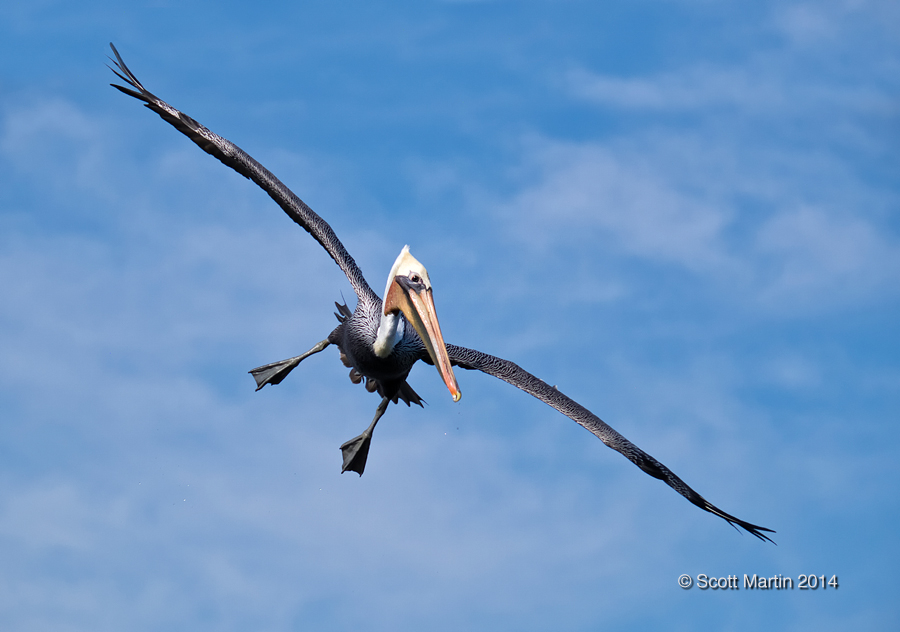
As mentioned earlier this trip was the first time I’d ever travelled without any Canon gear, which also means no specialized equipment for bird photography. For this Californian excursion all bird photography would be with the Fuji X-E2 and the 55-200mm zoom lens. We headed north to the Bolsa Chica Conservancy looking for some birds to practice with and although it was a quiet birding day there were a number of Brown Pelicans fishing in the wetlands.
Although the keeper rate was low compared to the Canon, the slow flying Pelicans did afford a few decent in flight photo ops.
.
We had a wonderful few days in California and look forward to our next trip west. Travelling with the new Fuji mirrorless camera system exceeded my expectations and I trust this blog post has given you an idea of capabilities of this type of gear. Images in this post ranged from 8-200mm focal lengths and covered a wide range of photographic challenges. I’m not of the opinion that this new breed of camera will replace the DSLR, however it does provide a superb travel gear system that is fully able to meet virtually every photographic challenge and do so with gear that is less conspicuous, much lighter and yet retains superb image quality.
I’m still a Canon guy but do like the Fuji….a lot!
Although this last shot was taken through some dirty glass windows at LAX, Deb & I enjoyed our last sunrise in California while waiting to board our plane for the rather long flight home.
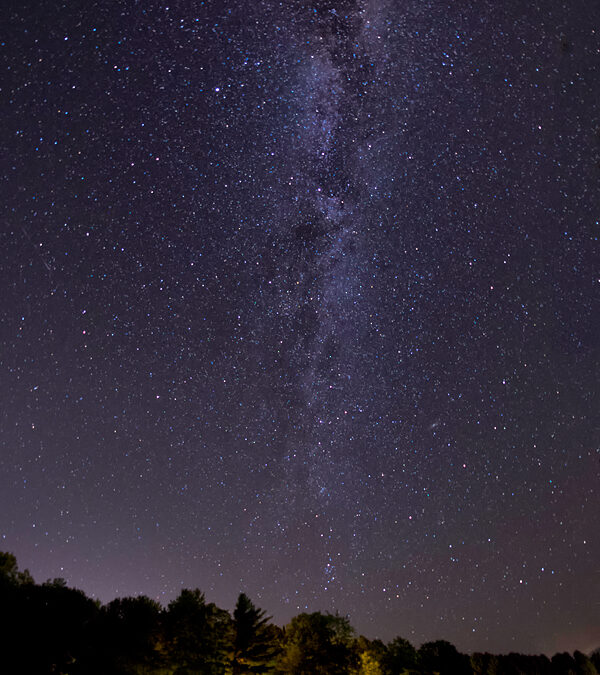
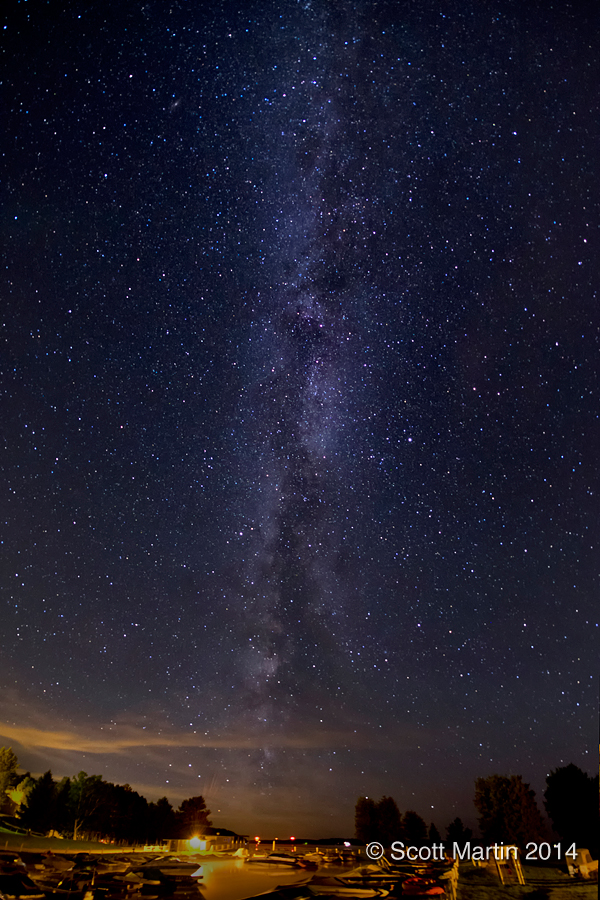
Since a young boy growing up in the Ottawa Valley, I’ve always had a fascination for stargazing and never tire of looking into the dark sky and with a sense of awe take in God’s handiwork as it stretches out across the heavens. As you take in the majesty of the Milky Way making its way across the night sky you are reminded of Psalm 19:1 which says “The heavens declare the Glory of God. The skies proclaim the work of His hands”. Although there have been years of looking upwards, it has not been until this past month or so that I’ve made any serious attempts to photograph the night sky. Today’s post will show case some of the images taken of the Milky Way and hopefully encourage you to get your camera out and experiment with astrophotography. Besides your camera, you really only need three other things to be successful; a tripod, a flashlight and coffee! This is my first attempt, taken with the tripod set up on the dock at the cottage.
The best Milky Way images have a wide field of view so you need to use your lens with the shortest focal length (a wide angle lens). As the light levels are low you also want the ‘fastest’ lens possible, meaning a lens with the largest aperture, allowing the most amount of light to reach the sensor in the least amount of time to effect a good exposure. So in terms of gear, the two most important considerations are focal length and aperture. Most of the images in this post were taken with an 8mm f/2.8 fisheye lens which has 180° field of view.
Astrophotography is also the perfect avenue to encourage you to shoot manually…. you really do need to have individual manual control of aperture, shutter speed and ISO. To top it off, you also need to focus manually!
In terms of exposure, long time exposures are required as there is so little light available. This is why a tripod is an absolute must for night time photography. Long exposures are not a problem with a tripod, however time is not always your friend with dark sky photography. As the earth rotates it effectively makes the stars appear to move across the sky and this motion is recorded in long time exposures. The stars cease to look light single spots of light but rather form star trails that get longer as the exposure time increases. So the ‘trick’ with Milky Way photography is to find an exposure time that is long enough to properly expose the image but not so long that distracting star trails form which detract from the image. To find the right exposure, photographers use the ‘500 Rule’ which states that the maximum allowable exposure time to prevent start trail formation is 500 divided by the effective focal length of the lens being used. I use the term ‘effective’ focal length as you must consider any crop factor that exists based on the sensor size of the camera you are using. So we can define the 500 Rule mathematically as Tmax = 500/(focal length x crop factor). For example, the Fuji X-E2 camera I was using has a crop factor of 1.5 rendering the 8mm focal length to function as a 12mm lens (8 x 1.5). Applying the 500 Rule we find that the maximum exposure to prevent motion blur of the stars is ~42 seconds (500/12). If I was able to use the same lens on the Canon 5D MkIII which is a full frame camera, the maximum exposure time would be ~63 seconds (500/8). If you don’t have an ultra wide angle lens, the standard zoom that comes bundled with most DSLR’s is usually in the 18-55mm range, which when used in portrait mode will still do a good job photographing the Milky Way. The maximum exposure to ensure no star trails will be 500/(18×1.5) or ~20 seconds.
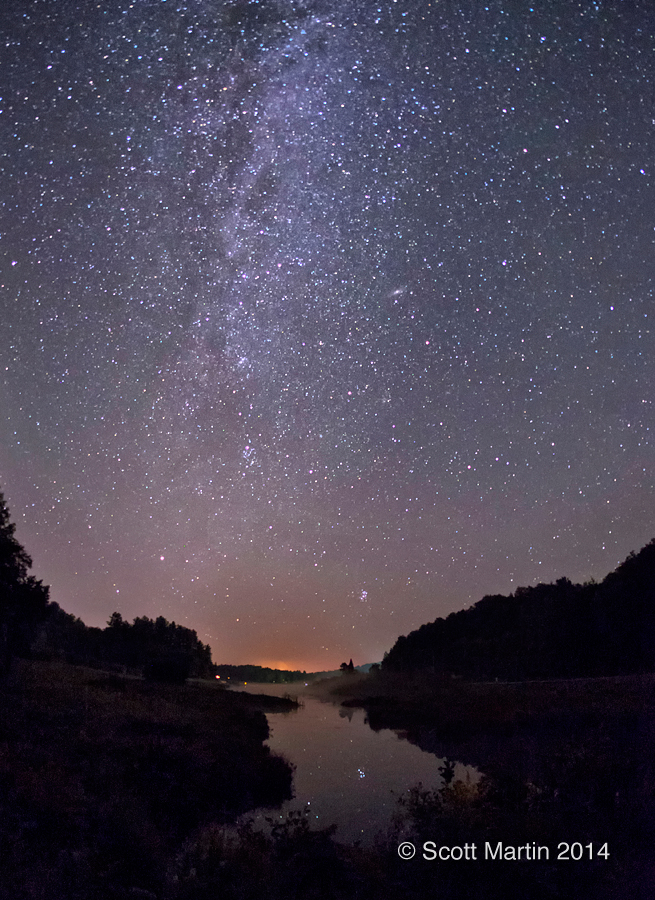
Milky Way looking down Long Lake just north of Utterson Ontario.
Once you have determined the required exposure duration using the 500 Rule, set your camera shutter speed accordingly. If the exposure is thirty seconds or less, simply set that shutter speed. If the exposure is longer than thirty seconds (the maximum pre-programmed shutter speed on most cameras) you will need to set the camera on the Bulb setting, which allows for unlimited exposure times, however you are responsible for timing the exposure. This is most easily done by purchasing a remote shutter release (inexpensive and available for most consumer cameras) or an intervalometer which also includes a timer that can be programmed for any shutter speed. The advantage of an intervalometer is that it can also be used to do Time Lapse photography and other things not possible with a remote shutter release.
We’ve talked a lot about shutter speeds for night sky photography as of the three exposure components, it is by far the most important. The next two things we have to determine are aperture and ISO and happily they are pretty simple. We set the aperture to the largest setting possible for the lens (the smallest f-stop number). For most lenses this will be between f/2.8 and f/4. This ensures the lens is capturing as much light as optically possible. ISO is the last parameter to set and we simply increase the ISO high enough to arrive at the correct exposure. The ISO effectively becomes the determining factor for the correct exposure (we’ve determined the shutter speed that can’t be exceeded and we’ve opened the lens as much as possible so we are left with the ISO as only remaining variable). The problem is that, although high ISO technology in cameras has improved dramatically over the past few years, as the ISO increases the amount of digital noise increases, especially in the shadow or dark areas, of which there are many in astrophotography. Noise is the bane of night photography and we will talk more about that in a moment.
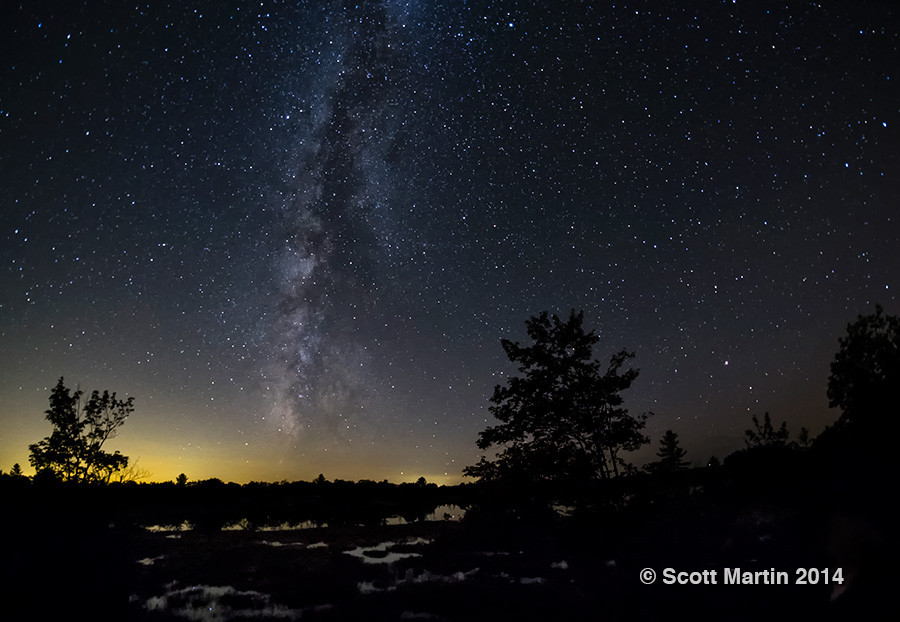
In terms of ISO, I have found that anything in the range of 2500 – 4000 will produce an acceptable result with 30 second exposures at f/2.8 on the two set ups I use for night sky photography (Canon 5D Mk III & 16-35mm f/2.8 lens and a Fuji X-E2 & 8mm f/2.8 fisheye lens). The following image was taken at a marina near our cottage with a 30 second exposure, f/2.8 and ISO 2500.
The last technical item needed to be discussed to help produce great astrophotography images is focusing. The extremely low light levels experienced during night sky photography render the electronic automatic focusing (AF) systems useless. Most electronic AF systems work by looking for adjacent areas of high contrast and then focus the lens to make the demarcation between adjacent areas of differing contrast as sharp as possible. To solve the low light focussing problem, most modern digital cameras fire an AF assist beam before the exposure which is usually in the form of a red beam of vertical lines, which project on to the object being photographed. This creates a series of adjacent high contrast lines which are recognized by the AF system and allows for accurate focusing in low light. The AF assist beam may work well indoors in low light, however is of no use at all when the object being photographed is light years away! Even the objects we place in the foreground of night sky images are usually hundreds of feet away. So our only option is to turn the electronic AF system off and focus manually with the focussing ring on the barrel of the lens. We need to turn off the AF system for two reasons; it won’t work in the dark and two, we don’t want the AF system to ‘hunt’ during the exposure. (Hunting is when the AF system moves the lens back and forth through the entire focusing range trying (unsuccessfully) to focus the lens). Although the simple solution for focussing is to focus manually, we still have the problem that we can’t really see anything through the viewfinder in the dark, so we often need a few test shots to get the focus of the lens just perfect. So remember when you are zeroing in on the proper ISO to get the right exposure, always check your test shots for focus as well. Fortunately focussing in the dark is not too hard as the depth of field (DOF) at small focal lengths is very large, even when using wide open apertures. To find the right focus I typically set the focusing ring to the infinity mark on the distance scale on the lens barrel and them back off that position slightly to make sure any foreground objects are properly focused. This technique generally works very well.
Landscape orientation over Torrance Barren Dark Sky Preserve (25 seconds, f/2.8, ISO 4000)
One final topic to cover that will help improve your results is to always think about composition when photographing the stars. This may seem counterintuitive, especially when shooting in the dark and thinking about the stars, but interesting foreground elements, whether they appear in silhouette or are illuminated must be considered if you desire great photographs. This means moving around a lot in the area where you are photographing, finding the spot where the foreground elements can frame the stars to effect the most pleasing result. In the image above the tripod location was selected so the two tall trees framed the Milky Way (and the Milky Way was positioned off centre in the frame according to the rule of thirds).
When playing with composition, it is wise to take a number of different perspectives in order to arrive at the best result and that is one of the great things of digital photography, the cost is the same whether you take one or one hundred frames. Ironically that is also one of the downsides of the digital age….in the old film days, when each trip of the shutter cost $1.00, you thought a lot about composition (and all the other exposure details before taking the shot) and this cost driven pressure help keep the image quality high!
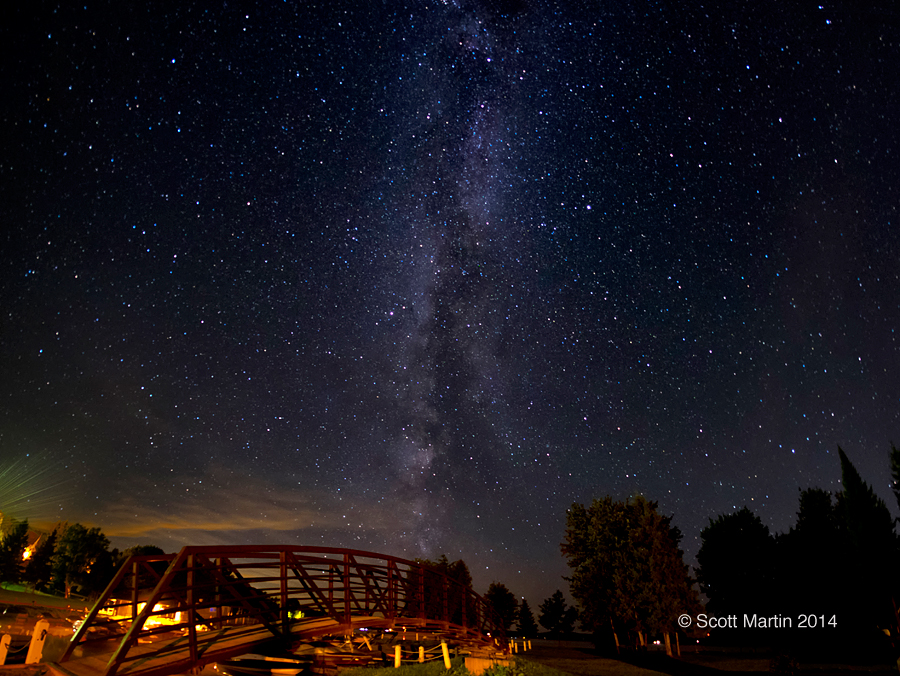
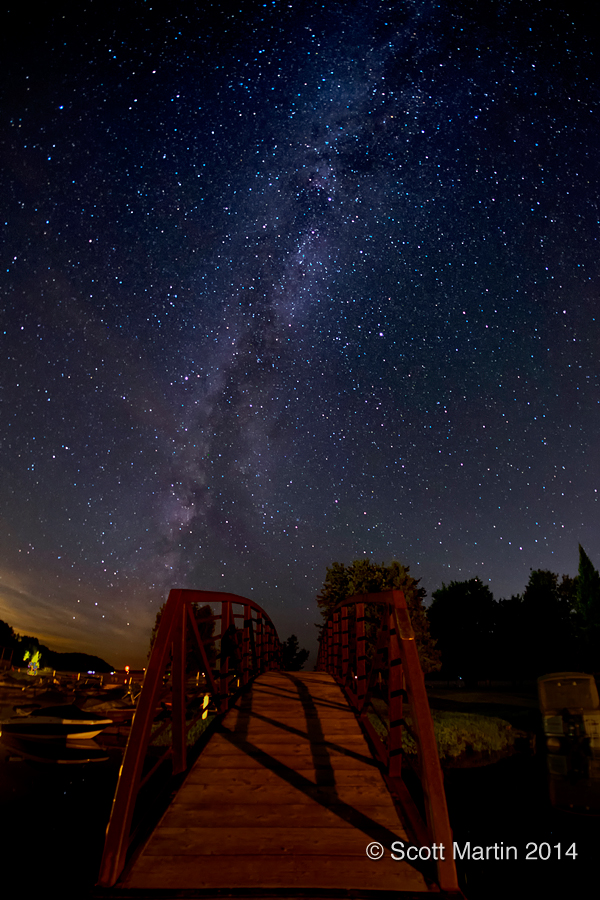
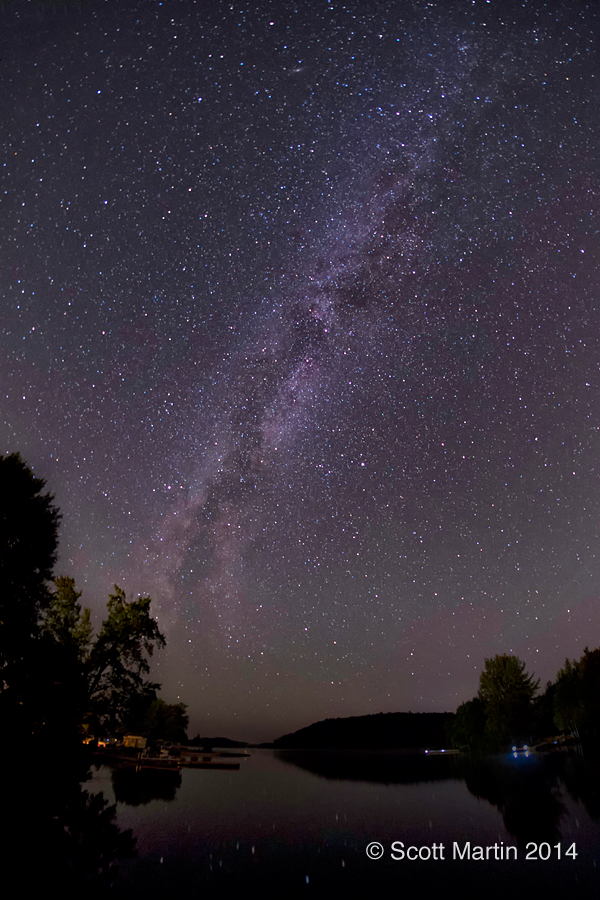
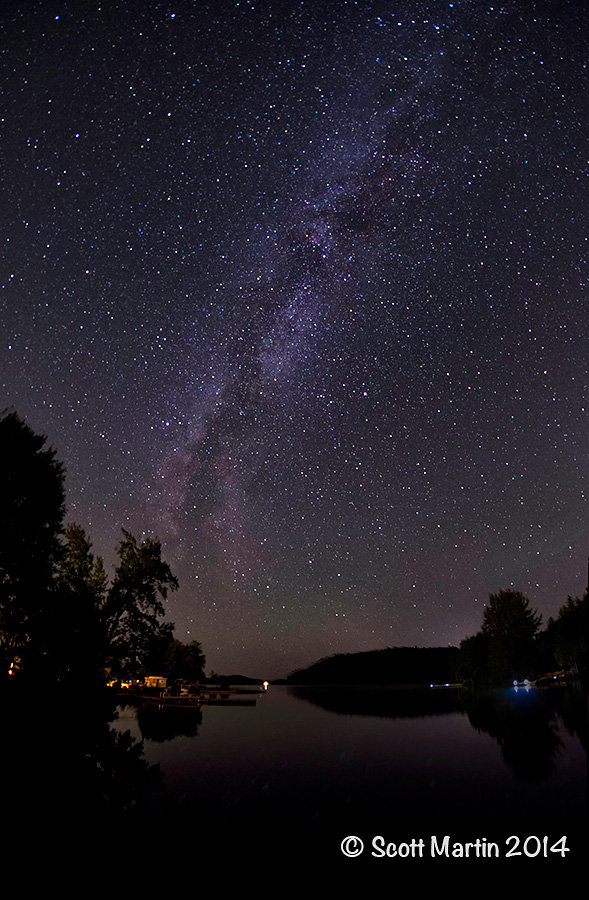
There is an interesting bridge that crosses the entrance to a marina near our cottage that provides and interesting foreground object for dark sky photography. The next three images show slightly different compositions trying to create the most pleasing result.
The first shows the bridge in three quarter perspective in landscape orientation with the Milky Way at the end of the bridge. It is probably the least pleasing image as the Milky Way is in the centre and the frame orientation reduces the amount of Milky Way in the frame.
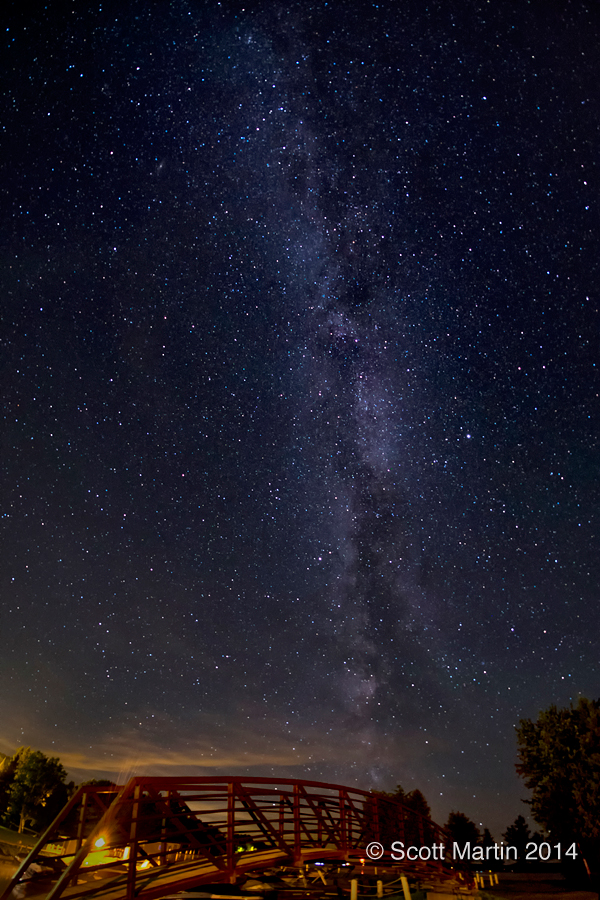
Here is the same image taken in portrait orientation. A much better result.
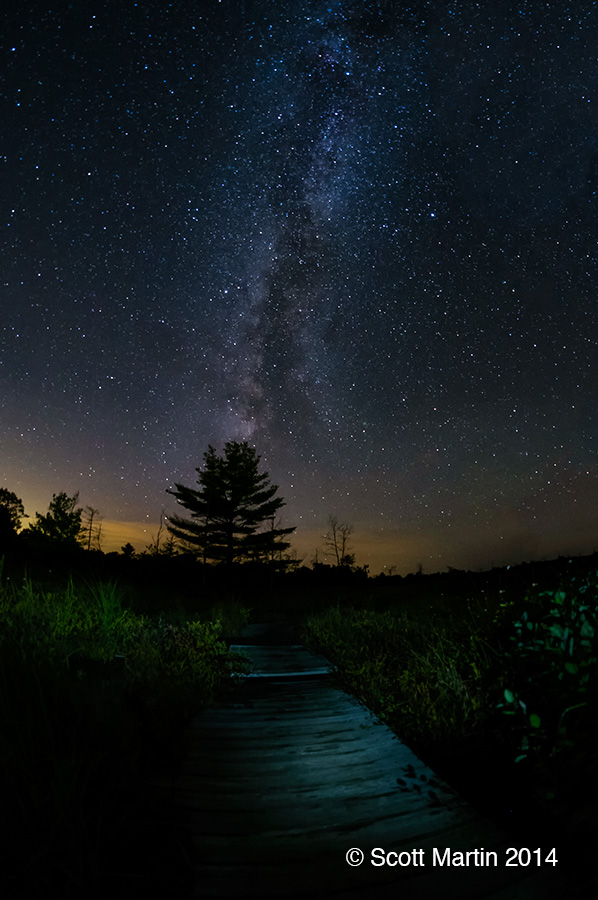
The next image is taken looking directly down the bridge and giving the appearance that the bridge is leading you to the Milky Way that awaits at the other end. This is the best image of the group (IMO) and hopefully a good example of always thinking about the foreground elements when composing images of the Milky Way. However photography is subjective and you may disagree….please feel free to comment!
Earlier we referred to digital noise being one of the problems that must be dealt with when doing long exposure night time photography. As a general statement, digital noise is most apparent in the shadow or dark areas of an image and noise increases as ISO increases. Photographing the Milky Way always requires high ISO’s as the exposure time is limited by the 500 Rule (otherwise we would simply use a low ISO and longer exposure time to reduce noise). A more detailed discussion on noise is beyond the scope of this post however I do want to show two examples of noise reduction and make some general comments on how noise reduction is achieved in most cases.
First, most good camera bodies have settings that allow for in camera noise reduction on long exposures. My experience has been that in-camera noise reduction is not as effective as the many methods offered in post processing. Also when in-camera noise reduction is employed the processing time required greatly increases the time needed to write the file to the memory card (often approaching the exposure time). For these reasons I always turn off in-camera noise reduction.
This next image is a single frame taken from the dock at our cottage. Noise reduction by Define 2, a Nik software plug-in for Photoshop. This is a one click automated function that works very well.
Another way to achieve great, perhaps the best, noise reduction is to stack multiple images and combine them afterwards in Photoshop. This is a time consuming and rather complicated process however the results speak for themselves. The following a stack of eight images (including the above image).
Compare the darkness of the sky in the stacked image as opposed to the single image. The single image is acceptable but the stacked image is much better. The one problem with the stacked image is that in the post processing I neglected to include the reflected stars in the water and I haven’t found the time to reprocess the stack to include the reflections. In any event it is good practice to take four to six of the same image when shooting at night which allows the possibility to stack them afterwards if you have a really great image.
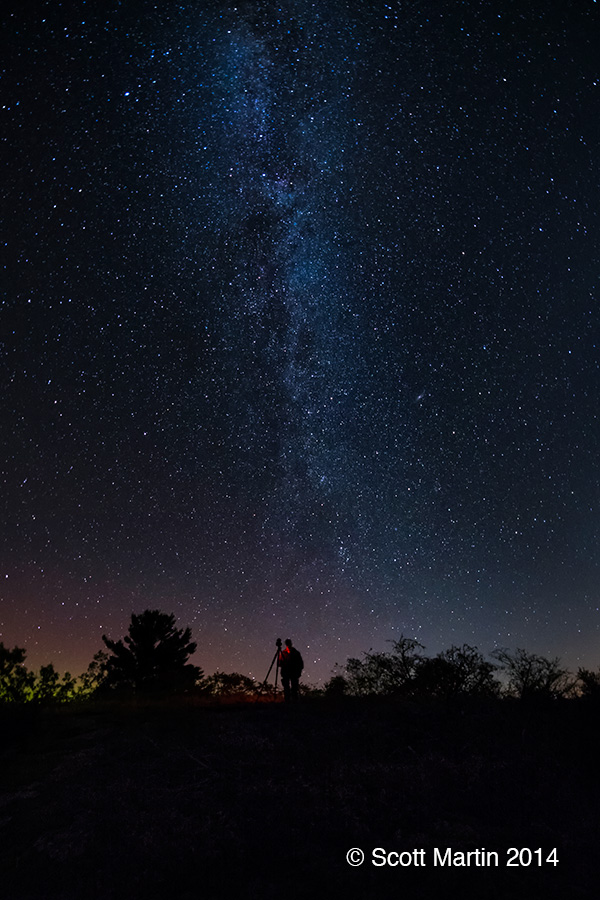
The following images were taken at the Torrance Barren Dark Sky Preserve in Muskoka Lakes Township about two hours north of Toronto by car. I met there with my good friend Arni, of ArniWorks Photography, for a few hours of night sky photography and it was a beautiful night with above zero temperatures and perfect stars. As an unexpected surprise we were also treated a beautiful display of the Aurora Borealis or Northern Lights. You can see Arni’s blog post from the evening by following this link.
Here is a shot including Arni and you can also see a hint of the developing aurora just above the horizon.
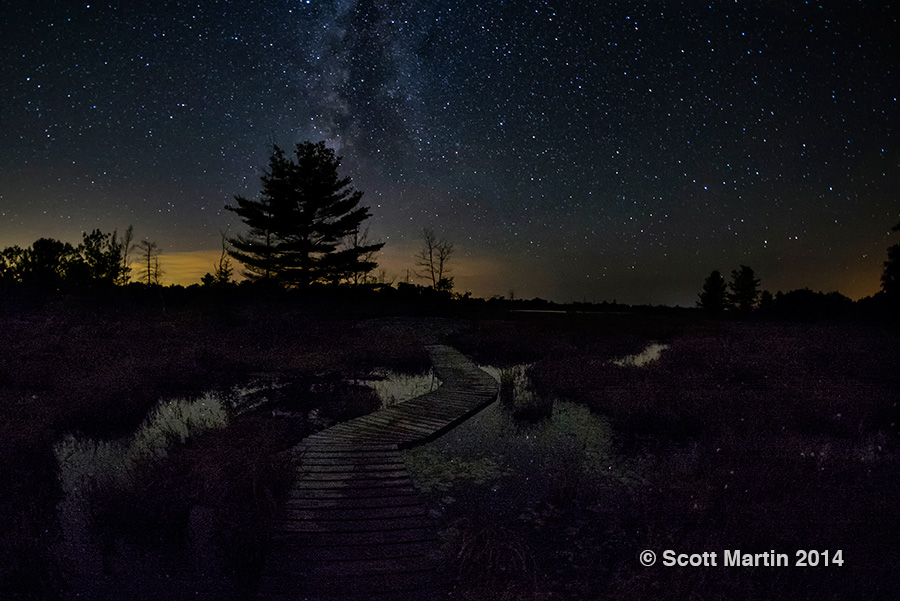
A meandering boardwalk.
Light painting is a technique that involves using a flash light or camera flash to ‘paint’ the foreground during the exposure. With a little practice it can produce interesting results, especially when you remember to be selective with your painting, using the technique to highlight certain objects in the foreground that will augment the image but never to uniformly illuminate the whole area. This next image was painted with a small LED flashlight.
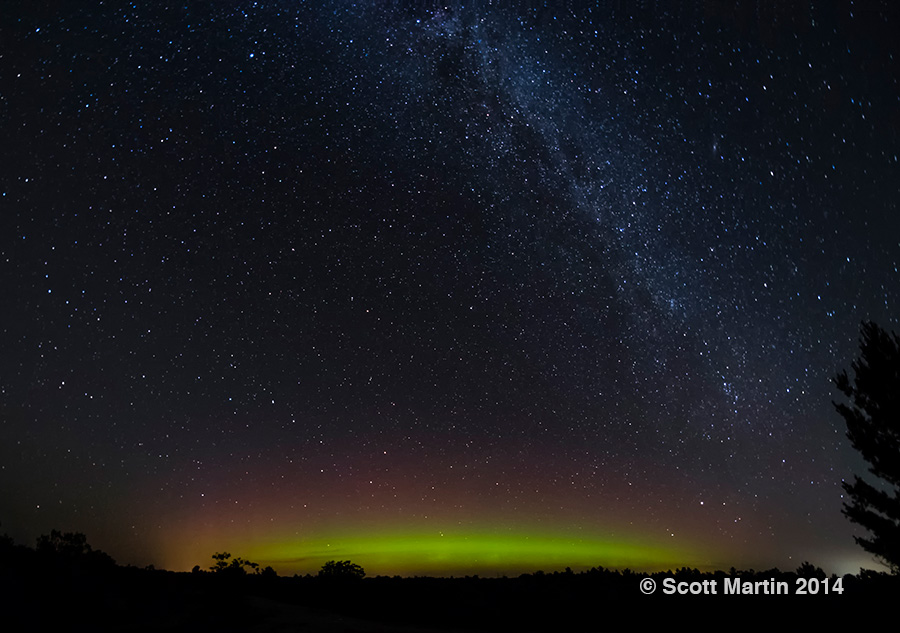
As already mentioned Arni & I were able to see and photograph a display of the Northern Lights which added a wonderful dimension to our evening and the images we were blessed to capture. This next image shows the extent of the display and you should be able to easily distinguish the Big Dipper and Polaris (North Star).
It looks good in portrait orientation as well.
I trust you have found this post helpful and if you have never taken your camera out at night, you will feel ready now to give it a try! Night photography is not as difficult as it sounds and the results can be spectacular.
There are a number of other Milky Way images (25) that can be found in the Naturescapes Gallery of the SMP website.
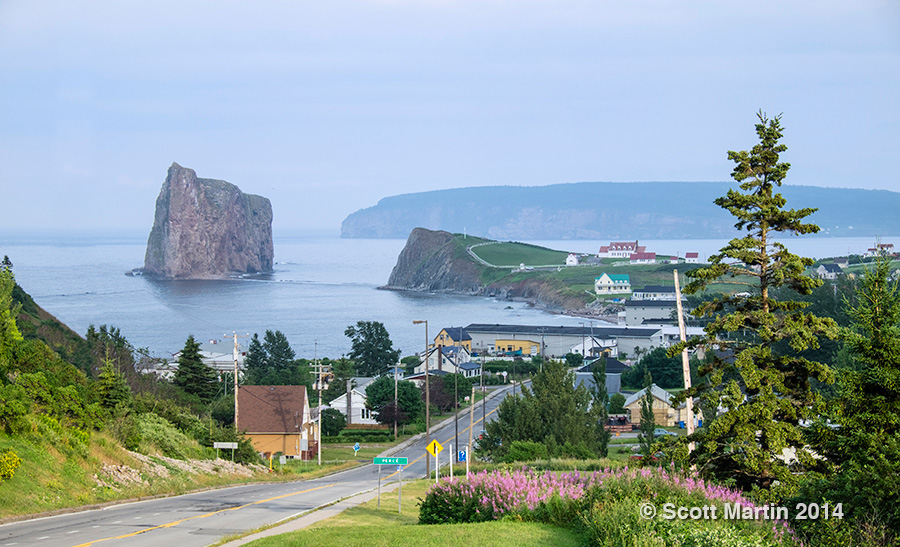
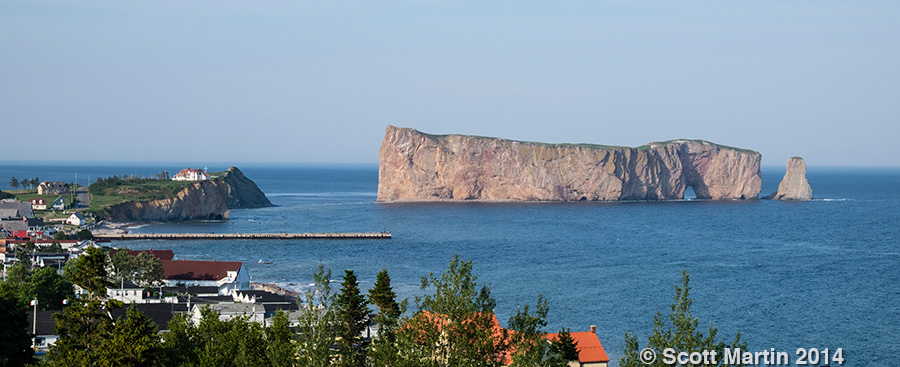
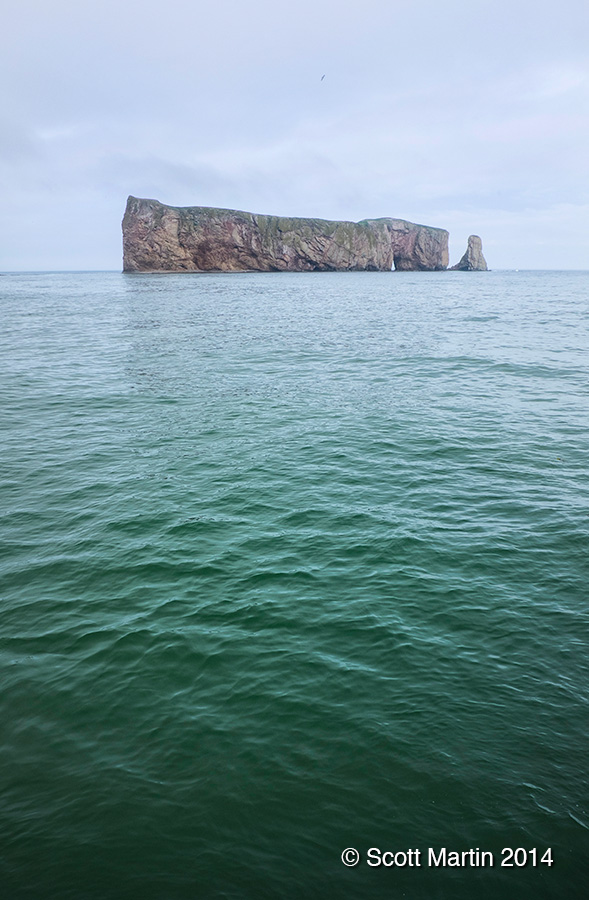
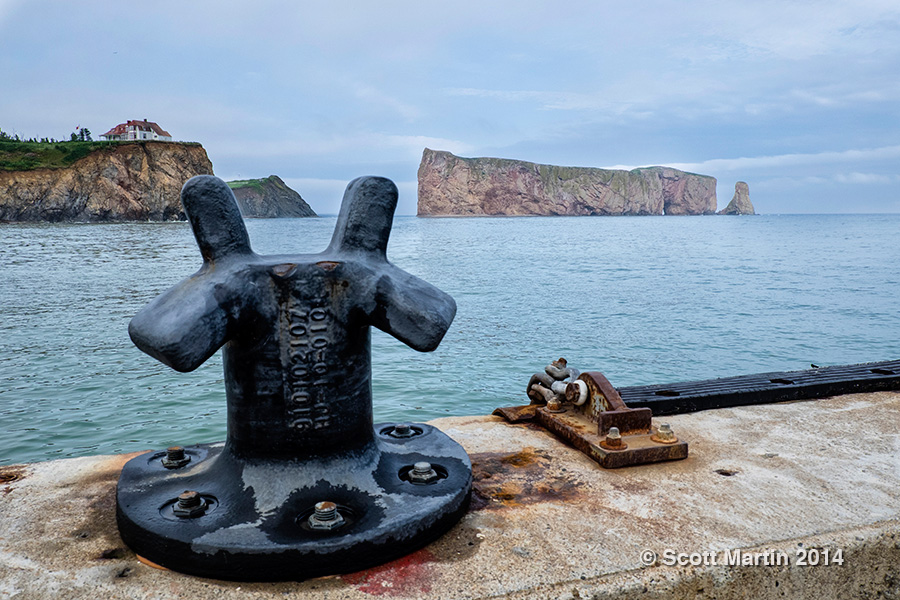
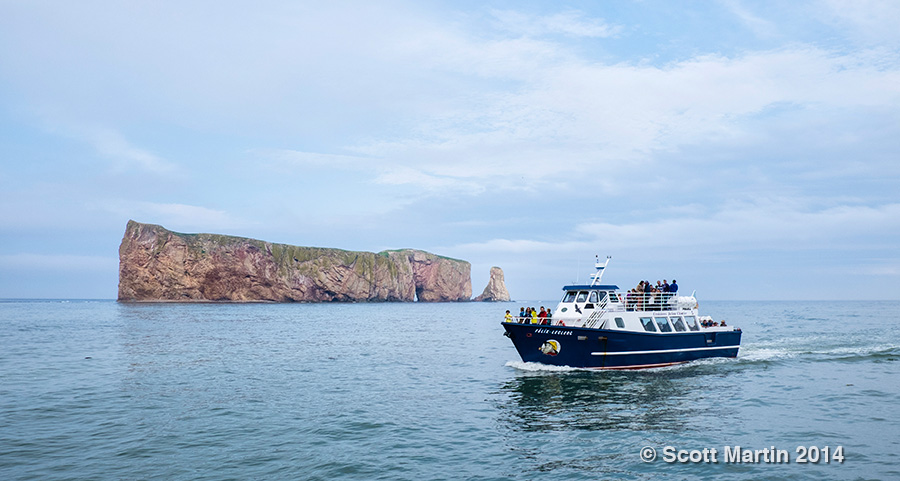
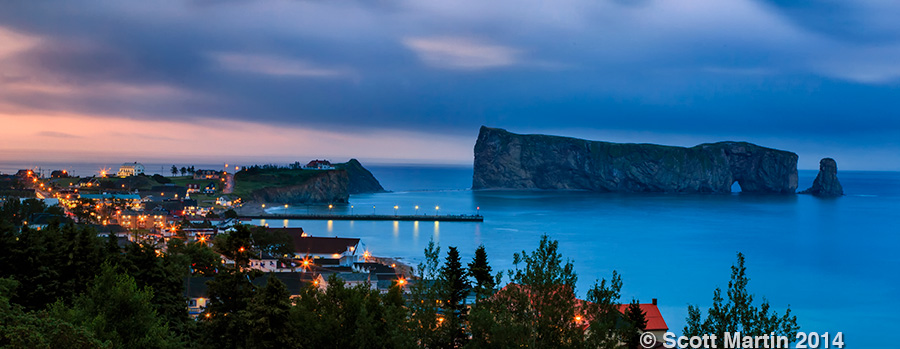
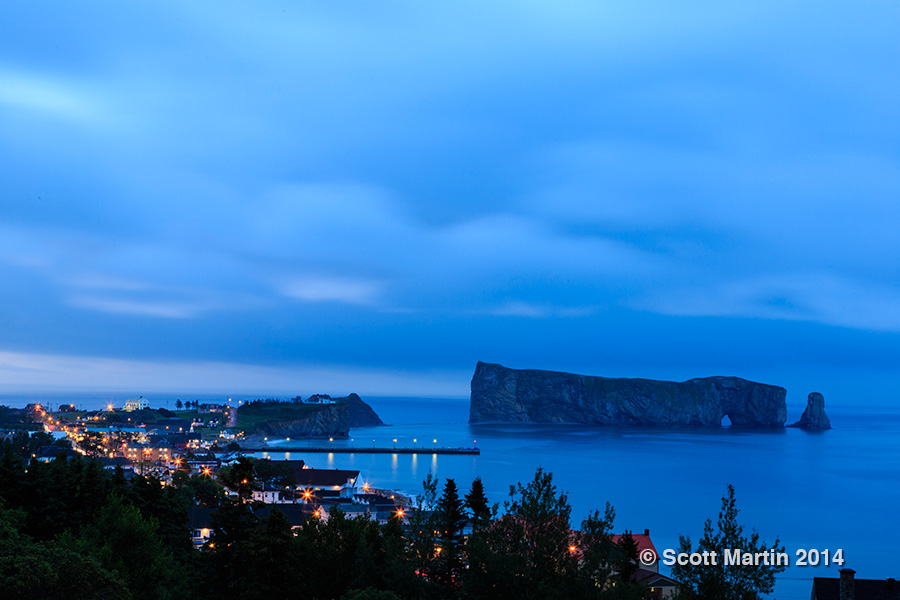
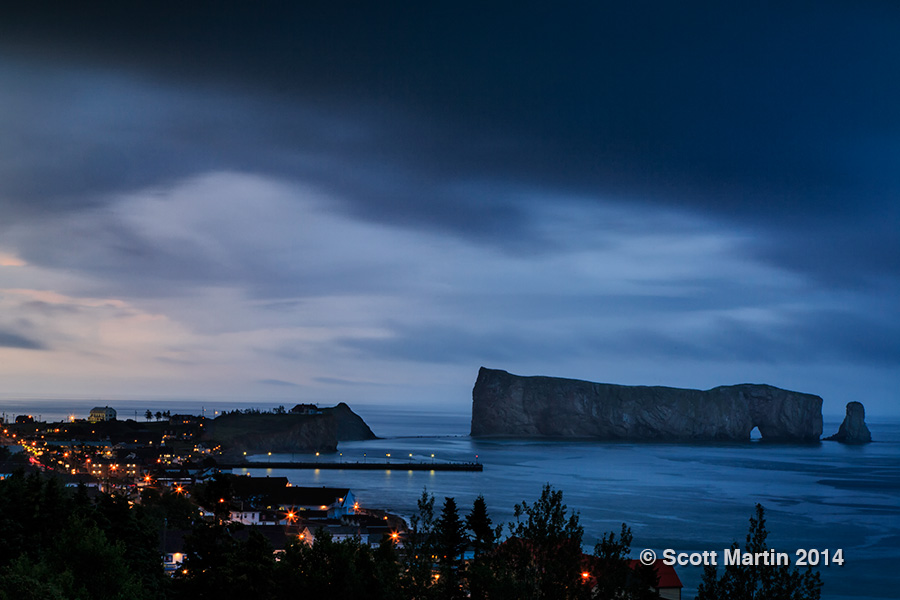
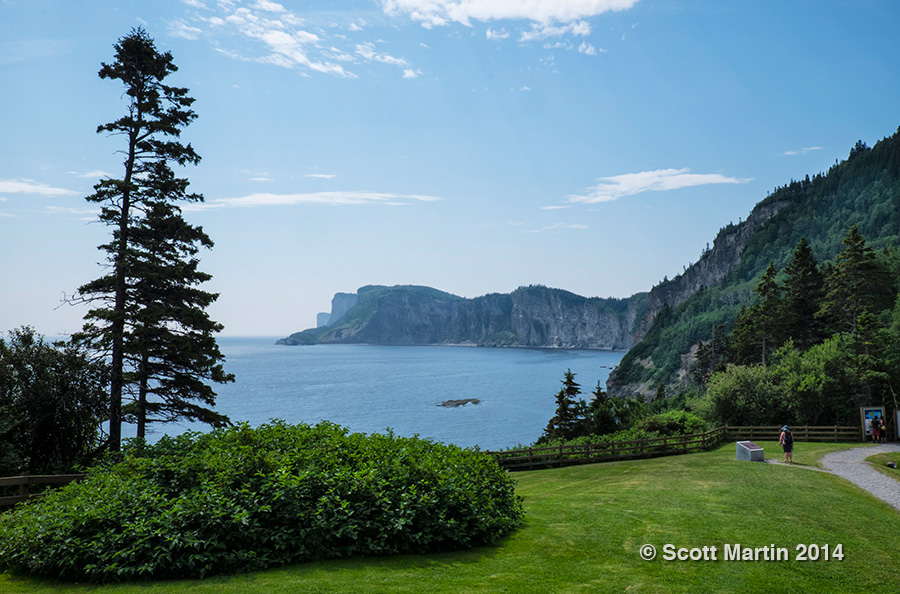
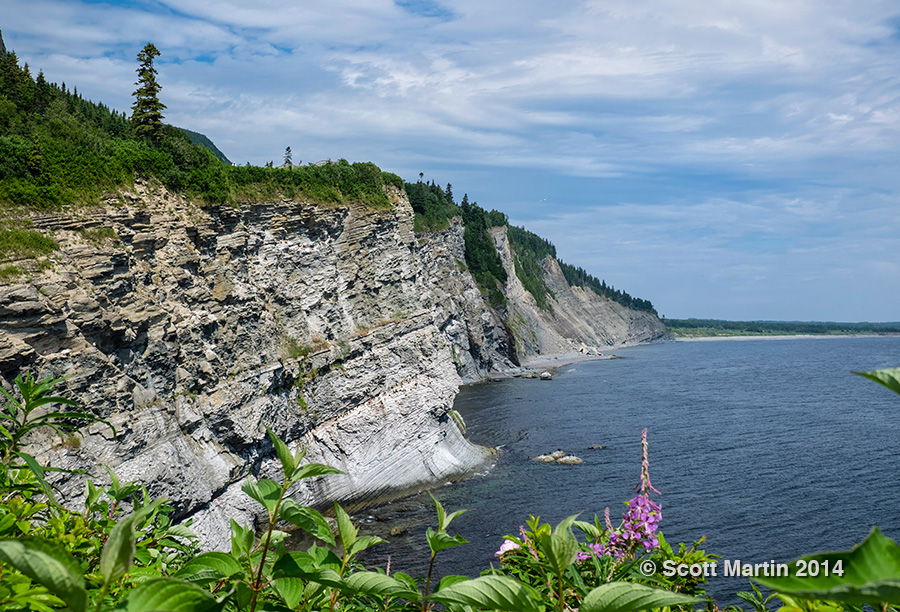
As you wind your way around the eastern perimeter of the Gaspé Peninsula in Quebec along Highway 132 you will enter the beautiful little community of Percé, famous for Percé Rock and Bonaventure Island which is home to the second largest Northern Gannet population in the world. The entrance to Percé from the north provides a beautiful vista that is typical of the Gaspé Peninsula. Percé Rock is on the left and Bonaventure Island is in the back ground.
The village of Percé was first settled in the mid nineteenth century and was named after its famous rock which was originally named in 1603 by Samuel de Champlain who called it Pierced Island because of the then two large holes that pierced the rock. Percé is home to about 3,000 people although that number swells in the summer with the influx of tourists.
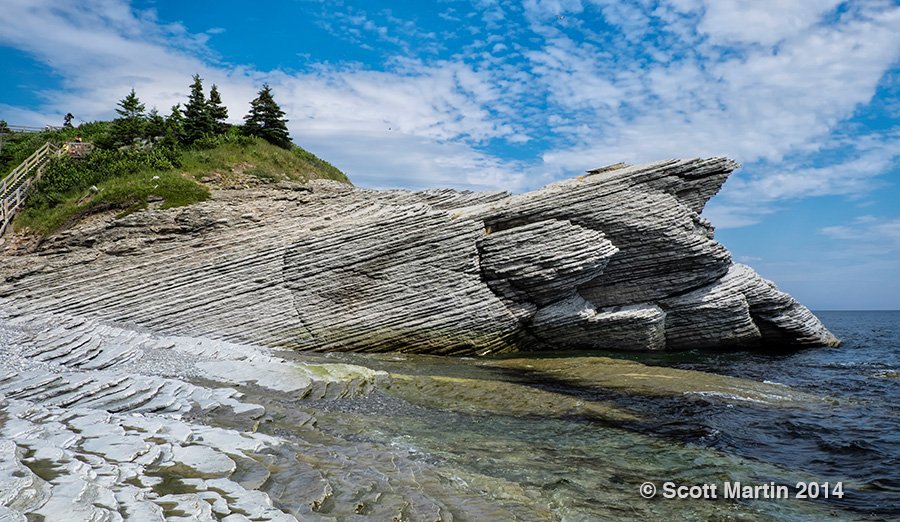
Percé Rock is made of limestone and measures 1,500′ long, 300′ wide and 300′ high at the highest point. It sits about half a mile from shore and a narrow sand stone bar between the rock and the shore allows one to walk across to the rock during low tide. If fact, when the tide is low it is possible to walk all the way to the fifty foot high hole in the rock. Due to the large amounts of rocks that fall from the rock people are discouraged from walking to the rock, however it is quite a thrill to do so.
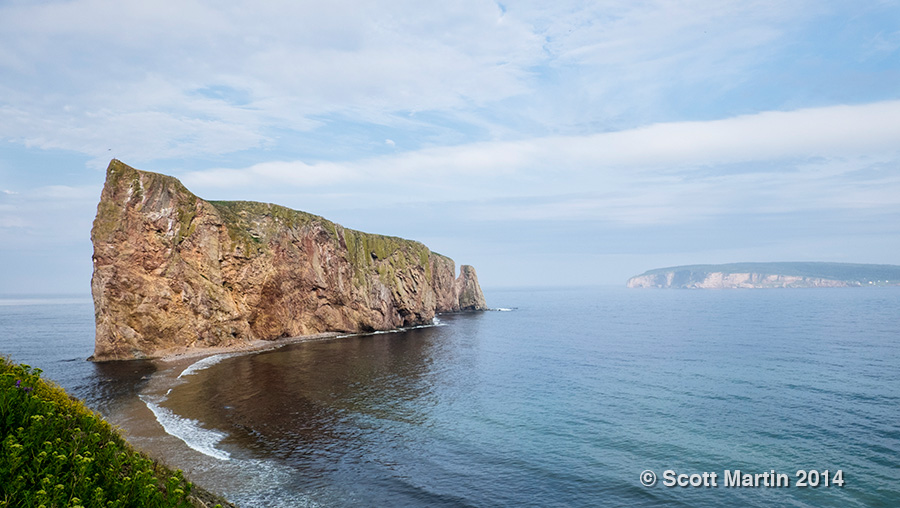
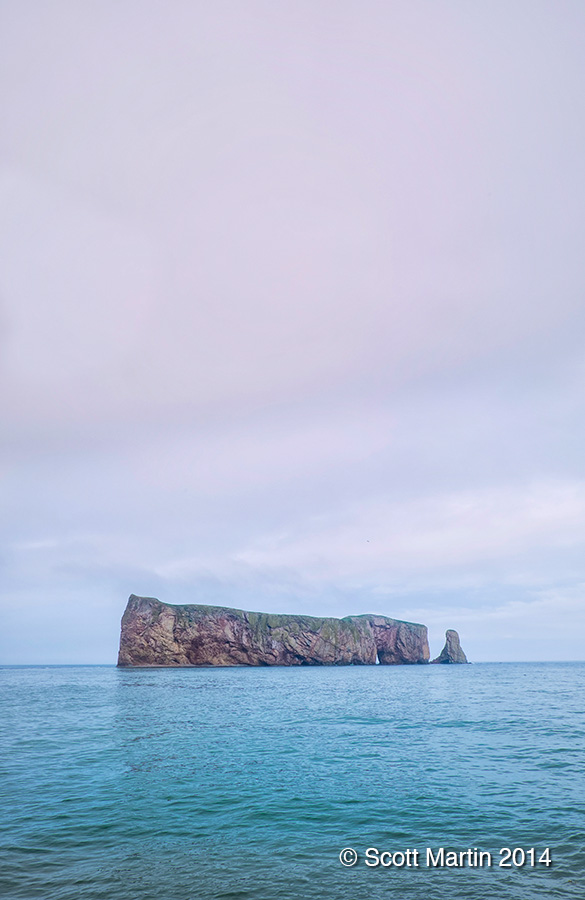
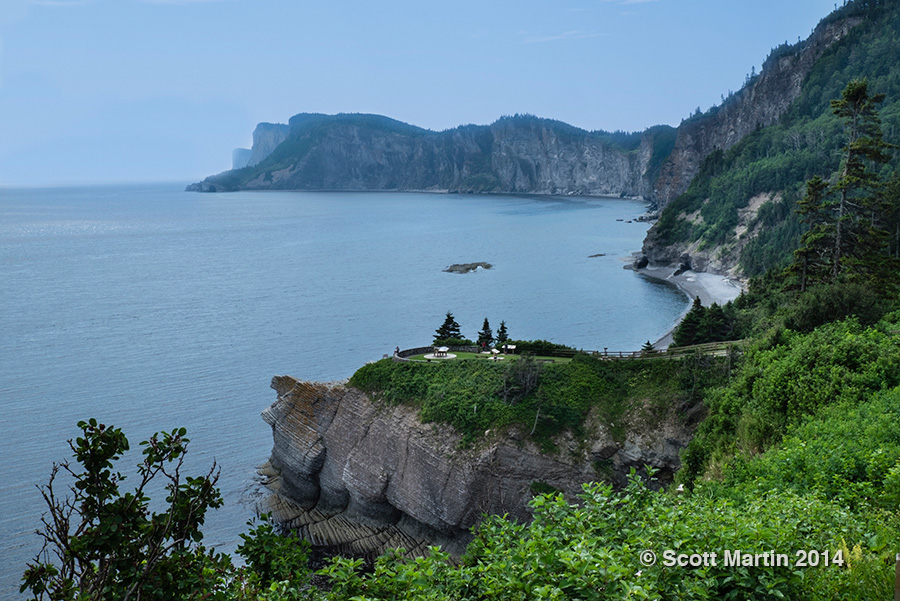
Percé Rock is very photogenic and the many different vantage points allow for many great views. Its difficult to get unique images of the rock, however always fun to try. This first image is a simple profile of the rock showing its relation to the town. Originally there were two holes in the rock however the larger of the two collapsed in June 1845 leaving the obelisk that now stands alone at the end of the rock.
About two miles off shore from Percé is Bonaventure Island, which is a round island of about 1.6 square miles. It is home to the second largest colony of Northern Gannets in the world as well as other pelagic species that nest there in the summer months. It is estimated that there are more than 110,000 Gannets on the Island. You can see Bonaventure Island in this next shot.
Mount Joli is the distinctively shaped cliff on one end of the sandbar than connects Percé Rock to the mainland (The sandbar is easily seen in the above image). Mount Joli provides a perfect belvedere for photographing Percé Rock….so much so that you now have to pay $2.00 to take the path to a small wooden platform from where you can get that iconic view of the rock. The previous shot and the next few pictures were taken from Mount Joli.
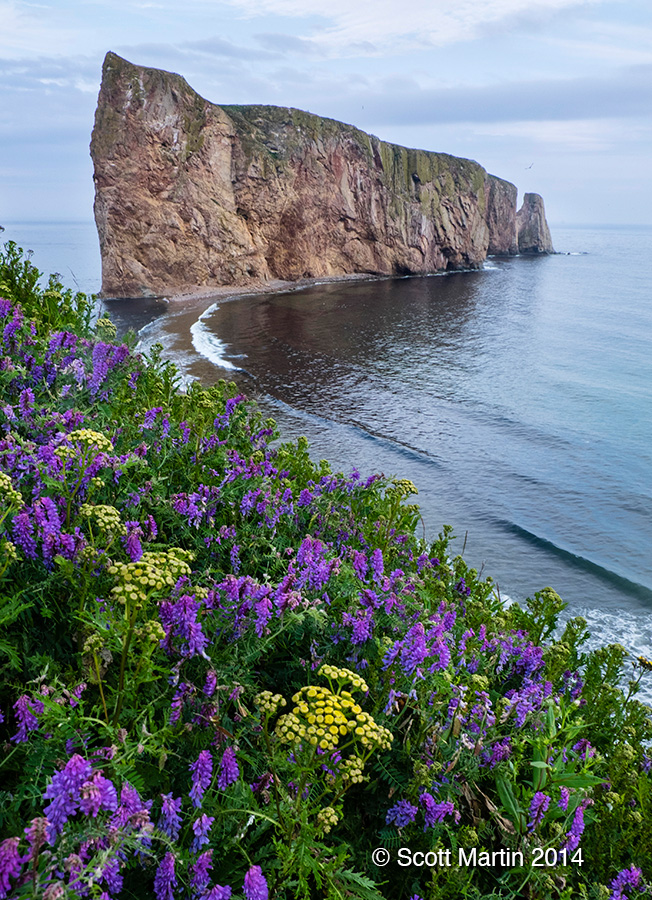
When given the opportunity to include something of interest in the fore ground of an image, it is generally a good idea to do so. The question is to know just how much to include as you don’t want the fore ground inclusion to compete with the object of the image. This next image may have too much however I really like the result and thats the great thing with photography…its a purely subjective art.
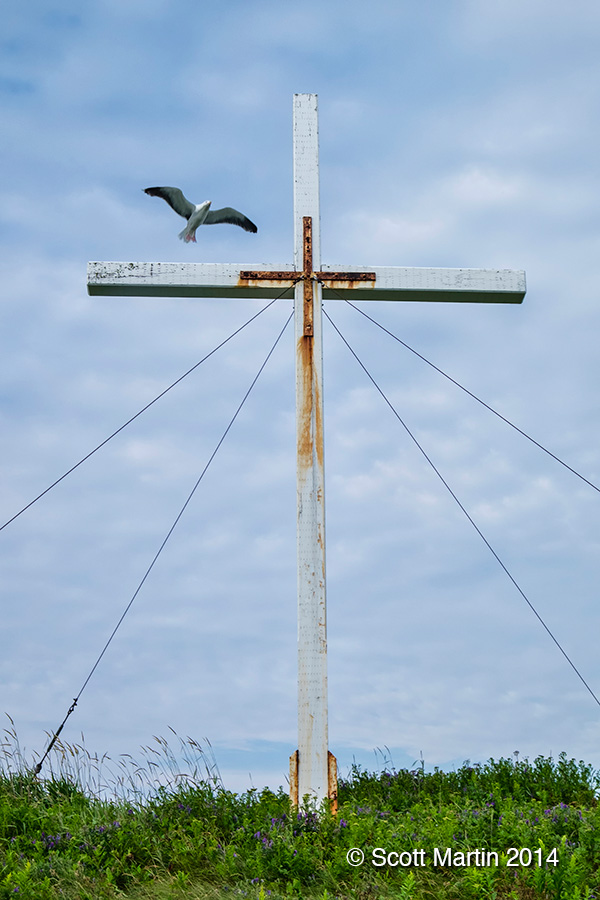
The Gaspé Peninsula has a Roman Catholic religious heritage and churches and crosses are commonplace throughout the region. An old white cross is found on Mount Joli and it was fortunate to have a gull fly by at the perfect time to make an interesting addition to the image.
We arrived in Percé late in the afternoon and after checking into our hotel we took the concierge’s recommendation for a good spot to eat. The place he recommended turned out to have completely forgettable food although it did provide a view of the rock that has become one of my favourite images of the trip…always take the camera with you when you go out for diner 🙂
As mentioned, unique shots of iconic objects are difficult to find. Here are a few atypical but probably not unique images of Percé Rock.
.
.
.
While in Percé we stayed at the Hotel Le Mirage and I would highly recommend that you stay there if you are in the area. Everything was great with our stay at the hotel, especially the view from our second story balcony, from where the next image was taken.
….and the same shot taken a few hours later.
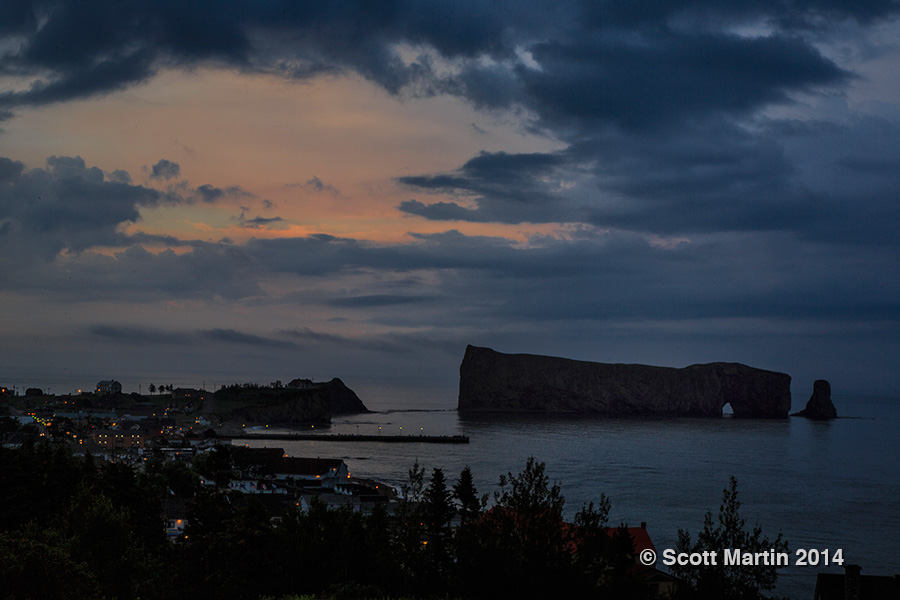
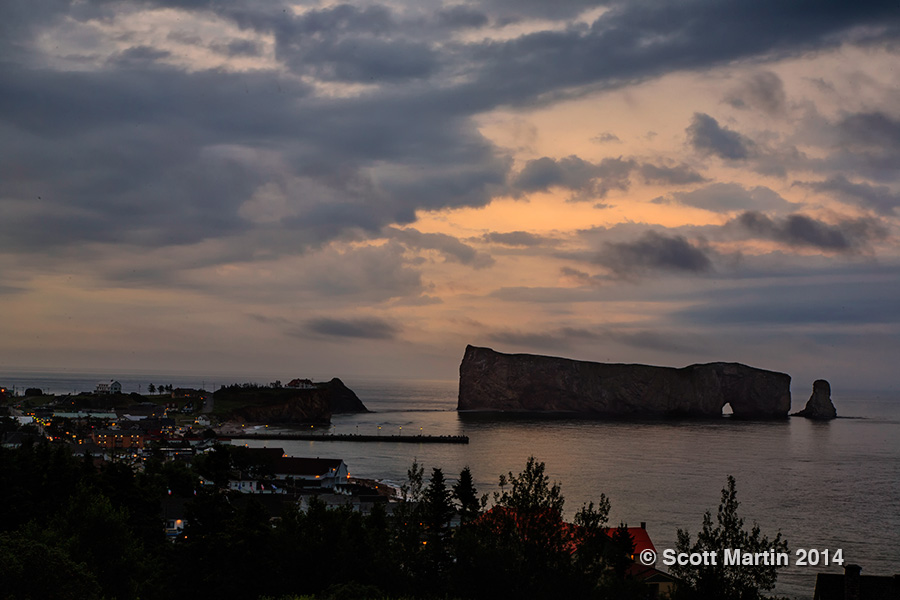
Night photography is a very enjoyable niche that is really quite simple as long as you have a good tripod to keep the camera completely motionless over the long time exposures that are required. It is especially enjoyable when you can practice night photography from the comfort of your hotel room balcony as with these next images. Perhaps because of its location at the tip of a peninsula, the weather conditions are constantly changing around Percé. The winds and clouds are quickly changing and the scenes are rapidly unfolding in front of the camera. The next images were all taken over a period of about an hour.
.
The previous two images are shorter exposures as the cloud detail was very important to the image and therefore any motion in the clouded had to be minimized in order keep the clouds in sharp focus. The next two images have much longer exposures to allow movement in the clouds which blurs them in the image creating a very different feel.
The approaching storm!
I trust the images in this post have given you a glimpse of what the little village of Percé with its iconic rock is like and I hope that its enough of a glimpse to influence your future travel plans as a personal visit to the area would never disappoint. Its a spectacular and unique corner of our great country that really needs to be seen in person. Even the best photographs can not do the area justice.
With the exception of the night images, which were taken with the Canon 5D and 16-35mm lens, all of the images in this post were taken with the Fuji X-E2 and 18-55mm lens.
We recently returned from an almost 4,000 km drive around the Gaspe Peninsula of Quebec. It was a wonderful trip for many reasons, including that my parents joined us and we were able to visit my Dad’s parents homestead in the little town of New Richmond on the south side of the peninsula. Prior to my grandparents moving to Oshawa in the 1920’s, there were five generations of Martin’s in the Black Cape/New Richmond area of the Gaspe Peninsula.
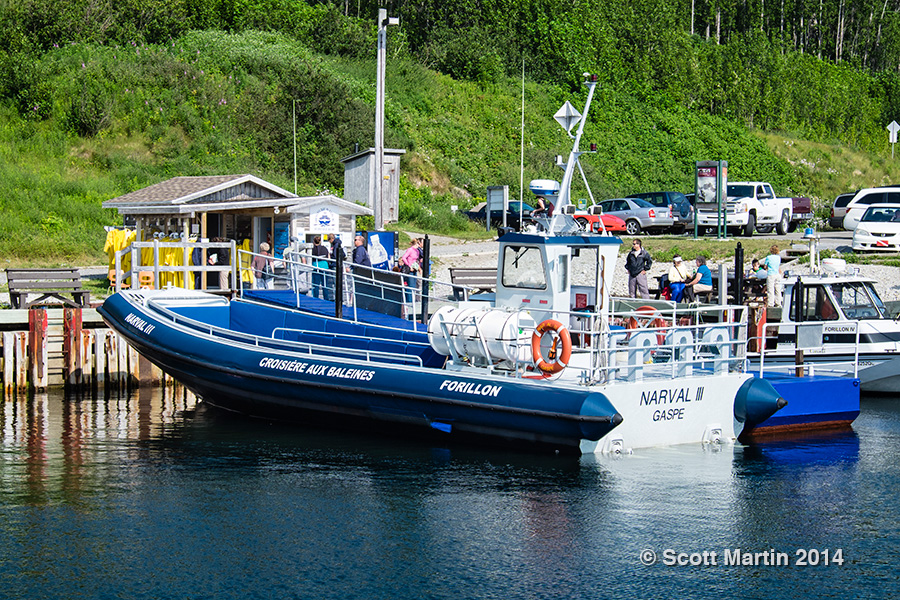
Undoubtably, one of the high points of the vacation was seeing Minke and Humpback Whales while whale watching out in the rough waters of Gaspe Bay and the Gulf of St. Lawrence. Our boat, the Narval III was operated by Croisieres Baie de Gaspe leaving from Grande-Grave harbour within Forillon National Park, Quebec’s first National park, located at the Eastern tip of the Gaspe Peninsula.
As you can see the Narval III is a beautiful boat for whale watching.
Narval III
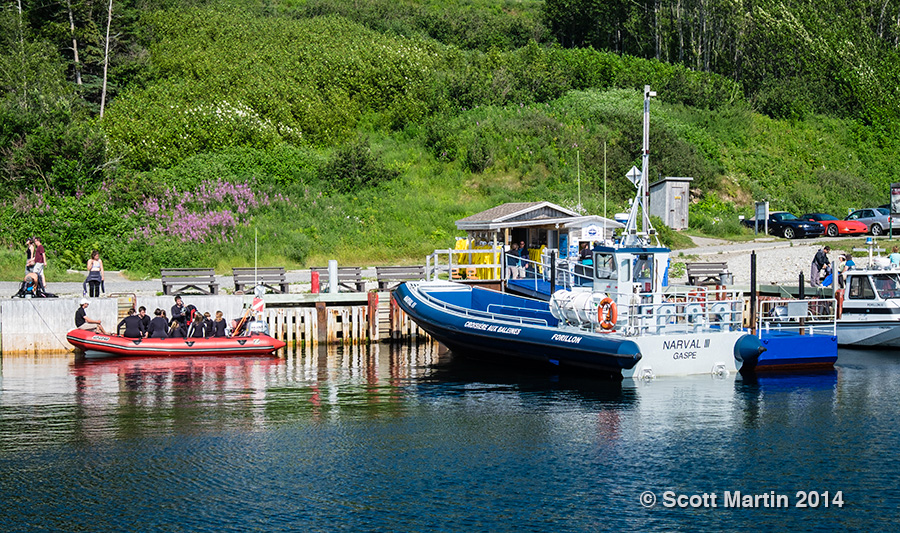
This next shot with the smaller red zodiac on the left gives some perspective as to the size of the Narval III.
Narval III
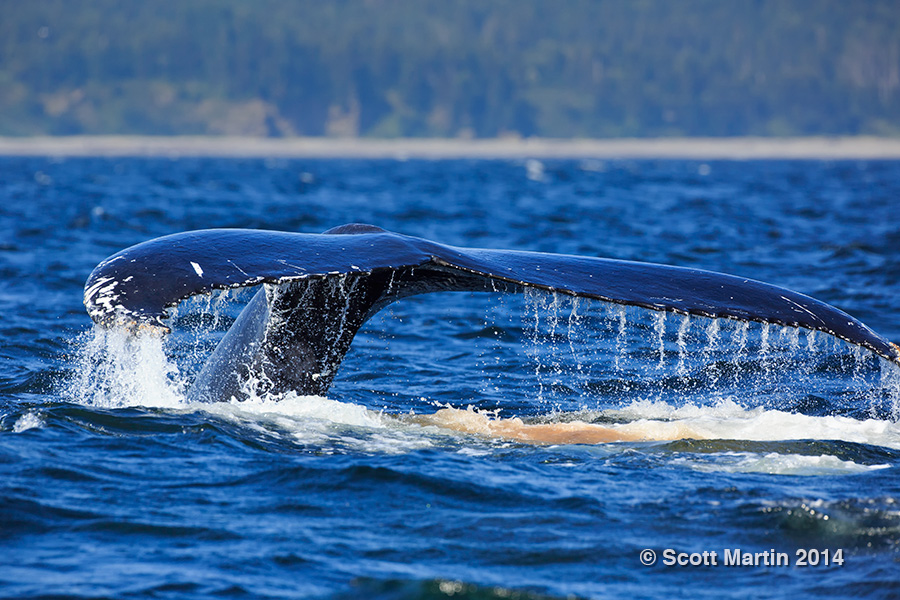
We had reserved our spots on the boat a number of weeks before arriving, however because of the rough seas and high winds, we were forewarned that it would be a rough almost three hours on the boat and that we would get completely soaked. Deb & my mom were wise in their decision to stay on shore, but my Dad and I donned the complementary rain gear and climbed aboard. Not knowing anything about whale observation and given the rough seas, I was pretty much convinced we wouldn’t see any whales, however only a few minutes into the voyage we saw some Minke whales, which are the second smallest of the baleen whales (more on baleen whales in a minute). The average length of a Minke whale is 23 feet. It was such a thrill to see even a ‘small’ whale that the trip was already a success, but only a short while later we found a pair of Humpback Whales and I was amazed at how close they would come to the boat as we watched and followed them for the next hour or so.
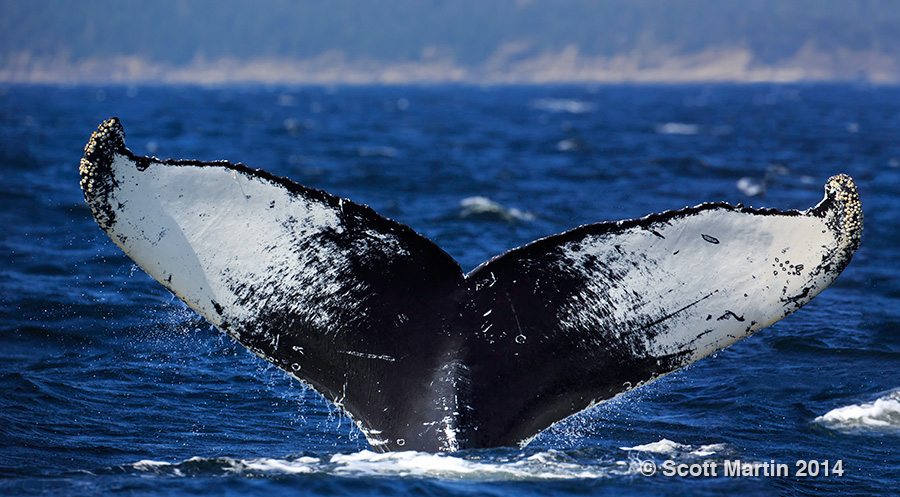
Here is one of the first pictures I was able to capture of the Humpback Whale.
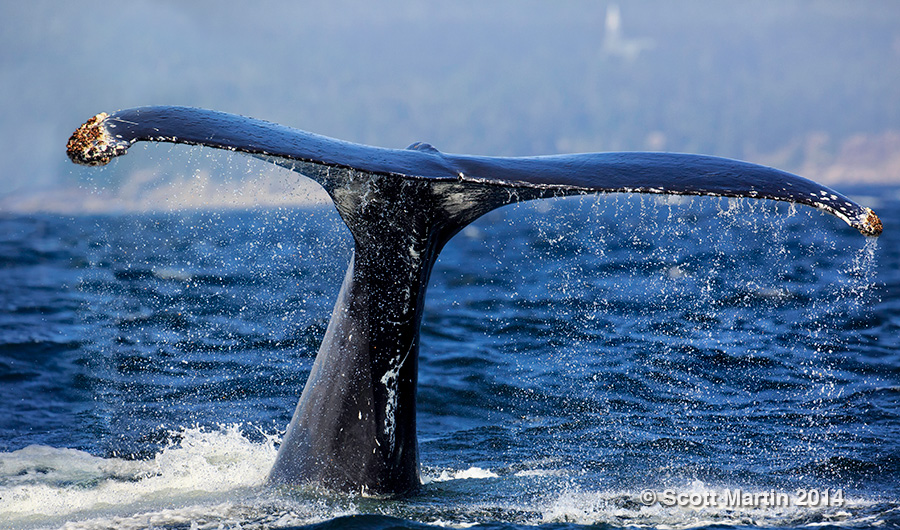
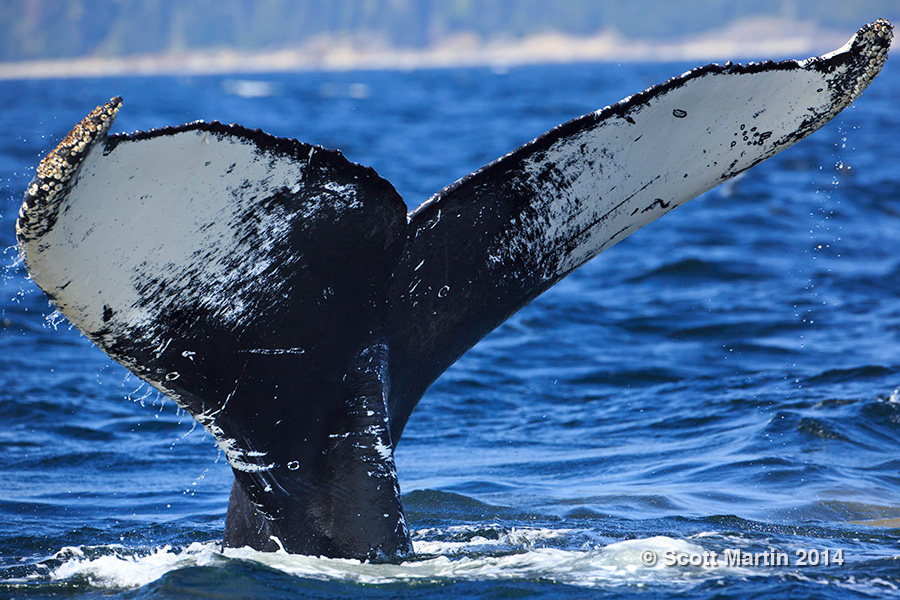
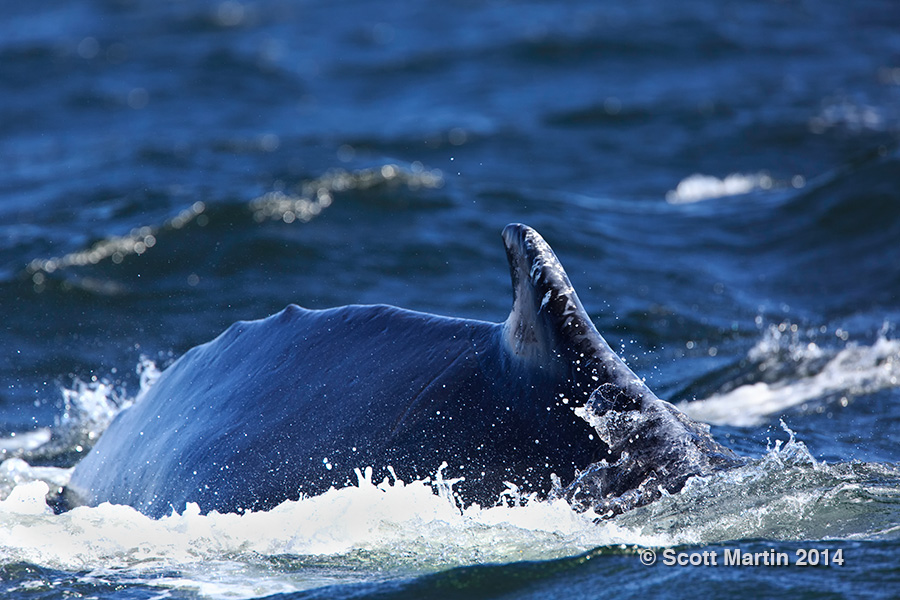
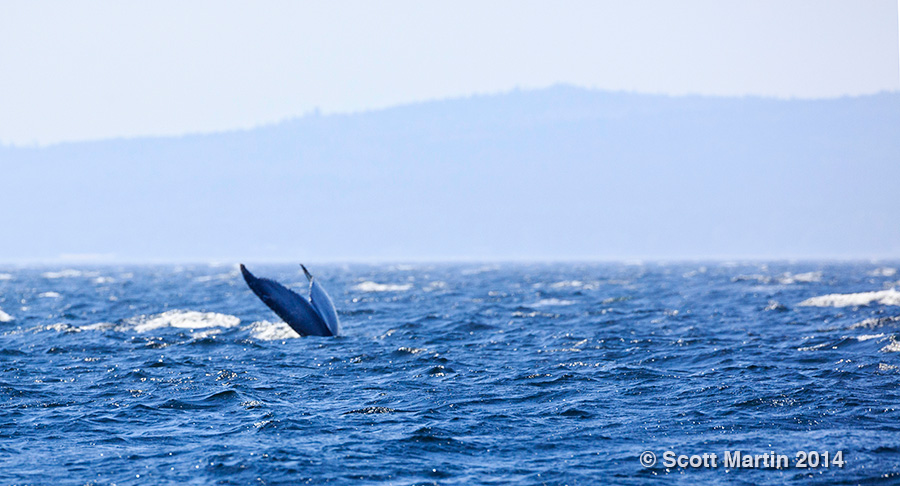
It is difficult, if not impossible, to describe effectively enough to provide someone else an appreciation for the sheer size of these whales. Humpbacks weigh in at about 40 tons (80,000 pounds) and can reach lengths of 62′, or larger than a transport truck, yet they are very graceful to observe in the water. The normal method of spotting whales is to look for the 10-15′ high water spout created when the whale surfaces to breath and forcibly exhales air through the blowhole before inhaling. This is an easy thing to spot under calm seas, but the high winds and ten foot swells made it much more difficult for us to observe the water spouts. After seeing a spout, the small dorsal fin would appear about twenty feet behind often followed by the fluke or tail, allowing for great photo opportunities. The following are a few of the results.
The underside of a Humpback tail has large white areas which are an identification distinction visible from quite far away.
Humpback Whales are part of the baleen whale grouping. Baleen whales are edentulous, meaning they have no teeth, but instead have up to 400 baleen plates on both sides of their mouths. These plates are side by side, perpendicular to the roof of the mouth and can be up to 4′ in length. When the whale closes its mouth while feeding on a school of krill, the small fish are trapped between the baleen plates while the water is expelled. The food is then swallowed. Blue whales, the largest animals on the planet, are also baleen whales, thus the biggest whales in the world have no teeth, which is perhaps one of those little pieces of trivia you will never forget after reading this blog post!
The Humpback Whale, like many whale species, was brought to the brink of extinction around the turn of the last century by over fishing and a hunting ban was implemented in 1966. Since then the population of the Humpback globally has slowly increased, however the National Geographic Association still lists the Humpback as endangered. It is estimated that there are 80,000 Humpbacks alive today.
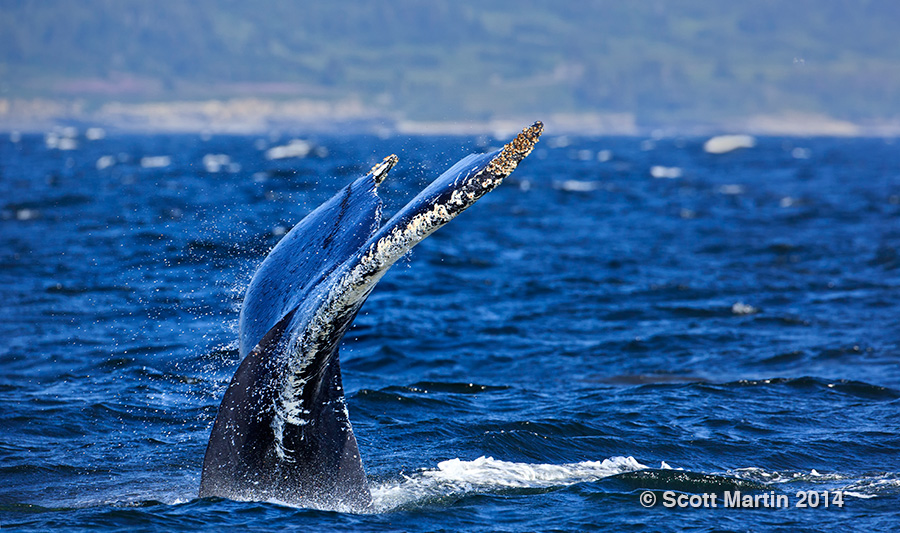
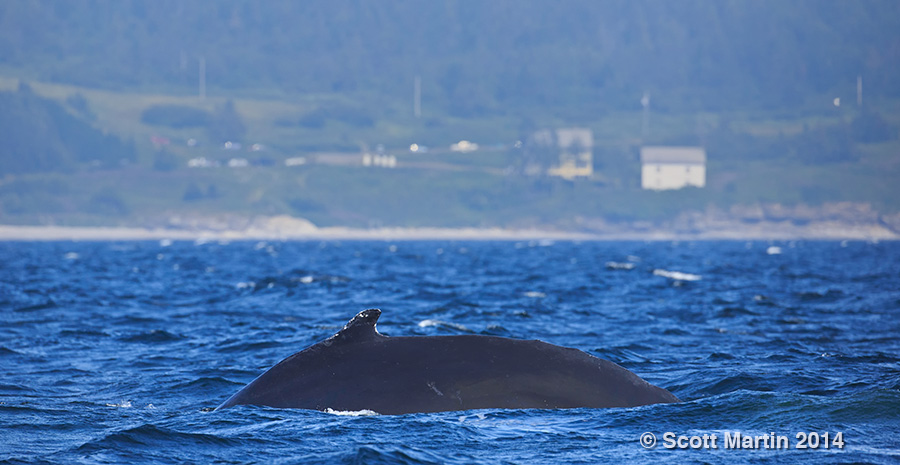
The Humpback Whale gets its name from the distinctive hump seen in its dorsal spine as it arches above the water when it surfaces to breath.
Humpback’s Hump
I was fortunate to capture a unique perspective of the dorsal spine of the Humpback Whale as it surfaced while swimming directly towards the boat. Only a small part of the whale is visible, but you can see how the humpback got its name.
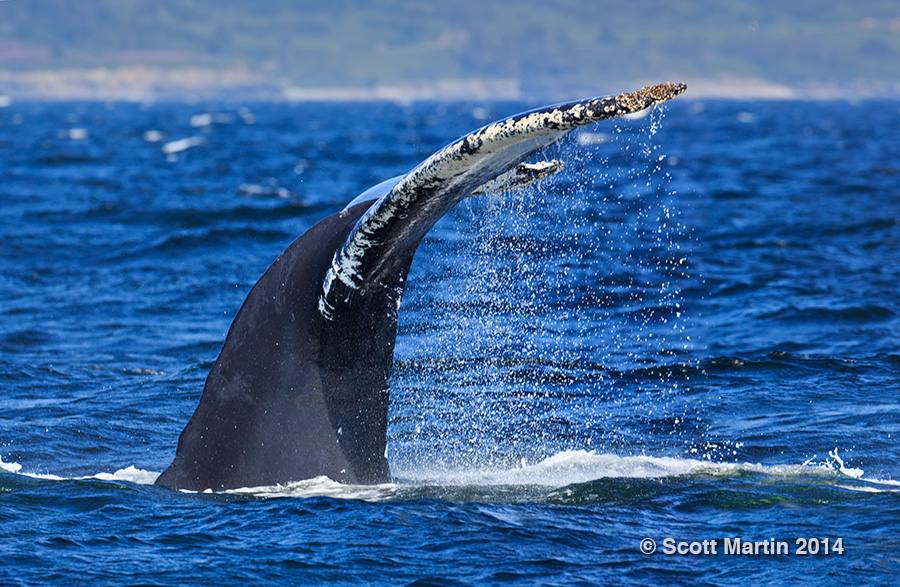
Humpback Whales are migratory animals that cover a lot of miles every year, in fact 16,000 miles on average. They summer in the cooler northern polar waters and head south in the winter to the tropical waters where they breed and give birth to their young. Interestingly they don’t eat while in the cooler waters in the summer and live of the fat reserves created by all the krill and small fish they consume in the winter months. Although they don’t eat in the summer, they continue to produce waste as this next image shows 🙂
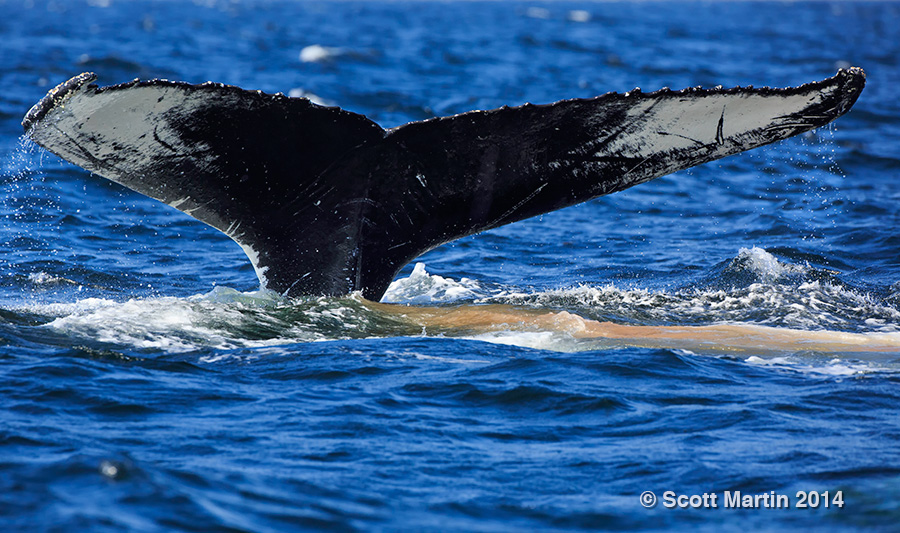
You won’t find this next pic in the gallery, but it is included here in an attempt to convey the relative size of an adult Humpback whale, using the rough waters of Gaspe Bay and the shoreline in the back ground to provide some scale. The width of the Humpback fluke can be up to one third of its length meaning the tail width can reach 15-20 feet or the length of most recreational motor boats.
Humpback Fluke
I trust that you have enjoyed these Humpback Whale images and if you’ve never been whale watching, I would urge you to plan a trip to Forillon National Park and sign up for an excursion with Croisieres Baie de Gaspe. You will be amazed when you see up close one of the largest animals that God designed to roam our oceans.
To see the above images in more detail, you can view them in the Wildlife Gallery.
As mentioned in the opening of this blog post, our whale watching excursion left from Grande-Grave Harbour in Forillon National Park. You could easily spend a few days exploring the park itself and admiring its many beautiful vistas overlooking the Gulf of St. Lawrence and Gaspe Bay. One of the most picturesque is Cape Bon Ami in the northern section of the park. The cliffs around the Cape provide nesting grounds for Black-legged Kittiwakes, Razor-billed Auks, Common Murre and Black Guillemots, which will be described in a future post. In the mean time here are some pictures of Cape Bon Ami and the surrounding area.
The whale images in this post were all taken with a Canon 5D Mk III and 500 f/4 L lens while all other images were taken with a Fujifilm X-E2 and 18-55 zoom lens. Long time readers of this blog will recognize that this is a significant departure from a gear perspective, however I will talk about the new Fuji equipment in more detail in a future post.
One final note; if you would like to receive future blog posts via email, please enter your email address in the “Subscribe to Blog Via Email” box at the top of the right sidebar. By doing so, you will receive future blog posts via email as soon as they are published. Your email addresses will never be shared and your email subscription is easily managed.
Time lapse photography is something that has always been of interest and recently both my son and I have been experimenting with this fascinating niche in the photographic world. The basic premise of time lapse is quite simple; you record several images at regular intervals over an extended period of time and then after processing them, add the images into a video file. When you play the resulting video file, you have a video that shows everything captured in the still images over the period of time they were taken compressed into a few seconds. For example, if you take one image every fifteen seconds for an hour you will take a total of 240 images. Placing these 240 images into a video file of 24 frames per second will produce a video of ten seconds duration. Thus the resulting video will display in ten seconds what occurred over a period of an hour.
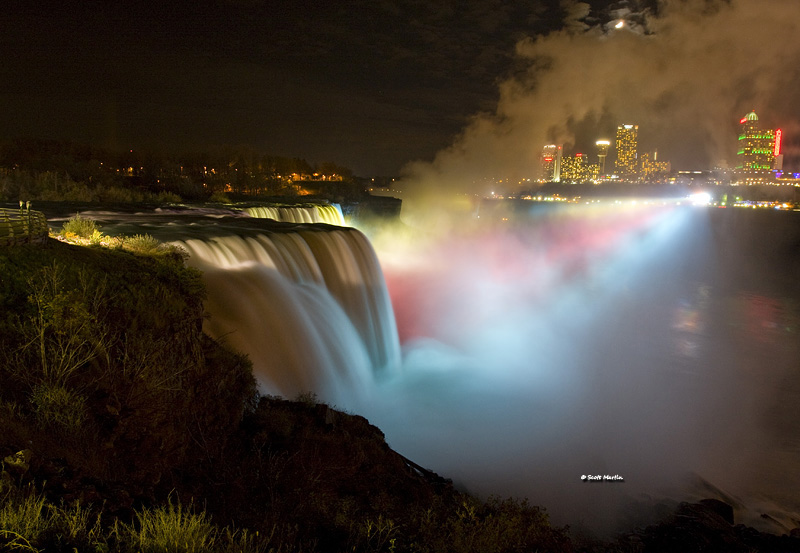
This first sample time lapse is exactly as described above; 240 images taken over an hour ending with sun down and displayed in a 24 fps video file. The images were taken from our hotel room in Niagara Falls.
Besides your DSLR you require two other pieces of equipment to get into the time lapse game, a tripod and an intervalometer.
The tripod is required to ensure that the camera is stable and records the exact same frame with every exposure over the time lapse period. Next to the camera and lens, the tripod is arguably the most important piece of equipment and I would certainly buy a tripod before a flash. As tripod technology hasn’t changed much since the advent of carbon fibre, I would recommend investing in the best possible as they will, for all intents and purposes, last a lifetime. I use Gitzo tripods which have proven very reliable over the years. They are well constructed, very stable and lightweight. As time lapse photography generally involves wide angle or short telephoto lenses, I use a smaller Gitzo 1542T traveller tripod with a Markins Q3 ball head.
The intervalometer is simply a timer remote switch for the camera that allows you to program a remote timer (delay from activation to shutter release), interval timer (the amount of time between successive exposures), long exposure timer (defines exposure time with camera on bulb setting) and exposure count setting (how many exposures will be taken). I use the Canon TC-80N3. Some of the new cameras have an intervalometer built into the camera itself so make sure you check for this feature on your camera before buying an intervalometer.
The easiest time lapses to take are those with a constant exposure over the duration of the time lapse. Changing exposures within the time lapse often causes flickering in the final product which is very distracting and must be avoided. Even slight exposure variations when shooting in any of the automatic exposure modes will result in flickering which is why it is essential to shoot time lapses manually. Similarly you want to disable the autofocus on the camera for time lapse photography to ensure that that the camera focus does not change during the shoot.
This next time lapse is of the American Falls and consists of about 380 images taken over a ninety minute period.
Moving from a CF card with hundreds of images on it to the finished time lapse is surprisingly easy as long as you have a video editing software program. I use Adobe Premier Pro CS6, but any editor will work fine. You are not too concerned with post processing the images and any post processing done must be applied equally to every image to avoid flickering in the video. My workflow is to open all the RAW files in ACR (Adobe Camera Raw), select all, level and crop if needed (but care should always be taken to do this in camera so it is not needed in post processing), adjust for lens correction, contrast, clarity and vibrance and save the images as jpegs in their own folder. Open a new file your video editor (I prefer 24 frames per second), import your time lapse images, render the file and export it as you like it and you are ready to go. I’ve been playing around with both YouTube and Vimeo formats (you can find me at both sites under Scott Martin Photography). When watching the time lapse videos on full screen on the desk top, the Vimeo format appears better than YouTube, however for embedding videos in WordPress blogs like this the YouTube plugins are infinitely better than any of the Vimeo plugins I looked at.
Here is a 240 image, ten second time lapse of the Horseshoe Falls, again taken from our hotel room window on the 44th floor of the Hilton Fallsview Hotel in Niagara Falls.
I would encourage you to experiment with time lapse photography. It provides a lot of enjoyment and is one of those things you can truly multi-task with. My intent is to set up a camera for time lapse when I’m out doing landscape photography and that way as I’m moving about shooting sunrises and sunsets or exploring an area for landscape images I can simultaneously be recording images for a time lapse of the same scene.
Although this last image is not a time lapse, it is a time exposure taken from the American side of the falls, looking across the American Falls towards the Horseshoe Falls in the back ground.
Happy New Year to all of you who have followed this blog over the past year and I trust each and every one of you will enjoy a wonderful New Year in 2014, full of God’s blessings.
This will be a short post today and something completely different from the norm in that it will be a bit of a tutorial, so your feed back would be appreciated.
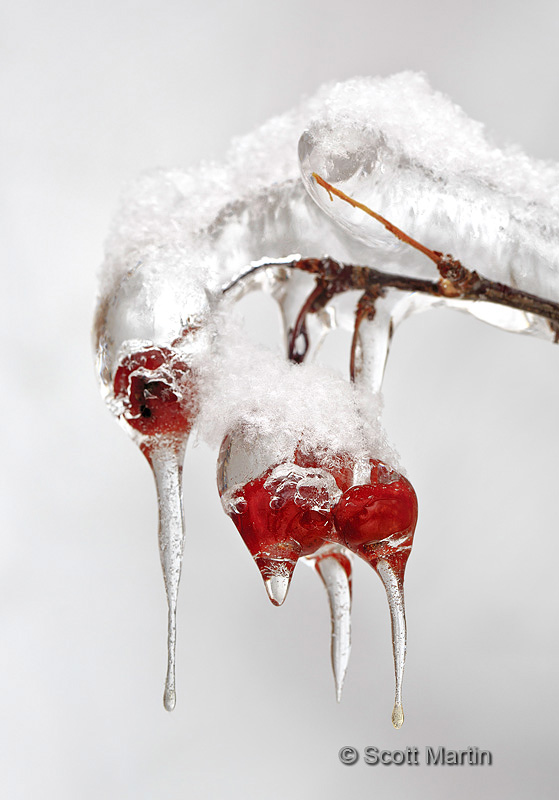
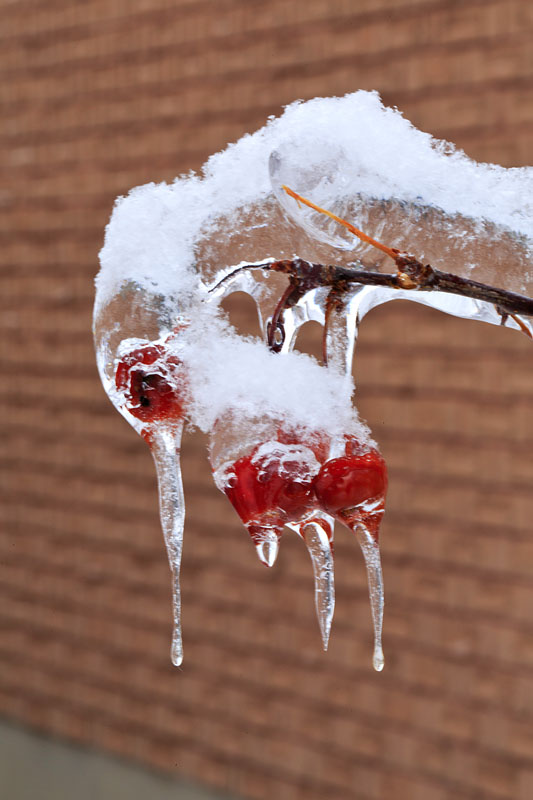
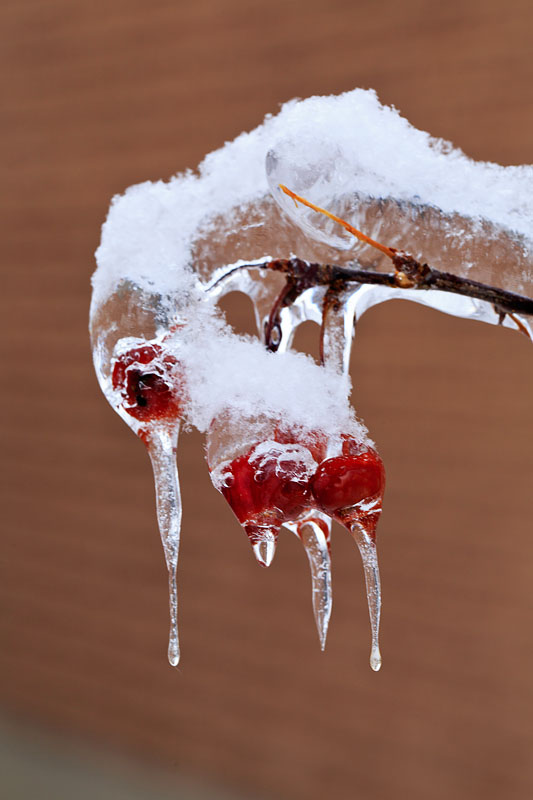
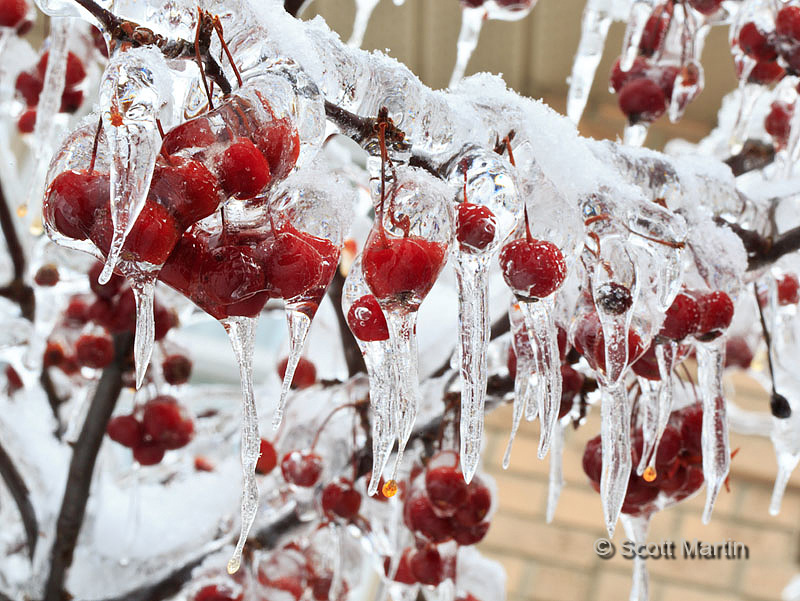
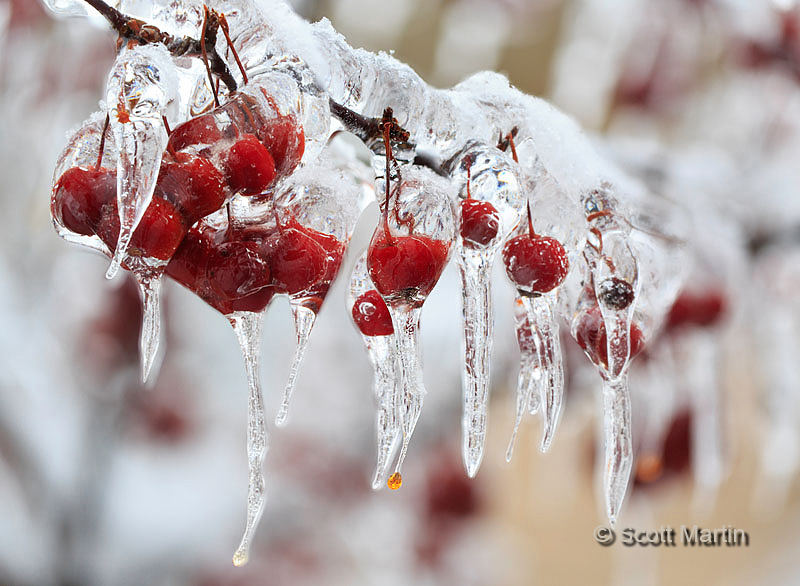
Christmas of 2013 in our area will forever be remembered for the ice storm that blanketed southern Ontario and caused power outages on a huge scale, affecting millions of people and leaving thousands of homes in the Greater Toronto Area without power for over a week. Our home in Oshawa was relatively unscathed, being without power for about half a day and an Ash tree in our front lawn suffering major damage (and perhaps may have to come down). Although the ice storm caused major destruction, it also allowed for some great photographs opportunities which actually lasted for three or four days before the sun came out and temperatures rose sufficiently to melt the ice. All of the images in today’s post are of a Flowering Crabapple tree located in the front yard of our home. Each image was taken using the Canon 5D MkIII and EF 100mm f/2.8L macro IS USM lens mounted on a tripod.
This first image is the final result after much experimentation to achieve the desired outcome; bright red Crabapples encased in ice with a snowy frosting and winter back ground.
Its important to consider the back ground (BG) of every image taken and if possible develop a BG that adds to the effectiveness of the image by isolating the object of the photograph from the BG. Classically, look for uncluttered BG’s that are out of focus, factors that help create separation between the object and its surroundings and therefore draws one’s attention to the object of the photograph. Technically this can be accomplished by two methods; when possible increasing the distance between the object and and BG, and increasing the aperture on your lens (lower f-stop) which reduces the depth of field (DOF; the distance range perpendicular to the lens that remains in focus).
The next three images are all taken with the same camera position as the image above, however the BG is the brick siding of our next door neighbour’s house. They show the relationship between aperture and depth of field and that even when a BG is separated from the object and out of focus, colour has a huge impact on the final result!
f/32 ISO 100 1/2 sec (smallest lens aperture, maximum depth of field, bricks recognizable but out of focus due to distance from object).
f/10 ISO 100 1/20 sec (less depth of field, bricks almost unrecognizable and crabapples in reasonable focus throughout)
f/2.8 ISO 100 1/125 sec (minimum depth of field, bricks unrecognizable however crabapples not in focus due to extremely shallow depth of field)
Some may prefer the f/2.8 image while others may prefer the f/10 version as more of the object remains in good focus. A little bit of photoshop on the f/10 version improves the image about as much as can be accomplished given the colour of the brick BG.
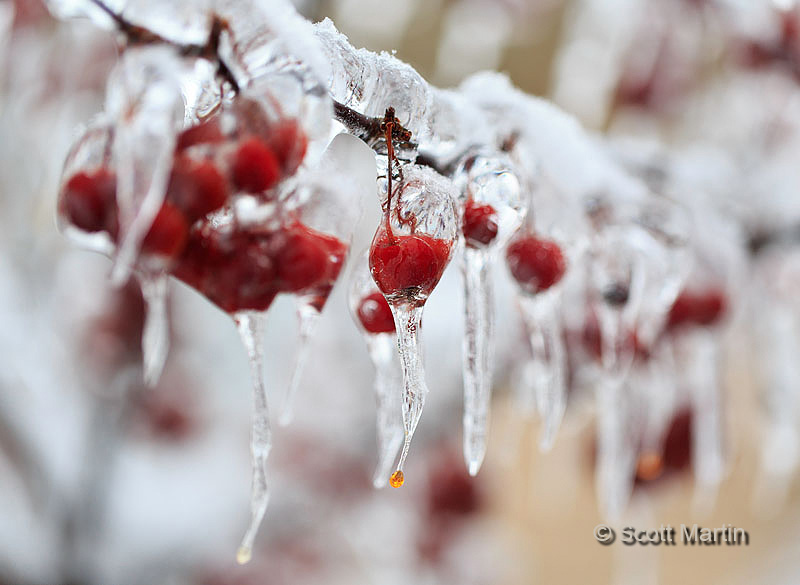
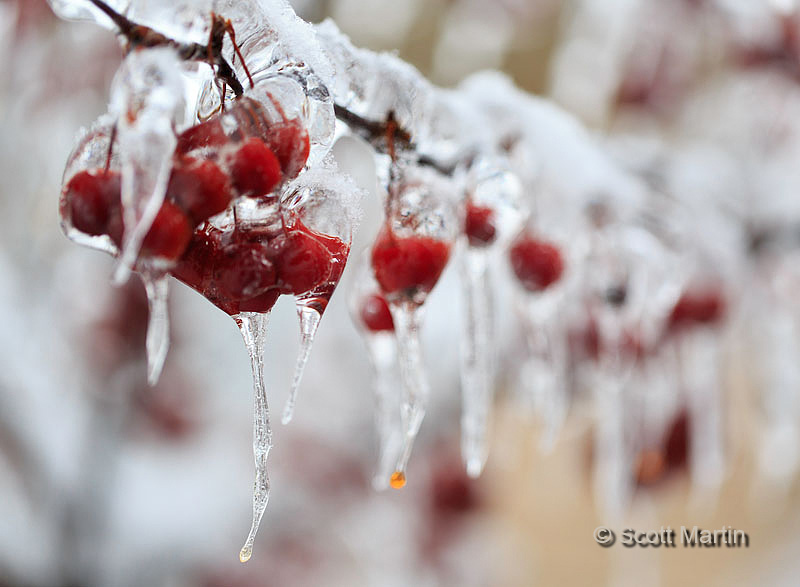
Not being happy with the colour of the BG I decided to use a 48″ white/silver reflector (which is typically used to reflect light onto a person during portrait photography) to create the appearance of a snowy BG. Intuitively I selected the white reflecting surface which produced the following result.
Although this is an improvement, all the detail in the ice covering the branches is lost and the structure within the icicles is greatly reduced using the white reflector. This led me to try something that was quite counter intuitive which was to use the highly reflective silver reflector and take the shot one more time which produced the results shown in the first image which has lots of detail in the ice, snow flakes and icicles that was absent using the white reflector. Here it is again with a little text in keeping with the date today.
The above image was relatively simple to take in that separating the subject from the BG was easy, the back ground was uncluttered and there was even room to place our own BG into the image. It may have taken some time and experimentation but the process was not a difficult one…..you just have to do it 🙂 But what about situations where you are faced with a cluttered BG that can not be separated from the object? In that case all we have to play around with is the depth of field which we do by changing the aperture of the lens. Remember: larger aperture (lower f-stop) has a shallow DOF while a smaller aperture (higher f-stop) has a deeper DOF. As an aside, focal length of the lens also affects DOF. A wide angle lens (shorter focal length) has a greater DOF than a telephoto lens (longer focal length) at the same aperture.
Here is a different branch of our Crabapple tree with a very cluttered and close BG in which I’ve purposely positioned the object branch at an angle to the lens which makes DOF considerations all the more challenging.
The first image f/32 ISO 100 1/2 sec. Things are in focus but there is no obvious object to be found. An all around poor image which even includes the windows and bricks on our house.
At f/2.8 ISO 100 1/320 sec things start to improve, an object is clearly identified but compositionally it is in the middle of the frame….a big mistake.
Focusing on the Crabapple cluster in the left of the frame at f/2.8 to improve the composition doesn’t work well as the DOF is so shallow you can not visually lock onto the object and therefore the image does not hold any interest.
So what can you do? Probably the best thing to do at this point is to agree that the ‘perfect shot’ is not coming from this set up and move on, however with todays digital files and photoshop we can quite easily blend multiple images into one final image. The most complicated form of this process is know as focus stacking where one will take tens (or even hundreds) of images of the same subject slowly moving the focus point from the front to the back of the object and then put all these images together to create an image where the entire object appears in perfect focus even though each individual image in the stack had a very shallow DOF. The simplest form of this process (and the least desirable in terms of results) is to put two images together. This last image is a blending of the f/32 and f/2.8 images above. If you look closely you will see the downside of the two image process but I trust this example shows the possibilities exist so that with patience and thinking things through you can often achieve results that will turn your snapshots into photographs!
I trust this was a helpful post and now its back to working on posts of our European trip.


Follow Scott Martin Photography